Hello everyone! I hope you all will be absolutely fine and having fun. Today, we will have a look at the DHT11 Arduino Interfacing. DHT11 is an embedded sensor, used to measure both temperature and humidity of the surroundings. It is made up of two different parts i.e. capacitive humidity sensor and a thermistor. DHT11 is a slow sensor but is quite efficient for the applications where we need to do some basic analog data exchange. There is a small chip inside this sensor which performs the function of analog to digital to analog conversion and gives the results for temperature as well as for humidity in digital form. This digital signal can be read easily through any micro-controller. LM335 is another temperature sensor and to understand today's post more properly, you should also go throu ...
Hello everyone! I hope you all will be absolutely fine and having fun. Today, I am going to provide a detailed discussion on Flame Sensor Arduino Interfacing. Flame sensor is an electronic device which is capable of sensing/detection of fire or a high temperature zone. It gives an indication through an LED attached at its top, just after sensing the fire. These type of sensors are usually used for short ranges. They are able to detect the fire up to 3 feet. Flame sensors is the most common device available in the market these days due to its good results and cost efficiency. You should also have a look at Flame Sensor Library for Proteus . Flame sensors are available in the market in two types one having three pins and the other having four pins respectively. Both of the sensors can be eas ...
Hello everyone! I hope you all will be absolutely fine and having fun. Today, we are going to work on Arduino Keypad Interfacing . First of all, I would like to tell you a bit about the keypad. After getting the basic idea about the keypad, we will start our discussion about Arduino Keypad Interfacing. You should also have a look at Interfacing of Keypad with PIC Microcontroller . In this tutorial, I am going to use a 4×4 keypad. It has sixteen buttons having four alphabetic characters. Let's have a look at the Arduino Keypad Interfacing: What is Keypad? The keypad consists of multiple buttons, arranged in the form of a matrix(rows & columns) and is used in embedded projects. They are cost-efficient and are easily available from online electronic stores. Keypads are normally available in a ...
Hello everyone! I hope you all will be absolutely fine and having fun. Today, I am going to give you a detailed Introduction to ATmega328. ATmega328 is an Advanced Virtual RISC (AVR) microcontroller. It supports 8-bit data processing. ATmega-328 has 32KB internal flash memory. ATmega328 has 1KB Electrically Erasable Programmable Read-Only Memory (EEPROM). This property shows if the electric supply supplied to the micro-controller is removed, even then it can store the data and can provide results after providing it with the electric supply. Moreover, ATmega-328 has 2KB Static Random Access Memory (SRAM). Other characteristics will be explained later. ATmega 328 has several different features which make it the most popular device in today's market. These features consist of advanced RISC ar ...
Hello everyone! I hope you all will be absolutely fine and having fun. Today, I am going to elaborate you, how to make Arduino Projects for beginners. Before gong into the detail of this tutorial first of all I would like to explain you a bit about Arduino. Arduino is an open source micro controller. A lot of help is available online so its user friendly hardware. Most of the students prefer to do work on this device. Arduino is a low cost high performance device. Due to its cost effectiveness and open source feature it is commonly available in the market these days. An amazing thing about Arduino is that students can take help online with a lot of examples regarding any of the task. There are thousands of Arduino projects are available online from beginner level to the major real life pro ...
Hello everyone! I hope you all will be absolutely fine and having fun. Today, I am going to tell you about how to design an algorithm for Servo Motor Control using Arduino . First of all I would like to tell you a bit about the servo motors. Servo motors are small devices having an output shaft. We can adjust this shaft in different angular positions by continuously sending the servo coded signal. Servo motor maintains the angular position of the shaft as long as the coded signal is present at the input. If the applied coded signal changes, angular position of the shaft of a servo motor also changes correspondingly. If you are working on Servo Motor then i would suggest you to must have look at this tutorial Servo Motor control in Proteus , as its always a best practice to design simulatio ...
Hello everyone! I hope you all will be absolutely fine and having fun. Today, I am going to share my knowledge with all of you guys about DC Current Sensor ACS712 Arduino Interfacing. First of all, I would like to tell you about importance of current sensing/measuring. Sensing the amount of current passing through any circuit can be useful in a lot of applications. For example, in low power consuming equipment, current sensing will be helpful to understand the system's impact on its battery life. The current sensing can also be used to make the decisions regarding safety in over current protection circuits. Simply, we can say that sensing and controlling the flow of the current through the circuits is now a fundamental requirement e.g. over current protection circuits, battery chargers, wa ...
Hello everyone! hope you all will be fine. In this article I am going to share the knowledge about displaying Scrolling Text on LCD with Arduino . A Liquid Crystal Display is usually known as LCD in the market. It is a display unit made up of liquid crystal. When we want to made electronics based projects, we need a device on which we can show the system’s output and the desired messages. There are a lot of such devices which are helpful to display the output messages and the most common is a seven segment display. Alternate good option is LCD, which are now available in different size having different qualities. 16×2 LCD Module is a most frequently used device for the electronic projects out of all the other types of LCD’s available in the market. 32 ASCII characters can be displayed on i ...
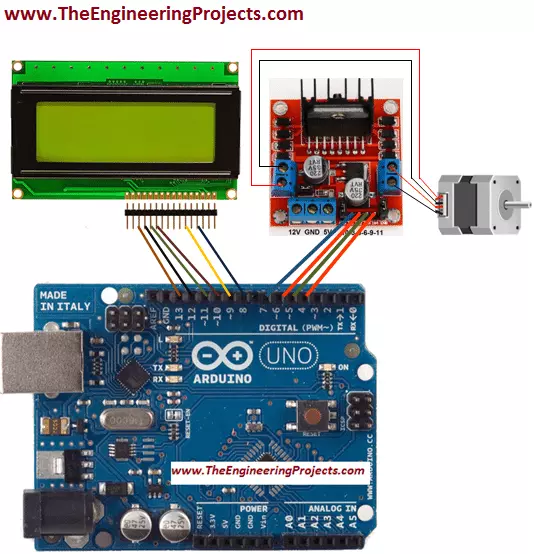
Hello everyone! I hope you all will be absolutely fine and fun. Today, I am going to tell you that how to make a simple algorithm for Stepper Motor Speed Control using Arduino. I have already discussed with you about DC Motor Direction Control using Arduino , Matlab and NI LabVIEW. Moreover, I have also discussed the DC Motor Speed Control using Arduino , Matlab and LabView. If you are working on Stepper Motor, then you must have a look at Stepper Motor Direction Control using Arduino , Stepper Motor Direction Control using Matlab and Stepper Motor Direction Control using NI LabVIEW. Now, in this tutorial I will explain you about the program which will helpful for Stepper Motor Speed Control using Arduino. Before going into the details of this tutorial you must have go through my previous ...
Hello friends! I hope you all will be absolutely fine and having fun. Today, I will elaborate you that how can we make a simple algorithm for Stepper Motor Direction Control using Arduino. In my previous tutorials I made algorithm for DC Motor Direction Control using Arduino , DC Motor Direction Control using Matlab , DC Motor Speed Control using Arduino and DC Motor Speed Control using Matlab. Now, in this tutorial I will control a stepper motor using Arduino by entering the different commands through its serial port. Before going into the detail of this tutorial, you must know the basic difference between stepper and DC motors. DC motors have only two input terminal one is positive and the other one is negative. You just have to provide the power supply and it will start rotating but thi ...