Hi Guys! Hope you’re well today. I welcome you on board. In this post today, I’ll detail the 7 best Arduino starter kits for beginners.
Arduino boards are particularly introduced for people with little to no knowledge about programming and electronics. These boards are the improvised version of microcontrollers. If you’re a student or someone planning to get your hands dirty with some electronic projects, Arduino boards are a great way to whet your appetite.
Arduino kits house many essential components required to start working with Arduino boards. These kits are developed for people who struggle to get a hold of the nitty-gritty of programming Arduino boards. These Arduino basic kits come with instruction manuals that detail the step-by-step pro ...
Hey Fellas! Hope you are getting along with life pretty well. This post is another addition in this Arduino Tutorial for Beginners series. Today, I'll discuss How to use analogWrite in Arduino? The analogWrite is mainly used to update the status of analog pins and is also used to map the analog values on the PWM (Pulse Width Modulation) pins.
You can check the article that I have posted previously on How to use analogRead in the Arduino - this command addresses the analog pins on the board and reads its status, while today's one does the exact opposite.
In this post, I'll try to break down each and everything related to analogWrite in simple steps, so you can grab the main idea pretty well. Let's jump right in.
How to use analogWrite in Arduino?
...
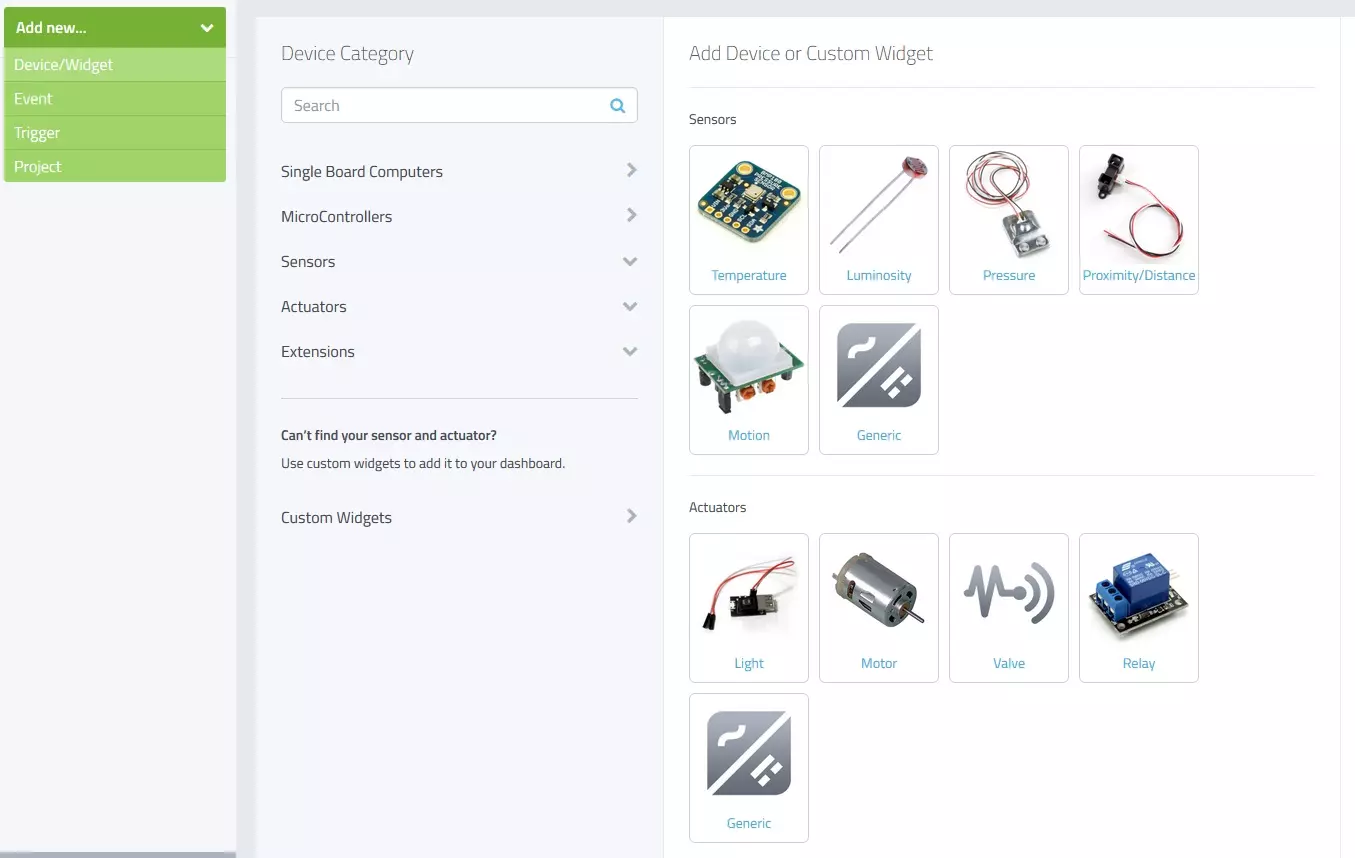
Hello friends, I hope you all are fine and having fun with your lives. Today, I am going to share a new and very exciting service with you guys which is named as myDevices Cayenne, we will have a look at getting started with Cayenne. Its really an awesome platform for students and hobbyist who wants to work on embedded systems but are afraid of programming codes.
Cayenne is an online project building platform using drag and drop. Currently it supports Arduino and Raspberry Pi. In simple words, you can design any of your Arduino or Raspberry Pi project simply by drag and drop different components. You don't need to write any code, you just need to place your blocks and upload it to your Arduino board. Its also known as the Graphical coding.
I came ...
Hey Fellas! Hope you are doing well. I feel pleasure to have you on this platform. Today, I'll discuss the detailed Introduction to Arduino Duemilanove which is a Microcontroller Board, introduced by Arduino.cc and is based on ATmega168 or ATmega328. It comes with 14 pins that can be used both ways: Input or Output. Duemilanove means "2009" in Italian.
Arduino boards have always been a good pick for hobbyists and students who intend to design projects that are mainly related to embedded system and automation. These boards are similar to microcontrollers, with little advantage over them as they come with some built-in peripheral features, setting you free from buying external components to employ automation in your project.
If we focus on Arduino ...
Hello friends, I hope you all are doing great and having fun with your lives. In today's tutorial, I am going to share How to interface Arduino with GLCD. I am gonna design a Proteus Simulation in which I will interface Arduino GLCD together. GLCD is also called Graphical LCD so today we are gonna do some designing on the LCD. The GLCD I am going to use is ks0108 and its model in Proteus is LGM12641BS1R and I have shared the complete Simulation along with Arduino Code below for download. But I would suggest you to design it on your own so that you could get the most out of it. If you haven't worked on the LCD before then I would suggest you to read How to Interface Simple LCD with Arduino.
Moreover, I am quite happy to announce that we have starte ...
Hello Everyone, hope you all are fine and having fun with your lives. Today, I am going to interface GPS Module with Arduino in Proteus ISIS software. Recently, I have shared this amazing GPS Library for Proteus, using which you can quite easily simulate your GPS Module in Proteus software. Today, I am going to interface this GPS Module with the Arduino UNO board and will simulate the result in Proteus software. I am going to use TinyGPS Library and will get Longitude and Latitude out of this GPS Module.
So, if you are new to GPS and you haven't yet installed the GPS Library for Proteus, then you must first download that library and install it. I am using Arduino board in today's tutorial but you can use any other microcontroller as well like PIC ...
Hello friends, hope you all are fine and having fun with your lives. Today's post is about getting started with pixy camera. Now, the first thing comes in mind is what is Pixy Camera so let's first have a little introduction about Pixy Camera on which I recently worked. Pixy Camera is a small camera board which uses NXP microcontroller. Its a very powerful board and can get easily interfaced with simple Arduino UNO board. So, now we can do image processing even on Arduino UNO. Image Processing needs a powerful board that's why we can't interface simple webcam with Arduino UNO or mega etc. Before using pixy camera, when I need to do on board image processing I always used either Arduino YUN, Raspberry Pi or Arduino USB host shield but still it was ...
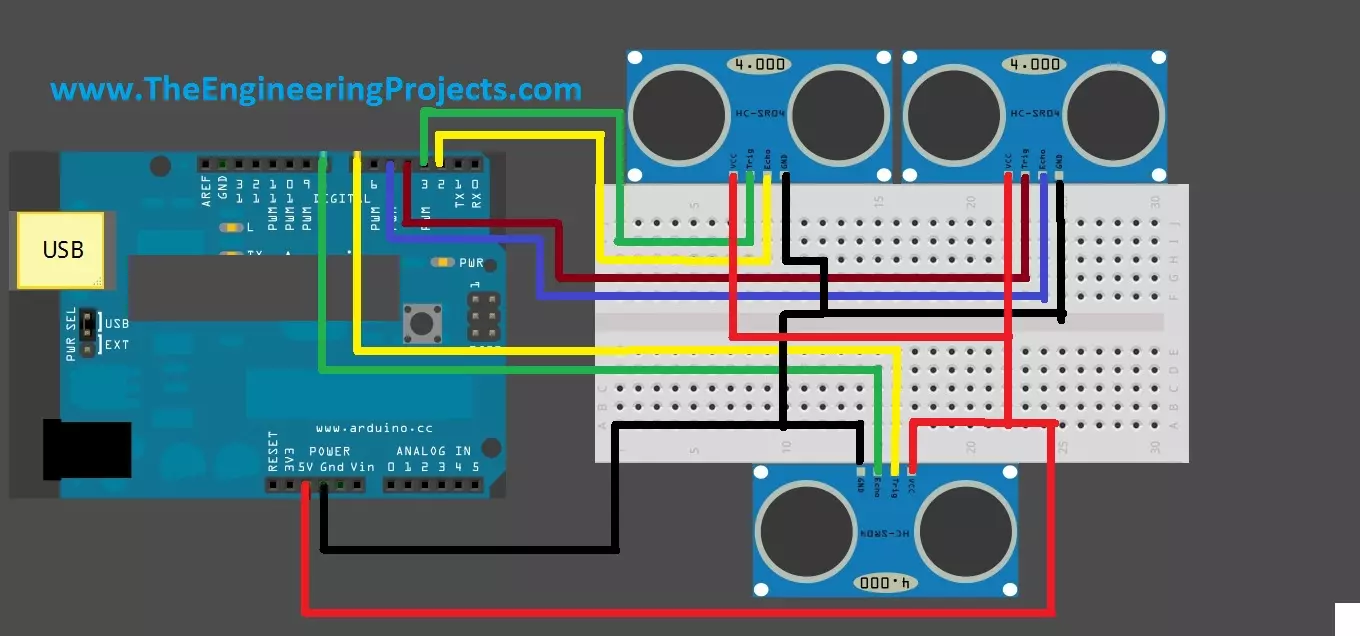
Hello friends, hope you are having fun and enjoying life. Today, I am gonna post about interfacing of multiple Ultrasonic sensor with Arduino. In the previous post, we have seen Interfacing of Ultrasonic Sensor With Arduino and in this post I have interfaced single ultrasonic sensor but in projects especially related to robotics, we have to interface multiple ultrasonic sensors. For example you have an obstacle detection robot, now in order to detect obstacle in front of robot you have to place once sensor on the front side but now you can't detect any object present on left or right side of your robot, so you have to place two sensors one on the left side of robot and one on the right side so in this project you need to use total three ultrasonic ...
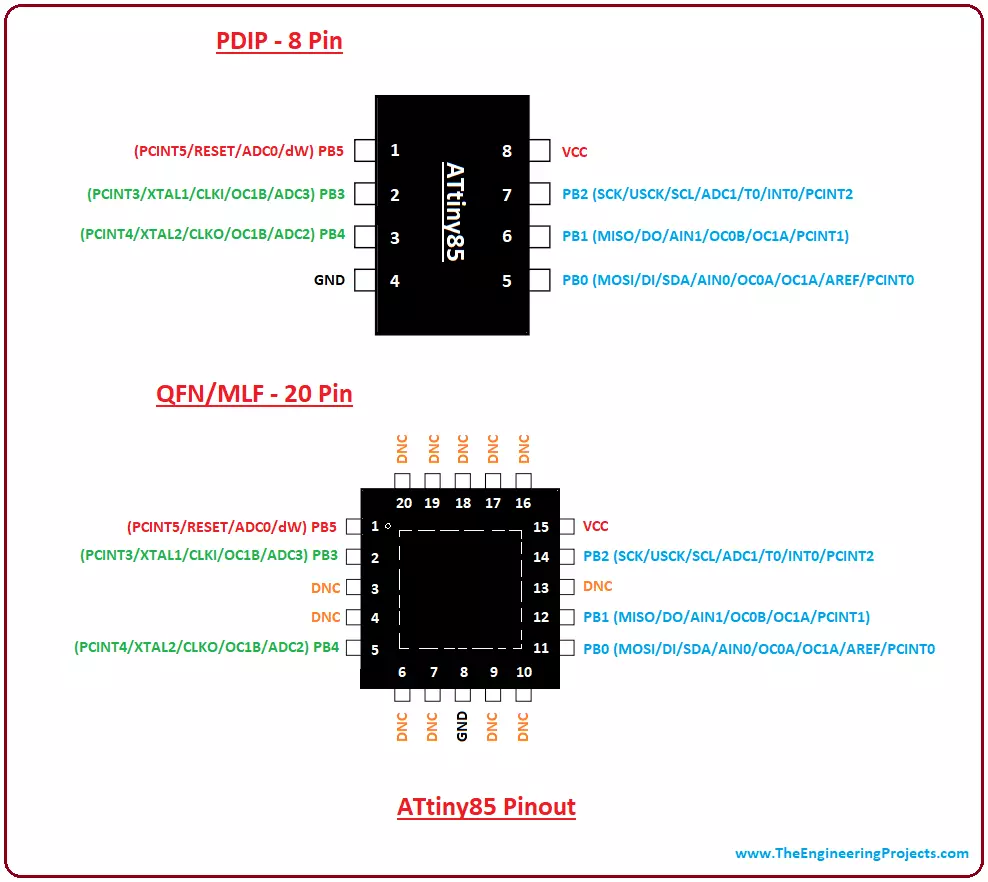
Hey Guys! Hope you are doing well. I am back to give you a daily dose of valuable information. Today, I'll discuss the details on the Introduction to ATtiny85. It is an 8-bit AVR microcontroller, introduced by Microchip, and is based on RISC CPU. It comes with 8-pin interface (PDIP) and falls under the category of low power controllers. Programmable watchdog timer and 10-bit ADC converter are added in the device that makes it suitable for sensor interfacing and resetting the device in case it gets stuck in an infinite loop.
Microchip never fails to satisfy the requirements of any individual by providing flawless microcontroller modules that are directly or remotely connected with automation and embedded systems. With the invention of these tiny o ...
Hello everyone, I hope you all are fine and having fun with your lives. Today, I am going to share the next tutorial in this series of basic Arduino tutorials and it's named How to use Arduino Serial Write. In this tutorial, I have given an overview of How to use the Arduino Serial Write Command. In the previous tutorial, we have seen How to use Arduino Serial Read? in which we have read the data coming from the serial port.
While today we will have a look at how to send the data through a serial port in Arduino and for that, I am going to use the Arduino Serial Write command. It's also going to be a very simple and basic Arduino tutorial but if you are new to Arduino then you must read it completely as it will gonna help you out. I have also desig ...