Hello friends! I hope you all will be absolutely fine and having fun. Today, I am going to share my knowledge with all of you about how to make a simple program for DC Motor Direction Control in LabVIEW. In my previous tutorials, I have also worked on DC Motor Direction Control using Arduino. You should go through these tutorials they will be helpful in better understanding of the tutorial DC Motor Direction control using NI LabVIEW. The word DC is basically an abbreviation of Direct current. So, a direct current motor is commonly used motor having two input terminals, one is positive and the other one is negative. If we connect these terminals with the voltage supply the motor will rotate. If you change the polarity then motor will rotate in oppo ...
Hey Guys! Hope you’re well today. Happy to see you around. In this post today, I’ll detail the Introduction to 1n4734a.The 1n4734a is a Zener diode used as a low-current voltage regulator. It is composed of silicon material and is employed as a shunt regulator in many applications. This Zener diode conducts the current in both directions in contrast to a normal diode that conducts in one direction only i.e. conducts in forward biased condition only.
I suggest you read this post all the way through, as I’ll be discussing the datasheet, pinout, features, and applications of 1n4734a. Let’s jump right in.
Introduction to 1n4734A
The 1n4734a is a Zener diode used in clipping circuits with a high power rating.
It comes in the DO-41 package and is used as a low-current voltage regulat ...
Hello friends, hope you all are fine and having fun. Today I am going to share my new tutorial which is Sequential LED Blinking Using 555 Timer in Proteus ISIS. If you recall our one of previous tutorials, which was ‘Multiple LED Flashing Project Using 555 Timer in Proteus ISIS’, but in today’s tutorial we are going to take the same concept to a next level and we are going to make the LEDs blink in either ascending or descending order.
It is a very simple tutorial like the previous one, but the only change is, in this project we have added a Shift Register (4017) next to 555 Timer. 4017 is a Serial IN Parallel OUT Shift Register, which means, at input port it takes data in Serial manner and at output port it will give data in Parallel manner. All ...
Hello friends, today's post is, as the name suggests, about the Voice Recognition using EasyVR Shield. Voice recognition is quite a difficult task and usually done on software like MATLAB, but what if someone needs a stand alone project, a kind of autonomous voice recognition project, which doesn't use computer.
EasyVR is the solution for such projects. I recently did one project on this module named as Voice Recognition using EasyVR Shield and it worked really cool so I thought to share this new technology with you guys. I couldn't write the next part of Proteus tutorial, actually firstly I was busy in this project and then I thought to share this one as its quite exciting one. After completing this project, I will come back to Proteus tutorial.
...
We are familiar with multiple features of the ESP32 module. Like Wi-Fi capabilities, classic Bluetooth, Bluetooth low energy (BLE), inbuilt sensors etc.
Hello readers, I hope you all are doing great. We have already mentioned in our previous tutorials that, ESP32 is also featured with a Dual-Core Processor. Which provides better performance and efficiency.
In this tutorial, we will learn how to use ESP32’s dual cores. ESP32 has two (32-bit each) Tensilica Xtensa LX6 microprocessors namely, core0 and core1 which makes it a powerful dual-core microcontroller and hence stands apart from its predecessors.
When we compile and upload a code using Arduino IDE, we do not have to worry about which core executes the code. It just runs.
Fig. 1 ESP32 dual-co ...
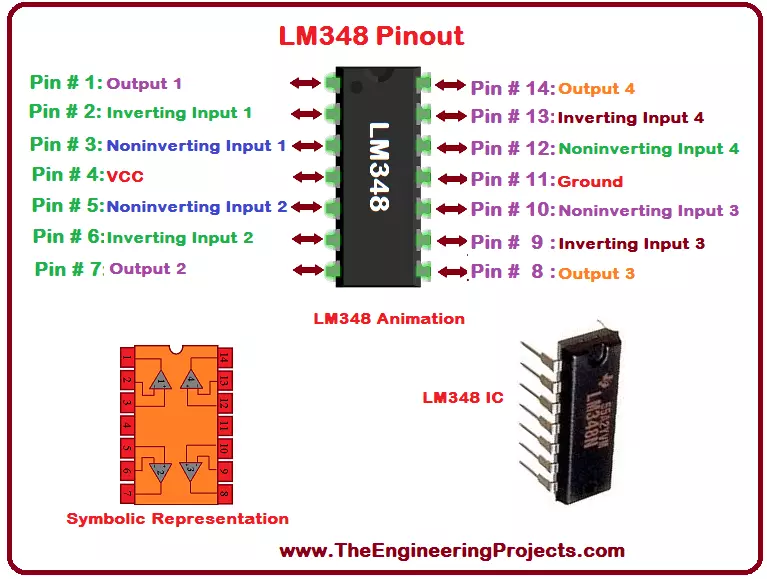
Hello everyone! I hope you all will be absolutely fine and having fun. Today, I am going to share my knowledge on Introduction to LM348. LM-348 i basically a General Purpose (GP) Operational Amplifier. It is an independent and quadruple operational amplifier. LM 348 has similar characteristics in comparison to uA741. It is an internally compensated amplifier having high gain.
LM-348 has four internal amplifiers. We can achieve isolation between these amplifiers by biasing each of the amplifier independently. This isolation can be done using different techniques e.g. layout technique. It can be used at several different places where amplifier matching is needed. LM 348 has very low supply current drain as compared to the standard 741. Moreover, I ...
Hello readers, today we will learn about the messaging protocol supported by ESP32(called MQTT protocol), which is used for IoT applications. The communication protocol to be used for data transmission and connectivity in web-enabled devices depends upon the type of IoT application.
The Internet of Things (IoT) is a network of interconnected computing devices like digital machines, automobiles with inbuilt sensors, having unique identifiers and the ability to communicate data over a network without the need for human intervention.
Before implementation, let's first have a look at what is MQTT Protocol?
What is MQTT?
MQTT stands for Message Queuing Telemetry Protocol and is a messaging or communication protocol used for IoT applications.
In MQ ...
Hello friends, hope you all are fine and having fun with your lives. Today, I am going to share a new exciting post on Send SMS with SIM900D in Proteus ISIS. In my previous post, I have shared the new GSM Library for Proteus, which is the first ever designed library for Proteus, and I am quite excited while sharing its features. So, today, we will use this GSM Lirbary for Proteus and we are gonna send sms with Sim900D module available in that library. We are gonna design this whole project in Proteus ISIS.
If you wanna implement it on hardware then you must have a look at Send SMS with SIM900D module with Arduino which is designed in real hardware but today we are gonna just do the simulation part. Iam not gonna use any Microcontroller today. Inst ...
Hi Guys! Hope you’re well today. I welcome you on board. In this post, I’ll walk you through How a Hobbyist Can Work on Electronic Projects in America.
Working on electronic projects is a bit inundating.
From selecting the topic to research work and development to execution, you need to hustle, grind and drill to keep your final product up and running.
When you are new to the electronic field, you must not be afraid to get your hands dirty in diving deep into the nitty-gritty of the project. This means that no matter what kind of technical project you pick, you need to spend a significant amount of your time and money to reach your final goal. It's not just about making sure that whatever it is you're looking for is done well—it's also about making sure that your project is done ri ...
Hi Guys! Hope you’re well today. I welcome you on board. In this post, I’ll walk you through Electronics DIY Projects to Improve Work from Home.
Electronic devices are not cheap and rightly so. Since you require advanced setup and technical skills to build something sophisticated and delicate. The good news is that you don’t have to spend a fortune on such devices since DIY electronic projects are the solution. You can make similar electronic projects you find online at home and save a lot of money. Some people prefer working on a breadboard while others prefer building on printed circuit boards. However, if you’re new to this field, we’ll suggest you start from the breadboard, before building your projects on the PCBs. The good thing is that you don’t require a big setup or advanced ...