Hello fellows, I hope you all are doing great. In today’s tutorial, we will have a look at What is Monostable Multivibrator. It is a simple electronic circuit, used to produce a pulse at its output also known as one shot. It generates output pulses according to corresponding circuitry requirements. Its main feature is that after the generation of the output pulse, it regains its stable state and does not produce any further output pulse till not triggers again.
This circuitry can be considered as a biased form of multivibrator (such circuitry that is used for implementation of 2-state modules like timers) that is (on) operating in the starting condition till the triggered point and then becomes unstable on its own. In today's post, we will have a look at its circuitry, construction, wor ...
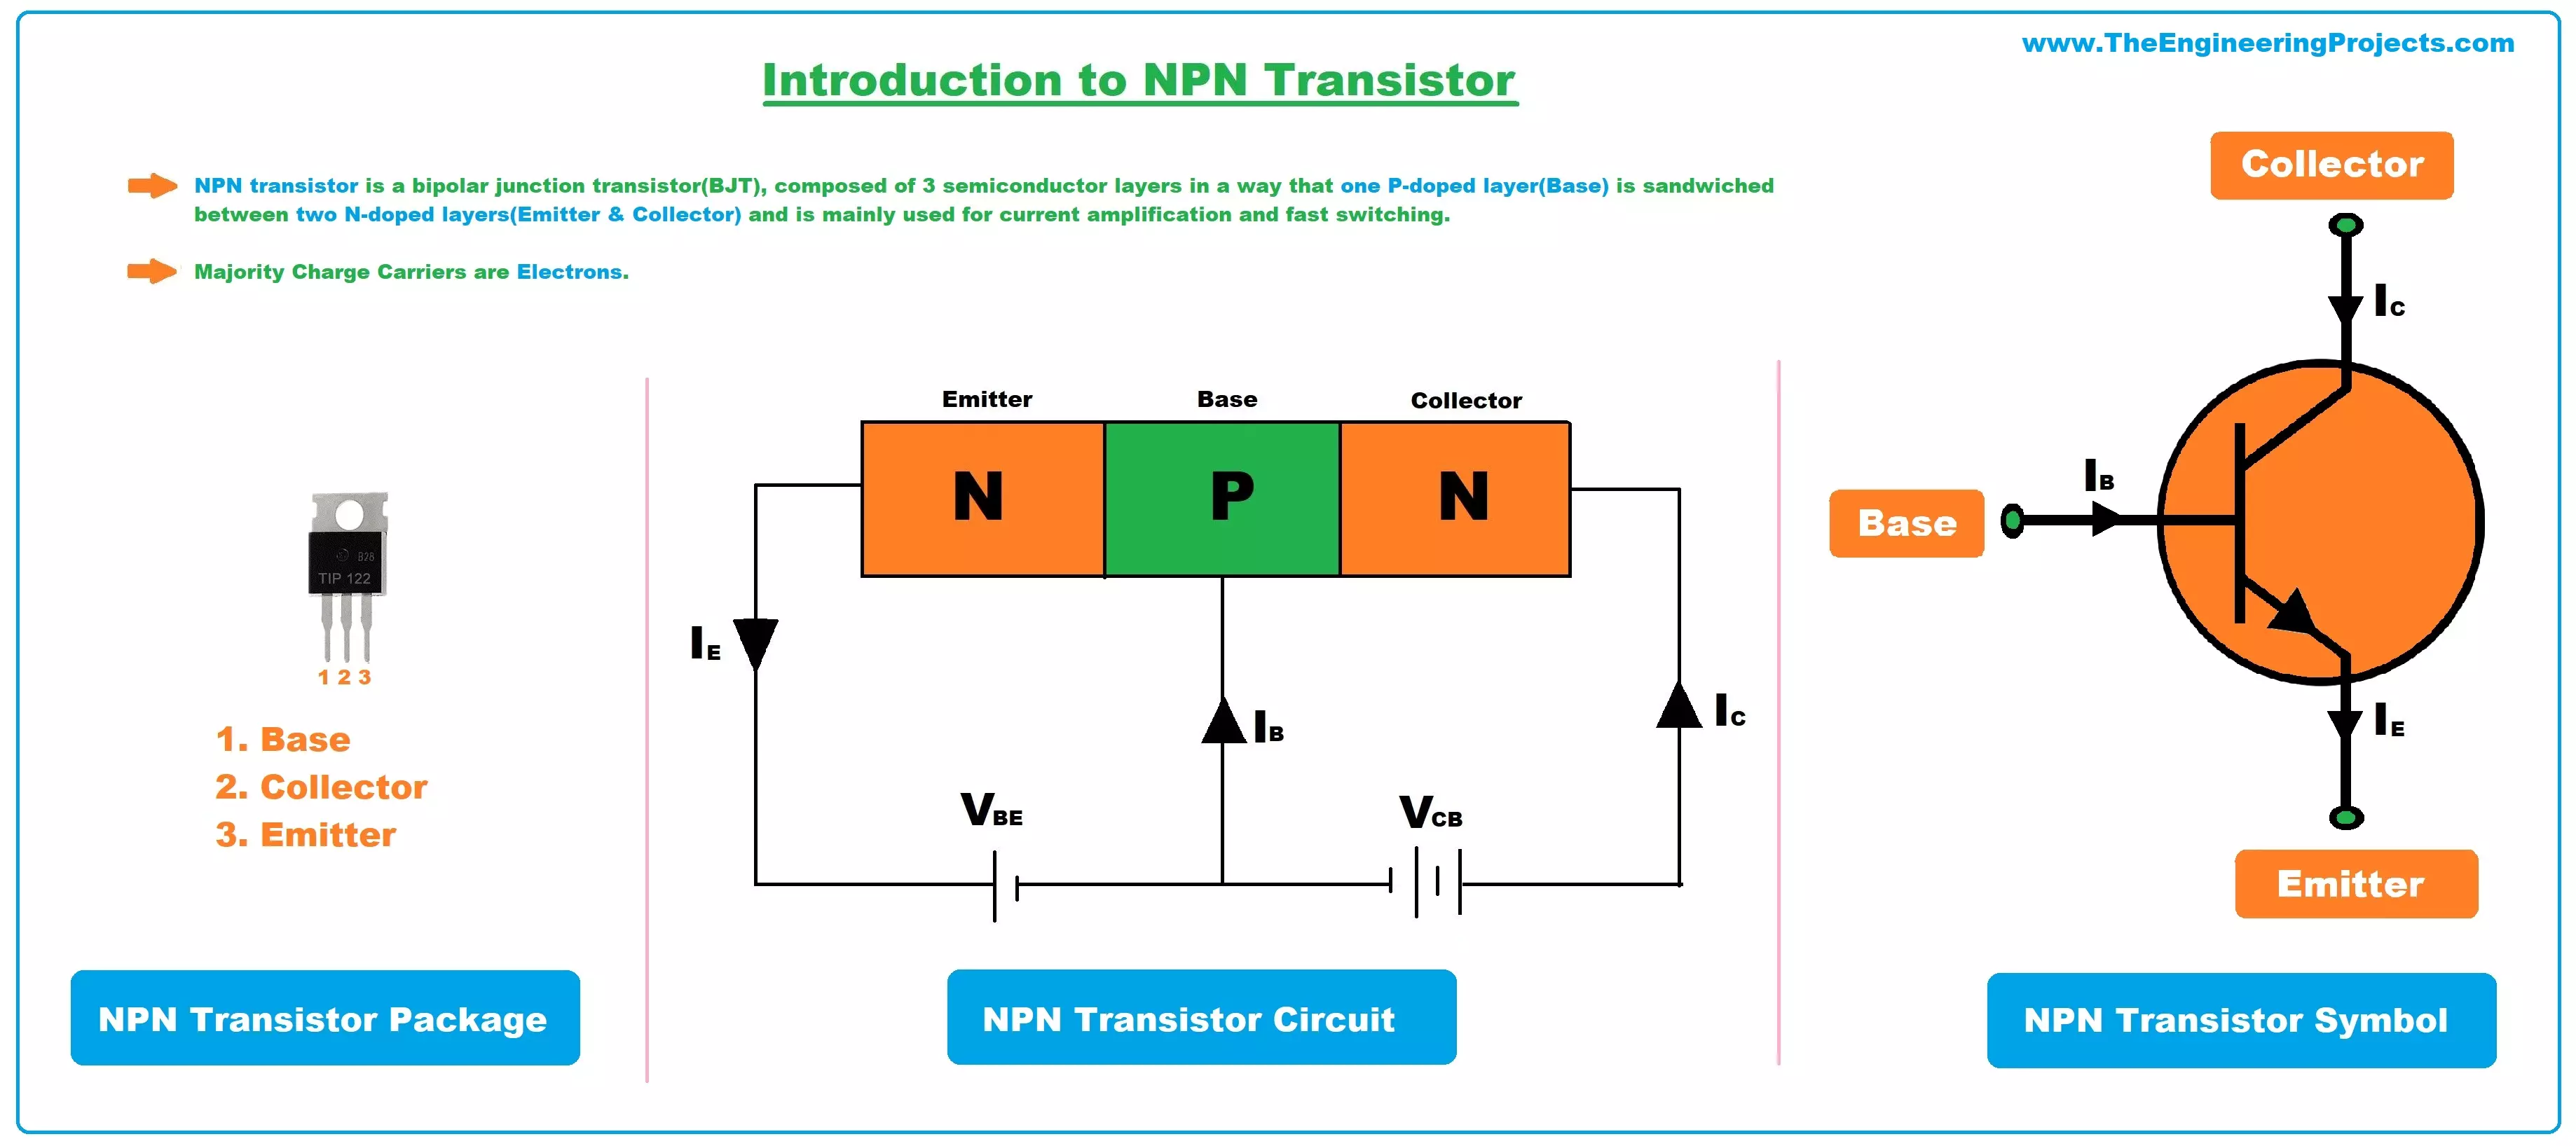
Hello Friends! I hope you are well. Today, I am going to give you a detailed Introduction to NPN transistor. In this tutorial, we'll look at the NPN transistor, how it works, circuit diagram, output characteristics curve, and applications. It is a bipolar junction transistor mainly used for current amplification and switching purposes.
BJTs (Bipolar Junction Transistor) are divided into two types i.e. NPN transistor and PNP transistor. Both transistors are different in terms of their electrical composition and construction, however, both are used for amplification and switching purposes in one way or the other.
What is NPN Transistor?
NPN transistor is a bipolar junction transistor(BJT), composed of 3 semiconductor layers in a way that o ...
Hello friends, I hope you all are doing great. In today's tutorial, we are gonna have a look at detailed Introduction to 74ls04. 74LS04is a participant of 74XXYY integrated sequence. The seventy-four sequences are numerical logic incorporated circuitries. This integrated circuit consists of 6 not gates. These gats do the function of reversing of different functions. To the existence of six gates, it also is known as hex inverter.
This integrated circuit is offered in numerous suites. You can select a suitable suite dependent on conditions. This module has fourteen pinouts which perform different functions. It is used in different memory units. In today’s post, we will have a look at its protection, wreck, oddness, privileges, etc. I will also shar ...
Hello readers, we hope you all are doing great. In this tutorial, we are going to demonstrate how to interface and control a servo motor using an ESP32 board. After that, we will demonstrate how to create a webserver to control the servo motor’s shaft position with the ESP32 board.
Servo Motors are among the most important actuators in robotics, with applications ranging from RC planes to automated door locks.
Hardware components required
A servo motor
ESP32 development board
Connecting wires
Breadboard
Servo Motor
There are several specific types of electric motor applications in which the motor must rotate only at a specific angle. For such applications, we need a special type of motor with such a special arrangement that causes the m ...
Hi Friends! Welcome you onboard. I have been writing these Arduino tutorial for beginners for quite a while now and today we are having the next episode. Today, I'll discuss How to use analogRead in Arduino. The analogRead is mainly used to program and address analog pins on the board. In our previous tutorial, we have seen How to use digitalWrite Arduino Command, which deals with digital pins of Arduino but today's one deals with analog pins.
There are many types of boards available in the market ranging from Arduino UNO, Arduino Mega2560, Arduino Micro and many more, which you can use based on your technical requirements. Arduino Programming is made simple by the Arduino.cc - the manufacturer of Arduino Boards, providing an open source software ...
Hi Friends! Hope you’re well today. Happy to see you around. Thank you for clicking this read. In this post today, I’ll walk you through the Introduction to CA3080.The CA3080 is an operational transconductance amplifier mainly used to convert the input voltage signal into an output current. It is widely used in variable gain amplifiers, frequency oscillators, current-controlled filters, and comparators. It carries an amplifier bias input which is utilized for linear gain control.
I’d recommend reading this entire post all the way through as I’ll detail the complete Introduction to CA3080 covering datasheet, pinout, features, and applications. Let’s jump right in.
Introduction to CA3080
The CA3080 is an operational transconductance amplifier (OTA) mainly employed in electrical circ ...
Hi everyone! Hope you’re well today. I welcome you on board. In this post today, I’ll walk you through the Introduction to P6KE220A.The P6KE200A is a transient voltage suppressor (TVS) diode that uses clamping action to provide circuit protection against overvoltage. It is widely used in low-voltage supplied ICs and MOS technology due to its quick response to transient overvoltages. For P6KE200A the clamping voltage is 246V and the breakdown voltage is ranged from 190V to 210V.
I suggest you read this entire post till the end as I’ll detail the complete introduction to P6KE200A covering datasheet, pinout, features equivalents, and applications of this component P6KE200A.
Introduction to P6KE200A
The P6KE200A is a transient voltage suppre ...
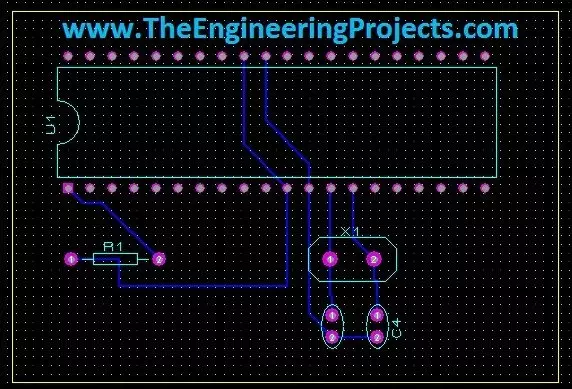
Hello friends, today's the last post of this Proteus tutorial. I have tried my best to explain everything but knowledge is limitless so explore this software, play with it and you will know many new things. Today's topic is about the PCB designing in Proteus. When you install Proteus, you have seen that along with ISIS there's also another package named as Proteus ARES. This Proteus ARES is used for PCB designing. You should also check the Arduino UNO PCB Design for Proteus ARES.
In order to design the PCB in Proteus ARES, first you need to make the circuit of that PCB in Proteus ISIS. You can also make PCB directly but I recommend that use Proteus ISIS first, its quite the easy approach as you don't need to do anything in it and the software in ...
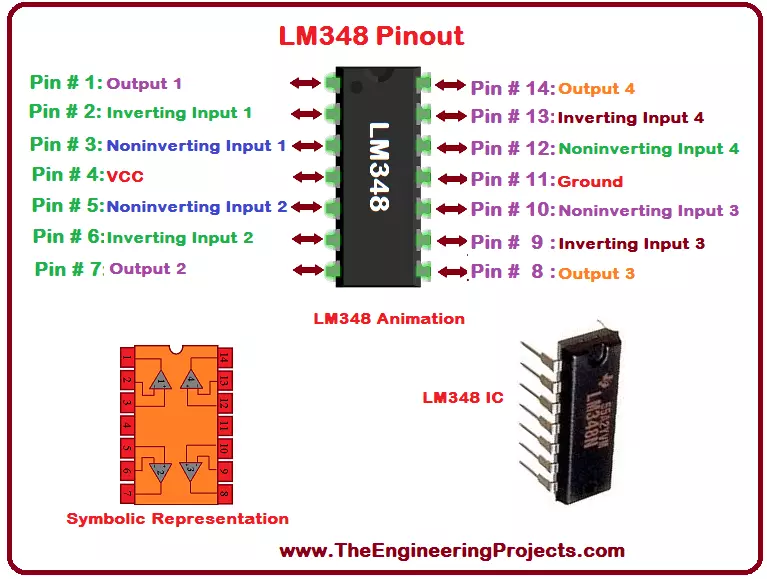
Hello everyone! I hope you all will be absolutely fine and having fun. Today, I am going to share my knowledge on Introduction to LM348. LM-348 i basically a General Purpose (GP) Operational Amplifier. It is an independent and quadruple operational amplifier. LM 348 has similar characteristics in comparison to uA741. It is an internally compensated amplifier having high gain.
LM-348 has four internal amplifiers. We can achieve isolation between these amplifiers by biasing each of the amplifier independently. This isolation can be done using different techniques e.g. layout technique. It can be used at several different places where amplifier matching is needed. LM 348 has very low supply current drain as compared to the standard 741. Moreover, I ...
ESP32 module comes with multiple inbuilt features and peripheral interfacing capability is one of those features. ESP32 module also consists of an inbuilt temperature sensor, but that can only measure the temperature of the ESP32 core not the temperature of the surrounding environment. So it is required to use a peripheral sensor to measure the temperature of the surrounding environment like home, garden, office etc.
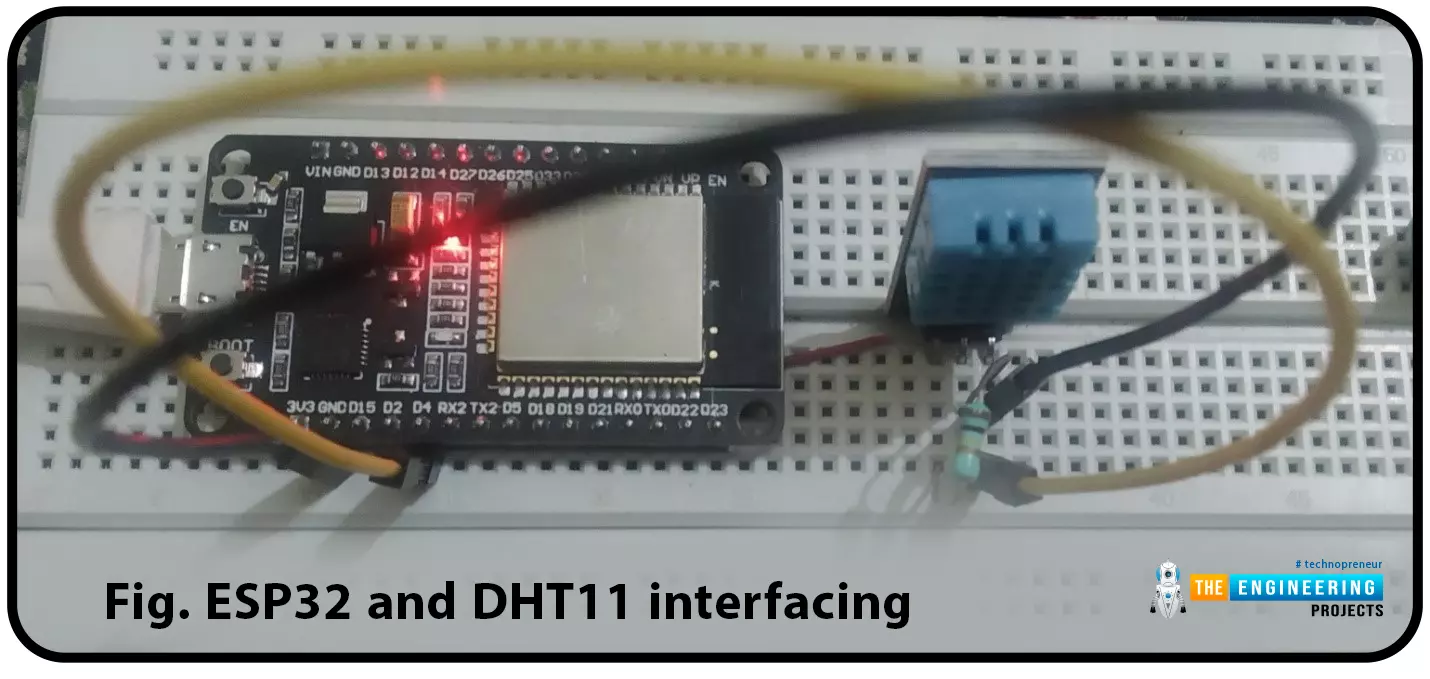
Hello readers. I hope you all are doing great. In this tutorial, we will learn how to interface DHT11 (temperature and humidity sensor) with the ESP32. Later in this tutorial, we will discuss how to share the sensor readings obtained from the DHT11 sensor to a web server.
Before moving towards the interfacing and programming part, let’s have a short introduction to the DHT11 ...