Hey Everyone! I hope you all are doing great and enjoying life. I am back to give you daily dose of some valuable information so you can progress and grow in your relevant field. Today, I am going to unlock the details on the Introduction to 2n2905. It is a PNP (Positive-negative-Positive) bipolar junction transistor (BJT) which is mainly used for general purpose and switching applications. In this transistor, N doped semiconductor exists between the two layers of P doped material. I am going to give you brief details about this transistor. Let's get started.
Introduction to 2n2905
2n2905 is a PNP bipolar junction transistor which is mainly designed for general purpose, small signal and switching applications.
It comes in TO-39 casing an ...
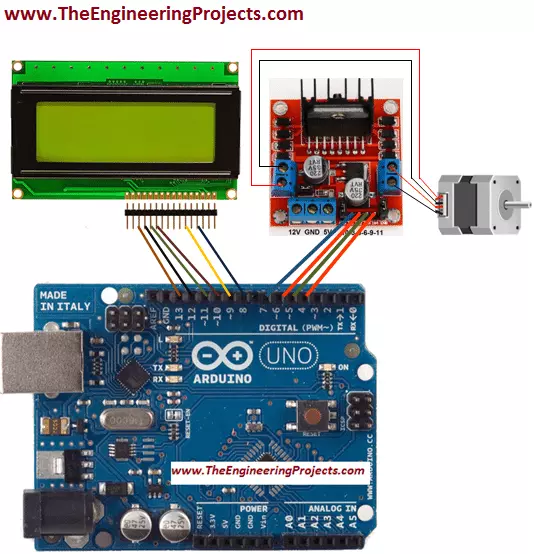
Hello friends! I hope you all will be absolutely fine and having fun. Today, I will elaborate you that how can we make a simple algorithm for Stepper Motor Direction Control using Arduino. In my previous tutorials I made algorithm for DC Motor Direction Control using Arduino, DC Motor Direction Control using Matlab, DC Motor Speed Control using Arduino and DC Motor Speed Control using Matlab. Now, in this tutorial I will control a stepper motor using Arduino by entering the different commands through its serial port.
Before going into the detail of this tutorial, you must know the basic difference between stepper and DC motors. DC motors have only two input terminal one is positive and the other one is negative. You just have to provide the powe ...
Hello friends, I hope you all are doing great. In today's tutorial, we are gonna have a look at detailed Introduction to ACS712. ACS712 is an AC or DC current sensor, which is used to measure AC or DC current. You should also have a look at Difference between AC & DC Power, that will help. The maximum value of AC and DC which can be measured is 30A, its output current signal can be read via analog I/O port of Arduino. It is also available in 5A and 20A version which provides precise and economical solutions for AC or DC current sensing in industrial and commercial systems.
ACS712 consists of a precise and low offset linear Hall sensor circuit with a copper conduction path located near the surface of the die. ACS712 is used in different industrial projects and commercial electr ...
Hello friends, I hope you all are doing great. In today's tutorial, we are gonna have a look at a detailed Introduction to DS18B20. DS18B20 is a temperature sensor that can measure temperature from -55oC to +125oC with an accuracy of +- 5%. It follows 1 wire protocol which has revolutionized the digital world. Because of its 1 wire protocol, you can control multiple sensors from a single pin of Microcontroller.
DS18B20 is normally used in industrial projects where high accuracy is necessary. I will give you a detailed overview of this temperature sensor in today's post where we will have a look at its Pinout, working, protocol, etc. I will also share some links to projects where I have interfaced it with Arduino or other microcontrollers. If you have any questions, please ask in comment ...
Hello Guys! I hope you’re well today. Happy to see you around. Thank you for clicking this read. In this post today, I’ll walk you through the Introduction to TL082.The TL082 is a wide bandwidth dual JFET input operational amplifier. High speed, low cost this device comes with internally trimmed offset voltage. It is available with a fast slew rate, a large gain bandwidth, and a low supply current.
I suggest you buckle up as I’ll discuss the complete Introduction to TL082 covering datasheet, pinout, features, and applications. Let’s get started:
Introduction to TL082
The TL082 is a high-speed, low-cost, wide bandwidth and dual JFET input operational amplifier.
This component is available with an internally trimmed offset voltage. It comes with a fast slew rate and low supply cu ...
Hello friends, I hope all are fine and having fun with your projects. We have covered enough Arduino commands in this Arduino Tutorial for Beginners series and now we are ready to create a simple project by interfacing an LED (Light Emitting Diode). Today, I am going to share a very Simple Arduino LED Example in Proteus ISIS. First I will blink single LED using Arduino UNO and then I will blink multiple LEDs in Proteus.
When you start working on Arduino then Arduino LED example is the first example which you must try because its the easiest one. Moreover, we all know that we have a small LED connected to pin # 13 on each Arduino so you can also check your Arduino as well that whether its working or not. So, let's get started with Simple Arduino LE ...
Hello friends, I hope you all are fine and having fun with your lives. Today, I am going to share a very quick and basic tutorial in which I will show you How to use Arduino Serial Flush. I hope you guys are going to like it. We have seen How to use Arduino Serial Write? In that tutorial, we have sent some data over the Serial Port so you must recall that tutorial because we are going to use the same example today. Moreover, it's also good if you have a look at How to use Arduino Serial Monitor because that's also related.
Moreover, I hope that's going to be my last lecture on Arduino Serial Port because I have covered it in full detail. Although I am going to summarize all the Arduino Serial Post Commands in a single Post. You should also have a l ...
Hey Guys! Hope you are doing well. Welcome you onboard. Today, I'll discuss the detailed Introduction to CD4046 which is a Micropower Phase-Locked Loop (PLL) that comes with a common comparator input and a common signal input amplifier between a low-power linear voltage-controlled oscillator (VCO) and two different phase comparators.
The phase locked loop, as the name suggests, is a loop where the phase of the output signal is compared with the phase of the input signal using a phase detector between two signals.
Phase detector operates with the aim to adjust the two signal and make them quite in line with each other so they generate signals with the same magnitude.
In this tutorial, I'll walk you through the main details related to CD4046 by ...
Hello friends, hope you all are fine and having fun with your lives. Today, I am going to share a new Genuino Library for Proteus. Genuino boards are just the same as Arduino boards but with slight difference of color and shape. I have already posted a tutorial on Arduino Library for Proteus in which I have explained how to download the Arduino Library and use it in Proteus. Today, I am going to post a similar library but for Genuino boards. Their functionality is exactly the same as the Arduino Library but they have better look and Genuino Color.
II hope you are gonna like this library as well. Other bloggers are welcome to share this library with their reader but do mention our link in creator section, we will be really obliged. Now, let's start ...
Hello friends, I hope you all are fine and enjoying yourself. Today I am going to share my new project tutorial which is Relay Control Using 555 Timer in Proteus ISIS. We all know about relays that are used for automatic switching and are magnetically connected while electrically insulated. If you don't know much about relays then I think you should first read What is a Relay? in which I have given a detailed overview of relays and where are relays used? After reading this post you will have a good grip over relay and today's post will be piece of cake for you. Relays are mostly used with some microcontrollers like Arduino or PIC Microcontroller. You might also wanna have a look at traffic Signal Control using 555 Timer, which is good if you are i ...