Hello everyone! I hope you all will be absolutely fine and having fun. Today, I am going to share my knowledge about Introduction to NE555. NE 555 is a precise timing circuit device. It can produce the precise time delays and oscillations. The time interval can be controlled by external resistor and capacitor when NE-555 operates in mono stable mode.Whereas in adjustable mode two external resistors and one capacitor controls the duty cycle and frequency.
NE555 is an Integrated Circuit (IC/Chip) which can be used in different types of timers. The output circuit is capable of bearing current up to 200mA. NE-555 timer works on voltage ranging from 5V to 15V. The output level have compatibility at 5V supply. NE 555 timer can be used in oscillator a ...
Hello friends, I hope you all are doing great. In today’s tutorial, we are gonna have a look at detailed Introduction to RN4020. RN4020 is a completely licensed Bluetooth category 4.1 low energy consuming unit. This module is surfaced with the Bluetooth which is organized by Unpretentious ASCII instructions by UART interfacing. It also comprises all Bluetooth SIG sketches and (MLDP) Microchip low Energy data for customized data.
The scripted features can be secondhand to allow unconnected process without any Microcontroller or mainframe computer. It can be controlled from a distant position by other modules with the protected assembly and it can be reorganized by means of UART interfacing or by air. In today’s post, we will have a look at its casing, pins, structure, applications, ...
Hi Friends! Hope you’re well today. I welcome you on board. In this post today, I’ll walk you through the Introduction to Arduino Beetle.
Arduino beetle is the smallest Arduino board that comes with the functionality of Arduino Leonardo. This board is a remarkable addition to the minimalistic Arduino technology. It is based on the microcontroller Atmel Atmega32u4.
With the inception of innovations in modern technology, electronic devices are becoming light, more compact that happen to perform a lot of functions. These devices are economical and require little to no prior knowledge to get your hands dirty with them.
All Arduino boards are microcontrollers but not all microcontrollers are Arduino board. While using the Arduino board, you don’t ne ...
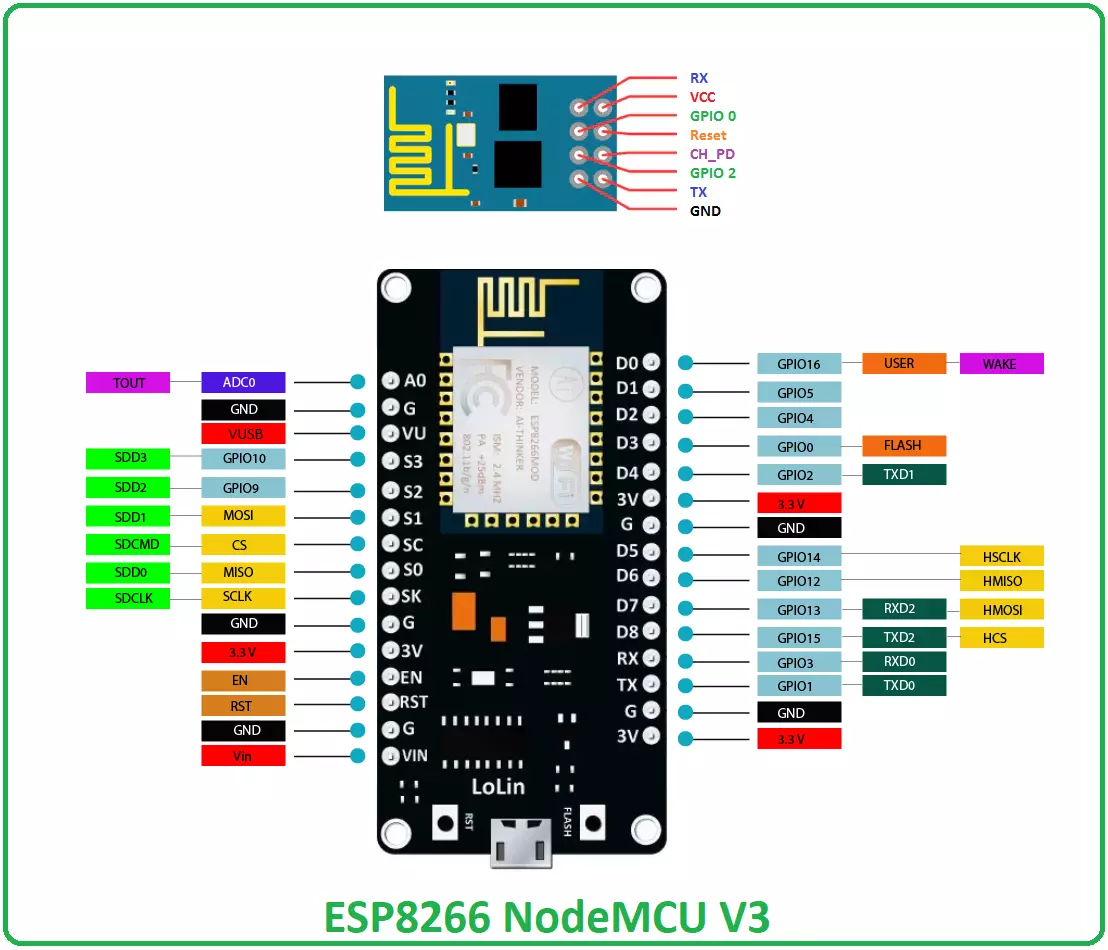
Hello friends! Hope you are doing well. Today, we will have a look at the detailed Introduction to ESP8266 WiFi module. ESP8266 is a very low-cost & user-friendly WiFi module, which develops a simple TCP/IP connection and can easily be interfaced with microcontrollers via Serial Port. The first chip in this series was ESP-01 which gained sheer attention in the market.
In this tutorial, we will discuss the ESP8266 WiFi module along with its pinout, features, specifications, applications and datasheet. Let's dive in and nail down everything related to this device.
ESP8266 WiFi Module
ESP8266 (also called ESP8266 Wireless Transceiver) is a cost-effective, easy-to-operate, compact-sized & low-powered WiFi module, designed by Espressif Systems, that supports both TCP/IP and Ser ...
Hello everyone! I hope you all will be absolutely fine and having fun. Today, I am going to give you an elaboration on Introduction to LM293 an Integrated Circuit (IC). LM-293 is a dual independent accurate voltage comparator. LM 293 has a capability to perform its operation from a single supply source as well as from split power supply. The purpose to design LM-293 is to permit a common mode range to the ground level and it perform this operation with single power supply source.
LM-293 is the most common device in the market these days due to its high performance and cost effectiveness. This device is considered to be an ideal for a lot of electronics applications. LM-293 has a lot of features which make it different from all other devices. The ...
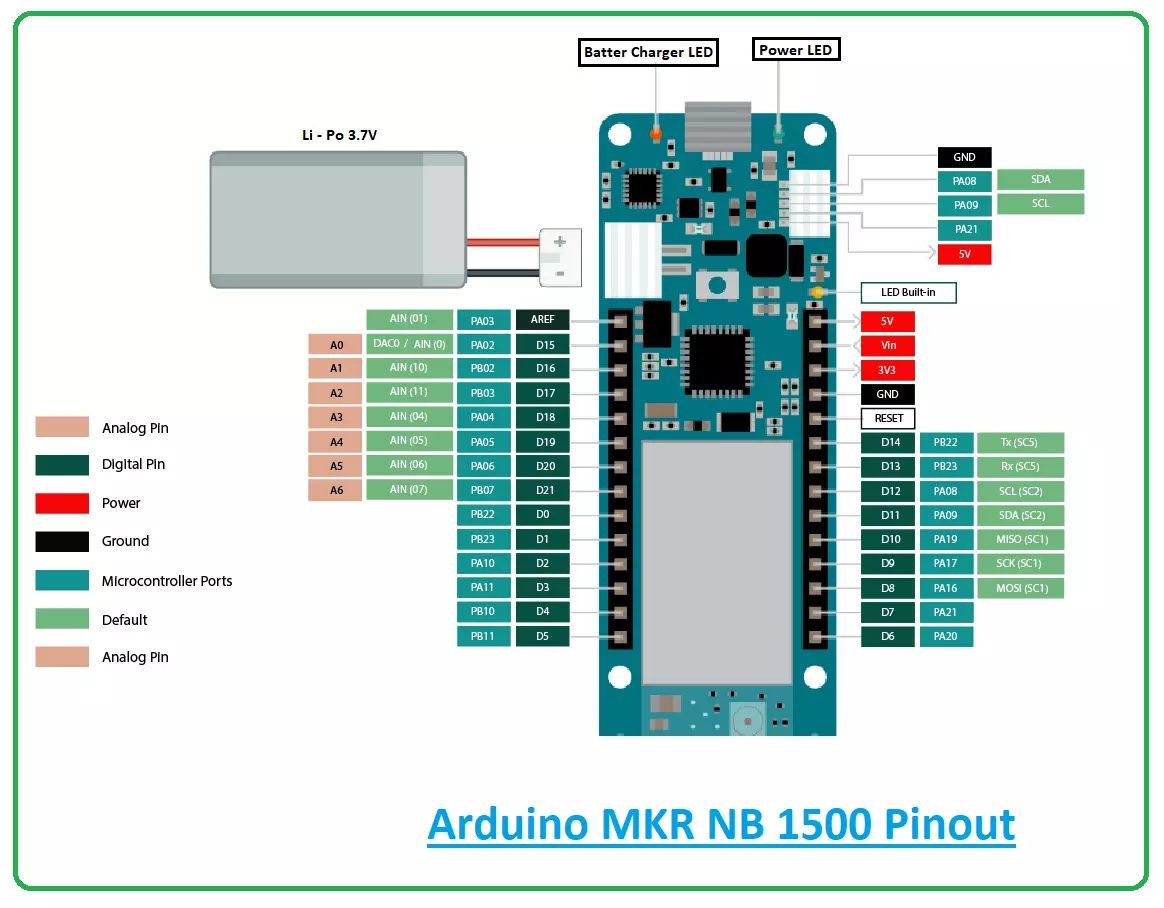
Hi Guys! Hope you’re well today. Happy to see you around. In this post today, I’ll walk you through the Introduction to Arduino MKR NB 1500.
The Arduino MKR NB 1500 is mainly developed for working in remote areas where no power or internet connection is available. This board is based on a SAMD21 Cortex-M0+ 32bit low power microcontroller and comes with an operating voltage of 3.3V.
Admit it.
The Arduino board is a remarkable addition to the development of many automation and embedded projects. These boards are incorporated with a series of digital and analog pins that can be connected with the expansion boards or other breadboards.
Most of the Arduino boards are integrated with 8-bit Atmel AVR microcontrollers. And all these boards incorporate ...
Thank you for joining us for yet another session of this series on Raspberry Pi programming. In the previous tutorial, we built a motion sensor-based security system with an alarm. Additionally, we discovered how to use Twilio to notify the administrator whenever an alarm is triggered. However, in this tutorial, we'll learn how to build a stop motion film system using raspberry pi 4.
What you will make
With a Raspberry Pi, Py, and a pi-camera module to capture images, you can create a stop-motion animated video. In addition, we'll learn about the various kinds of stop motion systems and their advantages and disadvantages.
The possibilities are endless when it comes to using LEGO to create animations!
...
Hello friends, I hope you all are fine and having fun with your lives. Today, I am going to share a very basic and introductory tutorial named How to use Arduino Serial Read. I am sharing this tutorial because I am getting a lot of emails in which users normally ask about basic Arduino tutorials as they are very new to them. So, I thought of sharing this very basic Arduino tutorial in which we are going to have a look at how we can use the Arduino Serial Read command.
I selected this tutorial as my first tutorial in this list of Arduino basic tutorials because learning to use Serial port is very necessary as it's one of the best troubleshooting tools for your code. I have also given a Proteus Simulation in which I have received the incoming data f ...
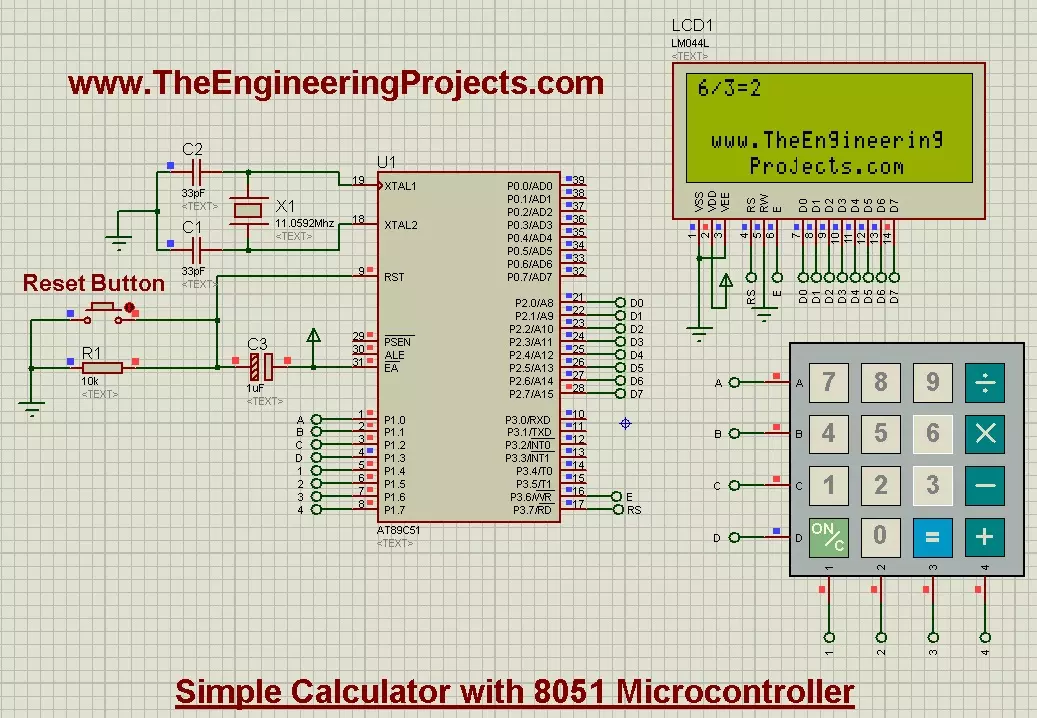
Hello friends, today's post is about designing a simple calculator with 8051 Microcontroller. In our previous post, we have seen How to Interface keypad with 8051 Microcontroller in Proteus ISIS. Moreover, we have also worked on Interfacing of LCD with 8051 Microcontroller in Proteus ISIS. If you haven't read these two posts then my suggestion is to read them first before going into the details of this post, as we are going to use both keypad and LCD in order to design the simple calculator with 8051 Microcontroller.
Actually we have already understood the working of both keypad and LCD so I thought to share this small project as it will give you the practical application of both keypad and LCD. And if you are new to 8051 Microcontroller then its ...
Hello everyone! I hope you all will be absolutely and having fun. Today, I am going to give a detailed discussion on Introduction to LM117. Lm 117 is basically a voltage regulator. It is most commonly known as positive (+ve) voltage regulator used to regulate the voltage up to the desired positive level. Lm-117 can regulate the voltage ranging from 12.5V to 37V and provides the current around 1.5A. LM 117 has three (3) pins and is quite easy to use.
To obtain the desired output voltage we need to connect the two external resistors. There are three types of regulations in LM-117 i.e. line regulation, fixed regulation and load regulation. The line regulation & load regulation both are far better than fixed regulation. LM 117 provides overload ...