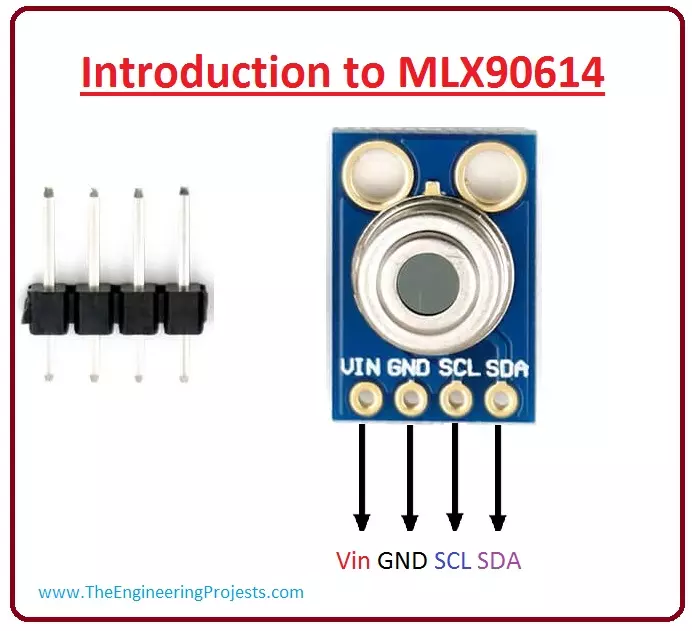
Hello friends, I hope you all are doing great. In today's tutorial, we are gonna have a look at detailed Introduction to MLX90614. MLX90614 is a temperature measurement device works on infrared radiations. It is the best choice for such applications where we can not easily reach to measure temperature because it provides non-contact measurement of temperature. It has Infra Red radiation receptive thermopile and ASSP (Acoustics Speech and Signal Processing) on same TO-39 cascading.
This temperature measuring device is surfaced with the digital Pulse width Modulation and System Managing Bus. It is used in different industries to measure and control the temperature of moving components of machines and it also used to remove the fog on the window of vehicles. In today's post, we will have a ...
Hi Friends! I hope you are enjoying your life and getting most out of it. We are here to give you daily dose of useful information so you can excel and grow in your relevant field and stand out from others. Today, I'm going to uncover the details on the Introduction to SG3525. It is a pulse width modulated control circuit that is used to control switching power supplies and particularly helps in providing lower external parts count and improved performance. I'll try to cover every aspect and properties related to this modulated control circuit so you get clear idea what is it about and what are its main applications. You can also have a look at Introduction to SG3524 which is mainly used in regulation power supplies and switching regulators.
Let' ...
Hi everyone! Thank you for viewing this article, I welcome you on board. In this post I’ll walk you through the detailed Introduction to BC546. BC546 is a low power NPN transistor mainly used for general purpose amplification and switching applications.
In this read you’ll study all nitty-gritty of BC546 transistor i.e. from pinout, pin configuration, and working principle to power ratings, key parameters, physical dimensions and applications. Keep reading.
Introduction to BC546
BC546 is a bipolar junction NPN transistor that finds applications in switching, amplification, impedance, H-bridge and current mirror circuits.
This transistor falls in silicon epitaxial planar transistor category which is generally divided into three groups A, B &am ...
Hello everyone! I hope you all will be absolutely fine and having fun. Today, I am going to elaborate you about Introduction to LM1458. Lm 1458 is basically a general purpose dual Operational Amplifier (Op-amp) i.e. it consists of two internal amplifiers. The internal amplifiers has both common power supply as well as common biased network. This is done so that their operation remains dependent on each other.
If the power supply and biasing is not common then they will be totally independent. LM 1458 is a device which is protected from short circuit and it requires no external components for the frequency compensation. LM 1458 is considered to be and ideal amplifier for voltage followers. This is due to its latch-up free operation and high commo ...
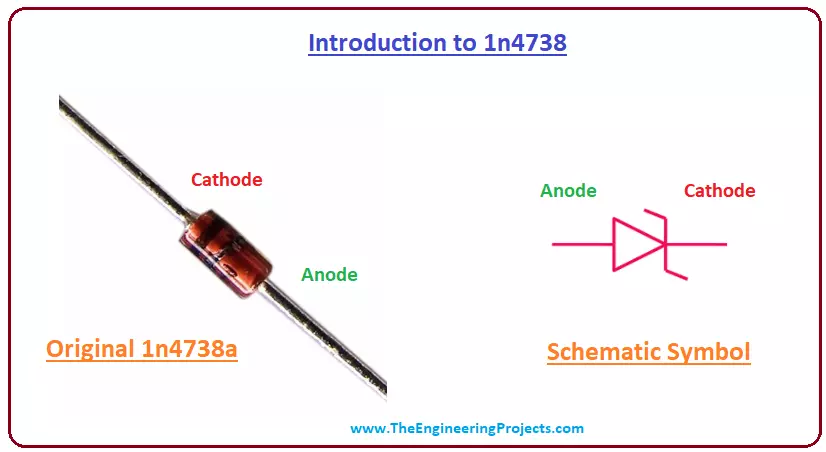
Hi Guys! Hope you are doing well. I am back to give you nuggets of valuable information related to engineering and technology so you can excel and grow in your relevant field. Today, I'll unlock the detailed Introduction to 1n4738a. It is a zener diode that comes with high power rating and is mainly used in stabilizing and clipping circuits.
The zener diode is slightly different from regular diode as former can conduct in both directions while later conducts in one direction only. It is available in double slug construction with corrosion resistant surfaces, helping to operate it under high temperature and pressure.
I'll try to cover each and everything related to this diode, so you don't have to grapple your mind surfing the whole internet and ...
Hello friends, I hope you all are doing great and having fun with your lives. In today's tutorial, I am going to share How to interface Arduino with GLCD. I am gonna design a Proteus Simulation in which I will interface Arduino GLCD together. GLCD is also called Graphical LCD so today we are gonna do some designing on the LCD. The GLCD I am going to use is ks0108 and its model in Proteus is LGM12641BS1R and I have shared the complete Simulation along with Arduino Code below for download. But I would suggest you to design it on your own so that you could get the most out of it. If you haven't worked on the LCD before then I would suggest you to read How to Interface Simple LCD with Arduino.
Moreover, I am quite happy to announce that we have starte ...
Hi Friends! Hope you’re well today. I welcome you on board. In this post today, I’ll walk you through the Introduction to Arduino Beetle.
Arduino beetle is the smallest Arduino board that comes with the functionality of Arduino Leonardo. This board is a remarkable addition to the minimalistic Arduino technology. It is based on the microcontroller Atmel Atmega32u4.
With the inception of innovations in modern technology, electronic devices are becoming light, more compact that happen to perform a lot of functions. These devices are economical and require little to no prior knowledge to get your hands dirty with them.
All Arduino boards are microcontrollers but not all microcontrollers are Arduino board. While using the Arduino board, you don’t ne ...
Hi Friends! I hope you’re well today. I welcome you on board. In this post, I’m going to discuss the Introduction to BC549. BC549 is a general purpose bipolar junction transistor that belongs to NPN transistor family. It contains three pins where small current change in one terminal produces a much large current change across other terminals. In other words, it is nothing but a current booster.
It is known as a low power low voltage current controlled device and is used for switching and amplification purpose. In this article I’ll be discussing complete details of BC549 transistor i.e. pinout, working principle, power ratings, physical dimensions and applications. Stay tuned.
Introduction to BC549
BC549 is an NPN general-purpose bipolar juncti ...
Hello friends, hope you are having fun. In today's post, we will have a look at Serial Communication with 8051 Microcontroller in Proteus ISIS. In the previous post, we have seen a detailed post on LED Blinking Project using 8051 Microcontroller in Proteus ISIS, which was quite a simple tutorial. And I hope if you are new to 8051 Microcontroller then from that post you must have got some idea about C Programming of 8051 Microcontroller.
Now, today we are gonna go a little further and will have a look at Serial Communication with 8051 Microcontroller and we will also design the simulation of this project in Proteus ISIS software. 8051 Microcontroller also supports Serial port similar to Arduino and PIC Microcontroller. And the communication protoco ...
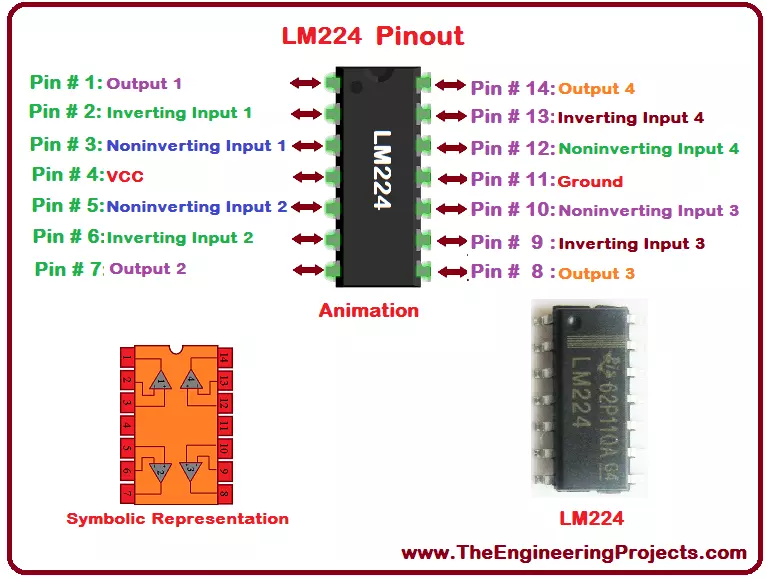
Hello everyone! I hope you all will be absolutely fine and having fun. Today, I will provide you document on detailed discussion about Introduction to LM224. LM-224 has four internal builtin operational amplifiers. These amplifiers are frequency compensated. The basic purpose to design these type of device is to operate it from a single power supply sources. Moreover, they are also able to perform different tasks using split power supplies. Magnitude of power supply and the current current drain both are independent of each other.
LM-224 has a very wide range of application areas which include DC gain blocks, transducer amplifiers etc. LM 224 has a large number of amazing features include wide power supply ranges, large bandwidth, low input offs ...