Hello friends, I hope you all are doing great. Today, I am going to share the new Rotary Inverted Pendulum Lab Library for Proteus, the fifth of our University Lab series. The inverted pendulum is the classic test of a control engineer: a stick that falls over the moment you stop correcting it, held upright by a motor and a few lines of code. In the rotary version a motor swings an arm, and a pendulum hangs from the end of the arm. The controller first swings the pendulum up from hanging, then catches it at the top and keeps it there, while the arm still goes where it is told.
Rotary Inverted Pendulum Lab Library for Proteus
Latest version: V1.0 (November 2026, this tutorial)
Other component libraries: C945 Transistor · PC817 Optocoupler · Relay Module · Resistor · 5 mm LED · Designer Colour LED · Push Button · Active Buzzer · Electrolytic Capacitor · Ceramic Capacitor · Tantalum Capacitor · Film Capacitor · 1N4007 Diode · Zener Diode · Schottky Diode · Supercapacitor · Photodiode · RGB LED · Bridge Rectifier · Flashing LED · Bi-Colour LED · SMD LED · Slide Switch · Toggle Switch · Rocker Switch · Micro Limit Switch · Emergency Stop Switch · SMD Resistor · Power Resistor · Resistor Network · Potentiometer · Trimmer Potentiometer · Slide Potentiometer · NTC Thermistor · DIP Switch · Fuse · Passive Buzzer · Mini Speaker · 7-Segment Display · LED Bar Graph · IR / UV LED · Small Transistors · TIP122 Darlington · N-MOSFET · P-MOSFET · PC817 Optocoupler · Filament Bulb · Power LED · Voltage Regulator · SCR and TRIAC · Inductor · Toroid Inductor · Crystal · Temperature Control Lab · DC Servo Lab · Ball and Beam · Magnetic Levitation · Coupled Tanks · AD8232 ECG · MyoWare EMG · GSR Sensor · MAX30205 · MCP4725 · MCP3008 · LM358 · NE555 Timer · INA128 · 74HC595
Helping Tools
- Serial Monitor Advance: a serial terminal window for the UART of your board
- Serial Monitor Expert: the serial monitor with extra debugging tools
- LCD Library for Proteus V3.0: 16x2, 20x4 and I2C LCDs to show your readings
Our library brings that lab into Proteus at true scale. It is our own design: a black base with a coreless DC motor and an H-bridge inside, an 80 mm aluminium arm on the motor's hub, a 1024-line encoder at the arm's tip, a 100 mm steel pendulum on that encoder's shaft, and a second 1024-line encoder on the motor. The model solves the full nonlinear equations of the rotary pendulum, the arm and the pendulum pushing each other around. The pop-up works out the linear model about upright, its unstable pole, the LQR gains for the weights you choose and the closed-loop poles. It measures the swing-up, every arm move and a tap on the pendulum. The demo swings it up, balances it, moves the arm, rides out a tap and lets go, from an Arduino UNO.
NOTICE: Our team has put a lot of effort into these small parts: the bodies, the animation and the pop-ups are all our own design, and you get them free. Your feedback is the fuel that keeps us going, so please tell us what you think in the comments below or in the Rotary Inverted Pendulum board of our forum. And if our free libraries help you, you can buy us a coffee. So, let's get started with the Rotary Inverted Pendulum Lab Library for Proteus:
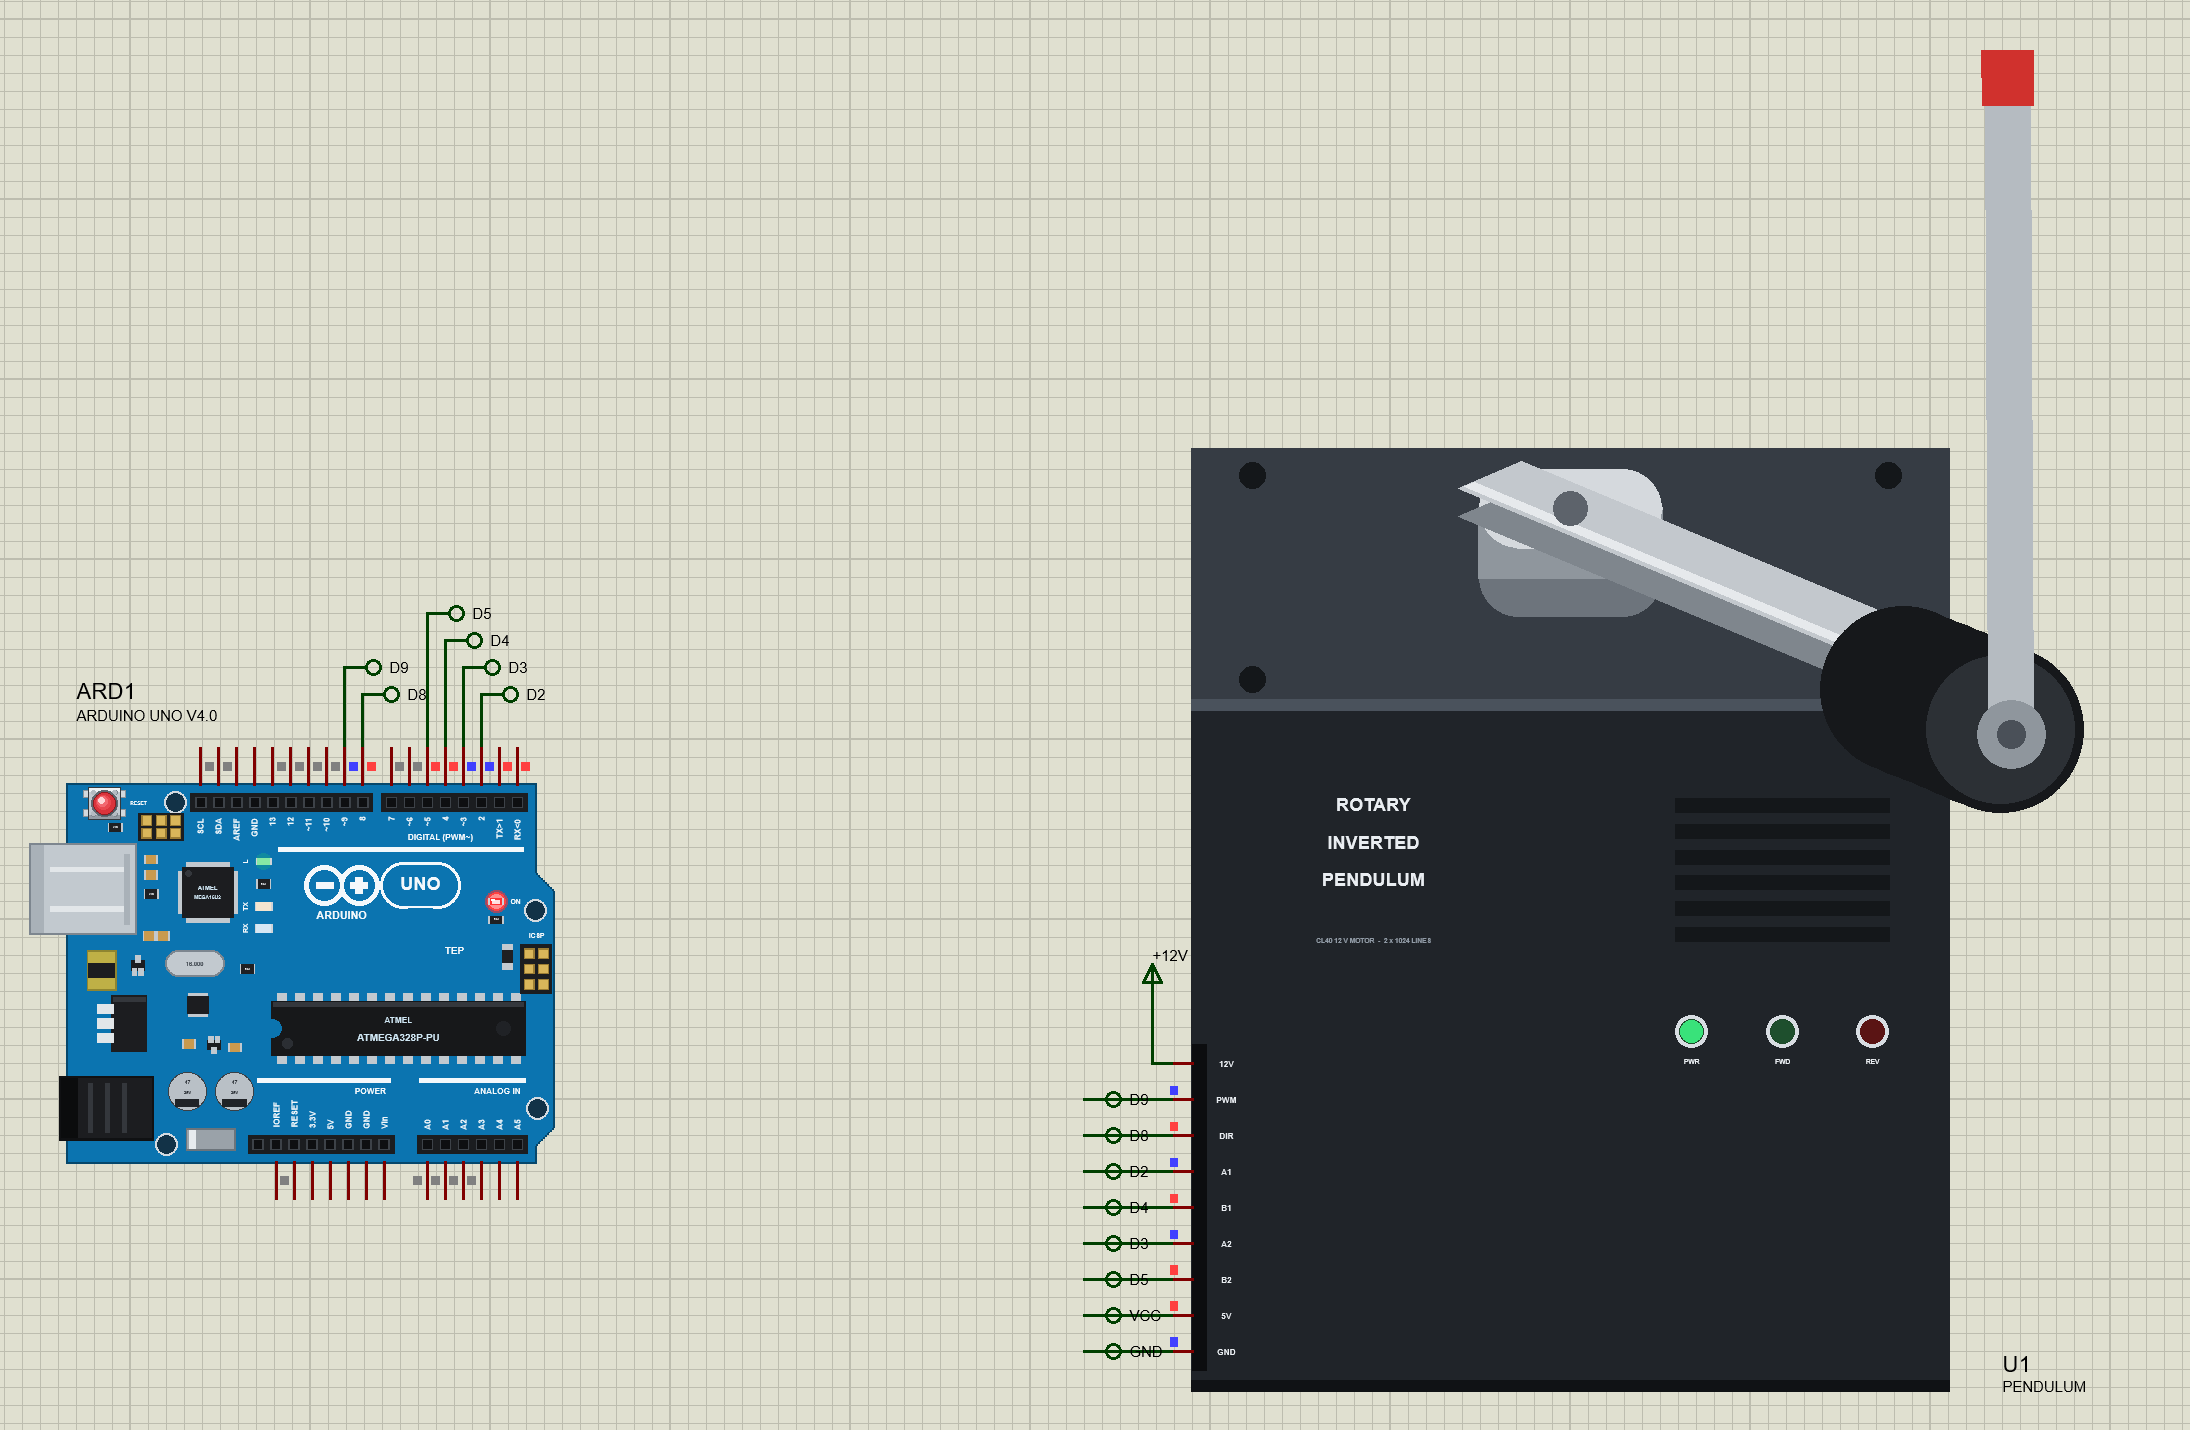
What is a Rotary Inverted Pendulum?
A rotary inverted pendulum, also called a Furuta pendulum after the engineer who made it popular, has two parts that turn. The arm turns in a horizontal plane on the shaft of a motor. The pendulum hangs from the far end of the arm and swings in the vertical plane across the arm. The motor only drives the arm; the pendulum is free. The only way to move the pendulum is to accelerate the arm under it, the way you move your hand to keep a broom standing on your palm. It is compact, it needs no long rail like the cart version, and the arm can swing the pendulum all the way up from hanging, which is why it is a favourite of control labs.
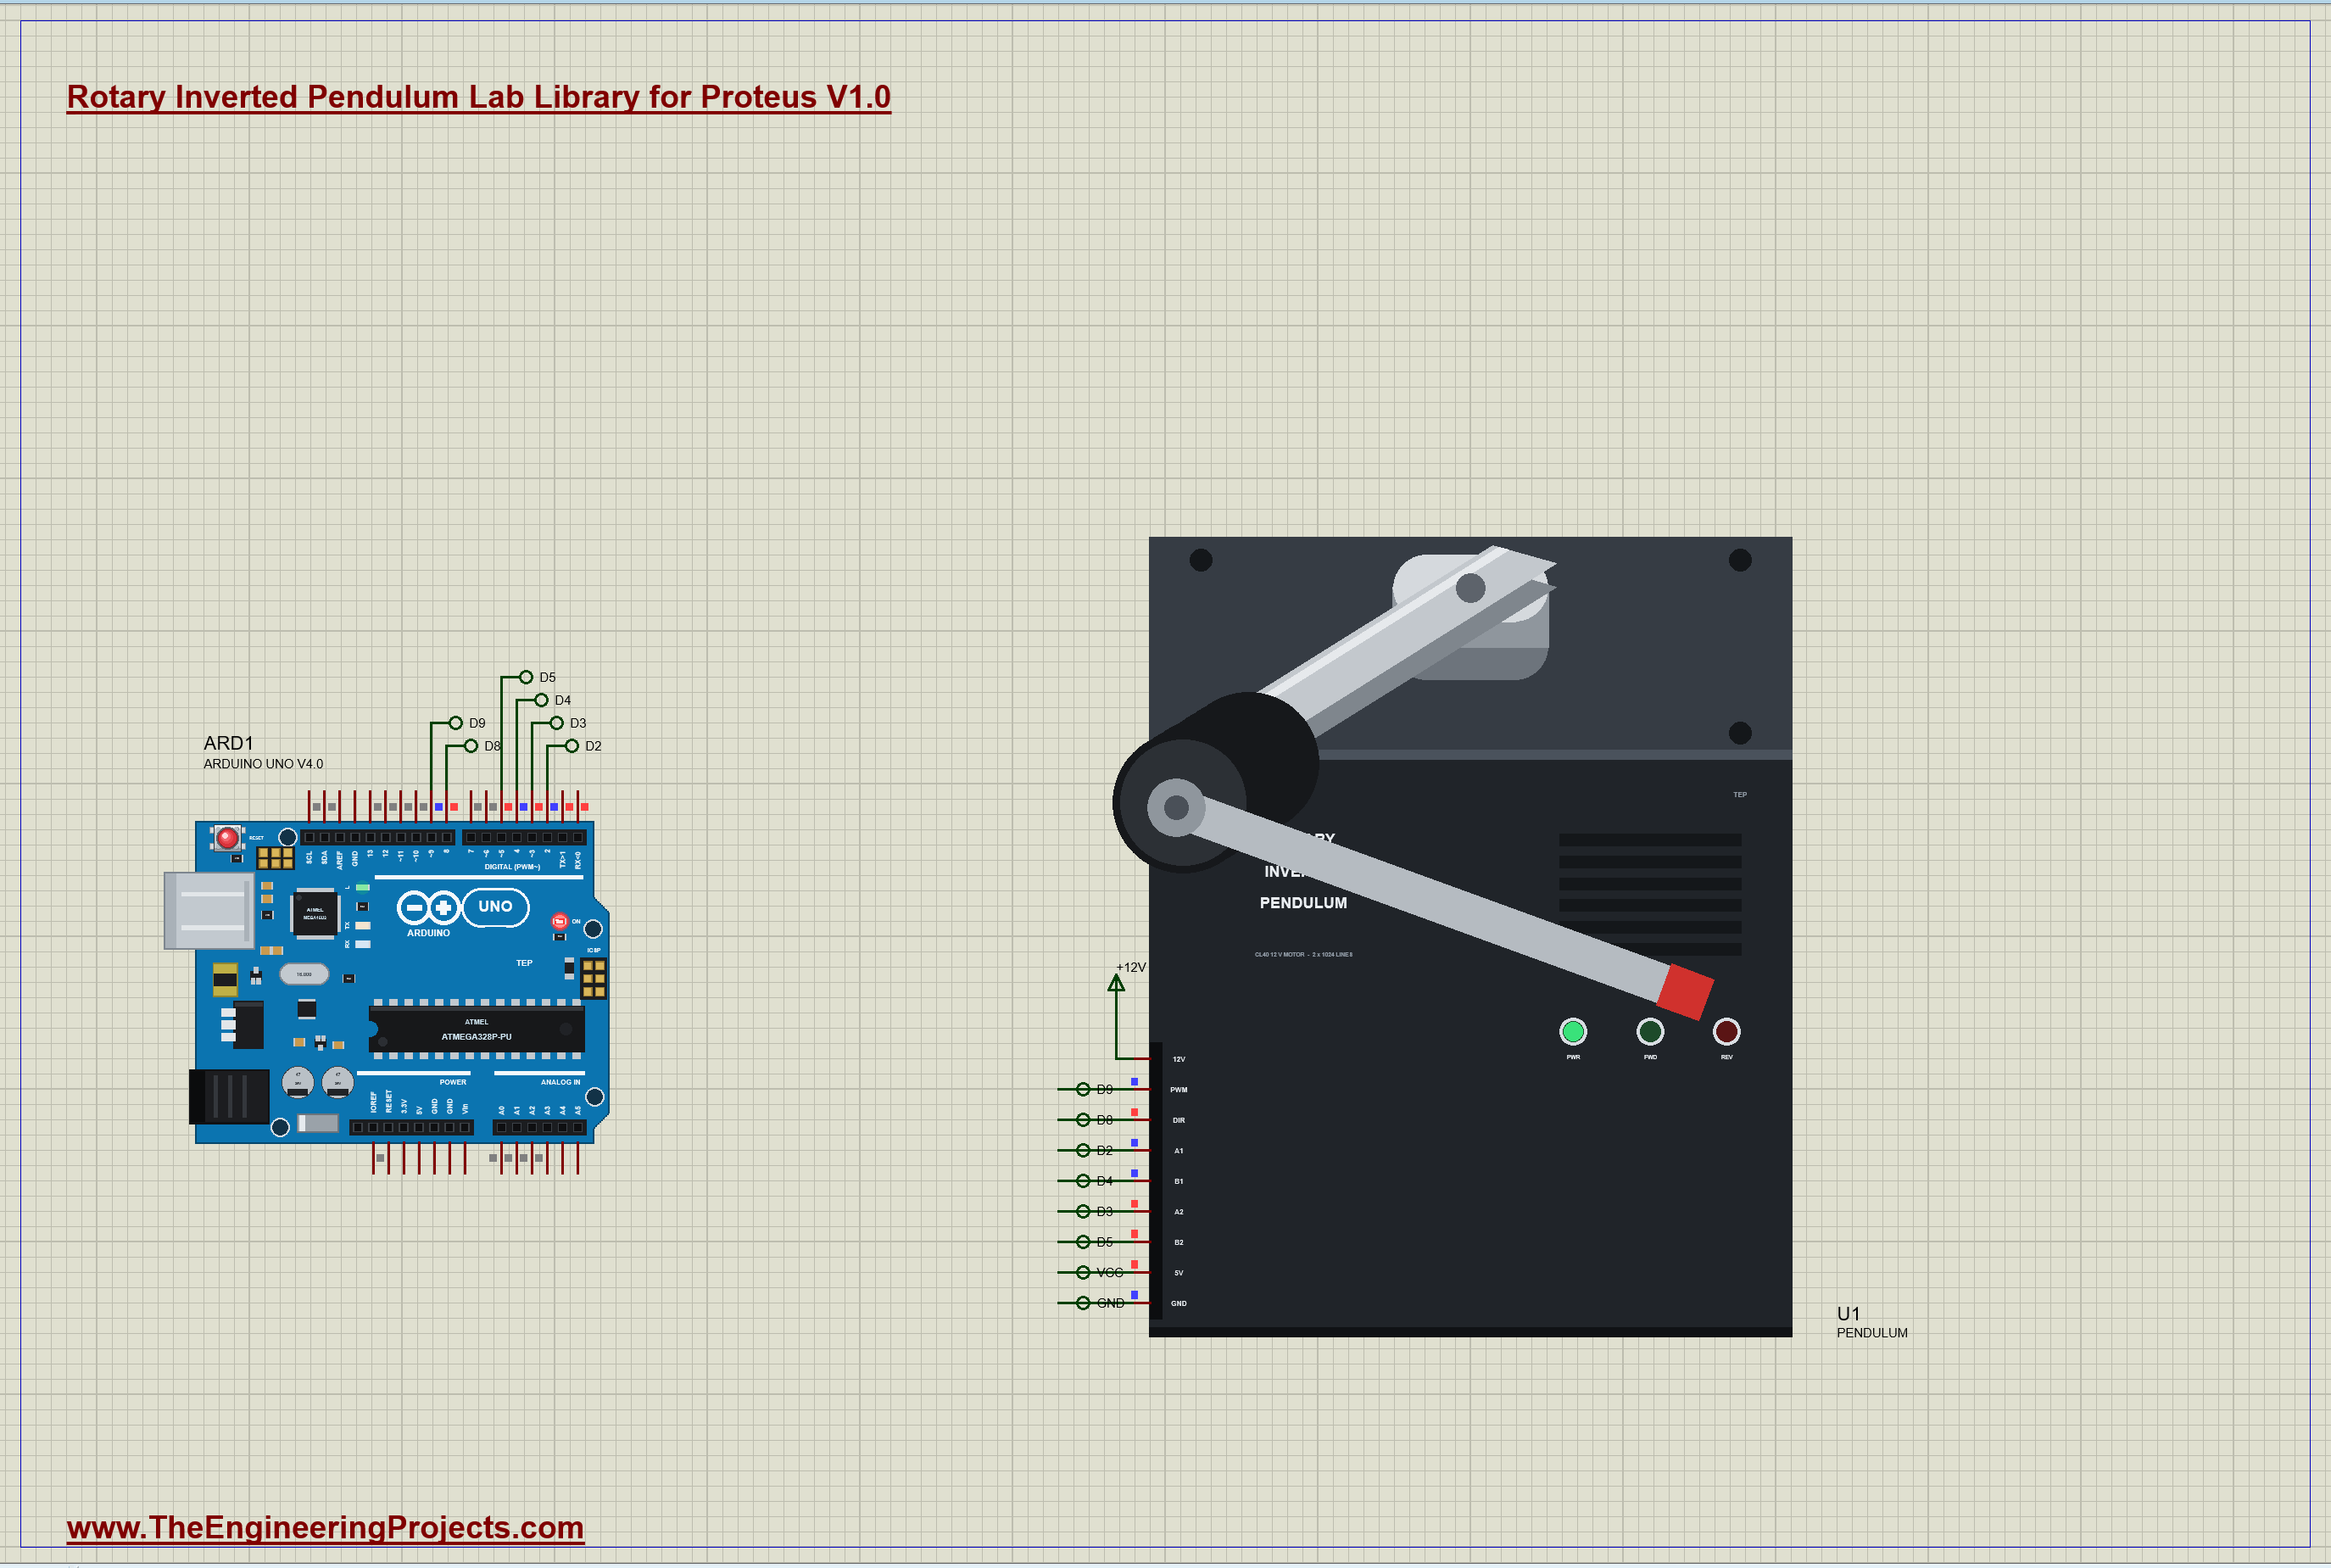
Our lab is drawn at its true size, seen from the front and a little above, so the arm's turn and the pendulum's swing both show on the sheet. When it is stopped the arm points toward you and the pendulum hangs in front of the base. At Run the arm turns, the pendulum swings around the encoder at its tip, and the PWR, FWD and REV LEDs on the front light with the supply and the motor's direction.
| The rotary pendulum lab | |
|---|---|
| Base | 100 x 80 x 100 mm, with the motor and the H-bridge inside |
| Motor | coreless DC, the values of the Allied Motion CL40 12 V winding: 4.6 Ω, 30 mN·m/A |
| Arm | aluminium, 80 mm from the shaft to the pendulum's axis |
| Pendulum | steel rod, 6 x 100 mm, 22.3 g, with a red cap |
| Encoders | two, 1024 lines each (4096 counts per turn): the arm and the pendulum |
| Pins | 12V, PWM, DIR (the H-bridge), A1, B1, A2, B2 (the encoders), 5V, GND |
The Motor and the H-Bridge
The motor has the values of a 12 V coreless motor, the Allied Motion CL40 12 V winding: 4.6 Ω, a torque constant of 30 mN·m per amp, and a rotor so light that the arm is nearly all of its load. At 12 V it can start with 77 mN·m and 2.6 A. The H-bridge on the base takes two signals. PWM high connects the motor to 12V and PWM low brakes it, so the duty sets the voltage; DIR picks the direction. The lab times every edge of both, so the motor sees the exact average of what the Arduino sends.
The Equations of Motion
The two angles are coupled. When the arm accelerates, the pendulum feels a push across its swing; when the pendulum swings, it drags on the arm; when the arm spins fast, the pendulum is thrown outward. The model uses the full Lagrange equations for an arm with its inertia and a pendulum treated as a uniform rod, including the Coriolis and centrifugal terms, the motor's back-EMF, a little friction in the motor and in the pendulum's bearing. It solves them every 0.1 ms. Nothing is linearized in the simulation itself; only the pop-up's model is.
The Unstable Pole
Linearize the equations about the pendulum standing straight up and you get four poles. One sits at zero, because the arm can be anywhere. One at -0.84 rad/s is the arm slowing down against the motor's back-EMF. Then there is a pair at +16.1 and -16.9 rad/s: the pendulum falling one way or the other. The positive one is the unstable pole. A small lean grows by a factor of e every 62 ms, so the controller has a fraction of a second to act, and must keep acting forever.
LQR: Four Gains at Once
The controller measures four things: the arm's angle, the pendulum's angle and their two speeds. The Linear Quadratic Regulator, LQR, finds the four gains that keep all of them small together, trading how hard it pushes against how far things wander. You choose the trade with weights: Q on the four states, R on the voltage. The pop-up solves the problem for a loop every 2 ms. With the default Q of 20, 10, 0.5 and 0.1 and an R of 1 it gives K = 4.166 V/rad, 30.64 V/rad, 1.519 V per rad/s and 2.360 V per rad/s, and the closed-loop poles move to -7.5, -8.9, -11.4 and -41.3 rad/s, all stable. The voltage is just the sum: V = K1 (arm - target) + K2 pendulum + K3 arm speed + K4 pendulum speed.
Swing-Up and the Wrong-Way Start
From hanging, the pendulum needs energy before the LQR can take over. The swing-up is the energy method of Åström and Furuta: push the arm in time with the swing, the way you pump a playground swing, until the pendulum has just enough energy to stand up. Near the top the LQR catches it. There is one more lesson in this plant. To move the arm to the right while balancing, the controller must first tip the pendulum to the right, and to do that it moves the arm to the left. The arm starts the wrong way. Engineers call such a plant non-minimum-phase, and the pop-up measures that dip on every move.
Features of the Rotary Inverted Pendulum Lab Library for Proteus
- The real look, at true scale: a 100 mm base, an 80 mm arm, a 100 mm pendulum, drawn in a view from the front and above; at Run the arm turns and the pendulum swings on the sheet, hiding behind the base when it should.
- The full nonlinear dynamics: the arm and the pendulum coupled, the motor's torque, back-EMF and friction.
- An H-bridge and two encoders on board: PWM and DIR timed edge by edge, A and B of both encoders at their exact times.
- The model about upright: all four poles, the unstable one shown big.
- LQR from your weights: the Q and R properties give the four gains and the closed-loop poles.
- Everything measured: the swing-up (swings, the catch), every arm move (rise, overshoot, the wrong-way dip, settling, how far the pendulum leans), the hold, and a tap.
- A pop-up: the arm from above and the pendulum along it with the energy, the history since the start, eight live values, graphs, an event log and a check page.
- A complete package: about 1.2 MB with the library, our Arduino UNO V4.0 and the demo, without the source code of the model.
The Rotary Pendulum in Proteus
The device is ROTPENDTEP in TEPROTPEND.LIB, under Control Labs, with the prefix U and the model TEPROTPEND.DLL, a mixed model: the bridge and the encoders are digital and timed edge by edge, the 12V supply is analog and carries the motor's current. Search ROTPEND in Pick Devices. Its nine pins are on the left edge of the base: 12V, PWM, DIR, A1, B1, A2, B2, 5V and GND.
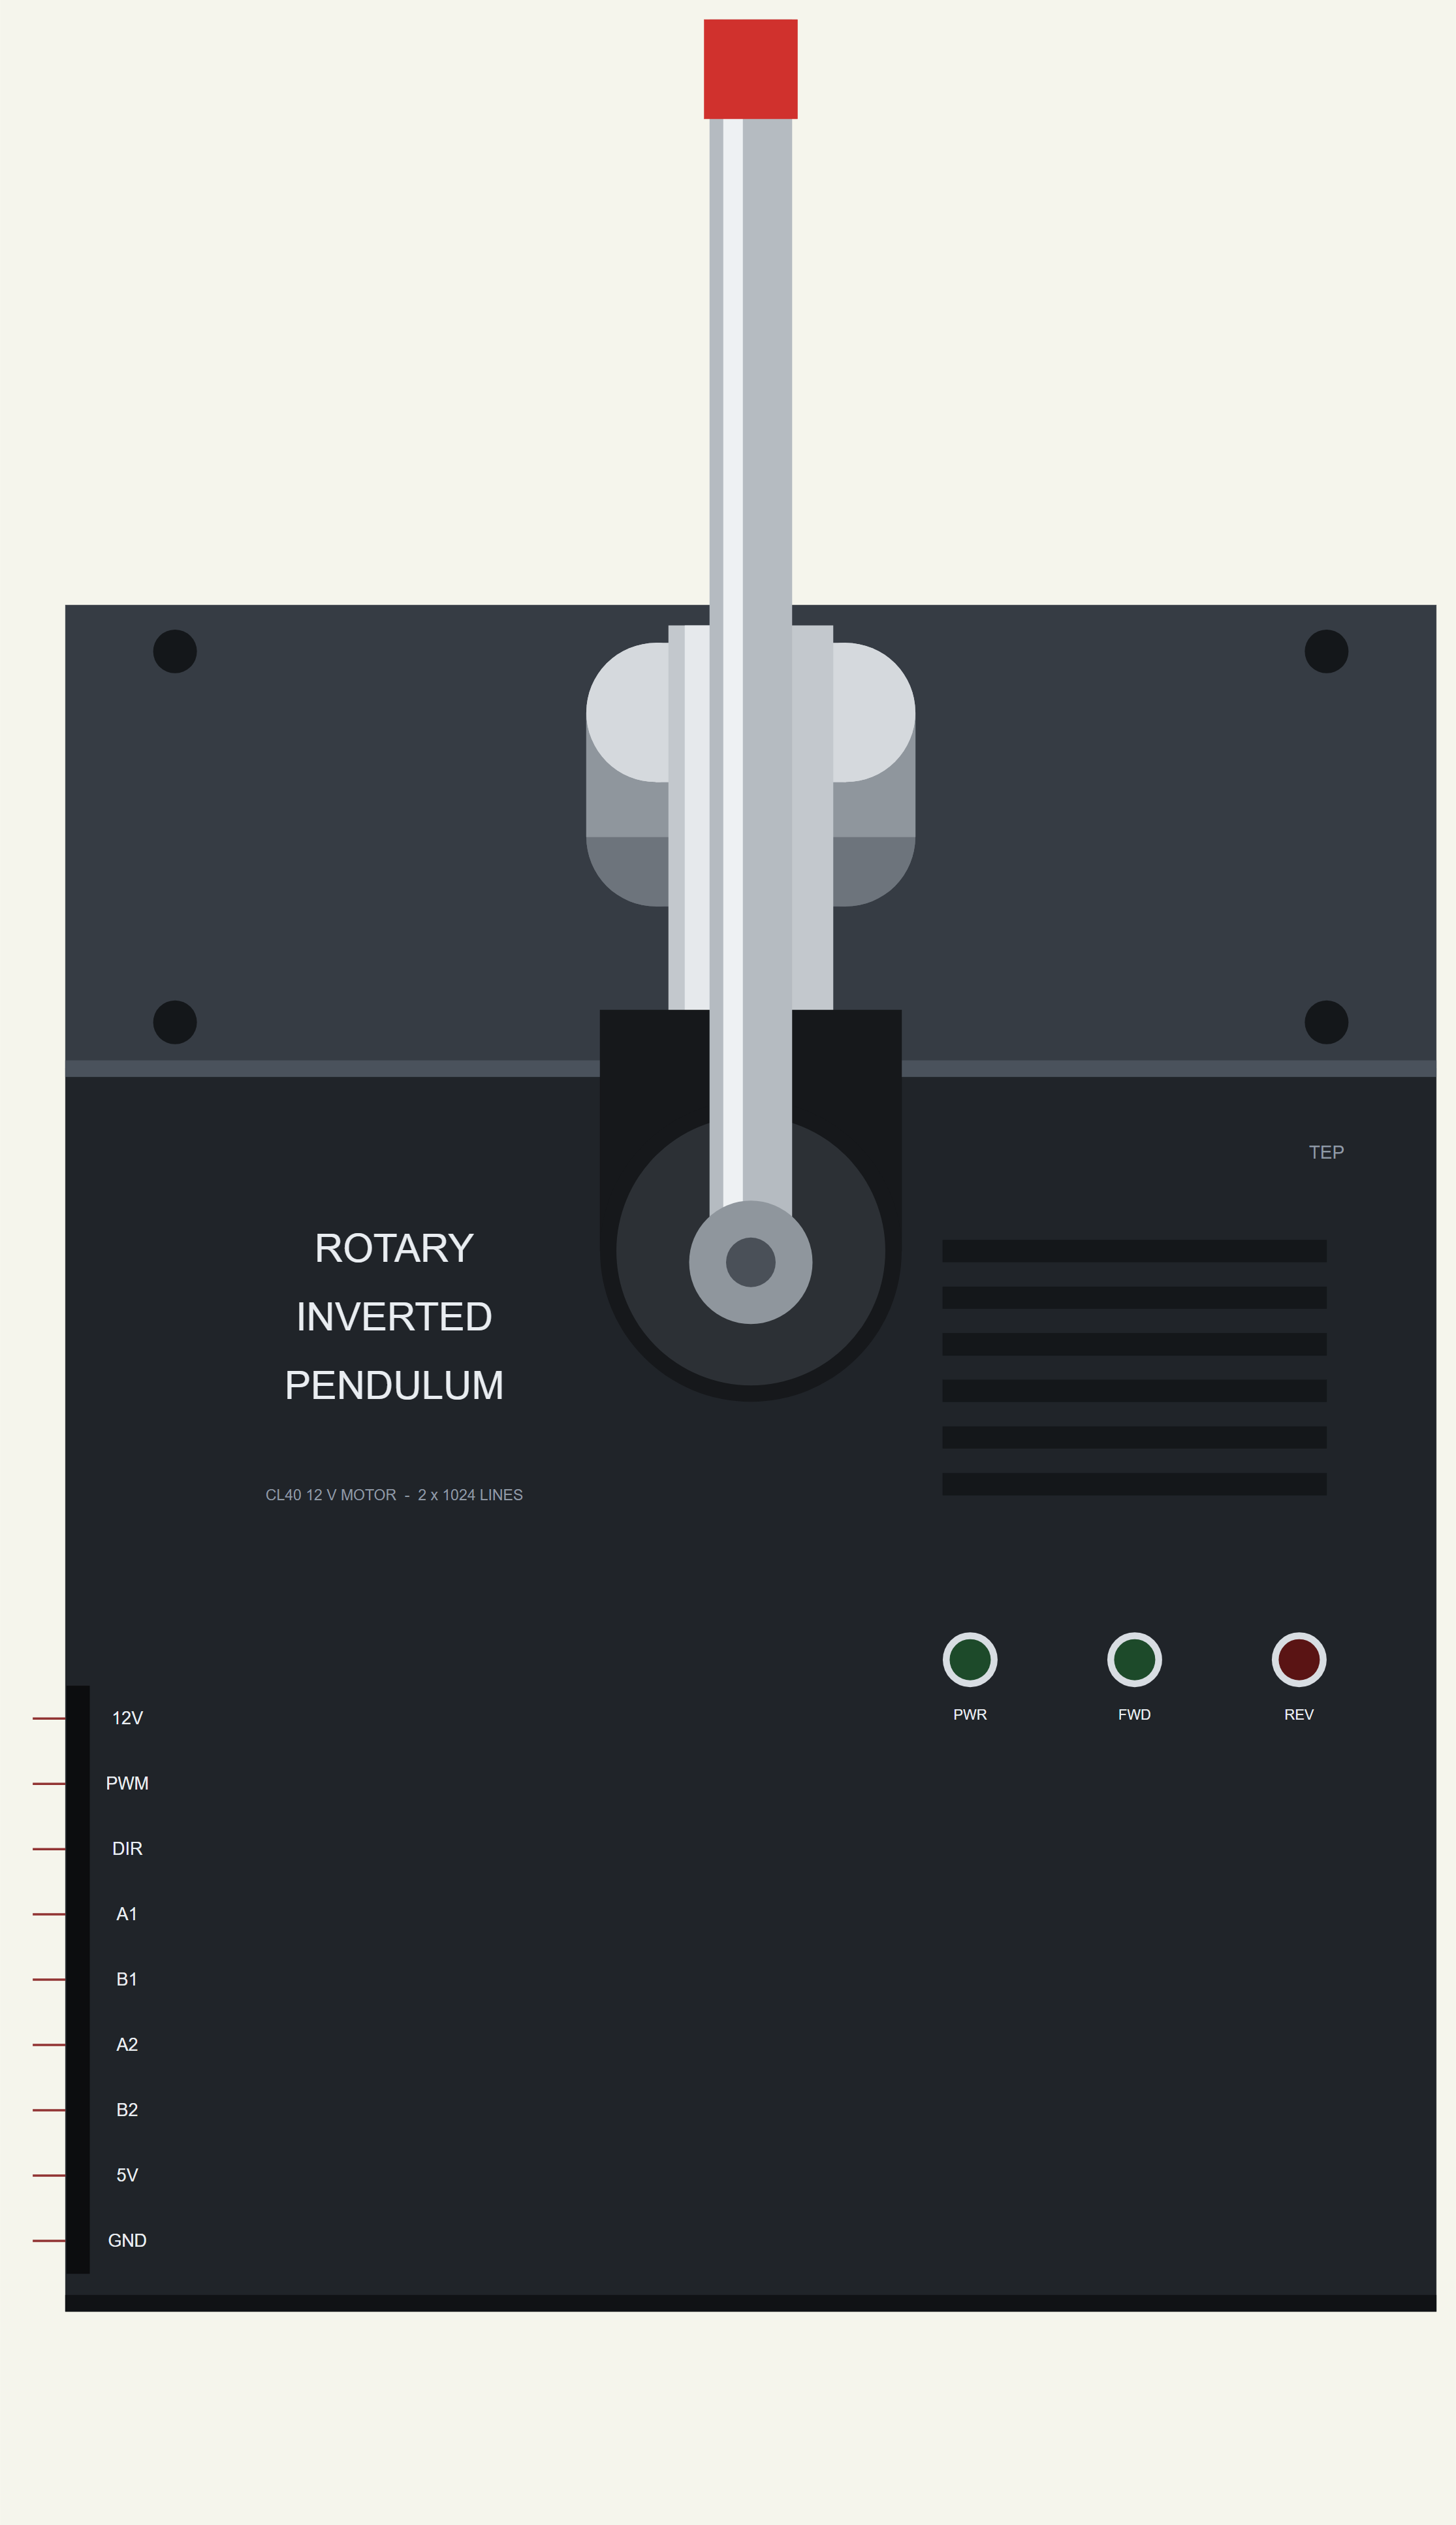
The Properties
| Property | What it does |
|---|---|
| Encoder lines (LINES) | lines per turn of both encoders, 1024 by default (x4 = counts per turn) |
| The pendulum at the start (START) | degrees from hanging; its encoder reads 0 there |
| LQR weights Q (Q) | arm, pendulum, arm speed, pendulum speed: 20 10 0.5 0.1 by default |
| LQR weight R (R) | on the voltage, 1 by default |
| A tap (TAP) | a tap on the pendulum (+2 rad/s) at this time in seconds; 0 = none |
Download Rotary Inverted Pendulum Lab Library for Proteus
Click the button below to download Rotary-Inverted-Pendulum-Lab-Library-for-Proteus-v1.0.zip (about 1.2 MB, without the source code of the models):
Rotary Inverted Pendulum Library for Proteus V1.0- README.txt: installation, the demo, the wiring, troubleshooting and the limits.
- Proteus Library Files:
TEPROTPEND.LIBand ourArduinoV4TEP.LIB. - Proteus Model Files:
TEPROTPEND.DLLandTEPARDUINO.DLL. - Arduino Code: the demo sketch.
- Proteus Simulation: the demo project, its HEX file and copies of the DLLs.
No Proteus yet? Read How to Download and Install Proteus 7 and 8. New to libraries? Follow How to Install a New Library in Proteus.
How to Install Rotary Inverted Pendulum Lab Library for Proteus
- Close Proteus and extract the whole zip file, for example to your Desktop.
- Copy the files from Proteus Library Files into the LIBRARY folder of Proteus.
- Copy the files from Proteus Model Files into the MODELS folder.
- Delete
TEPROTPEND.IDXfrom the LIBRARY folder if it is there. - Start Proteus, press P and search for ROTPEND.
Demo: Swing-Up, LQR, Arm Moves and a Tap
The demo is just the lab and our Arduino UNO Library for Proteus V4.0, with its built-in monitor, the same window as our TEP Serial Monitor Advance for Proteus. The lab's PWM goes to D9 and DIR to D8. A1 and A2 go to D2 and D3, the UNO's two external interrupts, and B1 and B2 to D4 and D5. 5V and GND go to the rails and 12V to a +12V terminal. The lab's TAP property is set to 9 s. Open Pendulum-LQR-ArduinoUnoV4.pdsprj; the sheet is A3, because the pendulum standing up and swinging out needs the room.
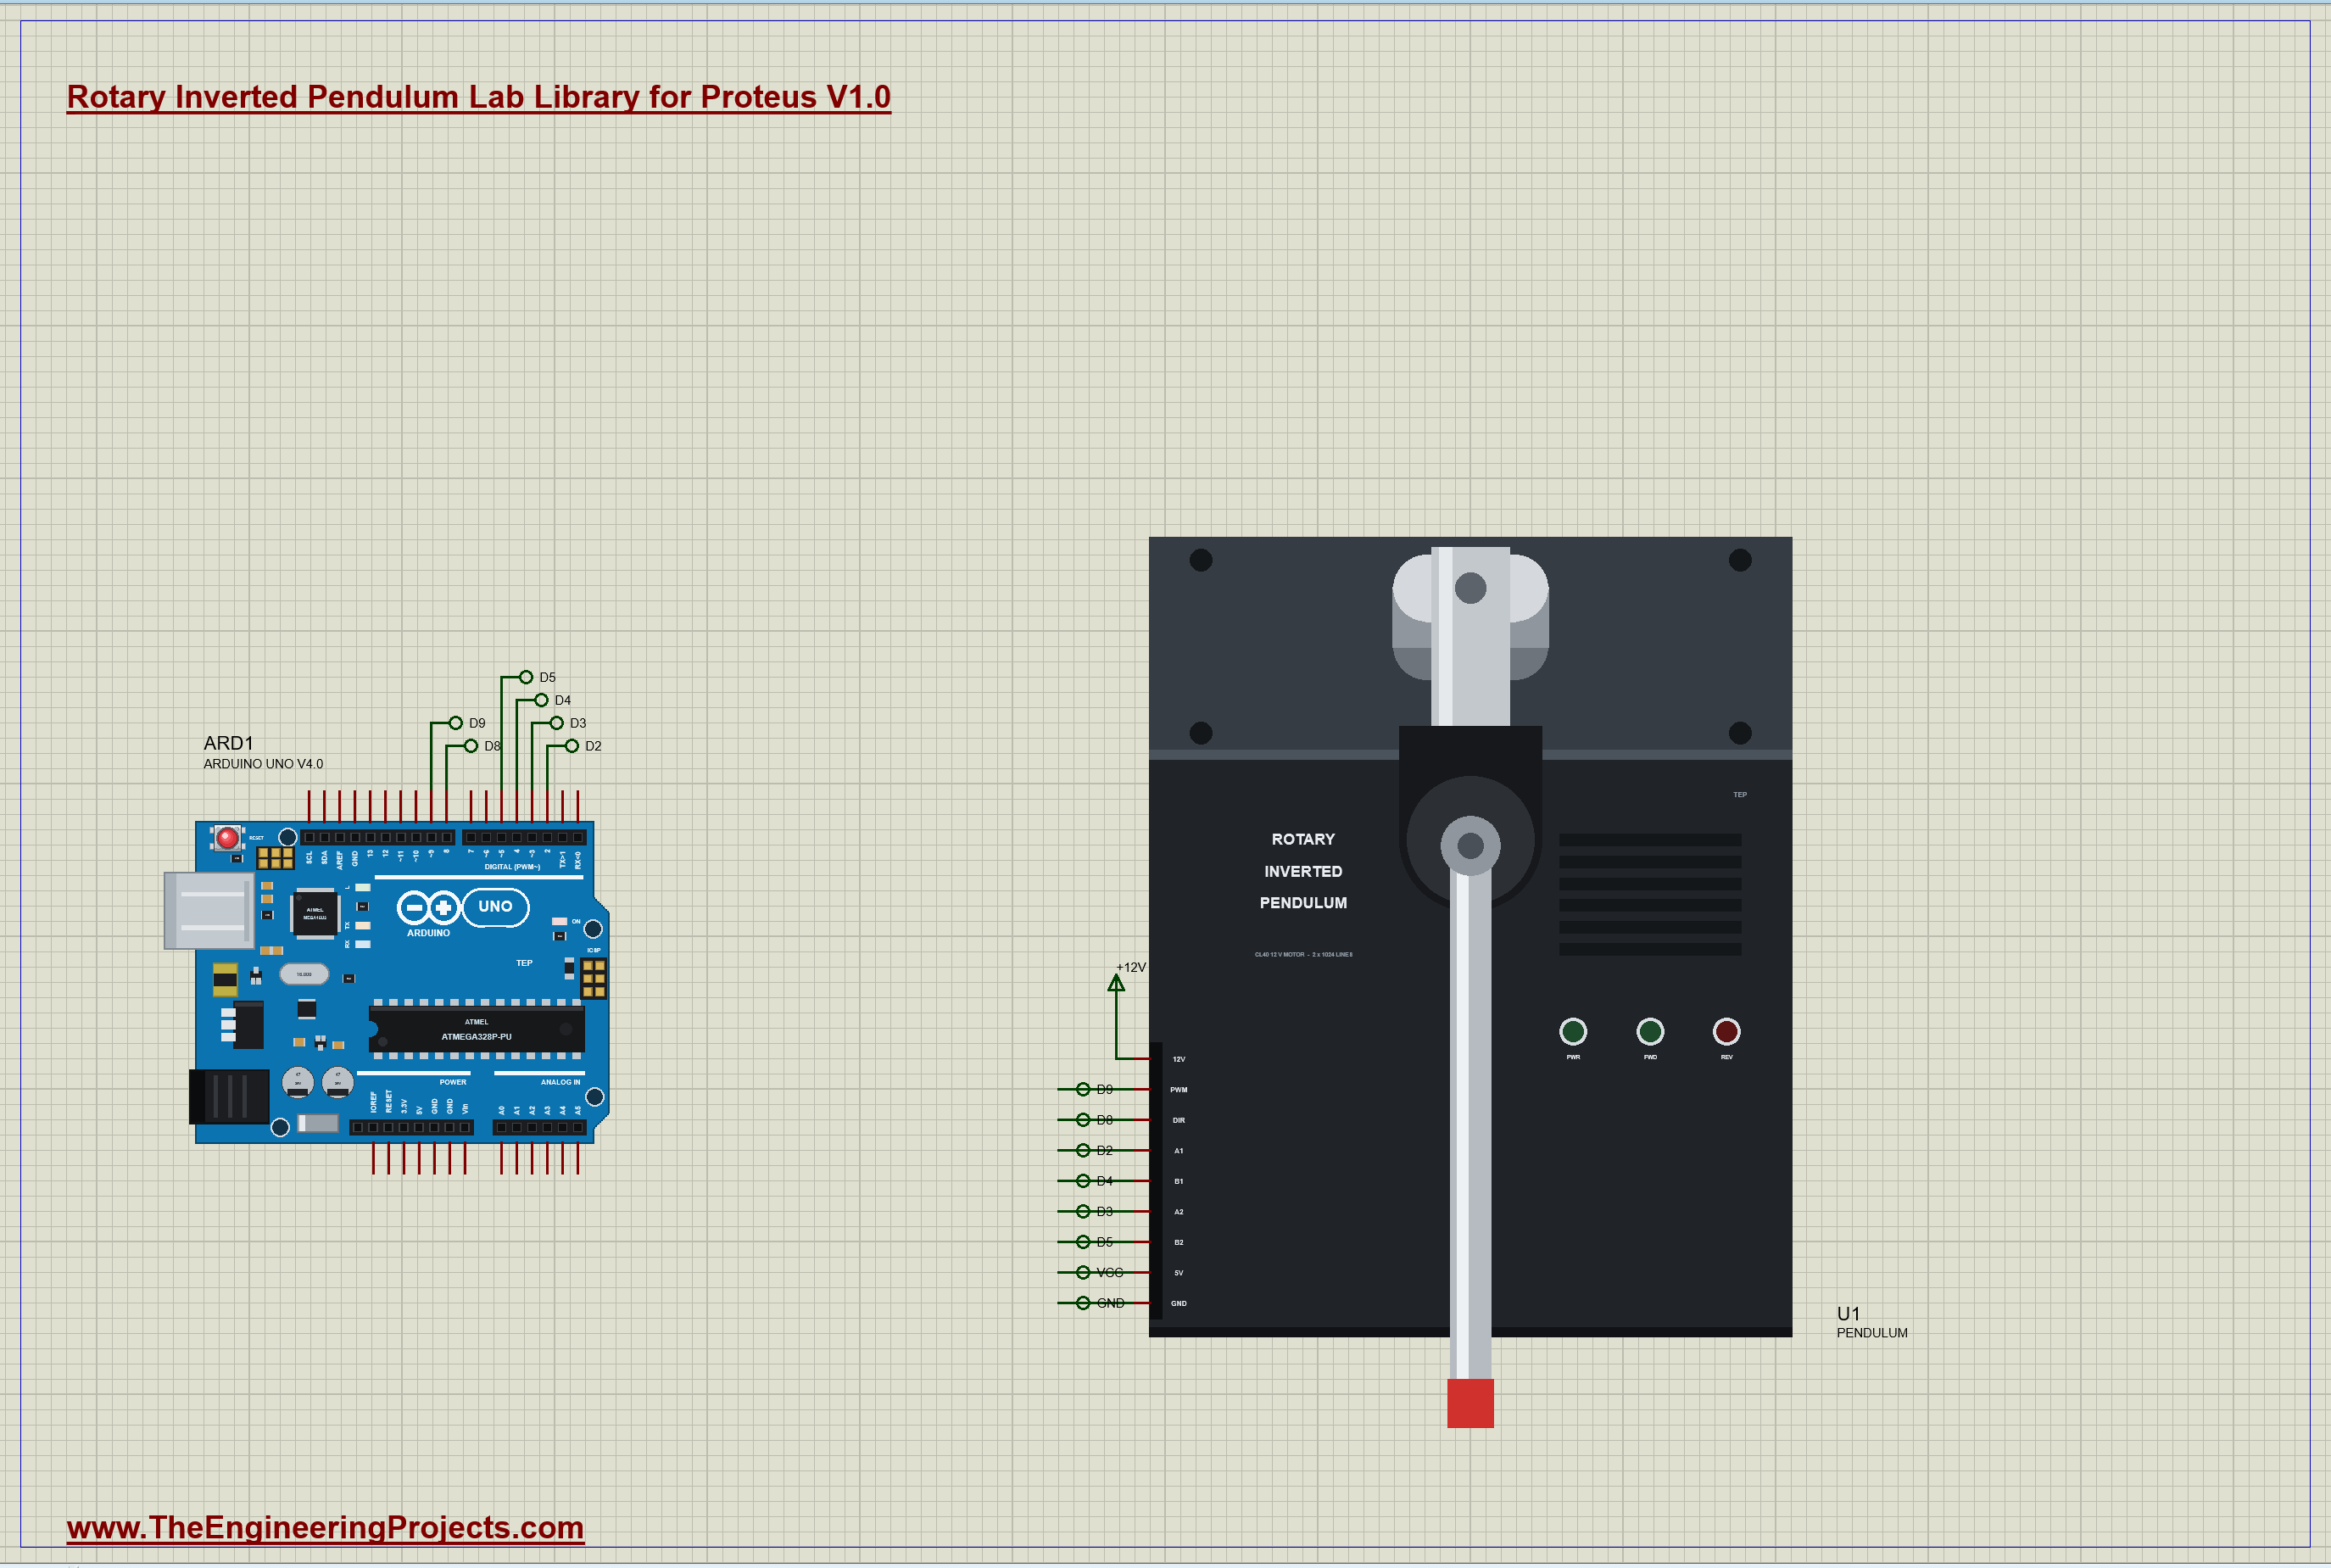
The Sketch
The UNO has two external interrupts, one for each encoder. On every change of A the sketch reads A and B from the port at once and counts up or down; that is x2 decoding, 2048 counts per turn:
volatile long armCount = 0, pendCount = 0;
void armEdge()  { byte p = PIND; armCount  += ((p >> 2) & 1) != ((p >> 4) & 1) ? 1 : -1; }   // A1 D2, B1 D4
void pendEdge() { byte p = PIND; pendCount += ((p >> 3) & 1) != ((p >> 5) & 1) ? 1 : -1; }   // A2 D3, B2 D5
Every 2 ms the loop turns the counts into angles, with the pendulum measured from upright, and filters the two speeds. At 0.5 s a 50 ms push of 3 V starts the swing. Then the swing-up works out the pendulum's energy and pushes the arm with the swing until that energy reaches the top. A small back-EMF term and a weak spring keep the arm near the middle:
  else if (mode == SWING) {                                    // energy control: push the arm with the swing until the pendulum has the energy
    float E = 0.5 * JP * alv * alv + MGL * (cos(al) - 1);      //   to stand upright (E = 0); a weak spring keeps the arm near 0
    float push = constrain(300.0 * (0.15 * 2 * MGL - E) / (2 * MGL), -5.0, 5.0);
    drive((alv * cos(al) > 0 ? -push : push) + KM * thv - 2.0 * th - 0.2 * thv);
When the pendulum comes within 20 degrees of upright the sketch hands over to the LQR, with the four gains straight from the pop-up:
else if (mode == BALANCE) drive(K1 * (th - ref) + K2 * al + K3 * thv + K4 * alv);Balanced, the target goes to 45 degrees at 4 s and back to 0 at 6.5 s. At 9 s the lab itself taps the pendulum. At 11.5 s the sketch switches the balance off. Every half second it prints the arm, the pendulum and the motor's voltage.
Run the Demo
Open the project and press Run. The demo runs about 12.4 simulated seconds, which Proteus ran in about two minutes on our PC. Click the lab to open its pop-up; everything below is from that one run, the demo exactly as it ships.
The Swing-Up and the Catch
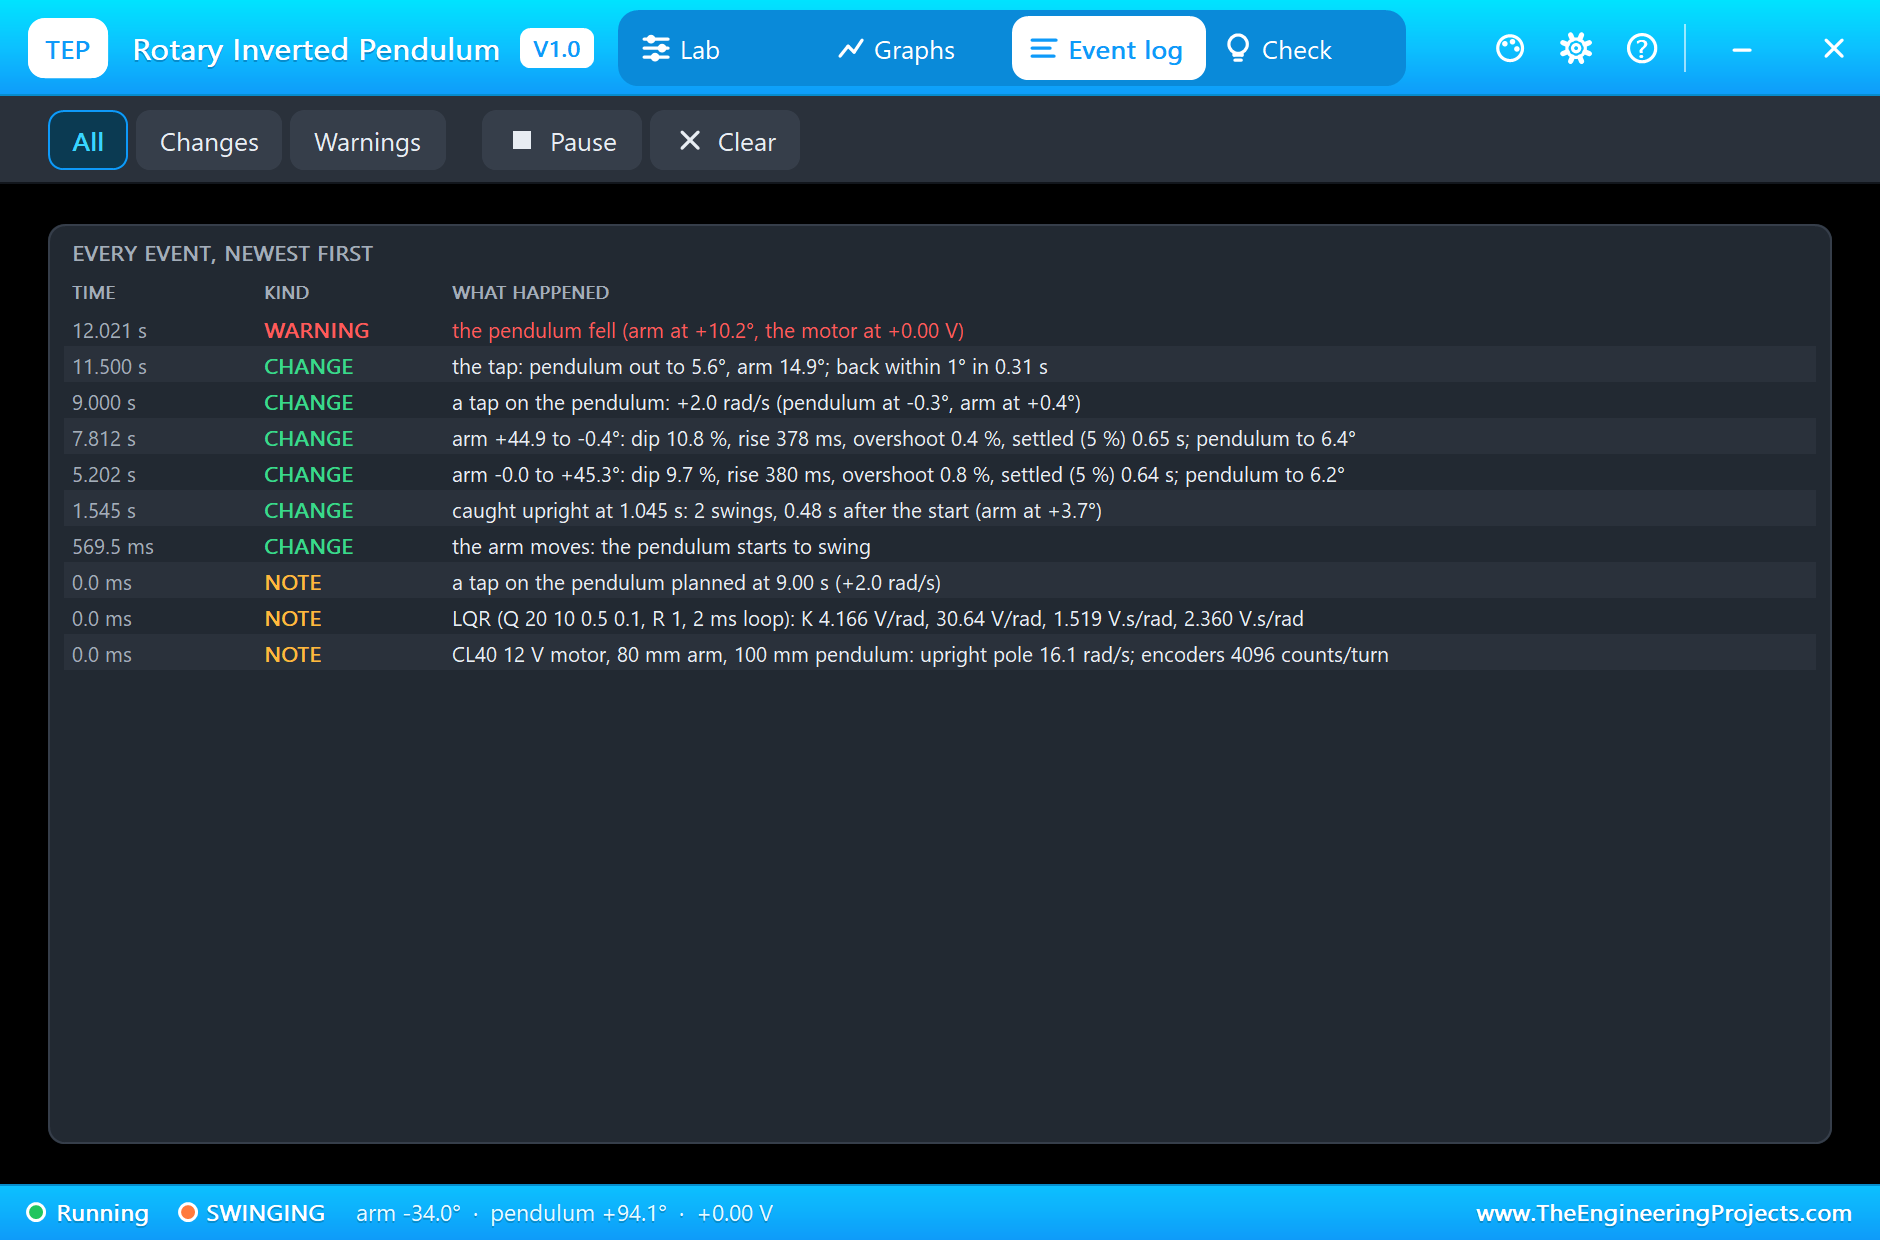
At 0.5 s the push starts the pendulum swinging and the energy swing-up takes over. Two swings later the pendulum comes up within the LQR's 20 degrees. It is caught upright at 1.045 s, just over half a second after the push, with the arm at +3.7 degrees. The pop-up's trend shows the arm sweeping out well past 90 degrees and back, and the pendulum coming up from the bottom of its graph to the zero line in the middle.
Moving the Arm While Balancing
At 4 s the target jumps to 45 degrees. The motor's voltage first swings the arm the other way: the dip was 9.7 % of the move. Then the arm runs to +45.3 degrees with a rise of 380 ms, overshoots by 0.8 % and settles within 5 % in 0.64 s. All the while the pendulum leans no more than 6.2 degrees. The way back at 6.5 s is the mirror image: the voltage jumps to +3.27 V, the arm first goes further out, a 10.8 % dip, then comes back to -0.4 degrees with a rise of 378 ms, 0.4 % overshoot and 0.65 s to settle, the pendulum leaning 6.4 degrees.
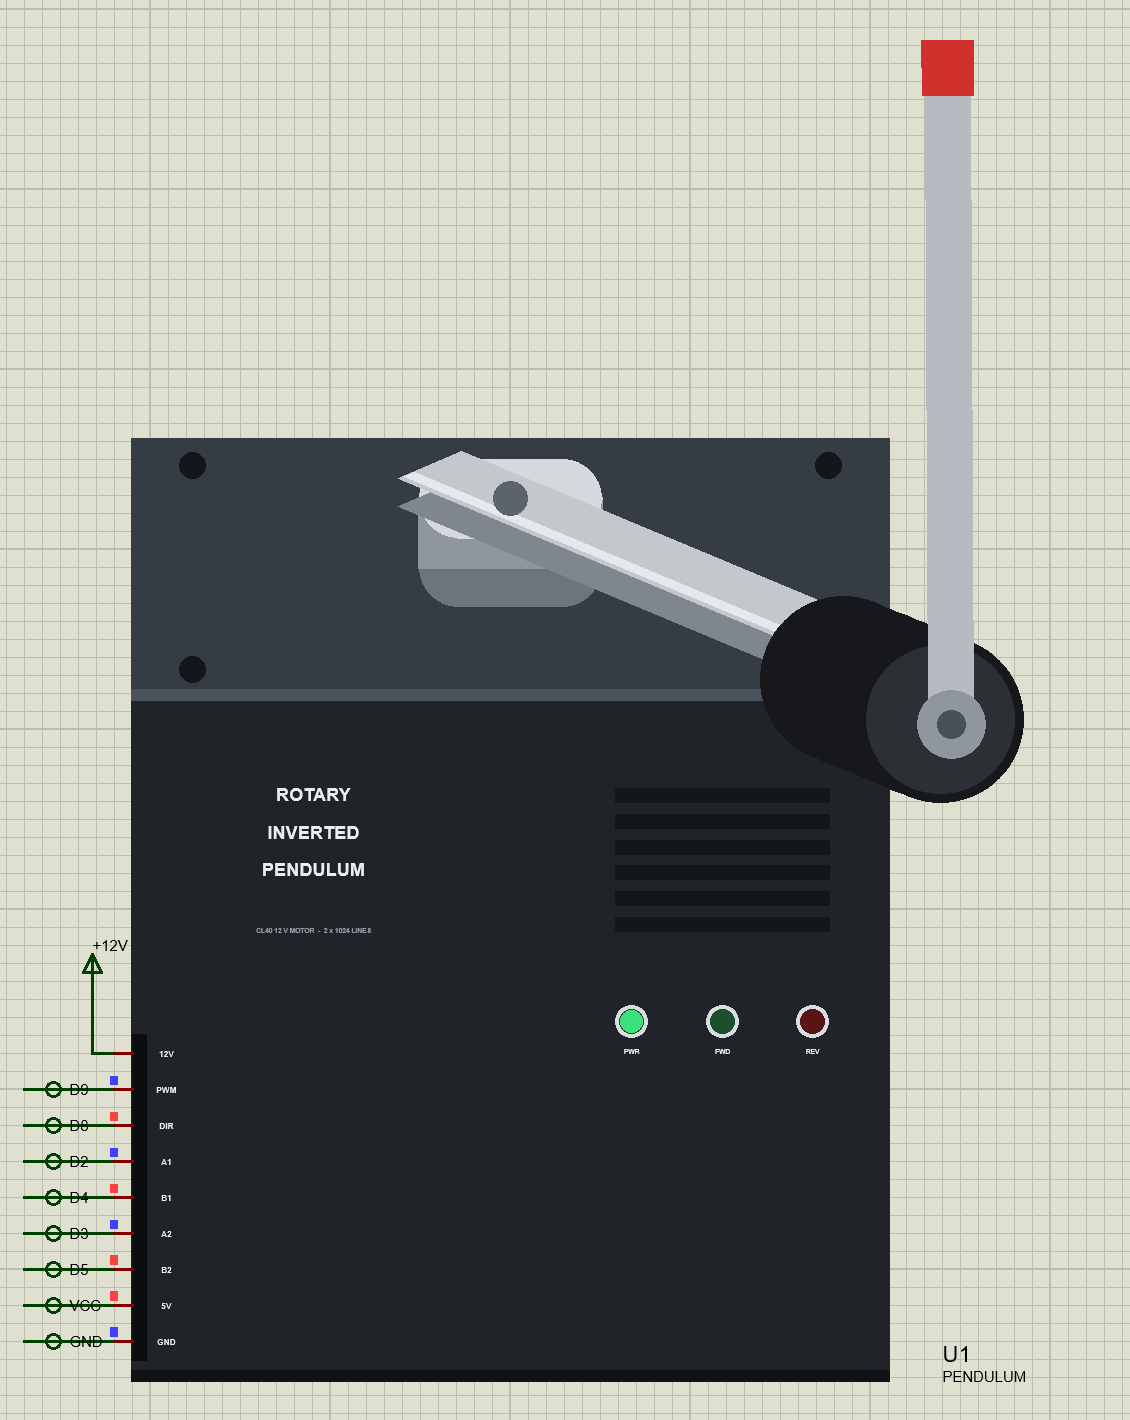
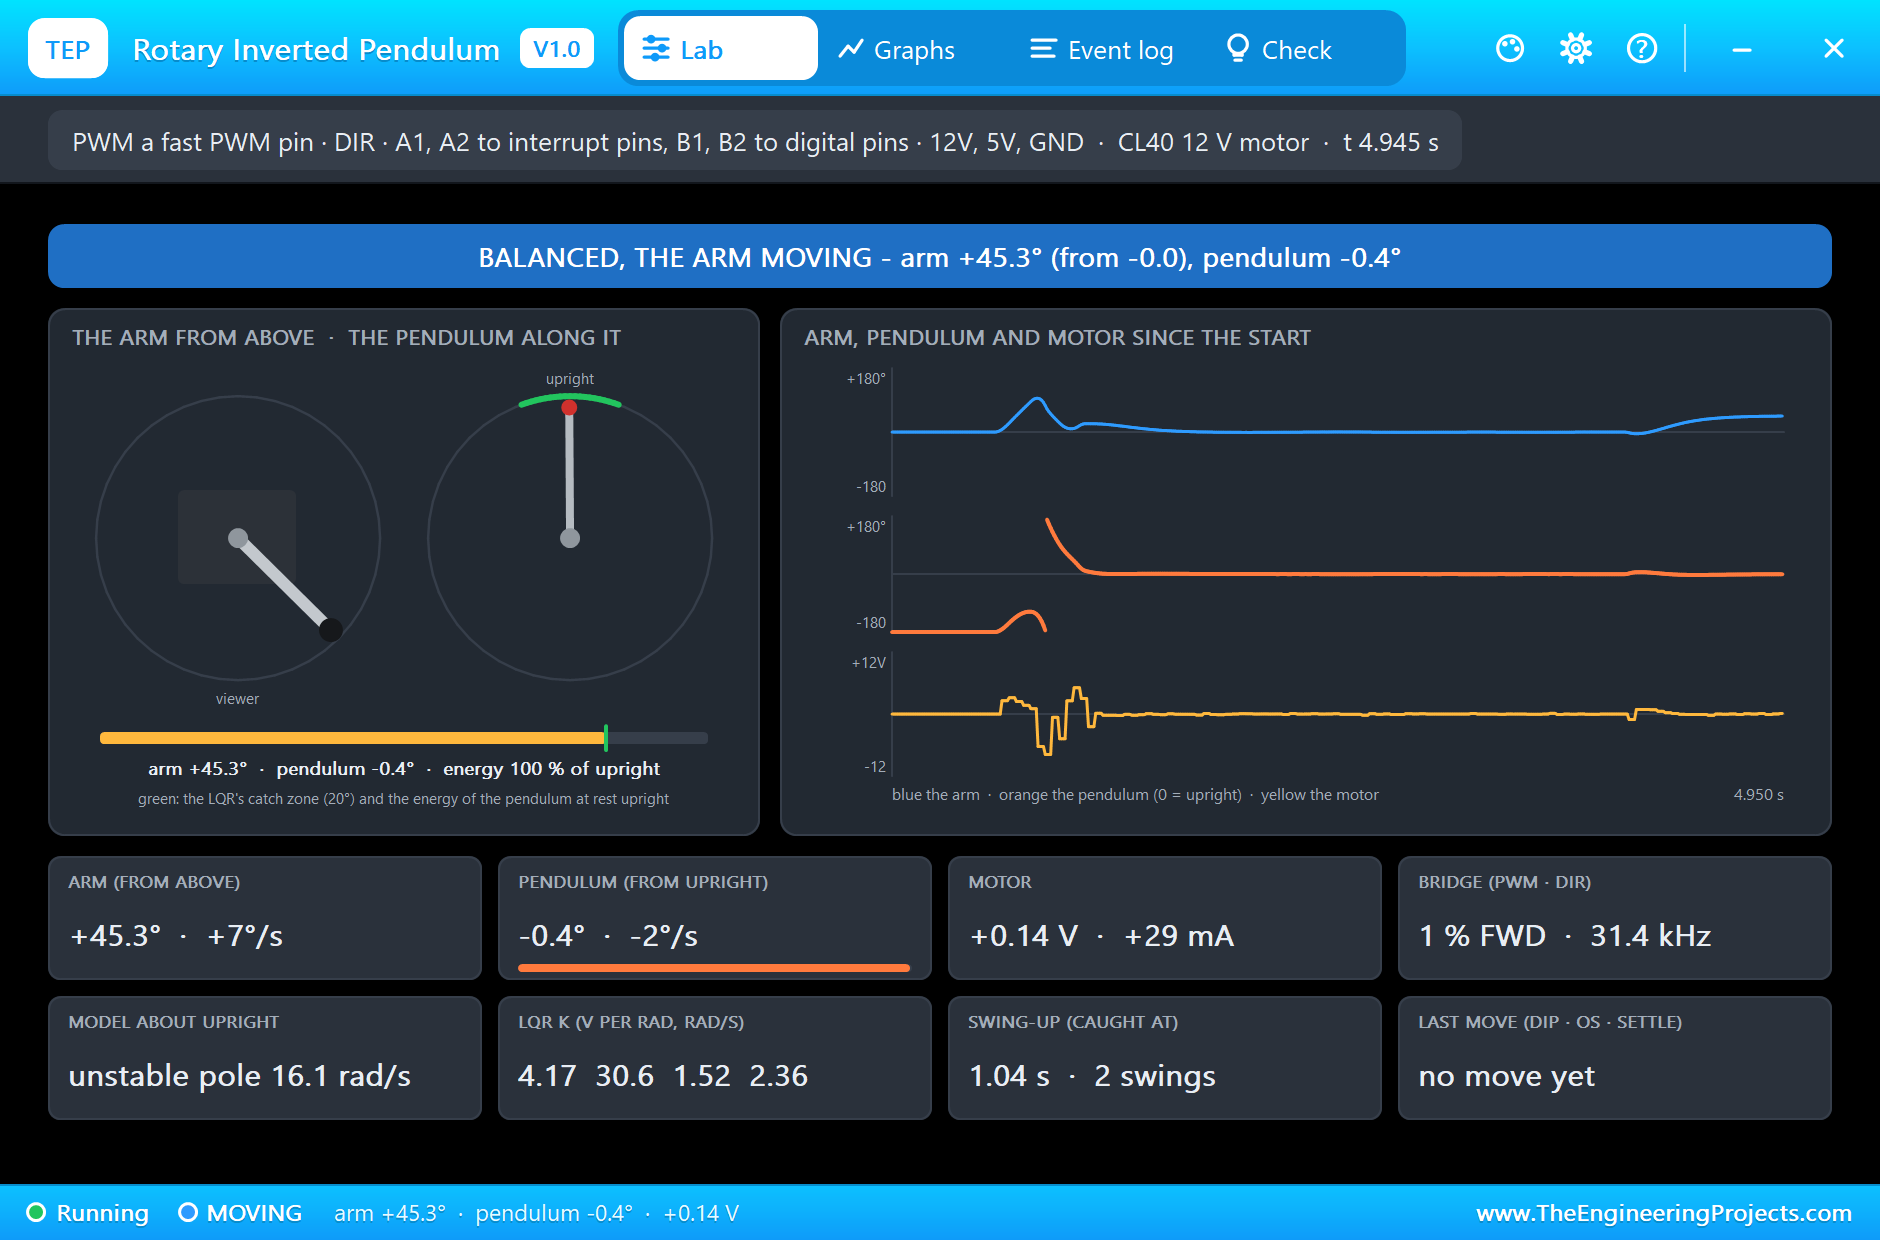
Holding and the Tap
Between the moves the balance is tight. Over a second the pendulum stays within 0.26 degrees of upright and the arm within 0.55 degrees, with the motor at only 0.31 V RMS of small corrections. At 9 s the lab taps the pendulum, adding 2 rad/s to its swing. The pendulum leans out to 5.6 degrees and the arm swings 14.9 degrees to get under it. The pendulum is back within 1 degree of upright in 0.31 s.
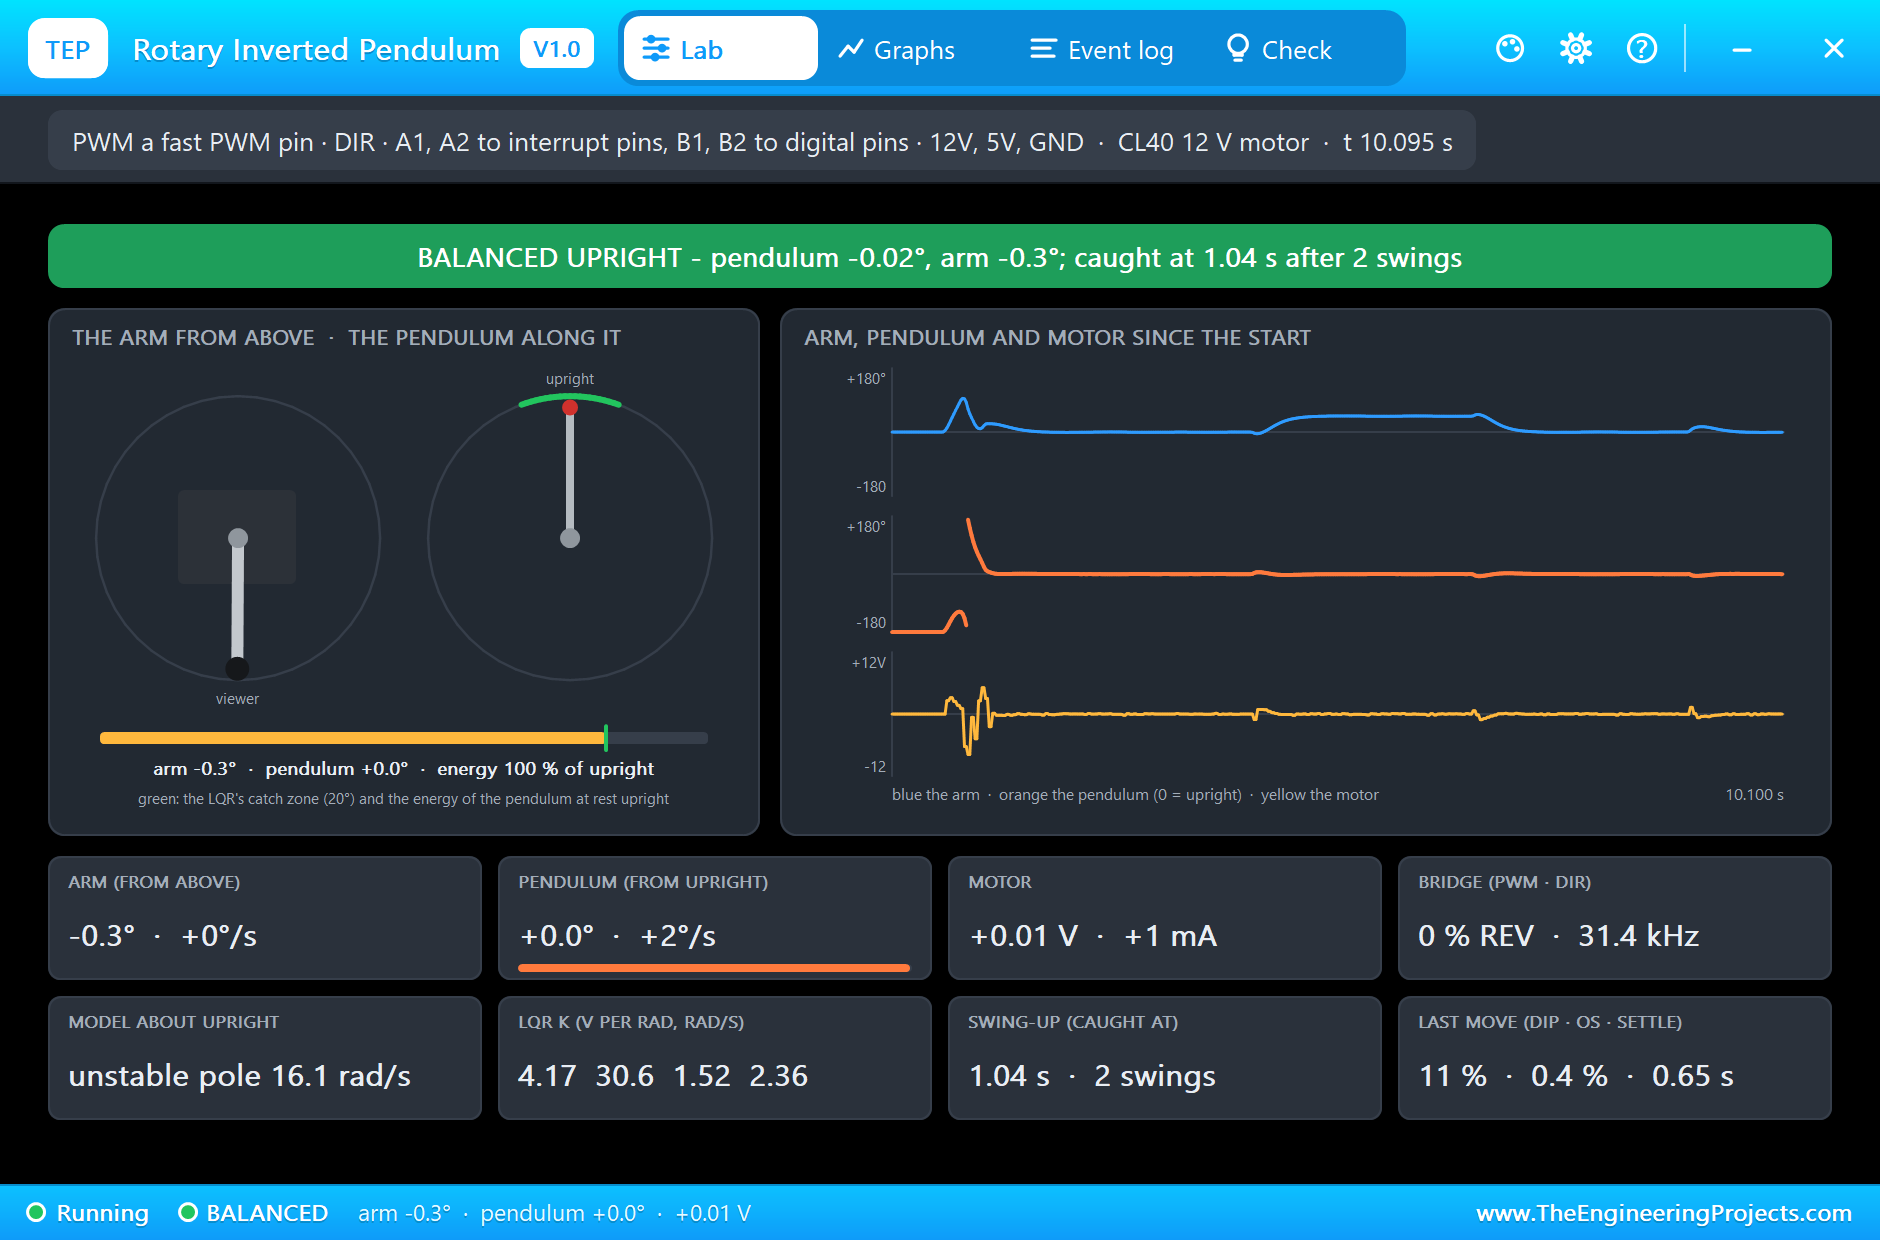
Letting Go
At 11.5 s the sketch stops driving the motor. Nothing holds the pendulum any more. For a moment it hardly moves, then the lean grows as the unstable pole says, by a factor of e every 62 ms: it is past 60 degrees at 12.02 s and swings down past the base, dragging the arm around with it. The sheet shows the pendulum falling in front of the base, and the pop-up switches to SWINGING.
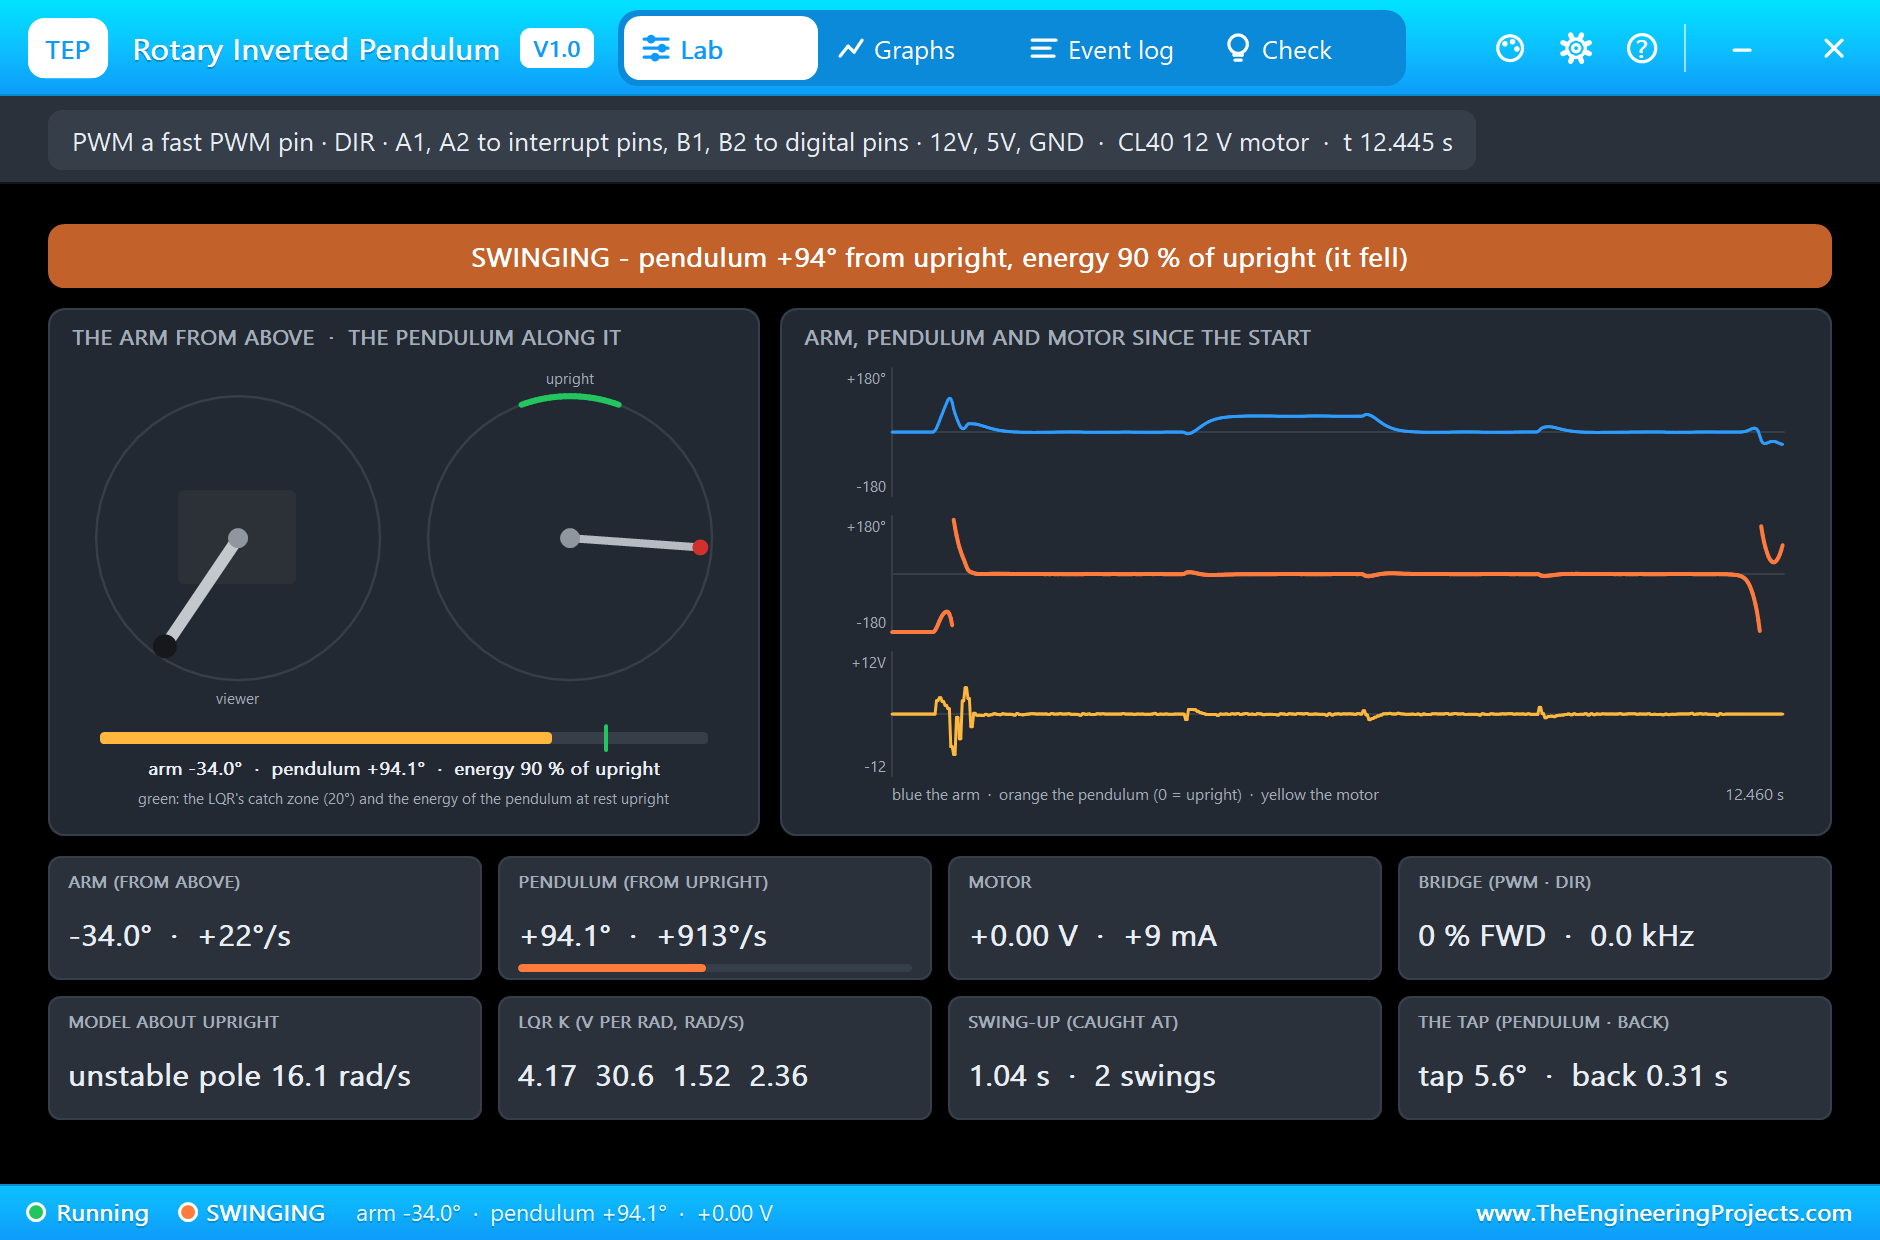
The Monitor
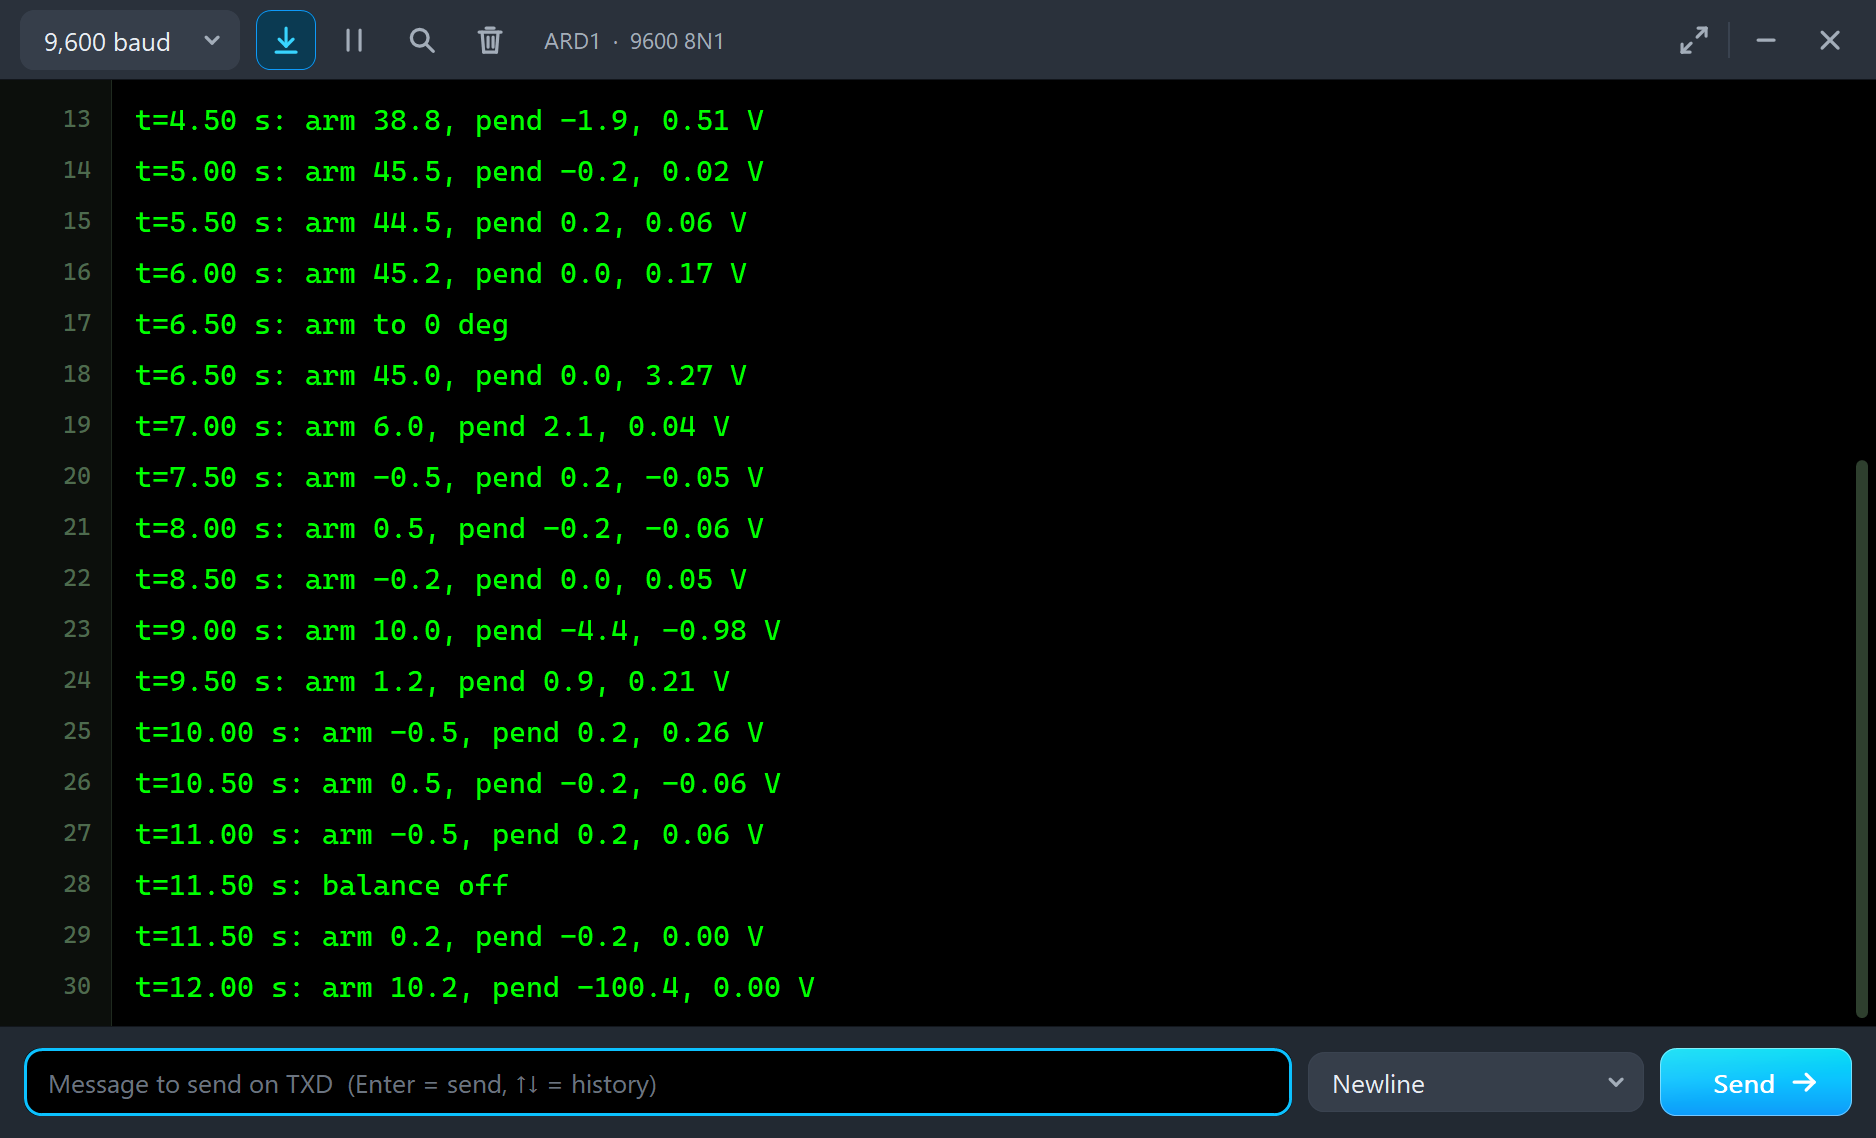
The UNO's monitor prints the arm, the pendulum and the voltage every half second: 45.5 degrees and -0.2 at 5.00 s, the jump to +3.27 V at 6.50 s when the target goes back to 0, 6.0 degrees at 7.00 s on the way back, the tap at 9.00 s with the pendulum at -4.4 degrees, and at 12.00 s, after the balance went off, the pendulum at -100.4 degrees.
The Graphs, the Log and the Check Page
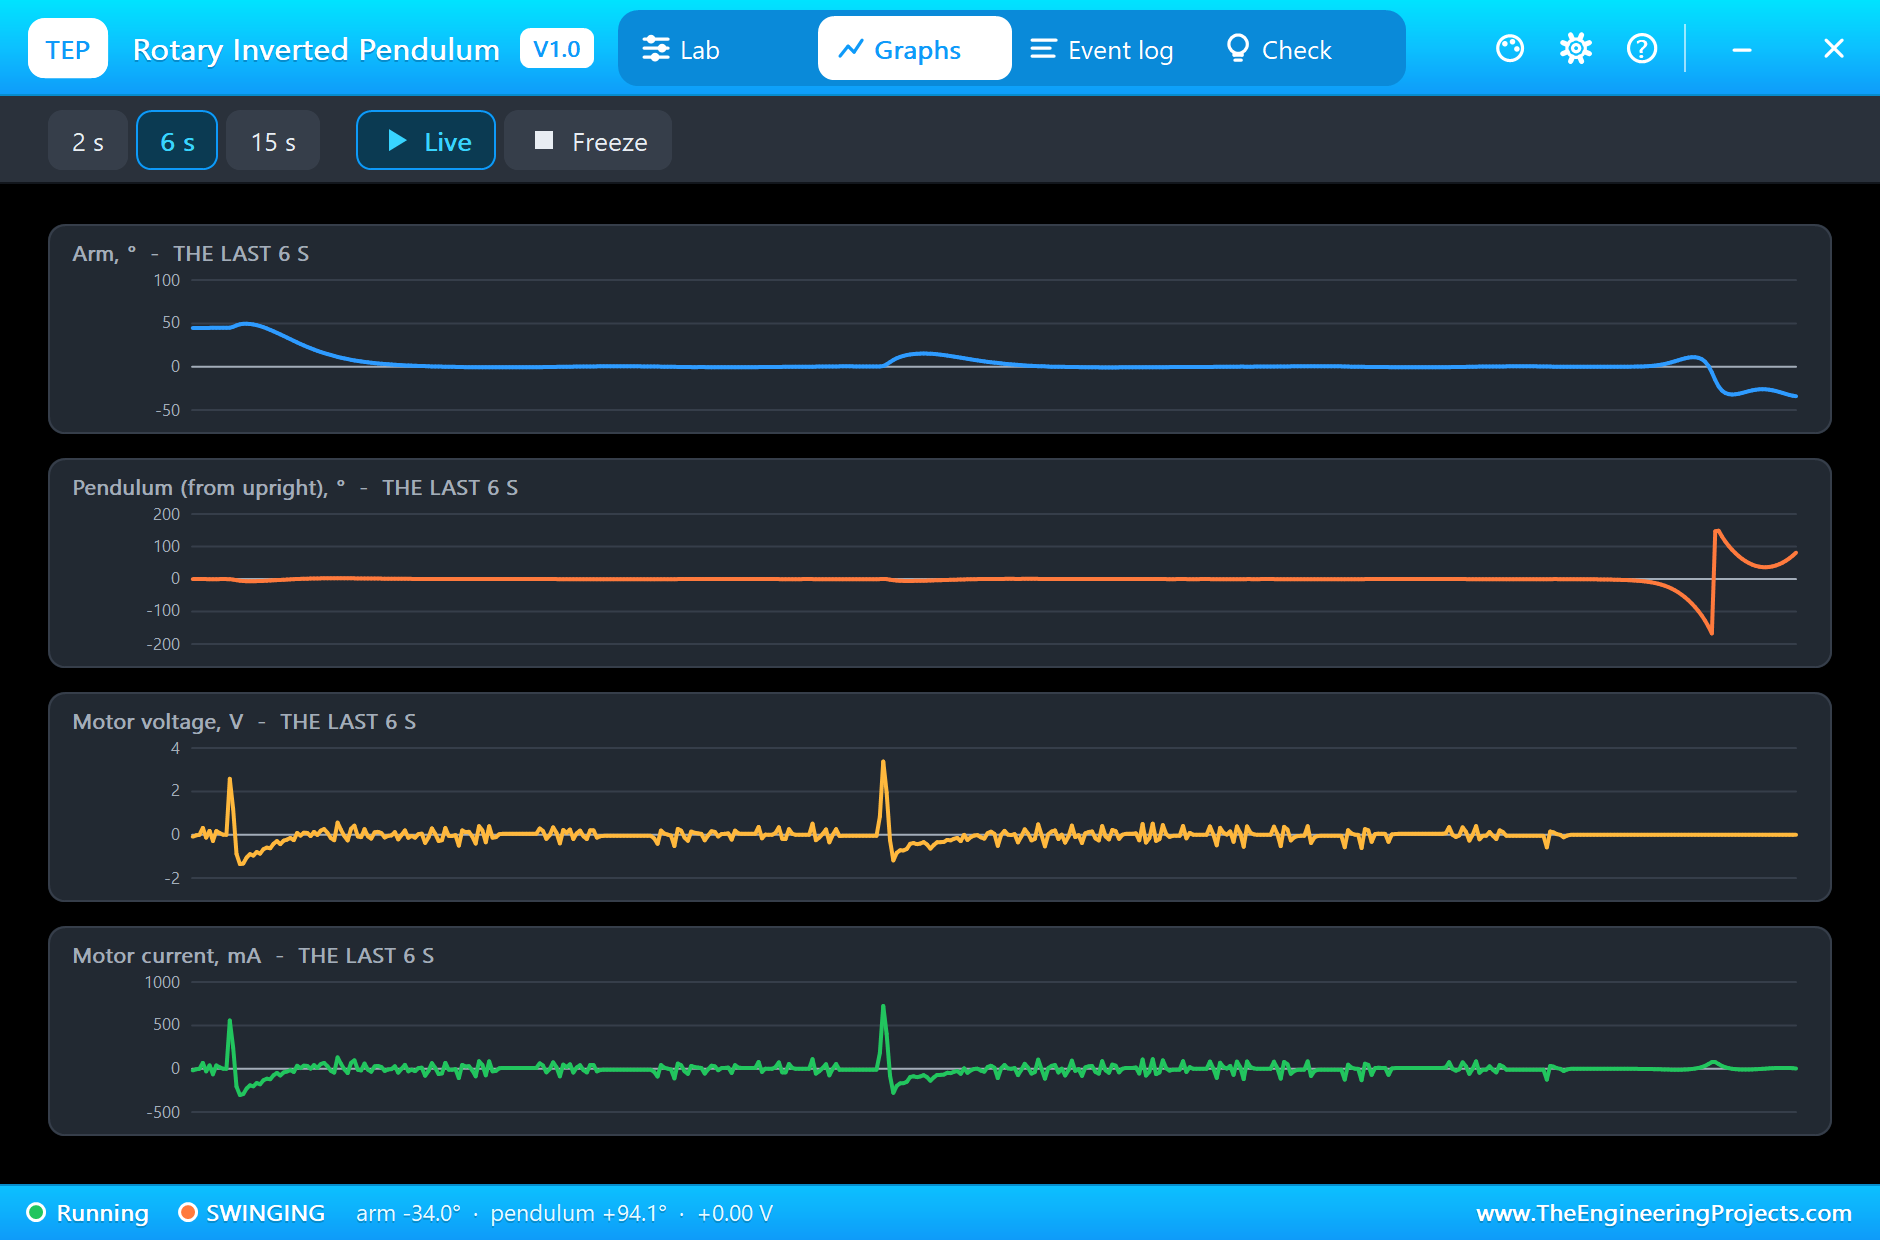
The Graphs page plots the arm, the pendulum, the motor's voltage and its current over the last 2, 6 or 15 simulated seconds. On the 6 s view you can see the arm's wrong-way start at 6.5 s, the tap at 9 s and the fall at the end. The Event log lists the catch, both moves with their numbers, the tap and the fall.
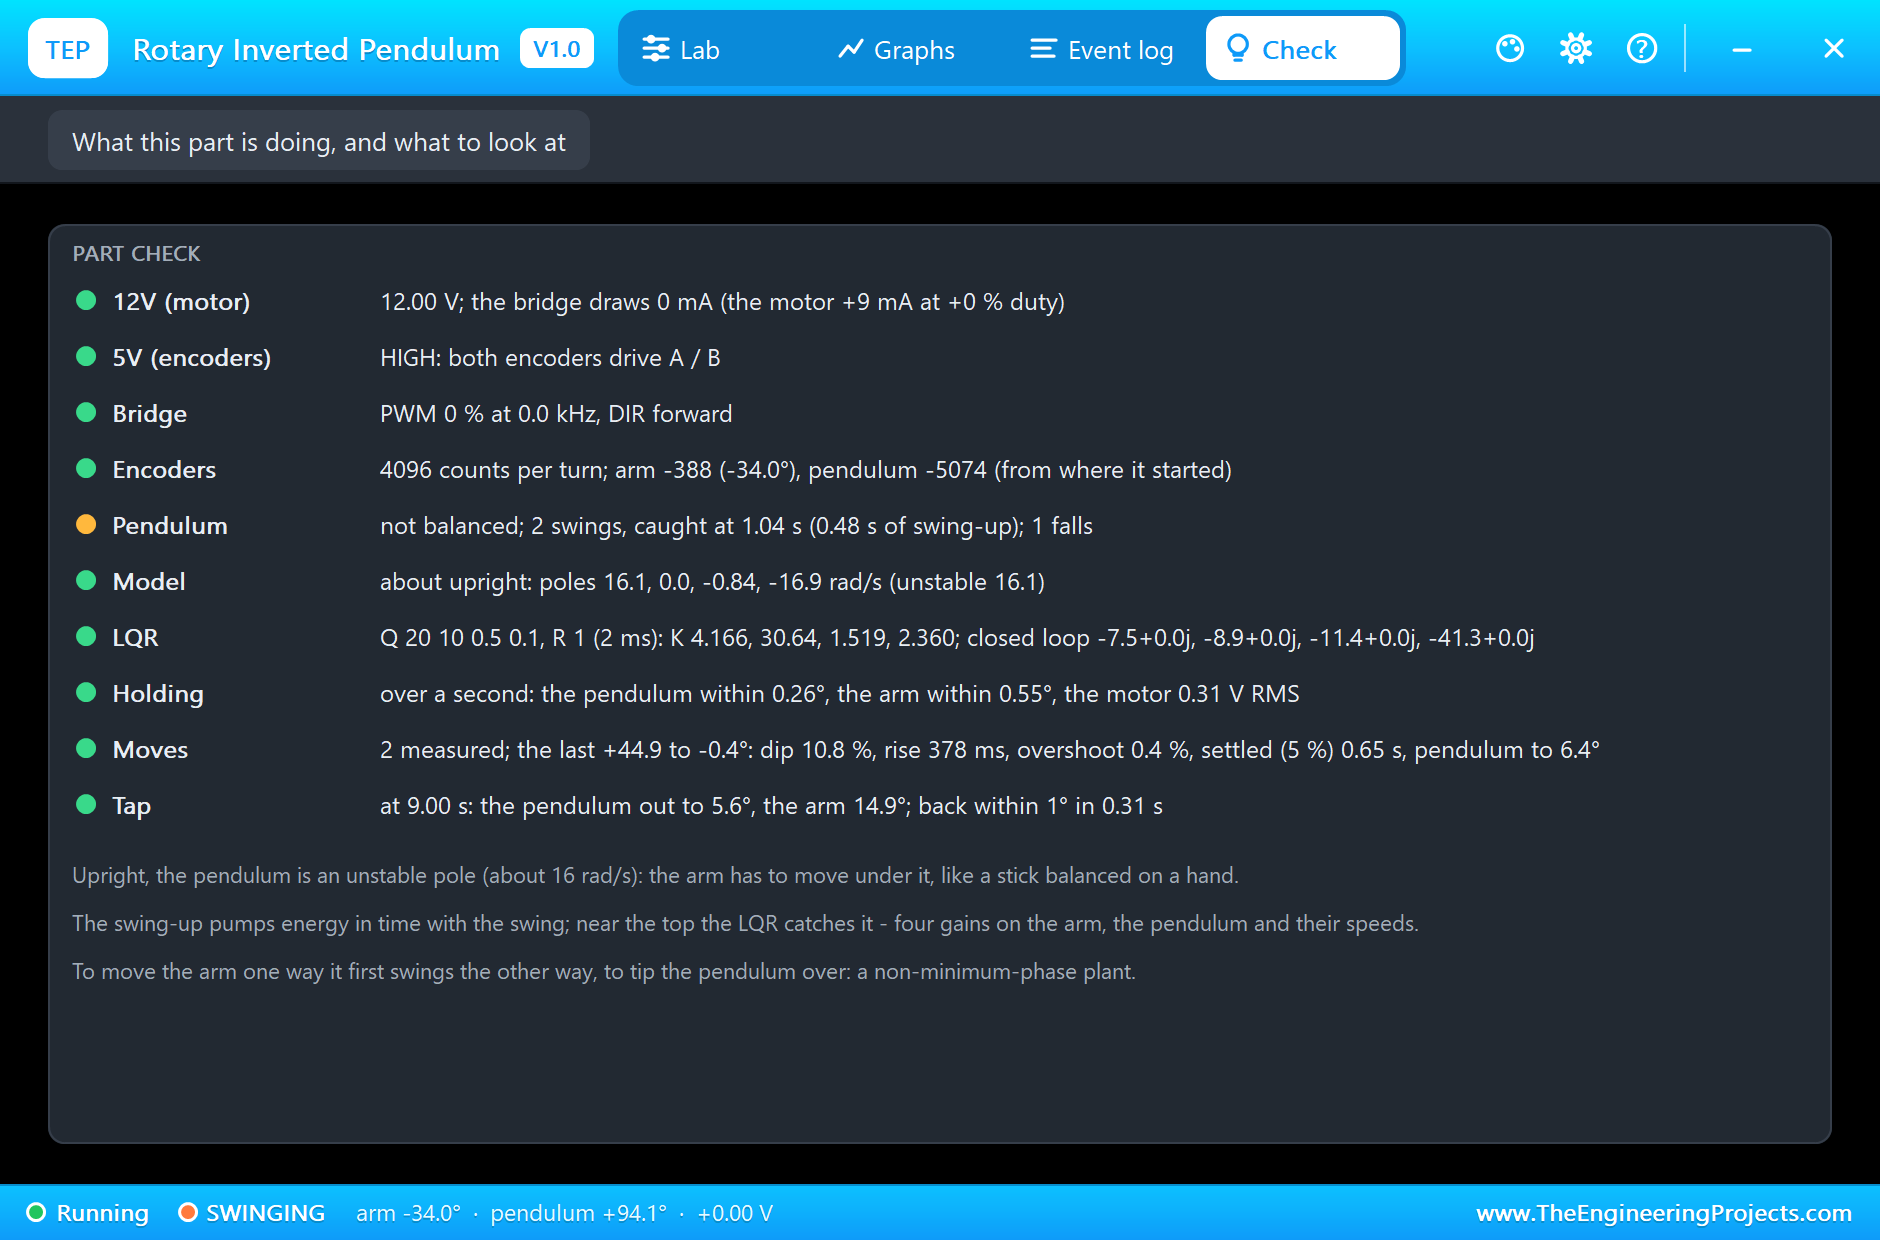
The Check page sums up the part: the 12 V supply, the 5 V for the encoders, the bridge, both encoders' counts, the swing-up, the model's four poles, the LQR's weights, gains and closed-loop poles, the hold, the last move and the tap.
Try It Yourself
- Raise the first Q weight to 100, copy the new gains into the sketch, and watch the arm move faster but dip further the wrong way.
- Raise R to 10 and see the gains drop, the motor work less, and the pendulum lean further on every move.
- Set TAP to an earlier time and a bigger target, and find the move that makes the pendulum fall.
- Halve the encoder lines and see the hold get noisier.
- Set START to 175 and write a sketch that catches the pendulum straight from near upright, without a swing-up.
Ideas to Extend the Demo
- Add a potentiometer for the arm's target and steer the balanced pendulum by hand.
- Send the angles to a PC and identify the unstable pole from the fall.
- Replace the LQR with a pole-placement design and compare the closed-loop poles.
- Make the swing-up gentler with a smaller push and count how many swings it takes.
Your Own Sketches
The demo sketch is in the zip file, and you can change it in the Arduino IDE. New to Arduino? Start with our Arduino Tutorial for Beginners. Export the compiled binary, and set the UNO's PROGRAM property to the new file. Our guide on How to get the HEX file from Arduino shows you where the file ends up.
Things to Know Before Using a Real Lab
- The encoder cable winds up: keep the arm within a turn or two either way.
- Start with the pendulum hanging still: its encoder counts from where it is at power-up.
- Keep clear of the swing: the swing-up throws the pendulum hard; keep hands and cables out of its circle.
- Expect a little wander: a real arm has some backlash and the pendulum's bearing some friction, so the arm drifts a degree or two while balancing.
Troubleshooting
- NO 12 V: the bridge is driven but 12V is missing, so the motor cannot turn.
- NO ENCODER SUPPLY: 5V is low and the encoders' outputs float.
- The pendulum never gets to the top: the swing-up's push is too weak, or its sign is wrong: push the arm against the pendulum's swing.
- It falls as soon as it is caught: a sign in the LQR; the pendulum leaning one way must turn the arm the same way.
- The part is not simulated:
TEPROTPEND.DLLis missing from MODELS and from the project folder.
Limitations of the Simulation
- The encoder cable's pull and the arm's flex are not modelled.
- The arm is direct drive: no gear backlash.
- The motor's inductance (0.59 mH) is far faster than anything here and is left out; its heating is not modelled.
- Arduino is a name of Arduino; this library is not made or endorsed by Arduino or Labcenter.
- Tested in Proteus 8.5 in November 2026 (the demo as shipped). Proteus 7 is not supported.
So, that was all about the Rotary Inverted Pendulum Lab Library for Proteus. I hope it helps you run the best-known balancing lab of a control course on your own PC: an energy swing-up, an LQR that holds an unstable pole, and an arm that has to start the wrong way to get where it is going. If you have any questions, ask in the comments and I will help you out. Till the next tutorial, take care and have fun!