Hi Friends! Hope you are doing well. Today, I'll give you a detailed Introduction to Arduino LilyPad. It is an Arduino Microcontroller Board, based on ATmega168/ATmega328 and is introduced by Leah Buechley and SparkFun Electronics.
This board is mainly developed for e-textiles and wearables projects. As per the designed purpose, it can be attached to fabric, sensors, power supplies, and actuators. You may need a conductive thread for joining this board with the required object.
In this post, I'll try to cover each and everything related to Arduino LilyPad, what is this about and how it is used for the development of desired projects. Let's jump right in and get down to the nitty-gritty of this board.
Introduction to Arduino LilyPad
Arduino Lil ...
In the previous post we have seen the project description of Voice Recognition Project using EasyVR shield. Today we will have a look at Getting started with EasyVR commander. EasyVR shield is a module which is used for voice recognition. First of all, we save our commands in the EasyVR shield and then we use these commands to control anything. In this project, I need to control the robot with voice commands like when someone says FORWARD then the robot start moving in forward direction.
Now first of all what I need to do is to save this FORWARD voice in the shield, which we will see today how to save the command in the shield and after that I will show you the Interfacing of EasyVR shield with Arduino UNO. So that when I say Forward the motor sta ...
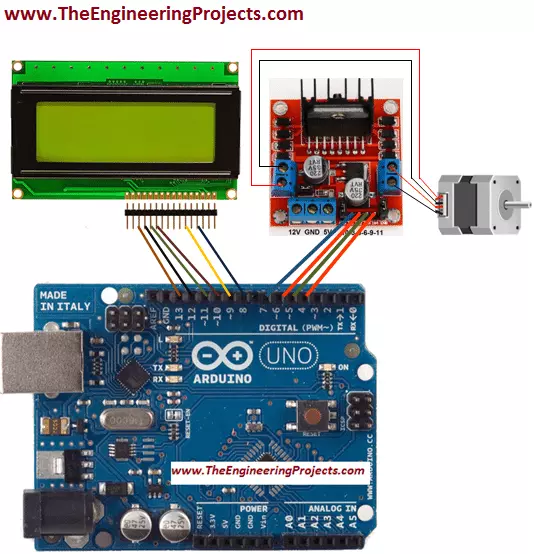
Hello friends! I hope you all will be absolutely fine and having fun. Today, I will elaborate you that how can we make a simple algorithm for Stepper Motor Direction Control using Arduino. In my previous tutorials I made algorithm for DC Motor Direction Control using Arduino, DC Motor Direction Control using Matlab, DC Motor Speed Control using Arduino and DC Motor Speed Control using Matlab. Now, in this tutorial I will control a stepper motor using Arduino by entering the different commands through its serial port.
Before going into the detail of this tutorial, you must know the basic difference between stepper and DC motors. DC motors have only two input terminal one is positive and the other one is negative. You just have to provide the powe ...
Hello Everyone! Hope you’re well today. Happy to see you around. In this post today, I’ll walk you through the Introduction to Arduino Uno WiFi Rev 2.
Arduino Uno WiFi Rev 2 is a microcontroller board based on ATmega4809 and carries an ECC608 crypto chip to ensure a secure and safe WiFi connection. The board contains 14 digital I/O pins, 5 PWM pins, 6 analog pins, one SPI protocol, one I2C, and one UART communication protocol.
I suggest you read this entire post till the end as I’ll detail the complete Introduction to Arduino Uno WiFi Rev2 covering pinout, pin description, features, programming, and applications.
Let’s jump right in.
Introduction to Arduino Uno WiFi Rev 2
The Arduino Uno WiFi Rev 2 is a microcontroller board that is mainly ...
Hi Guys! Hope you’re well today. I welcome you on board. In this post today, I’ll walk you through the Introduction to Arduino MKR WAN 1310.
The Arduino MKR WAN 1310 includes Lora connectivity that can perform very long-range transmission operations consuming low power.
This device is an ideal pick for the hobbyists requiring to develop IoT devices using the minimum networking experience using low power devices.
The MKR WAN 1300 is incorporated with the Microchip® SAMD21 which is the low-power processor, the MKR family’s characteristic crypto chip (the ECC508), and the Murata CMWX1ZZABZ LoRa® module.
Before you read further, I recommend you have a look at Introduction to Arduino Nano Every and Arduino MKR Vidor 4000 that I have uploaded previo ...
Hello guys! I hope you’re all in a good mood today because we are going to review the design of an interesting project today. We’ll be looking to design 4-way traffic lights in such a way that their delay is variable and is dependent upon the traffic density. This project is of intermediate difficulty level for people studying in undergrad engineering school with electronics, electrical and mechatronics as their major. It is also for the people learning Arduino and basic circuit design on their own or through some course. We have already designed a Simple 4-Way Traffic Light Control using Arduino and today we will make it smart by adding a variable delay.
Variable 4 Way Traffic Light:
As you all already know the importance of traffic lights and t ...
Hello friends, I hope you all are fine and having fun with your lives. Today, I am going to share a new tutorial which is Interfacing of Flame Sensor with Arduino. I have recently posted a tutorial in which I have shared the Flame Sensor Library for Proteus. Now in this tutorial, I am gonna use that Flame Sensor Library and will interface this Flame Sensor with Arduino. So, if you haven't downloaded this file then I suggest you to download this Flame Sensor Library so that you can easily simulate this flame Sensor in Proteus.
I am sharing interfacing of this Flame Sensor with Arduino today, but soon I will also post a tutorial on Interfacing of Flame Sensor with PIC Microcontroller. If you guys have any questions then ask in comments. I have also ...
Hello everyone! I hope you all will be absolutely fine and having fun. Today, I am going to tell you about how to design an algorithm for Servo Motor Control using Arduino. First of all I would like to tell you a bit about the servo motors. Servo motors are small devices having an output shaft. We can adjust this shaft in different angular positions by continuously sending the servo coded signal. Servo motor maintains the angular position of the shaft as long as the coded signal is present at the input. If the applied coded signal changes, angular position of the shaft of a servo motor also changes correspondingly. If you are working on Servo Motor then i would suggest you to must have look at this tutorial Servo Motor control in Proteus, as its a ...
Hello friends, i hope you all are fine and enjoying. Today i am going to share a new tutorial which is Interfacing Arduino with HC05 Bluetooth module. First of all lets have a little introduction about HC-05 Bluetooth module. HC-05 is a bluetooth module, which was designed for wireless data communication. This little module is capable of both sending and receiving data but it performs only one thing at a time, which means at a particular time it can only send or receive data but can't do the both tasks.
In order to send or to receive data, you have to make one module as a master and the other module as a slave. If both the modules are acting as master then, data will not transmit and if both the modules are acting as a slave then, again data will ...
Hey Everyone! Hope you’re well today. I welcome you on board. In this post today, I’ll walk you through the Introduction to Arduino MKR Vidor 4000.
The Arduino MKR Vidor 4000 is a powerful board with which you can develop your own controller board. The inclusion of FPGA makes this device unique and separate from other Arduino boards available in the market. With this FPGA feature, you can do audio and video processing which is not possible with other Arduino boards.
Using this device, you can design a real-time computer reading sensor information and the best part is this board is compatible with all other Arduino boards. With this board, you can make all pins PWM signals (on the FPGA block side) for handling the speed of motors. Moreover, you c ...