Hello friends, I hope you all are doing great. In today's tutorial, we are gonna have a look at detailed Introduction to Atmega32. ATmega32 is eight-bit higher enactment microcontroller, it is manufactured by an Atmel (it is a designer and builder of different semiconductors materials). It is founded on enriched RISC which stands for (Reduced Instruction Set Computing) design which consists of 131 (one thirty-one) potent commands.
Mostly commands implement in one mechanism sequence. The maximum frequency at which it operates sixteen MHz. It delivers a subtle equilibrium among enactment and balance. It is the Pico Power sort of the normal ATmega328 kind which permits it to work below lesser voltage and power necessities, nearly 1.62 volts. In today’s post, we will have a look at its fort ...
Hello everyone! I hope you all will be absolutely fine and fun. Today, I am going to tell you that how to make a simple algorithm for Stepper Motor Speed Control using Arduino. I have already discussed with you about DC Motor Direction Control using Arduino, Matlab and NI LabVIEW. Moreover, I have also discussed the DC Motor Speed Control using Arduino,Matlab and LabView. If you are working on Stepper Motor, then you must have a look at Stepper Motor Direction Control using Arduino, Stepper Motor Direction Control using Matlab and Stepper Motor Direction Control using NI LabVIEW. Now, in this tutorial I will explain you about the program which will helpful for Stepper Motor Speed Control using Arduino. Before going into the details of this tutori ...
Hello friends, hope you all are fine and having good life. In today's project, we will see how to display ADC value on LCD using Arduino in Proteus ISIS. Its quite a simple project in which we are gonna measure the voltage of ADC pins and then will display them over to LCD. The microcontroller I am using in this project is Arduino. The simulation is designed in Proteus ISIS. IF you are working on PIC Microcontroller then you should have a look at How to Display ADC value on LCD using PIC Microcontroller in Proteus ISIS.
Arduino has 10 bit ADC pins so whenever you apply voltage on these pins it will give you a value ranging from 0 to 1023 depending on the voltage provided. One can easily get this value using a simple function in Arduino analogRead( ...
Hello everyone, I hope you all are doing great. In today's tutorial, we are gonna have a look at How to design a Smoke Detector with Arduino. Its quite a simple project but if you are working on any security project then you must add this feature in it. You should also download this Gas Sensor Library for Proteus, and design its simulation.
I will use gas sensor MQ2 for this project. I have purchased MQ2 Gas Sensor module as its quite easy to interface with Arduino. Arduino board I'm using is Arduino UNO. I have also designed an LPG Gas Leak Detect using Arduino using this MQ2 Sensor. So, let's get started with How to design Smoke Detector with Arduino & MQ2 Sensor.
Smoke Detector with Arduino & MQ2 Sensor
First of all, we need to conn ...
Hi Guys! Hope you’re well today. I welcome you on board. Happy to see you around. In this post today, I’ll detail the Introduction to Arduino Sensor Shield.
Arduino Sensor Shield is a board compatible with the Arduino Boards and comes with the standard header layout. It is used to connect sensors, servos, LCD with the Arduino board without soldering. This board is connected with the Arduino Board using the jumper wires.
I suggest you read this post all the way through as I’ll be discussing the complete Introduction to Arduino Sensor Shield.
Let’s get started.
Introduction to Arduino Sensor Shield
Arduino Sensor Shield is a board used to connect sensors, servos, LCD with the Arduino Board without the requirement of soldering.
Using Arduino ...
Hello friends, I hope you’re all well and healthy. In today’s tutorial, we will be going through a simple, yet effective practice to design a 4-way traffic light simulation in Proteus software. This project is designed for undergrad engineering students with majors in electronics, electrical and mechatronics engineering. It is also useful for people that want to learn the basics of circuit design and Arduino programming.
4-Way Traffic Light Control using Arduino:
Traffic lights are an integral part of the world’s transportation systems. Over the years a number of different algorithms regarding traffic lights have been developed. The algorithm being used at any place for the purpose of controlling traffic takes into account of various factors, such ...
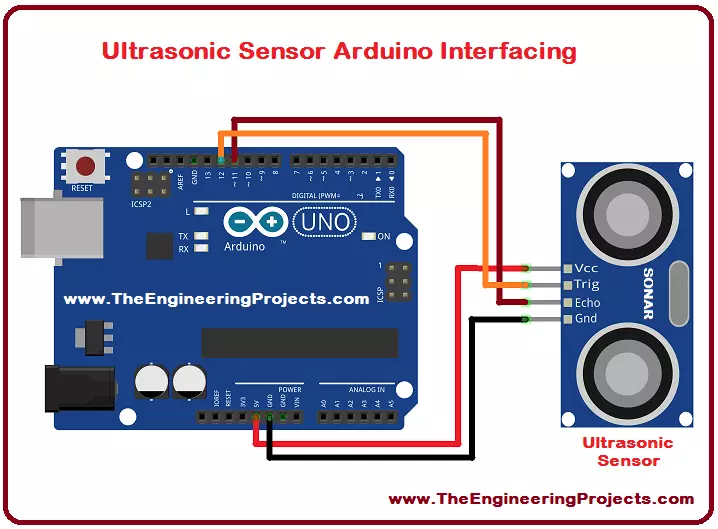
Hello everyone! I hope you all will be absolutely fine and having fun. Today, I would like to provide a complete discussion on Ultrasonic Sensor Arduino Interfacing. I would like to tell you some detail about ultrasonic sensor, after that we will move towards ultrasonic sensor Arduino interfacing. Ultrasonic sensor is also known as SONAR sensor. SONAR basically stands for Sound Navigation and Ranging. Ultrasonic is mostly used for the distance measurements. It can also be used for measuring the depth of the sea.
I have already shared Ultrasonic Sensor Library for Proteus. Ultrasonic/SONAR sensor is an electronic device used to estimate the distance of an object by continuously transmitting sound waves at a particular frequency and listens to tha ...
In modern electronics, the ability to monitor and control current flow is essential for maintaining the efficiency and safety of electrical systems. Engineers often rely on current sensors to observe how much current passes through a circuit, helping them analyze system behavior under different conditions. In this project, we simulate the interfacing of a current sensor with an Arduino using the Proteus software environment.
The aim of this simulation is to demonstrate how Arduino can read both the analog and digital outputs of the current sensor to identify the presence and level of current in a circuit. The system also displays the voltage reading and current status on a 20x4 LCD while controlling an LED indicator to represent current detection visually. By the end of this tutorial, you ...
Hey Fellas! Hope you are doing well. I feel pleasure to have you on this platform. Today, I'll discuss the detailed Introduction to Arduino Duemilanove which is a Microcontroller Board, introduced by Arduino.cc and is based on ATmega168 or ATmega328. It comes with 14 pins that can be used both ways: Input or Output. Duemilanove means "2009" in Italian.
Arduino boards have always been a good pick for hobbyists and students who intend to design projects that are mainly related to embedded system and automation. These boards are similar to microcontrollers, with little advantage over them as they come with some built-in peripheral features, setting you free from buying external components to employ automation in your project.
If we focus on Arduino ...
Hey Fellas! Hope you are getting along with life pretty well. This post is another addition in this Arduino Tutorial for Beginners series. Today, I'll discuss How to use analogWrite in Arduino? The analogWrite is mainly used to update the status of analog pins and is also used to map the analog values on the PWM (Pulse Width Modulation) pins.
You can check the article that I have posted previously on How to use analogRead in the Arduino - this command addresses the analog pins on the board and reads its status, while today's one does the exact opposite.
In this post, I'll try to break down each and everything related to analogWrite in simple steps, so you can grab the main idea pretty well. Let's jump right in.
How to use analogWrite in Arduino?
...