Hello readers, I hope you all are doing great. In this tutorial, we will learn how to interface the BMP280 sensor with the ES32 module to get temperature, pressure and altitude readings. Later, in this tutorial, we will also discuss how to upload these sensor readings to a web server.
BMP280
BMP280 or Barometric pressure sensor is a module used to measure temperature pressure and altitude. The small size and low power consumption feature of this sensor makes it feasible for battery-powered devices, GPS modules and mobile applications etc.
Fig. 1 BMP280 Sensor
The BMP280 is the product of BOSCH which is based on Bosch’s proven Piezo-resistive pressure sensor technology featured with high accuracy, long term stability, linearity and high EMC robus ...
Hello guys! I hope you’re all in a good mood today because we are going to review the design of an interesting project today. We’ll be looking to design 4-way traffic lights in such a way that their delay is variable and is dependent upon the traffic density. This project is of intermediate difficulty level for people studying in undergrad engineering school with electronics, electrical and mechatronics as their major. It is also for the people learning Arduino and basic circuit design on their own or through some course. We have already designed a Simple 4-Way Traffic Light Control using Arduino and today we will make it smart by adding a variable delay.
Variable 4 Way Traffic Light:
As you all already know the importance of traffic lights and t ...
Hello everyone! I hope you all will be absolutely fine and having fun. Today, I am going to provide you the discussion on Introduction to LM393. LM-393 has two internal operational amplifiers. These are internally frequency compensated. These are specifically designed to perform their tasks using a single power supply sources. LM-393 can also perform its operations properly by using split power supply. The current drain supply does not depend upon the magnitude of the power supply.
One of the most amazing feature of LM 393 is that ground is included in its common mode input voltage. Moreover, LM 393 has a lot of features e.g. wide voltage supply ranges, a very small current drain supply, low input offset current, low input bias current, output v ...
Hello everyone! I hope you all will be absolutely fine and having fun. Today, I am going to share my knowledge about Introduction to LM339. LM339 belongs to the family of devices having 4 independent voltage comparators. Each comparator is designed in such a way that it is capable of operating from a single power source over a wide range of power supplies. It can also operate for split power supplies. There is a unique characteristic of comparators, Input Common-Mode Voltage Range (ICMR) includes a ground even when it is operating from a single power supply voltage.
Basically, LM339 is a comparator IC having four built-in comparators. The basic purpose of a comparator is to rotate the signal between analog and digital domains. At its input termina ...
Hello everyone! I hope you all will be absolutely fine and having fun. Today, I am going to share my knowledge about Introduction to LM358. LM-358 consists of two independent high gain frequency compensated operational amplifier. They are specially designed to operate from a single supply or split supplies over a wide range of voltages.
LM-358 have lot of amazing features associated with them. These features include wide supply ranges, low supply current drain, independent of supply voltage, wide unity gain bandwidth, ground includes I common mode input voltage range, low input bias, open loop differential voltage gain, internally frequency compensation etc. LM 358 has a lot real life applications e.g. Operational Amplifier (Op-amp) circuits, tr ...
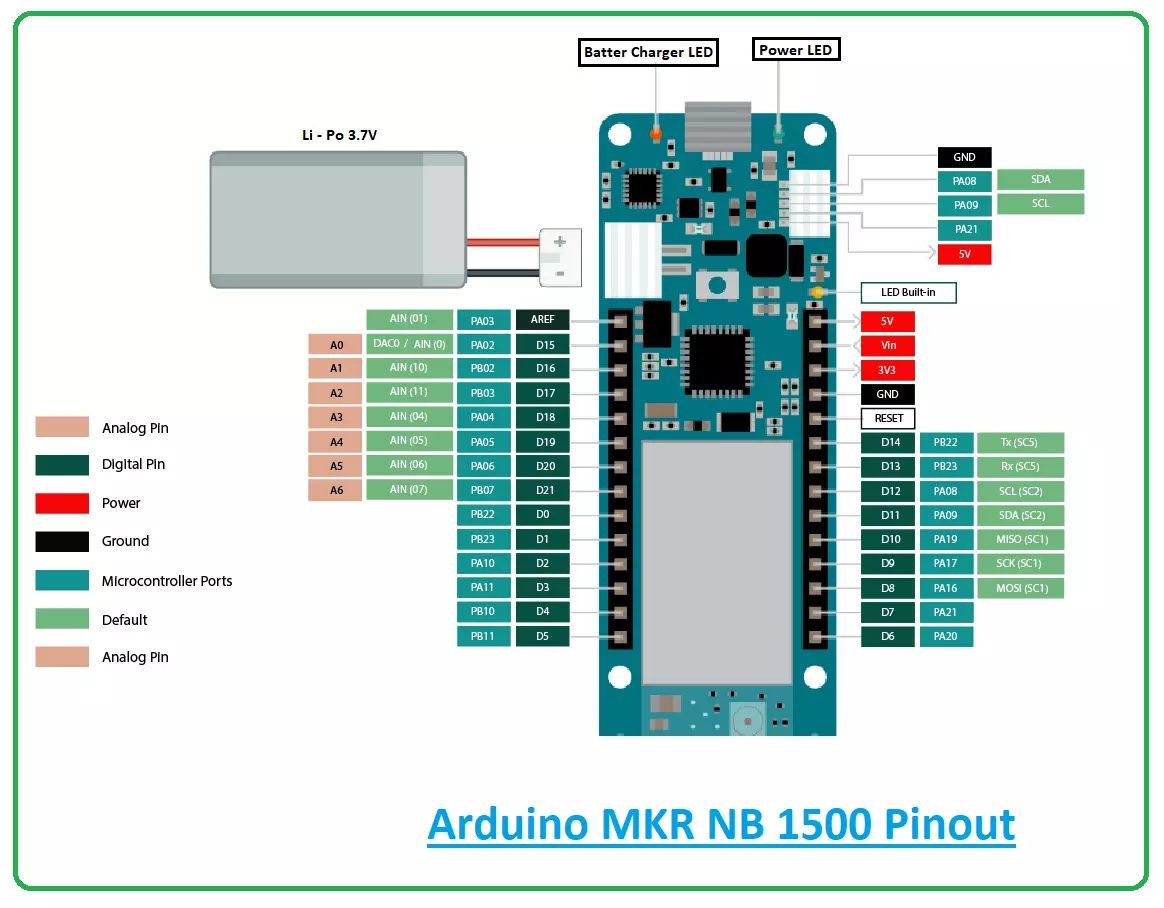
Hi Guys! Hope you’re well today. Happy to see you around. In this post today, I’ll walk you through the Introduction to Arduino MKR NB 1500.
The Arduino MKR NB 1500 is mainly developed for working in remote areas where no power or internet connection is available. This board is based on a SAMD21 Cortex-M0+ 32bit low power microcontroller and comes with an operating voltage of 3.3V.
Admit it.
The Arduino board is a remarkable addition to the development of many automation and embedded projects. These boards are incorporated with a series of digital and analog pins that can be connected with the expansion boards or other breadboards.
Most of the Arduino boards are integrated with 8-bit Atmel AVR microcontrollers. And all these boards incorporate ...
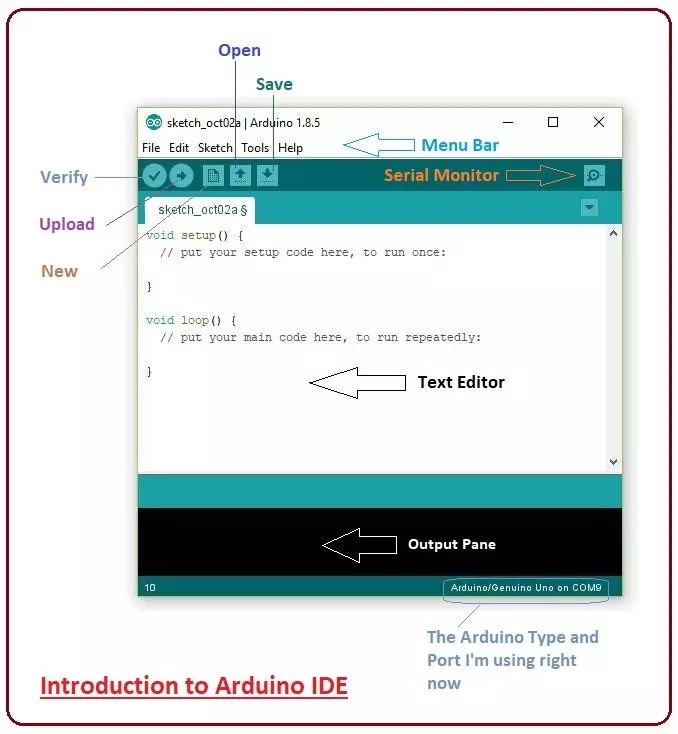
Hey Guys! Hope you are doing well. Today, I'll discuss the detailed Introduction to Arduino IDE, where IDE stands for Integrated Development Environment - An official software introduced by Arduino.cc, that is mainly used for writing, compiling and uploading the code in almost all Arduino modules/boards. Arduino IDE is open-source software and is easily available to download & install from Arduino's Official Site.
In this post, I'll take you through the brief Introduction of the Software, how you can install it, and make it ready for your required Arduino module. Let's dive in and get down to the nitty-gritty of this Software.
Introduction to Arduino IDE
Arduino IDE is an open-source software, designed by Arduino.cc and mainly used for wri ...
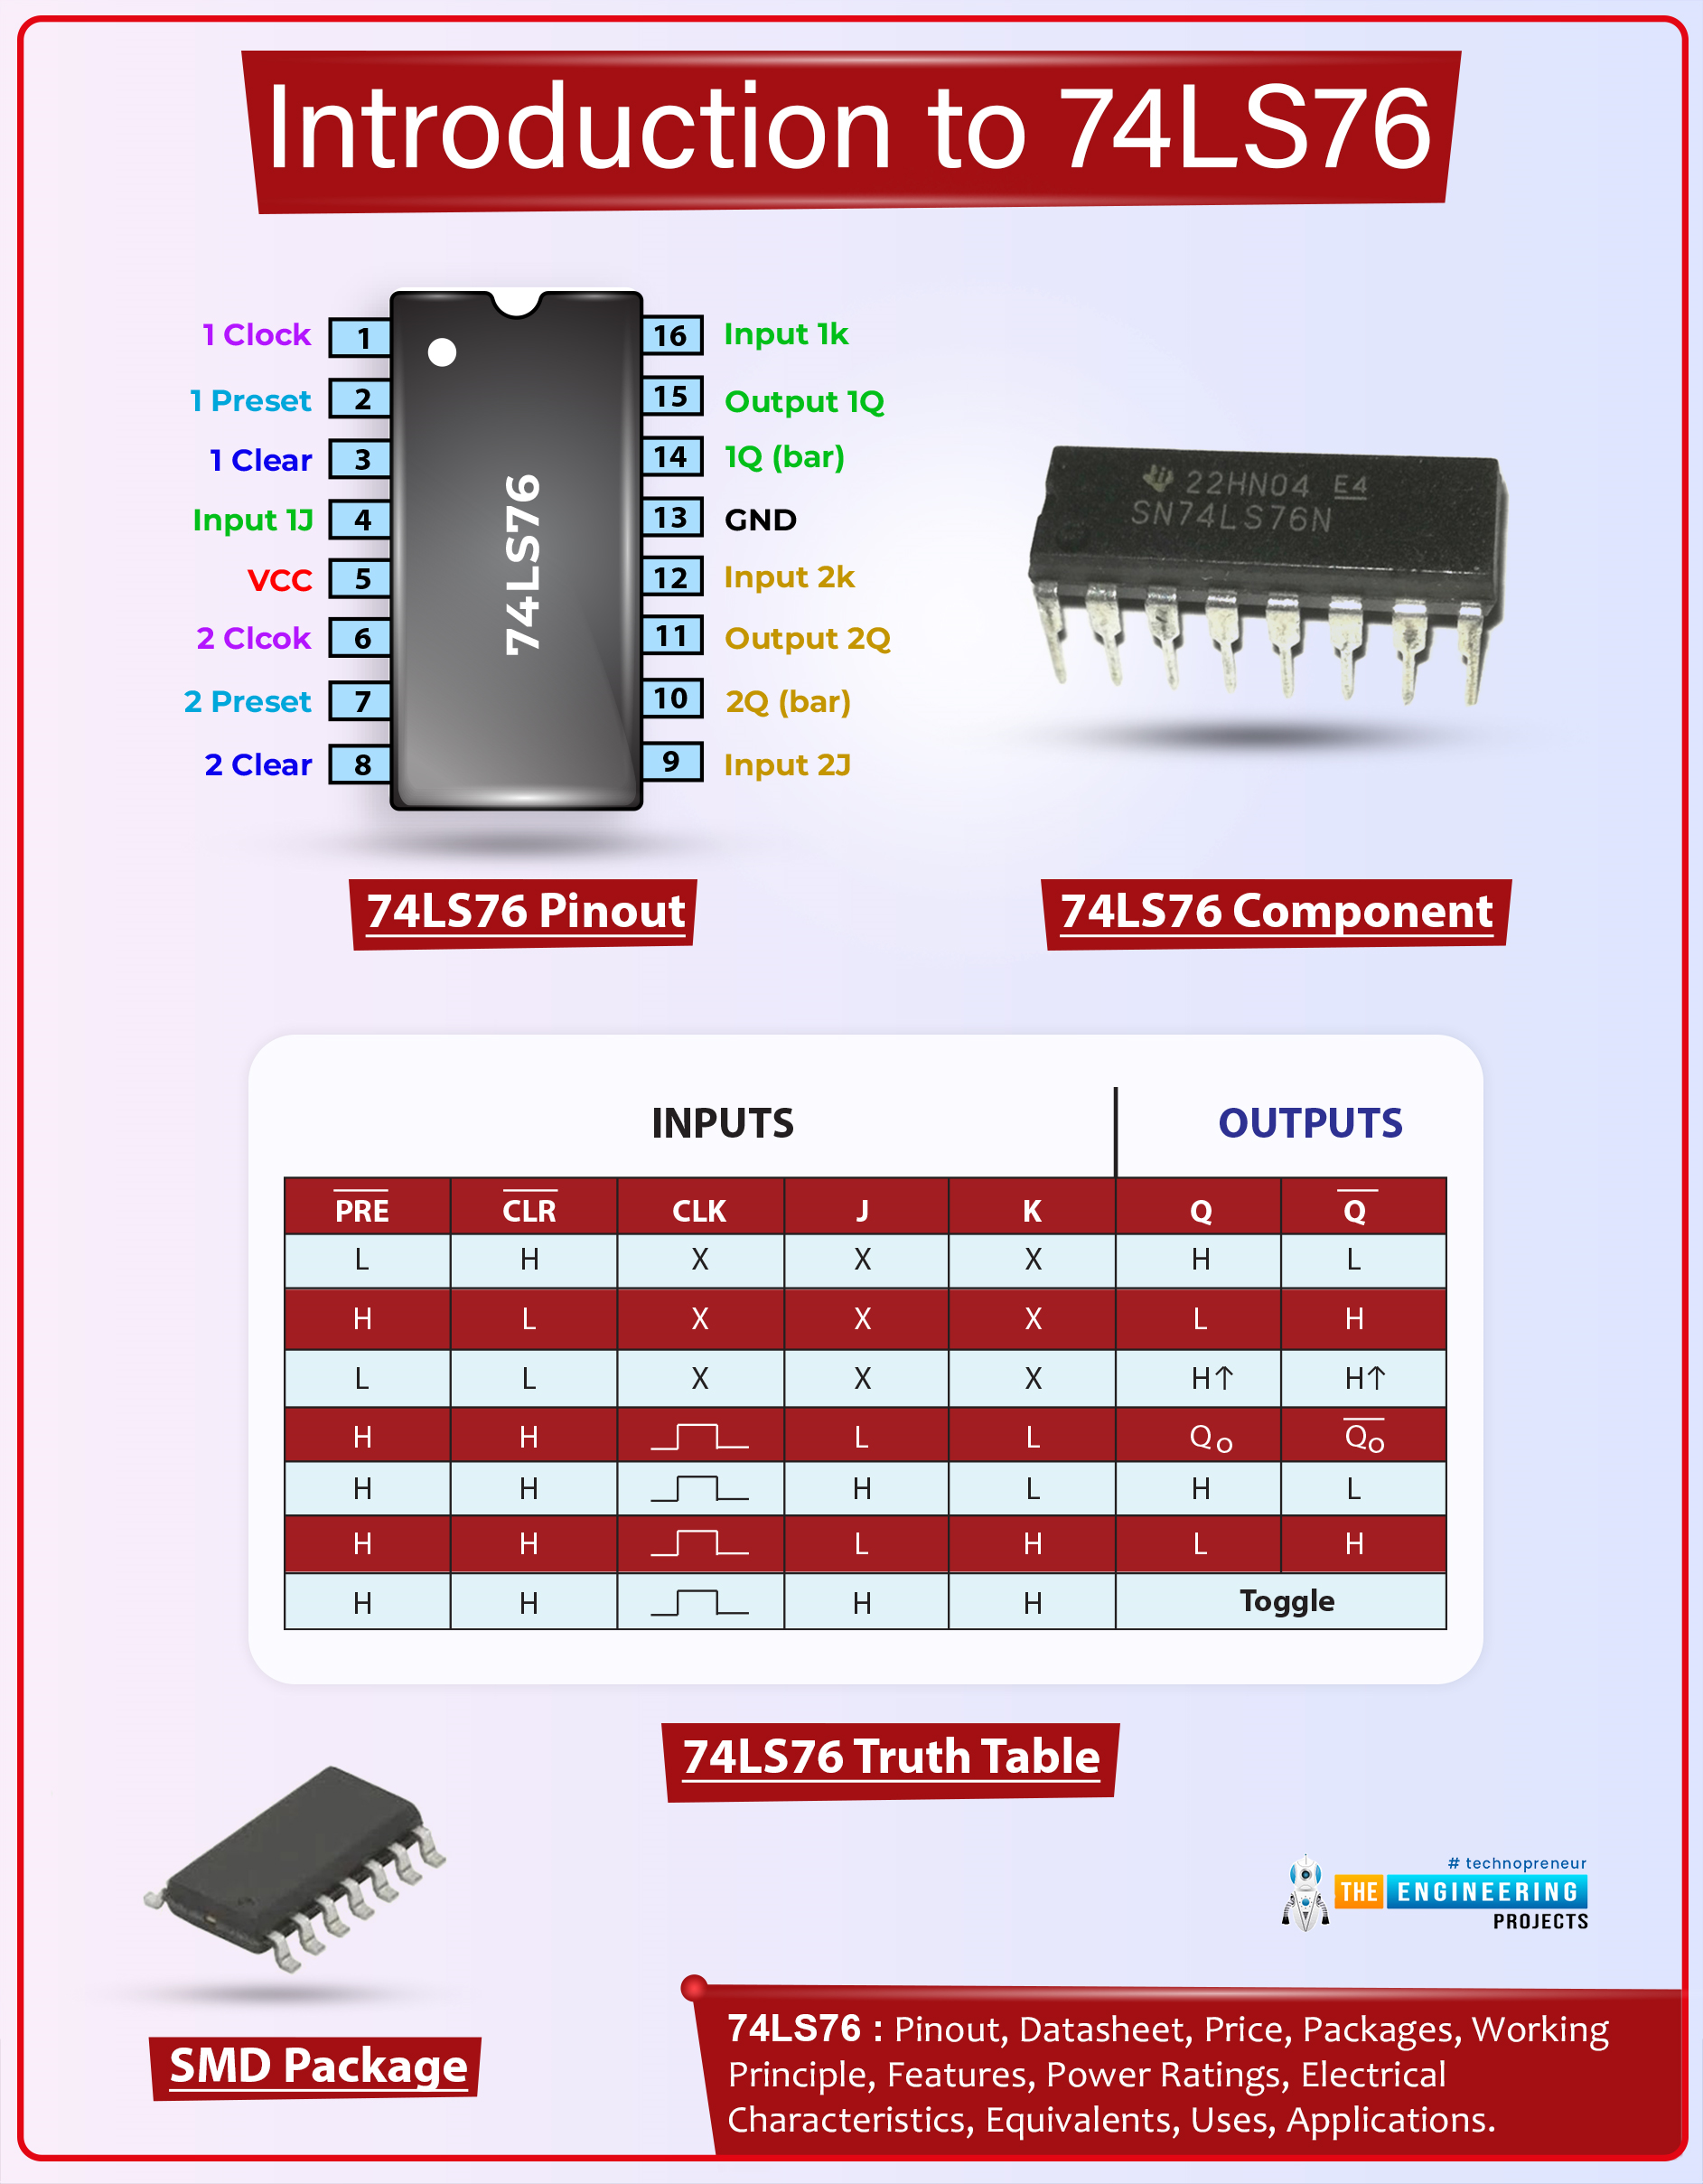
Hi Folks! Hope you’re well today. Happy to see you around. Today, I’ll walk you through the Introduction to 74LS76.The 74LS76 comes with separate J, K, clock pulse, direct clear inputs, and direct set. These flip-flops are developed in such a way when the clock is set HIGH, data will be received enabling inputs.
I suggest you buckle up as I’ll detail the complete Introduction to 74LS76 covering datasheet, pinout, features, alternatives, and applications.
Introduction to 74LS76
The 74LS76 comes with separate J, K, clock pulse, direct clear inputs, and direct set. These flip-flops are developed in such a way when the clock is set HIGH, data will be received enabling inputs.
This IC contains two JK flip-flops and each flip-flop can be utilized individually for the required applica ...
Hey Fellas! We always strive to keep you updated with best and valuable information so you keep coming back for what we have to offer. Today, I am going to uncover the details on the Introduction to 7805. It is a positive voltage regulator used for providing constant output voltage over a wide range of input voltage.
Before we move on, you must be clear what is voltage regulation? Voltage regulation is referred as the measure of voltage change between input and output.
The IC 7805 does the same thing. It provides constant output voltage when a range of different voltage is applied at the input terminal. This component comes with three terminals called input, ground, and output.
This is called positive voltage regulator because it generates posi ...
Hi Friends! Hope you are getting along with life pretty well. Today, I'll uncover the detailed Introduction to 2n5415 which is a PNP transistor mainly used for general purpose low-power amplifying and switching applications.
It comes with three layers: two P semiconductor layers and one doped N-layer where later is encapsulated between other two P-layers.
There are two major types of transistor: Bipolar Junction Transistor and Unipolar Transistor. This transistor falls under the category of Bipolar Junction Transistor as it comes with two charge carriers i.e. electrons and holes where later are the major charge carriers in PNP transistors.
In this post, I'll try to nail down everything related to 2n5415: its main features, working, and applicat ...