Hello friends, i hope you all are fine and enjoying in life. On a friends request, today i am going to share a new tutorial which is 'Getting Started with Arduino Software'. Previously i have uploaded a large no of project tutorials made on 555 timers and some MATLAB based Simulations. Now we are going to touch the next level and from now on we will work on mostly projects containing Arduino microcontroller. To get started with Arduino microcontroller, we first need to learn the operating software of Arduino microcontroller. This tutorial is very informative and i will be using Arduino software 1.0.5. It is a very basic level software and very easy to learn. IF you have already worked on Arduino software then you don't need to go through it. This tutorial is only for begineers who have jus ...
Hello friends, hope you all are fine and having good life. In today's project, we will see how to display ADC value on LCD using Arduino in Proteus ISIS . Its quite a simple project in which we are gonna measure the voltage of ADC pins and then will display them over to LCD. The microcontroller I am using in this project is Arduino. The simulation is designed in Proteus ISIS . IF you are working on PIC Microcontroller then you should have a look at How to Display ADC value on LCD using PIC Microcontroller in Proteus ISIS. Arduino has 10 bit ADC pins so whenever you apply voltage on these pins it will give you a value ranging from 0 to 1023 depending on the voltage provided. One can easily get this value using a simple function in Arduino analogRead(); but the real problem is to convert thi ...
In today's tutorial, we are going to see how to install Arduino driver in Windows. In the previous post, we have seen what is Arduino? and why is it so popular and whats its use? Now, afer getting the basic knowledge of Arduino, the next step you need to do is to install Arduino driver in your computer so that it got recognized by your computer as Arduino. If you don't install the Arduino driver in Wndows then you won't be able to program Arduino using Arduino software. tis tutorial is quite basic and is for the newcomers, who wants to start working on the Arduino software, if you have already run some codes on your Arduino then its not for you. You can skip it. Anyways, It's quite easy and it won't take much time. So let's get started with it. Installation of Arduino driver in Windows Fir ...
Hello friends, today I am posting a very basic tutorial on what is Arduino ??? In this tutorial I am gonna explain the basics of Arduino for the beginners. I am writing this tutorial because I got a lot of requests from the engineers in which they ask questions like what is Arduino ? What's the difference between Arduino and PIC? How to use Arduino? etc etc. So I thought of writing this topic. It's a very basic tutorial so if you are already familiar with this board and know the answer of this simple question What is Arduino ??? then you can skip this tutorial but again you must read it once, may be you get something out of it. :) I have posted a tutorial on Arduino Projects , in which I gave all the links of Arduino projects and tutorials posted on my blog, that's another reason for posti ...
In today's post we are gonna see how to connect Arduino YUN with Putty and access the files on Linux OS in Arduino YUN. In my last post Getting Started With Arduino YUN , I have explained in detail about basics of Arduino YUN. I am recall few important things here. Arduino YUN is a very powerful board with two processors on it. One is Arduino microcontroller used to control the output / input pins. The other processor is named as Atheros and it has Linus operating system on it, so one can easily run python scripts on it and can do any server or client side coding in it. So, today we are gonna see ow to access this Linux operating system of Arduino YUN using Putty software in Windows. Putty is a third party software used for accessing serial terminal, perform telnet or SSH communication etc ...
Hello friends, today we are gonna have a look on how to interface Seven Segment with Arduino in Proteus. In my last post, I have posted an Arduino Library for Seven Segment Display , which is designed by our team and is quite basic in functionality. So, if you haven't checked that post then first of all check that one and download the Arduino Library for Seven Segment Display as I am gonna use that library in today's post. Moreover, in order to run this library you are also gonna need to download Arduino Library for Proteus , using this library you will be able to use Arduino board in Proteus so also read that post and download this library and install it in your Proteus. Again I am mentioning that its the first library designed by our team so its in basic stages, it has few functions and ...
In today's post, I am gonna share a new Arduino Library for Seven Segment Display. In my recent project, I got a chance to work on seven segment displays, I have worked on them using PIC microcontroller but haven't got a chance to use them with Arduino. So, now as usual when I started working on them, I started searching for Arduino Library but I kind of got disappointed after getting quite heavy libraries for seven segments, and after a lot of search I thought of designing my own Arduino library for seven segment display, which I am gonna share in this post. :) It's not very advanced library as we know seven segment displays are not too complex, so its quite simple and using it you can quite easily display any numerical digit on the seven segment display. Moreover, I have also included an ...
Hello everyone, in today's post we are gonna have a look at how to interface temperature sensor Dallas 18B20 with Arduino. There are many temperature sensors available in market like LM35, DHT11 etc but personally I like Dallas18B20 most of all, as it gives the most accurate result up to four decimal points. It operates on single wire and sends all data through this wire. Another advantage of this wire is you can interface multiple sensors with a single data line. You should also have a look at How to use 18B20 in Proteus ISIS . In today's post, we are gonna get value from this sensor and then print it over the Serial Terminal as well as LCD. We will get the values in degree centigrade. Its not much difficult to interface 18B20 with arduino and also an Arduino library is also availble, usi ...
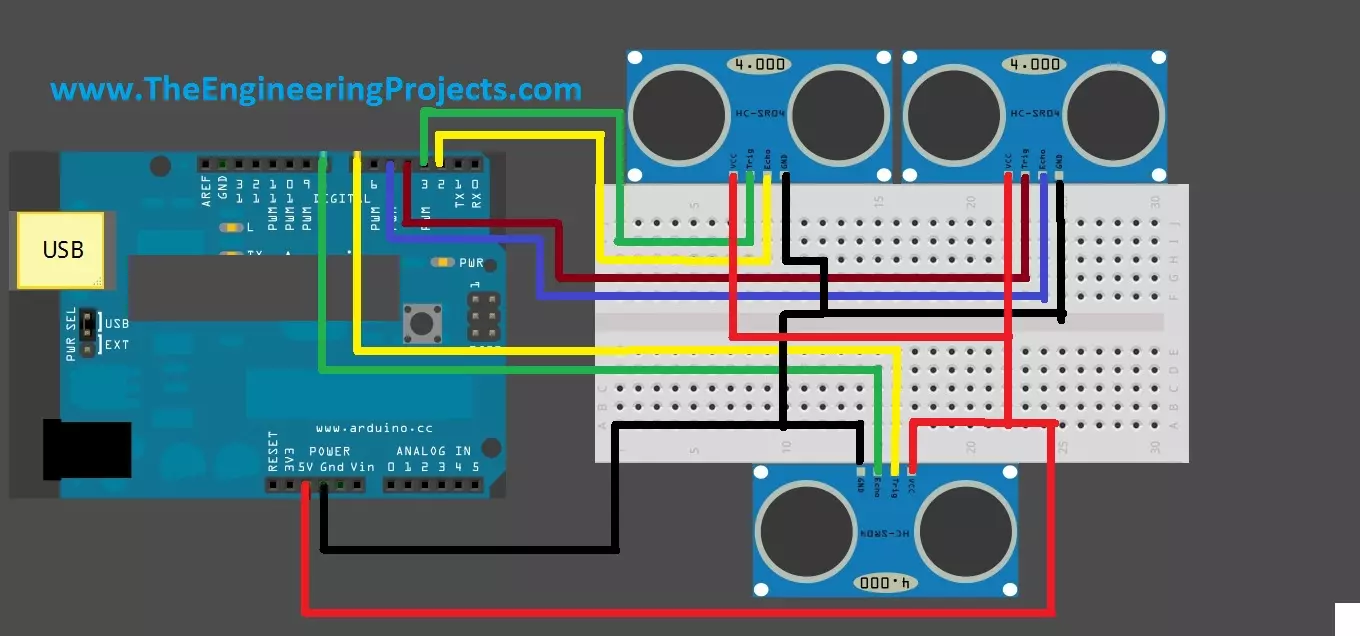
Hello friends, hope you are having fun and enjoying life. Today, I am gonna post about interfacing of multiple Ultrasonic sensor with Arduino. In the previous post, we have seen Interfacing of Ultrasonic Sensor With Arduino and in this post I have interfaced single ultrasonic sensor but in projects especially related to robotics, we have to interface multiple ultrasonic sensors. For example you have an obstacle detection robot, now in order to detect obstacle in front of robot you have to place once sensor on the front side but now you can't detect any object present on left or right side of your robot, so you have to place two sensors one on the left side of robot and one on the right side so in this project you need to use total three ultrasonic sensors, one on the front, one on left and ...
Today, we are gonna have a look on How to Interface Ultrasonic Sensor with Arduino . Few days ago, I have posted a complete tutorial on How to Use Ultrasonic Sensor Library in Proteus and later I have posted different examples on How to Simulate Ultrasonic Sensor in Proteus . Those posts were about Proteus Simulations and weren't about hardware interfacing, so I thought today let's interface it in hardware. Simulation is a good starting point for projects but they are really far away from real world. It happened to me a lot of times that my simulations are working perfectly fine but when I design the same circuit in hardware then it says no I am not gonna work. :) So, the bottom line is never trust simulations, unless you properly test it on hardware. So, today I am gonna interface an Ultr ...