Hello friends! In this tutorial, we will interface a matrix keypad with Arduino Uno and show each pressed key on a 20x4 LCD in Proteus. We will begin with the keypad's internal connections, then build the circuit and write a sketch that keeps the displayed text within a defined area. A keypad is useful when a project needs several related buttons, such as digits for a calculator or commands for a menu. A matrix arrangement reduces the number of controller connections compared with giving every button its own dedicated input. Our example uses twelve keys arranged in four rows and three columns. We will preserve the original circuit's pin assignments, explain how the Keypad library scans them, and check common mistakes such as reversed connector order, repeated characters and LCD overflow. F ...
Hello friends! Our Pixy camera is connected and PixyMon is working, so we can now teach the camera which colour we want it to detect. In this tutorial, we will select a blue region on a globe, store it as a signature and refine the detection when other parts of the scene also match. We are using the original Pixy CMUcam5 and its matching PixyMon software. The screenshots belong to that setup. If you have Pixy2, use its corresponding software and instructions rather than assuming that every menu and parameter is identical. The most useful idea to understand before starting is that we are teaching a colour signature. We are not teaching the camera the meaning of a globe or asking it to recognize every globe regardless of colour. Once that distinction is clear, the results and their limitatio ...
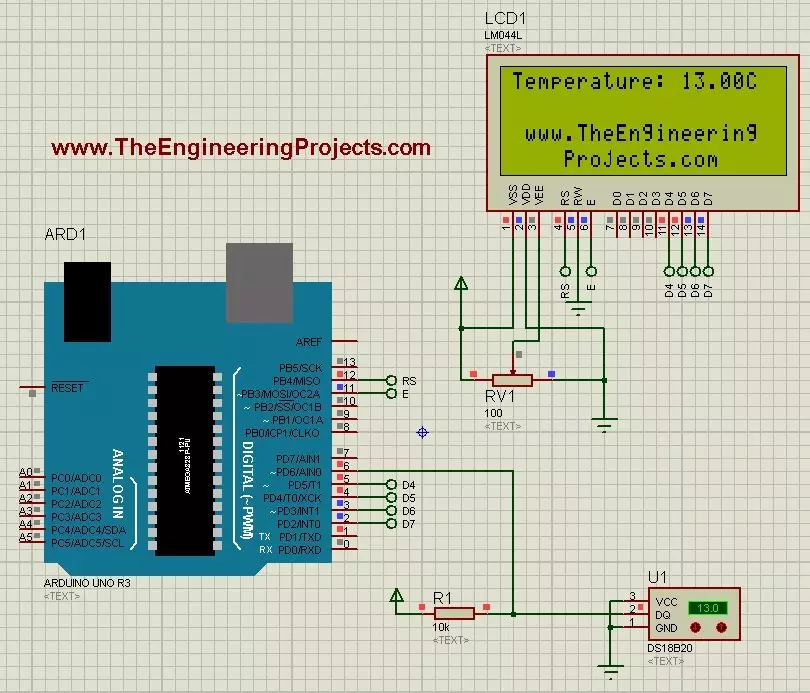
Hello friends! Today we will use the DS18B20 temperature sensor with Arduino Uno in Proteus and display its reading on a character LCD. The sensor is sometimes shortened to 18B20 in project descriptions, but DS18B20 is the part name we will use when selecting the device and checking its specifications. We will begin with the sensor connections, add a 20-column by 4-row LCD, and write a sketch that requests a temperature conversion before displaying the result. We will also handle a missing sensor explicitly instead of presenting an error value as though it were a real temperature. The Proteus model lets us change the simulated temperature using its controls. It does not measure the room around your computer. This makes it useful for checking the program and display workflow before building ...
Hello friends! We have prepared the original Pixy camera and installed PixyMon. In this tutorial, we will put the camera into its firmware programming mode, select the correct firmware file and check that it returns to normal operation afterward. This procedure applies to the original Pixy CMUcam5. The images show the earlier update performed for this series, including a 2.0.17 firmware file. They remain useful for understanding the sequence, but that filename should not be treated as a permanent recommendation. We will choose firmware from the original camera's official resources and keep its role separate from the desktop application and Arduino library. That distinction prevents a common mistake: downloading a newer-looking file for different hardware and assuming it is an upgrade for t ...
Hello friends! In the previous tutorial, we prepared the Pixy camera and identified its cables. Now we will install PixyMon, the desktop application that lets us view the camera image and configure the original Pixy CMUcam5. We will follow the Windows installation sequence shown in the original screenshots, explain the USB driver stage, and check that the camera can communicate with the application. The screenshots are historical, so the appearance of an installer or Windows notification may differ on your computer. This article concerns the original Pixy, not Pixy2. Choose software for the board you own before starting. A successful installation of the wrong product's application does not establish compatibility with your camera. Figure: PixyMon installation for the original Pixy camera. ...
Hello friends! Today we will get started with the Pixy camera and understand how it can add colour-based vision to a microcontroller project. Before connecting it to a robot, we will identify the board, choose the correct cables and establish what information the camera can actually provide. The board in this tutorial is the original Pixy CMUcam5, often called Pixy1. Its software, firmware and Arduino library belong to that product generation. If you have Pixy2, use its own documentation and downloads; similar names do not make the two software packages interchangeable. Our first objective is simple: connect the original camera to a computer, view a useful scene, and prepare it to recognize a coloured target. Once that works, we can pass compact detection results to Arduino and decide how ...
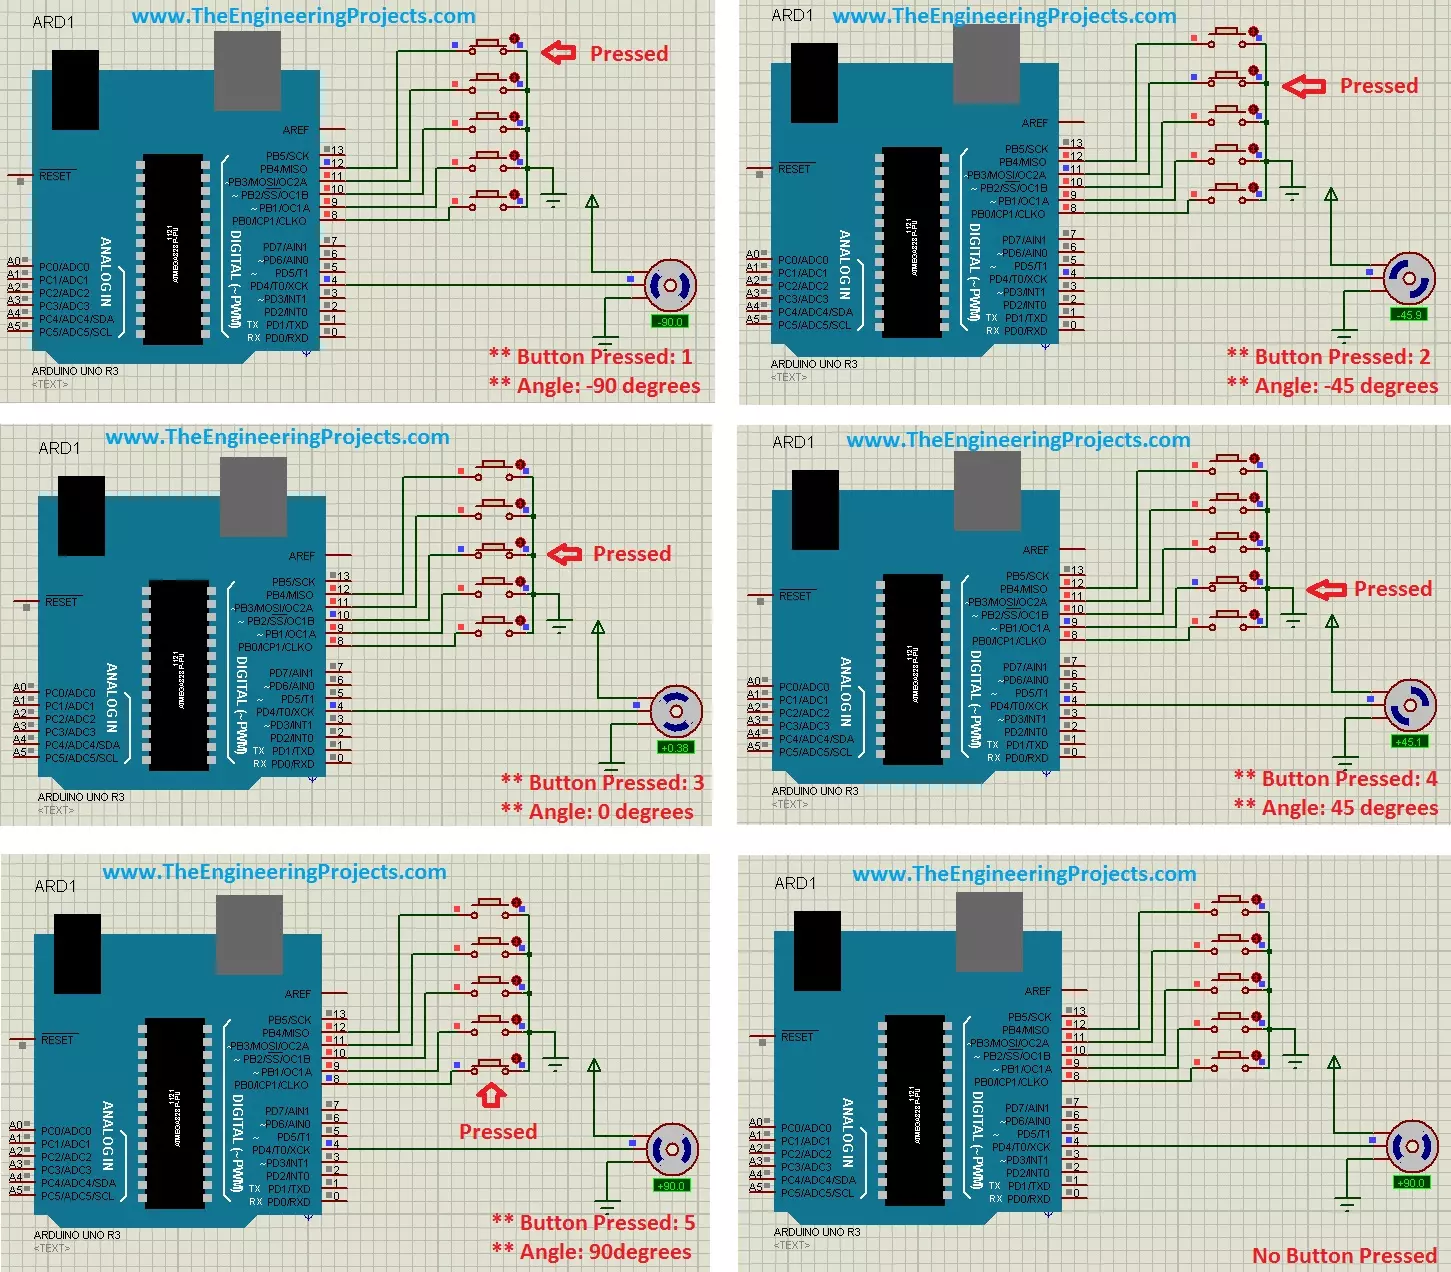
Hello friends! In this tutorial, we will control a servo motor with Arduino in Proteus. We will begin with a simple sweep, understand the signal that commands the position, and then add five push buttons so we can select individual positions. Libraries Libraries used in this tutorial Arduino UNO Library for Proteus: V1.0 (2015, used in this tutorial) · latest version: V4.0 (October 2026) Helping Tools Serial Monitor Advance : a serial terminal window for the UART of your board Serial Monitor Expert : the serial monitor with extra debugging tools LCD Library for Proteus V3.0 : 16x2, 20x4 and I2C LCDs to show your readings A positional hobby servo is convenient because its motor, gearbox and position controller are assembled in one unit. Arduino supplies a command signal while the servo's in ...
Hello friends! Today we will learn how to restart an Arduino program deliberately and, more importantly, distinguish a real microcontroller reset from simply starting our application logic again. These operations can look similar on the Serial Monitor while leaving the hardware in different states. For the main example, we will use a classic Arduino Uno with an ATmega328P and its watchdog timer. We will also revisit the two approaches in the original tutorial: connecting an output pin to RESET and calling a function pointer at address zero. Both need important qualifications before they are used in a project. The original wiring image is retained below for reference, but the recommended example does not need that jumper. Remove any output-to-RESET connection before following the watchdog p ...
Hello friends! Today we will install the Arduino bootloader on an ATmega328P using a second Arduino Uno as the programmer. This is useful when replacing the socketed processor on a classic Uno or restoring a compatible target whose serial bootloader has been erased. We will follow the original two-board arrangement: board B is the working programmer, and board A contains the target processor. Giving the boards separate roles helps prevent a common mistake, which is changing settings for one board while accidentally programming the other. The title uses the familiar ATmega328 family name, but the standard classic Uno configuration targets the ATmega328P. Read the marking on your chip before starting. An ATmega328, ATmega328P and ATmega328PB are different device selections; a similar name is ...
Hello friends! Today we will use an Arduino Uno footprint in Proteus ARES and turn it into a reusable package for our own PCB projects. This is useful when you want a removable Uno to plug into a larger board containing sensors, connectors or interface circuits. Libraries Arduino UNO Simulation Libraries Latest library: Arduino UNO Library for Proteus V4.0 (October 2026): working LEDs, a RESET button and a built-in serial monitor Other Arduino boards: Mega 2560 · Mega 1280 · Nano · Pro Mini · Mini (V4.0) All six V4.0 boards in one package: Arduino Library for Proteus V4.0 Helping Tools Serial Monitor Advance : a serial terminal window for the UART of your board Serial Monitor Expert : the serial monitor with extra debugging tools LCD Library for Proteus V3.0 : 16x2, 20x4 and I2C LCDs to sh ...