


Project Files of HC-05 Library for Proteus V1.1 (HC-05 & HC-06 Bluetooth)
 Libraries
 Code
 Projects
 Simulation
hc05-hc06-tep-v1-1-1dc43818571e43e9876c515ed30c1d1c.zip
Download HC-05 and HC-06 Library for Proteus V1.1
Download HC-05 and HC-06 Library for Proteus V1.1 comes as a ZIP archive of 30 files (1.3 MB, 2.9 MB unpacked) holding Proteus library files, simulation model DLLs, a Proteus simulation, an Arduino sketch, an Arduino library, compiled HEX firmware and data files.
- LIBProteus library
- IDXProteus library index
- DLLProteus model
- DSNProteus simulation
- INOArduino sketch
- LIBArduino library
- HEXHEX firmware
- CSVData file
Description
HC-05 and HC-06 Library for Proteus V1.1 is the download package that goes with our tutorial HC-05 Library for Proteus V1.1 (HC-05 & HC-06 Bluetooth). On this page you can download the ZIP file (1.3 MB) and see what is inside before you save it: 30 files in 12 folders, the Proteus library files (LIB and IDX), the simulation model (DLL), a ready Proteus simulation, an Arduino sketch, an Arduino library, the compiled HEX firmware and data files. The tutorial explains the design; this page gets the files onto your computer and into use.
What this library is
HC-05-HC-06-Bluetooth-Library-for-Proteus-v1.1.zip with HC-05 and HC-06 Simple and Advance (TEPBLUETOOTH.LIB and TEPBLUETOOTH.DLL), the TEP Serial Monitor and Arduino UNO libraries for Proteus, the LED control and master / slave chat simulations with their HEX files, the four demo sketches with the AltSoftSerial 1.4 library and a README.
This is version 1.1; older or newer releases, when they exist, are listed in the Development tab.
What is inside the ZIP file
- ArduinoV3TEP.LIB – Proteus library, 95.6 KB
- TEPBLUETOOTH.LIB – Proteus library, 92.2 KB
- TEPSERIALMON.LIB – Proteus library, 11.1 KB
- ArduinoV3TEP.IDX – Library index, 830 B
- TEPBLUETOOTH.DLL – Simulation model, 332 KB
- TEPSERIALMON.DLL – Simulation model, 978 KB
- and 24 more, all listed in the File Structure tab
The archive unpacks to 2.9 MB and carries its own README (README.txt), shown in the README tab above.
How to download
Use the download panel at the top of this page: after the counter (30 seconds for guests, 10 for members) the black button unlocks and the ZIP file comes straight from our content network. If the browser opens it instead of saving, use Save as; extract the whole archive before using anything inside it.
How to install
- Step 1: Extract the ZIP file with Windows (Extract All), 7-Zip or WinRAR, keeping its folders.
- Step 2: Close Proteus and copy ArduinoV3TEP.LIB, TEPBLUETOOTH.LIB and TEPSERIALMON.LIB and ArduinoV3TEP.IDX into its LIBRARY folder (Proteus 8: C:\Program Files (x86)\Labcenter Electronics\Proteus 8 Professional\LIBRARY).
- Step 3: Copy TEPBLUETOOTH.DLL and TEPSERIALMON.DLL into the MODELS folder next to it, so the part simulates.
- Step 4: Start Proteus, press P and search for "ArduinoV3TEP"; place and wire it as in the tutorial.
- Step 5: In the Arduino IDE use Sketch → Include Library → Add .ZIP Library, then restart the IDE.
- Step 6: Open HC05_LED_Control.ino, HC05_Master_Chat.ino and HC06_LED_Control.ino and 3 more in the Arduino IDE, pick board and port and Verify (Export Compiled Binary gives the HEX).
- Step 7: In Proteus set the controller's Program File to HC05_LED_Control.hex, HC05_Master_Chat.hex and HC06_LED_Control.hex and 1 more; on hardware, flash the same file.
- Step 8: Open HC05-HC06-Chat-ArduinoUnoV3.pdsprj and HC05-HC06-LED-Control-ArduinoUnoV3.pdsprj in Proteus and press Play.
Read the detailed guide
This page is for the files. The full tutorial, HC-05 Library for Proteus V1.1 (HC-05 & HC-06 Bluetooth), explains the circuit and the code step by step and shows the working results and the simulation; read it before you build. Questions about the download or the installation go in the comments below; more Proteus downloads are listed further down this page.

File Structure
 File Structure
2.8 KB4.4 KB2.6 KB2.5 KB4.6 KB9.8 KB968 B1.4 KB8.3 KB2.5 KB82 B441 B422 B1.3 KB384 B830 B95.6 KB92.2 KB11.1 KB332 KB978 KB23.6 KB24.5 KB14.1 KB15 KB14.7 KB13.2 KB332 KB978 KB22.7 KBGallery12 images from the tutorialOpen the tutorial
 Gallery12 images from the tutorial
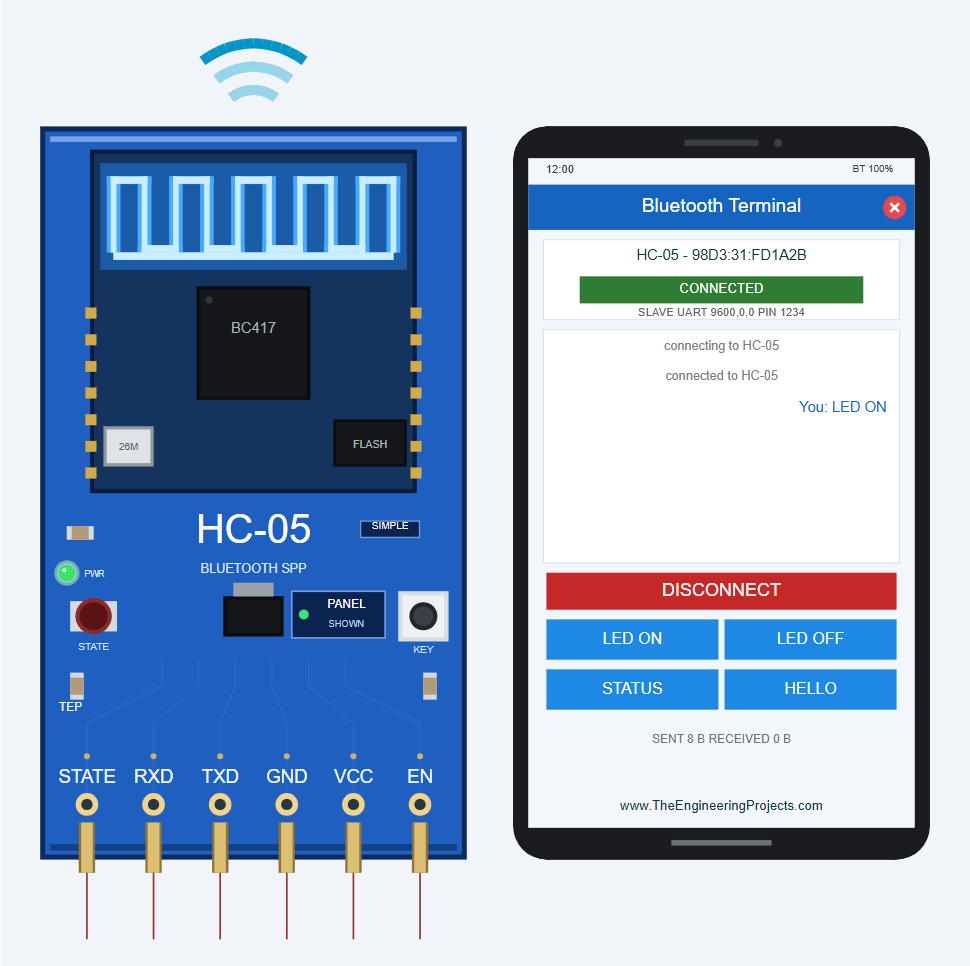
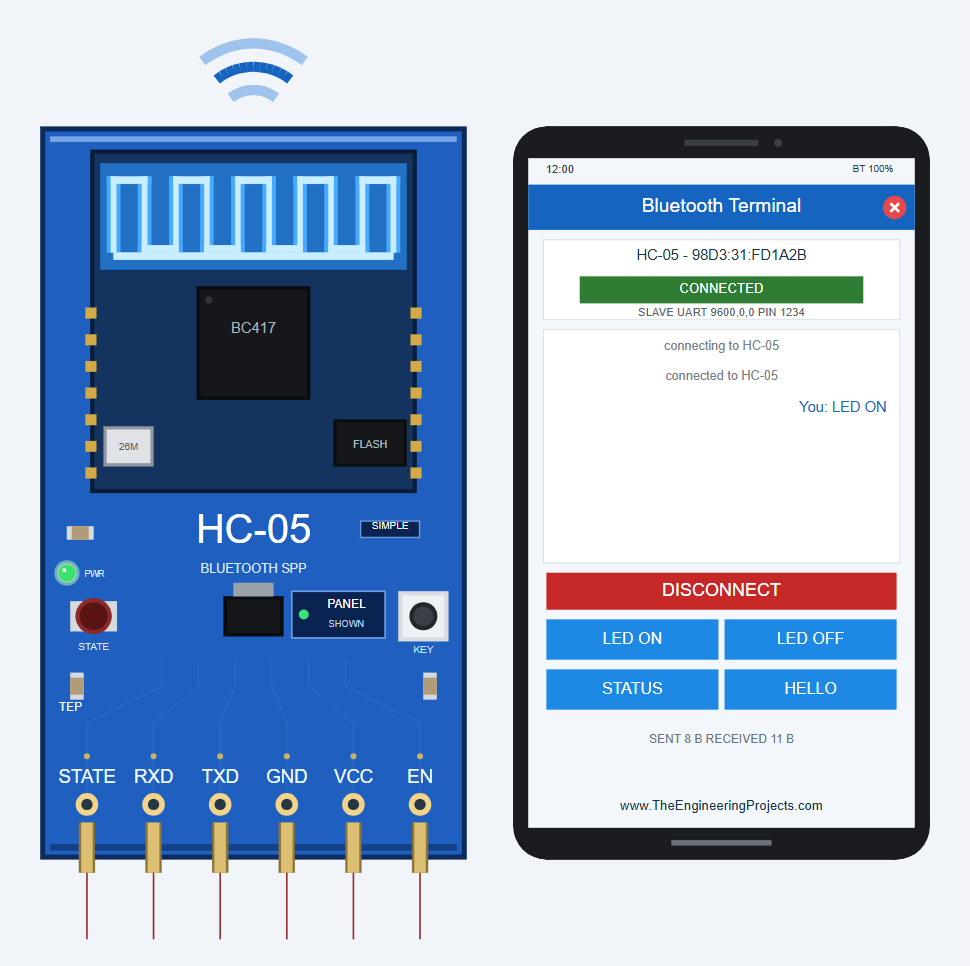
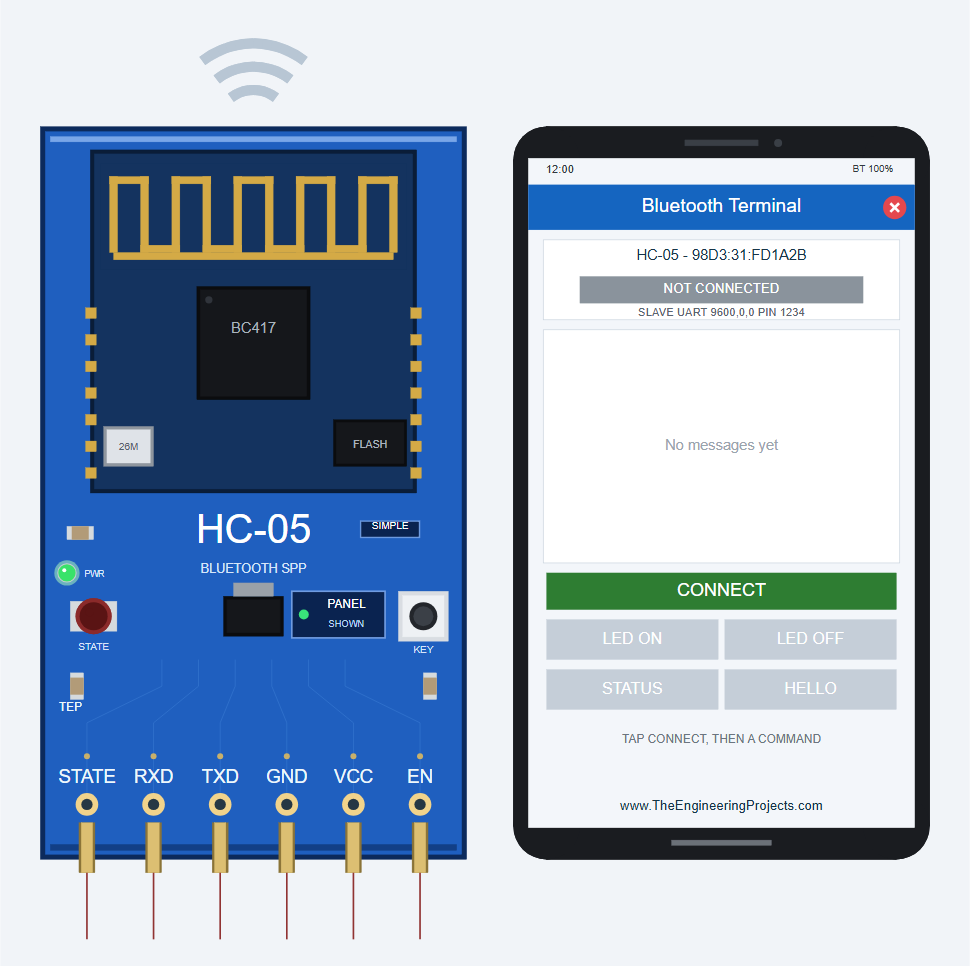
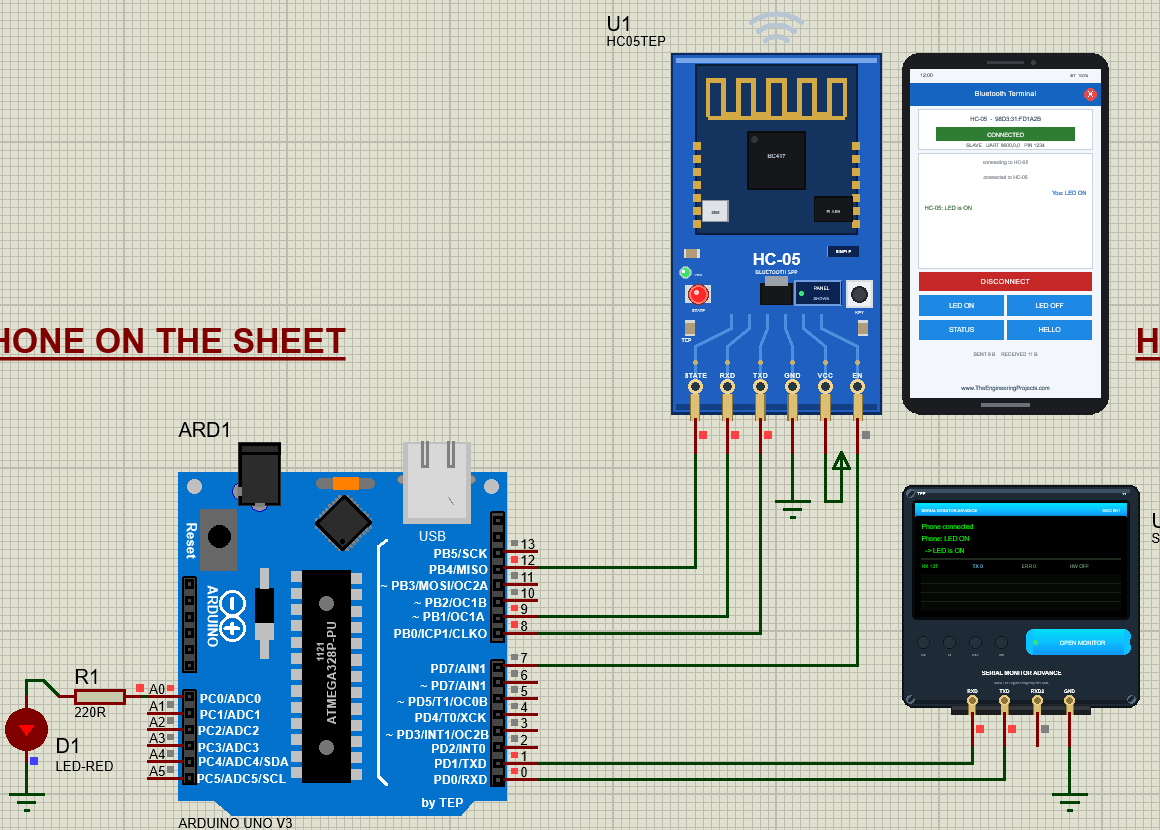
The circuit, the board and the results as they appear in HC-05 Library for Proteus V1.1 (HC-05 & HC-06 Bluetooth). Open an image for its full size.
README
 README
HC-05 AND HC-06 BLUETOOTH SERIAL MODULE LIBRARY FOR PROTEUS - V1.1
Designed by The Engineering Projects
www.TheEngineeringProjects.com

IMPORTANT LINKS
Article (read it first - pictures, step by step, every feature explained):
  https://www.theengineeringprojects.com/2026/10/hc-05-library-for-proteus.html
Report a bug or suggest a feature (our forum):
  https://www.theengineeringprojects.com/forum/category/hc-05-hc-06-proteus-library
The demos use our TEP Serial Monitor Advance (included) instead of Proteus's
Virtual Terminal - its own article:
  https://www.theengineeringprojects.com/2026/10/serial-monitor-advance-proteus-library.html

FILE STRUCTURE
HC05-HC06-TEP-v1.1/
|-- Proteus Library Files/
|   |-- ArduinoV3TEP.IDX                              0.8 KB   its index -> LIBRARY folder
|   |-- ArduinoV3TEP.LIB                             95.6 KB   TEP Arduino UNO (demos) -> LIBRARY folder
|   |-- TEPBLUETOOTH.LIB                             92.2 KB   HC-05 / HC-06 Simple + Advance (4 devices) -> LIBRARY
|   |-- TEPSERIALMON.LIB                             11.1 KB   TEP Serial Monitor Advance -> LIBRARY folder
|-- Proteus Model Files/
|   |-- TEPBLUETOOTH.DLL                            332.0 KB   HC-05 / HC-06 model -> Proteus MODELS folder
|   |-- TEPSERIALMON.DLL                            978.0 KB   Serial Monitor model -> MODELS folder
|-- Proteus Simulation/
|   |-- HC05_LED_Control.hex                         14.1 KB   demo 1, UNO 1 (HC-05)
|   |-- HC05_Master_Chat.hex                         15.0 KB   demo 2, UNO 1 (HC-05 master)
|   |-- HC05-HC06-Chat-ArduinoUnoV3.pdsprj           23.6 KB   demo 2: HC-05 master <-> HC-06 slave chat
|   |-- HC05-HC06-LED-Control-ArduinoUnoV3.pdsprj    24.5 KB   demo 1: LED control from the phone
|   |-- HC06_LED_Control.hex                         14.7 KB   demo 1, UNO 2 (HC-06)
|   |-- HC06_Slave_Chat.hex                          13.2 KB   demo 2, UNO 2 (HC-06 slave)
|   |-- TEPBLUETOOTH.DLL                            332.0 KB   copy of the model so the demos run as is
|   |-- TEPSERIALMON.DLL                            978.0 KB   copy of the monitor model
|-- Arduino Code/
|   |-- HC05_LED_Control/HC05_LED_Control.ino         2.8 KB   sketch (source of the .hex)
|   |-- HC05_Master_Chat/HC05_Master_Chat.ino         4.4 KB   sketch (source of the .hex)
|   |-- HC06_LED_Control/HC06_LED_Control.ino         2.6 KB   sketch (source of the .hex)
|   |-- HC06_Slave_Chat/HC06_Slave_Chat.ino           2.5 KB   sketch (source of the .hex)
|   |-- libraries/AltSoftSerial/                     30.1 KB   AltSoftSerial 1.4 (MIT, LICENSE.txt), 11 files
|-- README.txt                                      ~23.6 KB   this file
Total: 2.92 MB (unzipped). The C++ source code of the models is not included.

WHAT IS IT?
Simulation models of the HC-05 (master / slave) and HC-06 (slave) Bluetooth
serial port modules for Proteus 8. Every TEP HC-05 / HC-06 in a design shares
one Bluetooth "air": a master HC-05 finds and connects to its slave by itself,
and every slave can be connected from a virtual smartphone running a Bluetooth
terminal app. Whatever an Arduino writes into one module's RXD comes out of the
other side - the other module's TXD, or the phone's screen. Both AT command
sets (HC-05 firmware 2.0-20100601, HC-06 linvor V1.8), the EN / KEY pin, the
STATE pin, PIN pairing, BIND / CMODE and the real LED blink patterns are
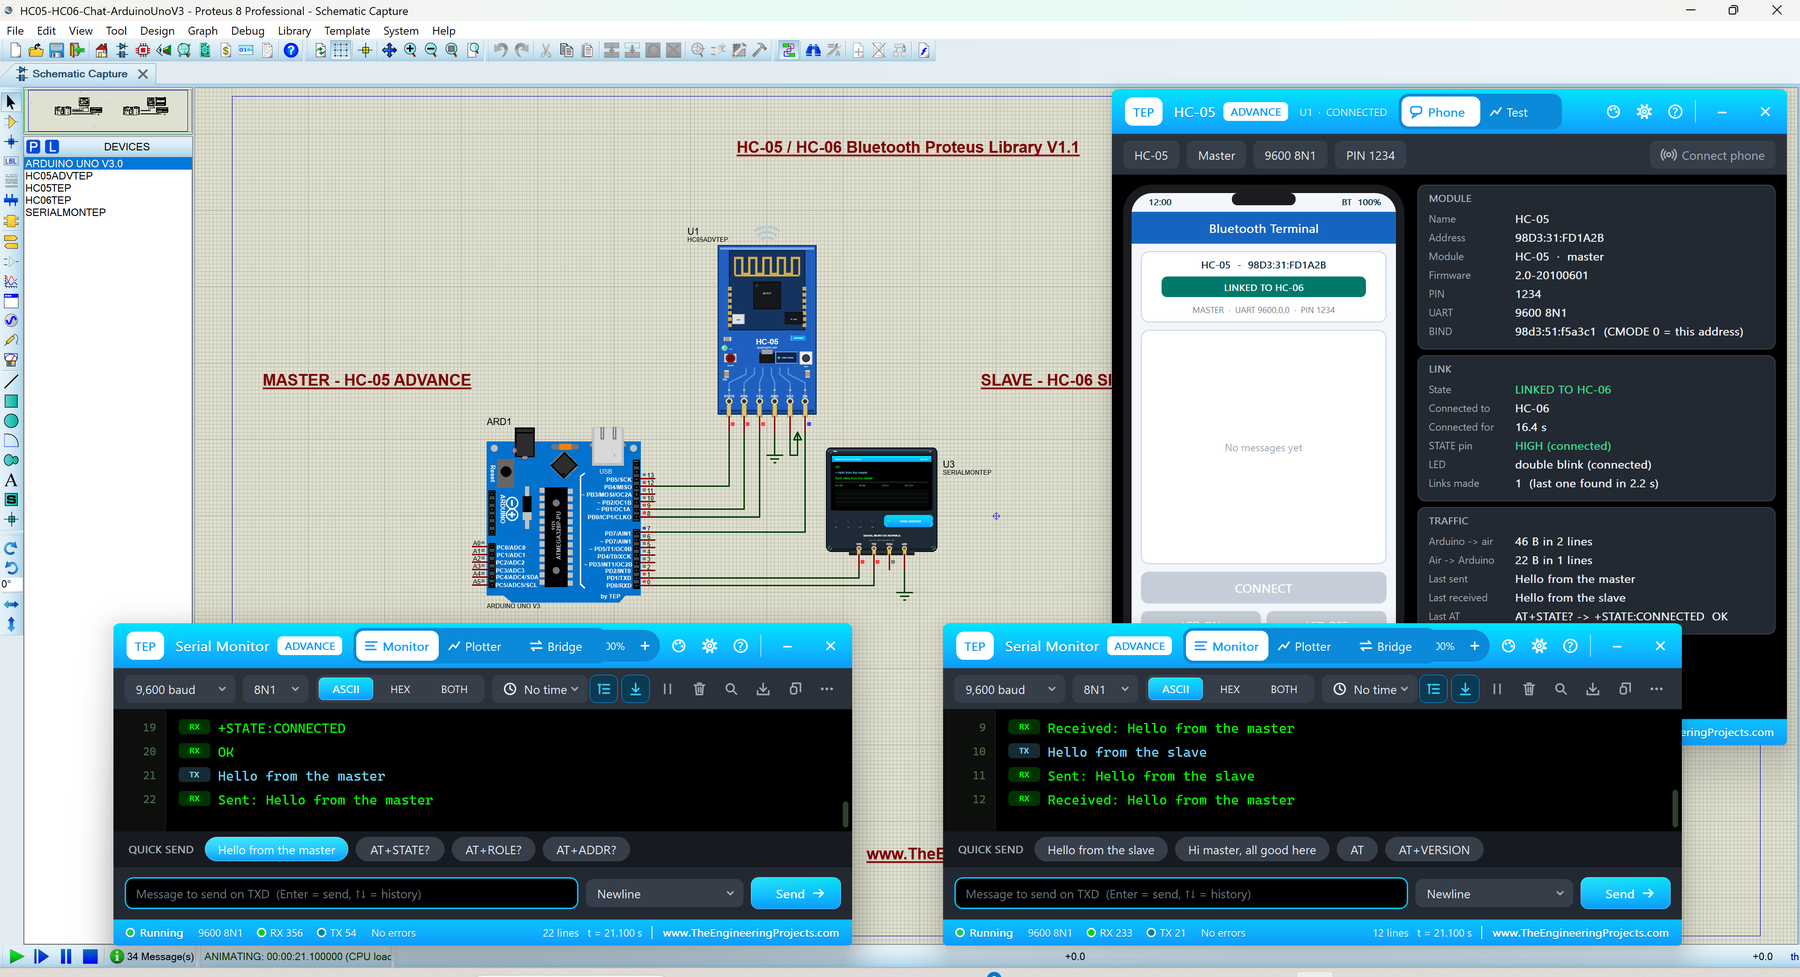
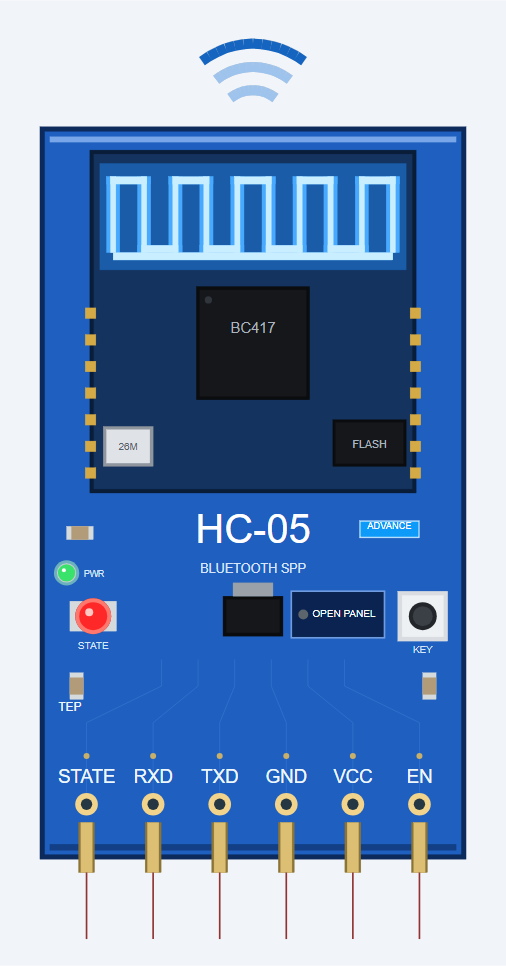
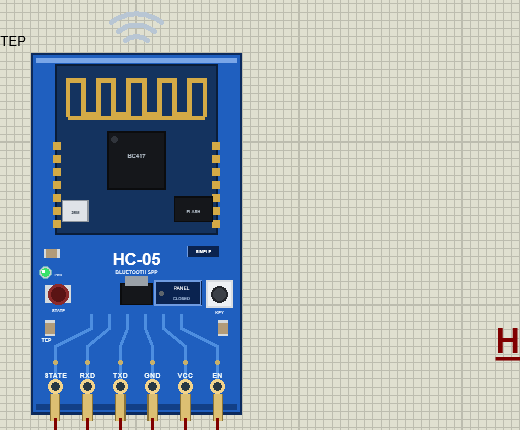
modelled. The parts look like the blue ZS-040 breakout with the gold PCB
antenna; while the simulation runs the red STATE LED blinks like the real one,
the green PWR LED shows the power, the PCB antenna glows blue while the module
sends or receives, and radio waves above it ripple out (sending) or in
(receiving).

FOUR DEVICES IN ONE LIBRARY - two styles of each module (search "HC-05" or
"HC-06" in Pick Devices):
  HC-05 Simple    device HC05TEP     "HC-05 Bluetooth Serial Module (Master/Slave) - Simple"
  HC-06 Simple    device HC06TEP     "HC-06 Bluetooth Serial Module (Slave) - Simple"
                  On-Sheet Panel: the virtual phone is drawn on the schematic
                  next to the module - click CONNECT and the commands on it.
                  The red X in the phone's title bar closes it, the PANEL button
                  on the board opens it again.
  HC-05 Advance   device HC05ADVTEP  "HC-05 Bluetooth Serial Module (Master/Slave) - Advance"
  HC-06 Advance   device HC06ADVTEP  "HC-06 Bluetooth Serial Module (Slave) - Advance"
                  Pop-Up Panel: only the module board on the schematic; at Run
                  a TEP pop-up window opens - the same look as the TEP Serial
                  Monitor (move it by its header, resize it, minimise it). The
                  tabs Phone and Test sit in the header; the gear and ? icons
                  open Settings and Help; the palette icon switches the theme:
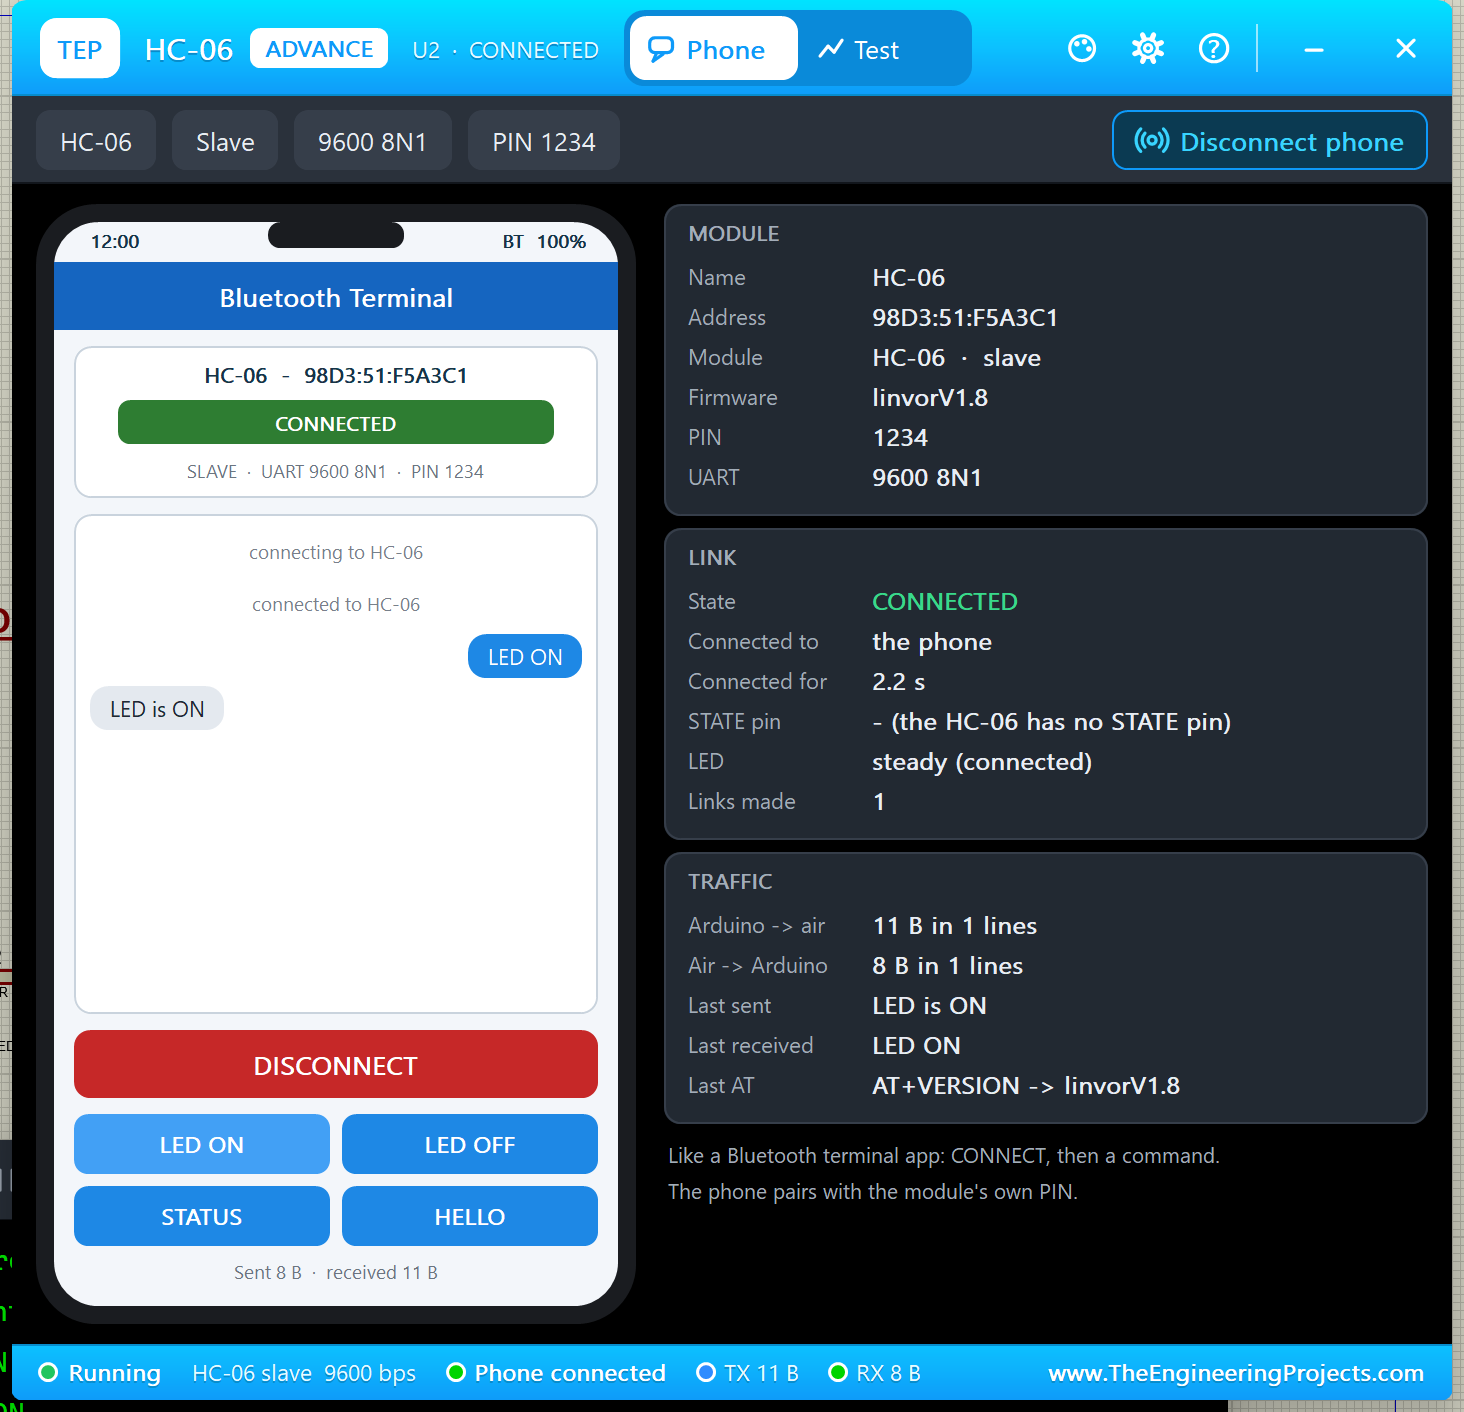
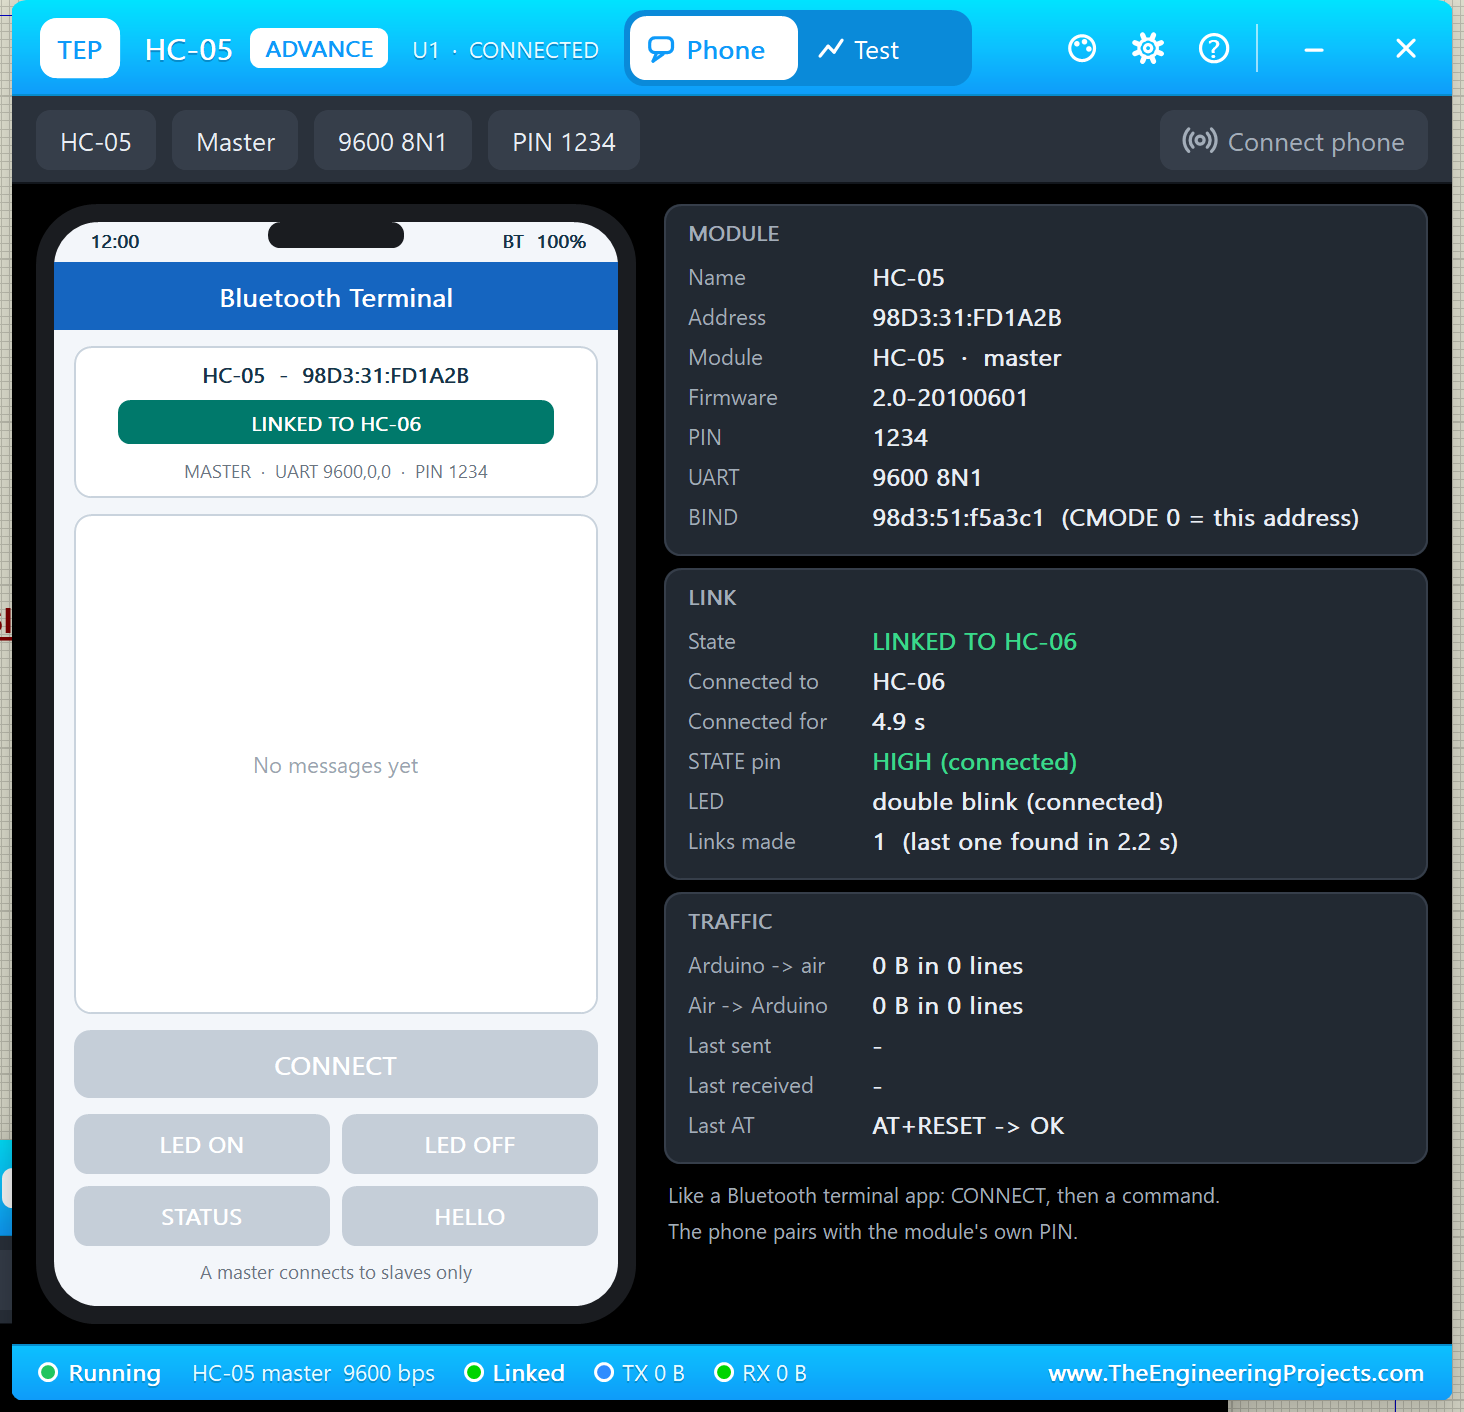
                    Phone     the virtual phone (CONNECT, LED ON / LED OFF /
                              STATUS / HELLO, the chat as bubbles) beside the
                              MODULE card (name, address, role, firmware, PIN,
                              UART, BIND), the LINK card (state, connected to,
                              connected for, STATE pin, LED pattern, links made
                              and the master's search time) and the TRAFFIC card
                              (bytes / lines both ways, last line sent and
                              received, last AT command and reply)
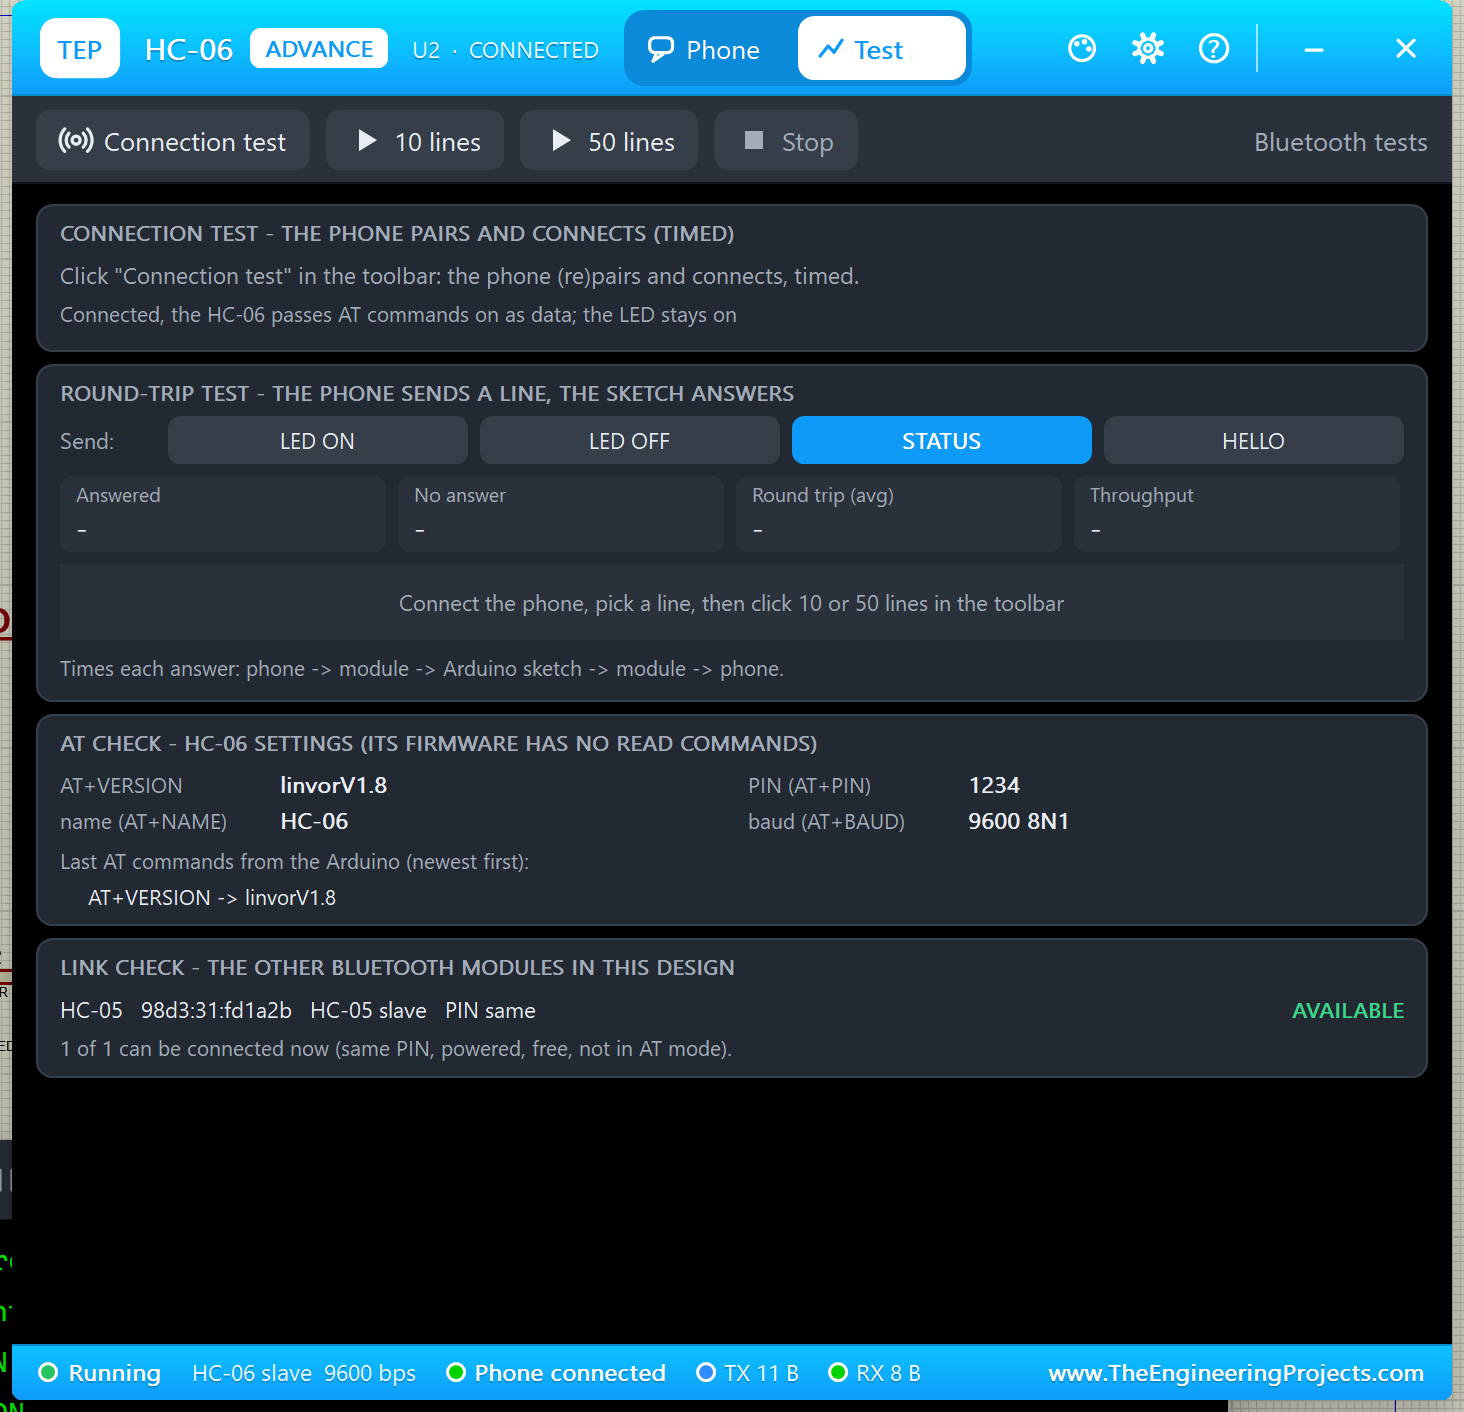
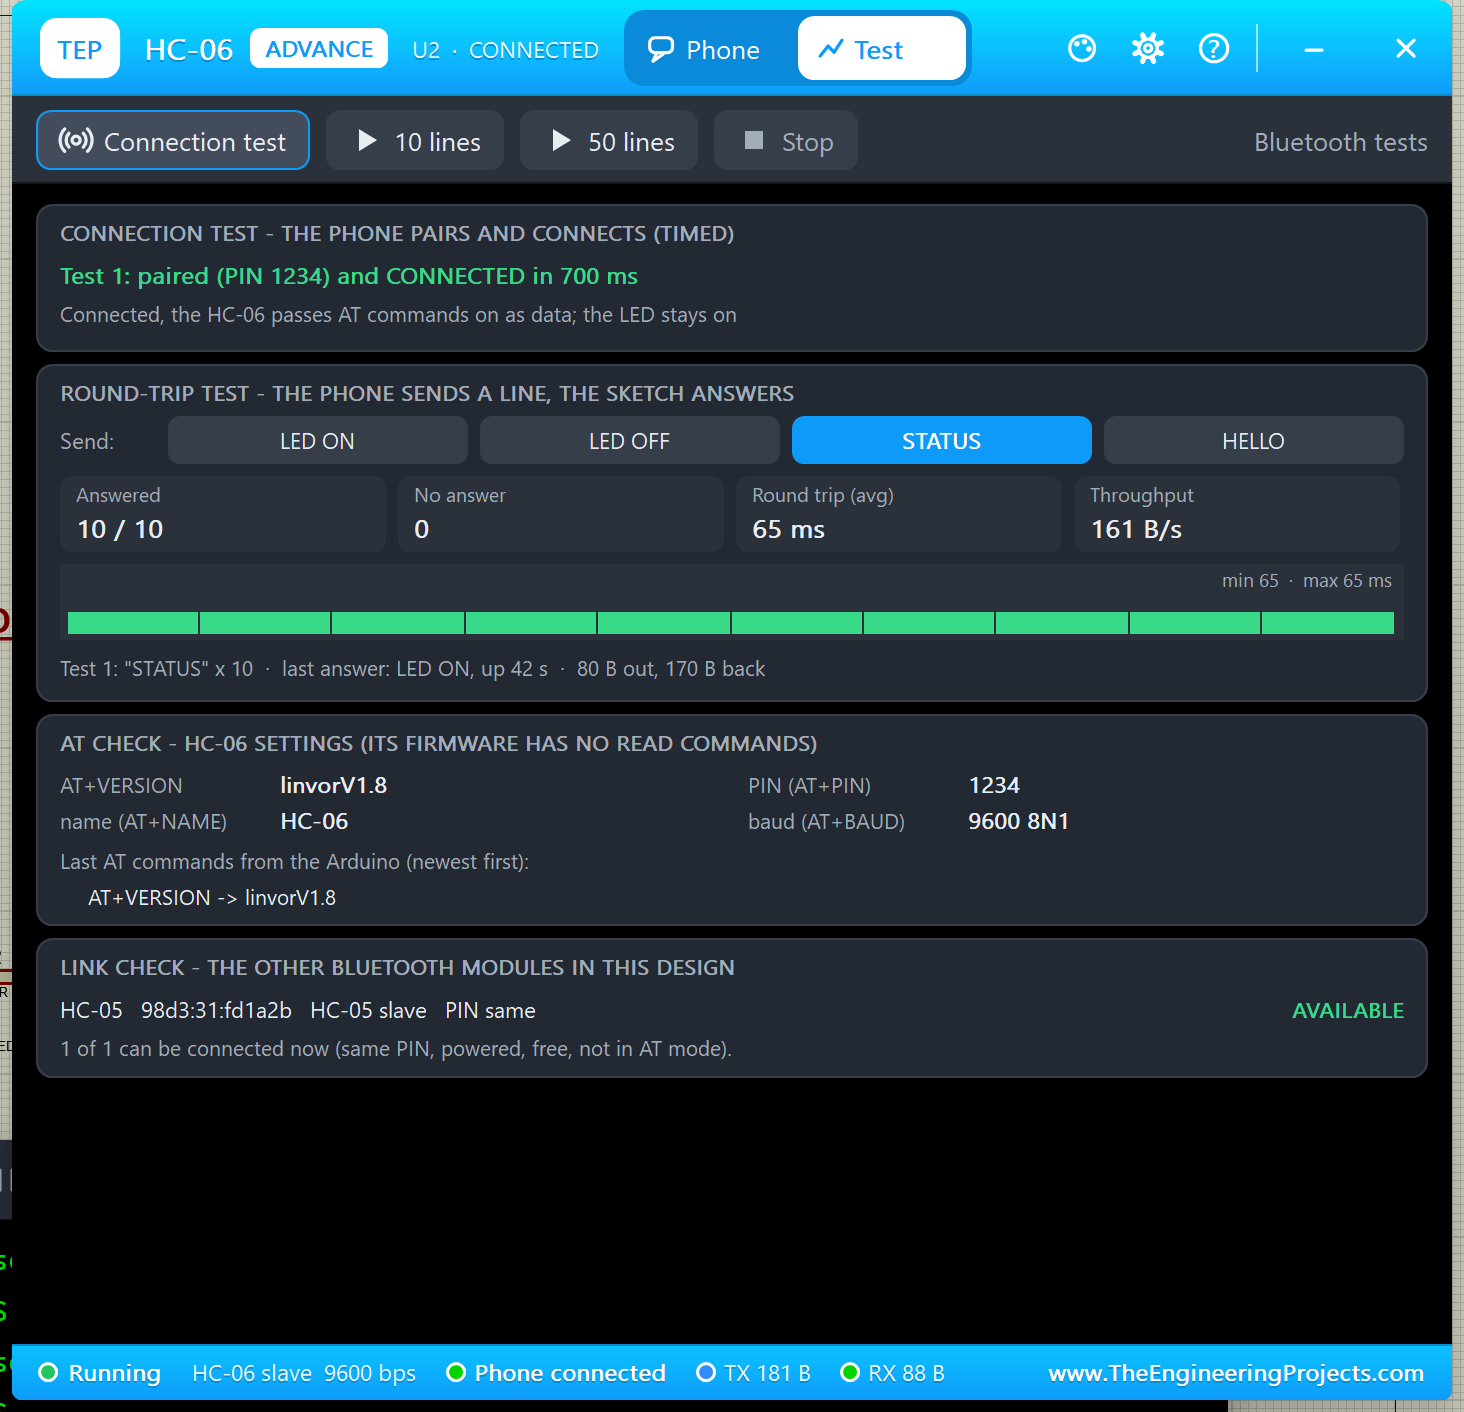
                    Test      CONNECTION TEST (the phone pairs with the PIN and
                              connects - timed, or the reason it cannot: WRONG
                              PIN, MODULE IS A MASTER, MODULE IN AT MODE ...;
                              a master shows how long its search took),
                              ROUND-TRIP TEST (the phone sends LED ON / LED OFF /
                              STATUS / HELLO 10 or 50 times and times the answer
                              of your sketch: answered, no answer, average / min
                              / max round trip, throughput, a bar per line),
                              AT CHECK (what AT+NAME? ROLE? PSWD? UART? CMODE?
                              BIND? STATE? ADDR? answer right now - HC-06: its
                              version, name, PIN, baud - and the last AT commands
                              your Arduino sent) and LINK CHECK (every other
                              HC-05 / HC-06 in the design: role, PIN same or
                              not, BIND match, and whether it can be connected
                              now or why not)
                    Settings  theme (TEP Dark / Light), text size, open at Run,
                              window size - remembered for your Windows user
                    Help      Help & Support like the TEP Serial Monitor: report a
                              bug, suggest a feature, article, user guide,
                              updates, donate, website, forum; Copy diagnostics
                              (settings, link, counters, test results) for a
                              bug report
                  The OPEN PANEL button on the board opens the window again
                  after you close it.
All four devices use the same model (TEPBLUETOOTH.DLL) and talk to each other.

NEW IN V1.1
* Four devices: HC-05 / HC-06 Simple (phone on the sheet, close / open) and
  HC-05 / HC-06 Advance (pop-up window with the phone, test tools, settings and
  help) - see above. One library file, TEPBLUETOOTH.LIB, replaces TEPHC05.LIB
  and TEPHC06.LIB; the old device names HC05TEP and HC06TEP still work.
* Board: a green PWR LED, the PCB antenna glows blue on every byte sent or
  received over the air, a PANEL / OPEN PANEL button and a SIMPLE / ADVANCE
  badge. The STATE LED keeps the real blink patterns.
* The demos use the TEP Serial Monitor Advance instead of Virtual Terminals -
  one monitor per Arduino (U3 = UNO 1, U4 = UNO 2) - and each demo shows both
  styles: LED control = HC-05 Simple + HC-06 Advance, chat = HC-05 Advance
  (master) + HC-06 Simple (slave).
* Chat demo: the master sketch sends lines that start with AT to its own HC-05
  (EN high = "mini" AT mode, the link stays up) and prints the reply; quick
  buttons on the monitors. The chat sketches no longer echo every typed
  character (the monitor shows what you send); each line is confirmed with
  "Sent: ..." or "Command: ...".
* Version 1.1 everywhere; the C++ source code is no longer included.

TEST STATUS
v1.0 was tested in Proteus 8.5 SP0 (30 Sep 2026) with both demos: LED ON / OFF
/ STATUS from both phones, AT+VERSION -> linvorV1.8 on the HC-06, the HC-05
sketch set up the master (AT+ROLE=1, AT+CMODE=0, AT+BIND, AT+RESET - every
reply OK), the master connected by itself and lines typed on either side
appeared on the other.
v1.1 was tested on a PC with 459 automatic checks (92 on the module model at
the pin level: both AT command sets, full and mini AT mode, master auto-connect
with BIND / CMODE / PIN, the phone, data both ways, LED patterns, AT+ORGL,
power loss, the AT log / AT check, the connection test, the round-trip test and
the link check; 93 on the complete Proteus model: all four devices, the PWR LED,
the antenna glow, the On-Sheet phone close / open, the pop-up window, its pages
and buttons, a round-trip test against a scripted sketch; 274 on the rendered
pop-up window). v1.1 was then tested in Proteus 8.5 (5 Oct 2026) with both
demos: the HC-06 Advance pop-up (CONNECT, LED ON, connection test 700 ms,
round-trip test 10 / 10 lines at 65 ms), the HC-05 Simple phone on the sheet
(LED ON, close with the red X, re-open with PANEL), the HC-05 Advance master
linking the HC-06 by itself in 2.2 s, chat both ways in the TEP Serial Monitors
and AT+STATE? answered with the link staying up. Proteus 7 is not supported.

INSTALLATION (about 2 minutes)
1. Close Proteus. Extract the WHOLE ZIP to a normal folder (e.g. Desktop).
2. Copy everything in "Proteus Library Files" (TEPBLUETOOTH.LIB with the four
   devices, TEPSERIALMON.LIB and the TEP Arduino UNO V3 library ArduinoV3TEP.LIB
   / .IDX used by the demos) to the LIBRARY folder of Proteus, for example:
     C:\Program Files (x86)\Labcenter Electronics\Proteus 8 Professional\LIBRARY
   (on some PCs: C:\ProgramData\Labcenter Electronics\Proteus 8 Professional\
   LIBRARY - use the folder that already holds Proteus's own .LIB files).
3. Copy TEPBLUETOOTH.DLL and TEPSERIALMON.DLL from "Proteus Model Files" to the
   MODELS folder (...\Proteus 8 Professional\MODELS).
4. Updating from v1.0: DELETE the old TEPHC05.LIB and TEPHC06.LIB (and any
   TEPHC05.IDX / TEPHC06.IDX) from the LIBRARY folder - TEPBLUETOOTH.LIB holds
   HC05TEP and HC06TEP now, two libraries with the same device names confuse
   Proteus - and replace TEPBLUETOOTH.DLL in MODELS.
5. Start Proteus. In Pick Devices (P) search "HC-05" or "HC-06": you get the
   Simple and Advance devices of each (category Peripherals > Wireless).

RUN THE DEMOS
Keep the four .hex files and the two DLLs beside the projects.
Demo 1 - "Proteus Simulation\HC05-HC06-LED-Control-ArduinoUnoV3.pdsprj"
  Two Arduino UNOs, each with an LED + 220 ohm on A0: UNO 1 with HC-05 Simple
  (U1, phone on the sheet) and Serial Monitor U3, UNO 2 with HC-06 Advance (U2,
  phone in its pop-up window) and Serial Monitor U4.
  1. Press Run. Both monitor windows open (9600 baud) and so does U2's pop-up.
     U4 shows "HC-06 firmware: linvorV1.8" (the sketch asks AT+VERSION while
     nothing is connected).
  2. U1: click CONNECT on the phone beside it - CONNECTING..., then CONNECTED
     (the STATE LED double-blinks, STATE goes high, U3 prints "Phone
     connected"). Click LED ON: the LED on A0 lights, the phone shows "HC-05:
     LED is ON", U3 shows "Phone: LED ON / -> LED is ON". Try LED OFF, STATUS
     ("LED ON, up 12 s") and HELLO. Watch the antenna glow and the waves.
  3. U2 (Advance): in its pop-up click CONNECT, then the commands. Open the Test
     tab: "Connection test" times the pairing (about 0.7 s); pick STATUS and
     click "10 lines" - the round-trip test sends STATUS ten times and times
     the sketch's answers (about 70 ms each).
  4. Close U1's phone with its red X and open it again with PANEL; close U2's
     window and open it again with OPEN PANEL on the board.
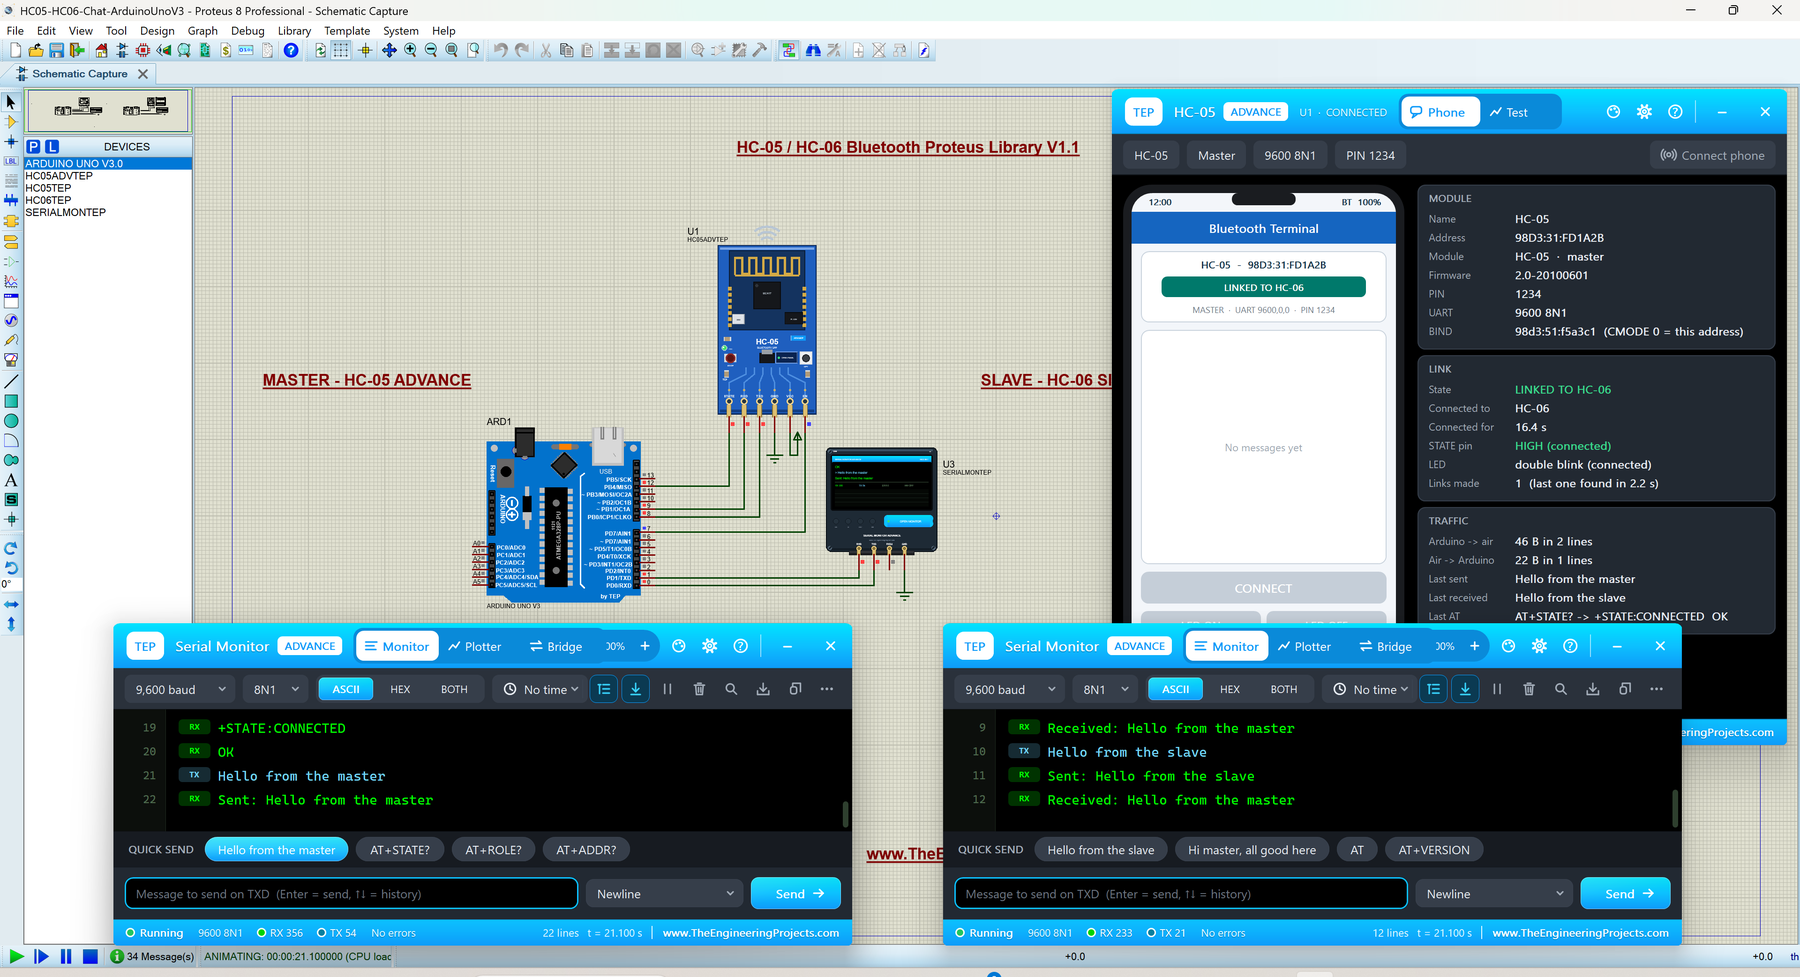
Demo 2 - "Proteus Simulation\HC05-HC06-Chat-ArduinoUnoV3.pdsprj"
  UNO 1 with HC-05 Advance (U1, the master) and monitor U3, UNO 2 with HC-06
  Simple (U2, the slave) and monitor U4.
  1. Press Run. U3 shows the master set-up (> AT, OK, > AT+ROLE=1, OK, ...
     > AT+RESET, OK, "Searching for the slave..."), U4 shows the HC-06 answering
     AT, AT+VERSION and AT+PIN1234. A few seconds after Run (the master
     searches every second, the link takes 1.2 s) the master is linked: U3
     prints "Connected - ...", both STATE LEDs show the link, U2's phone says
     LINKED TO HC-05, U1's pop-up LINK card says how long the search took.
  2. Type a line in U3's send box and press Enter (or click the quick button
     "Hello from the master"): U3 shows "Sent: ...", U4 "Received: ...".
     Answer from U4 ("Hi master, all good here").
  3. On U3 click AT+STATE?, AT+ROLE? or AT+ADDR?: the master sketch pulls EN
     high, sends the command to its own HC-05 ("Command: AT+STATE?" then
     "+STATE:CONNECTED" / "OK") and returns to data mode - the link stays up.
     U1's Test tab shows the same values in its AT CHECK and the last commands.
  4. On U4, AT and AT+VERSION are answered by the HC-06 only while no master
     is connected; once linked they travel to the master as text (that is how
     the real HC-06 works).
Closed a monitor window? Click OPEN MONITOR on the monitor part.

WIRING (AltSoftSerial, the same on every UNO)
  HC-05: TXD -> D8, RXD <- D9, EN <- D7 (chat demo), STATE -> D12, VCC 5 V, GND.
  HC-06: TXD -> D8, RXD <- D9, VCC 5 V, GND.
  LED demo: LED + 220 ohm from A0 to GND on each UNO.
  Serial Monitor RXD <- Arduino D1 (TX), Serial Monitor TXD -> Arduino D0 (RX),
  Serial Monitor GND -> ground, RXD2 open. Serial.begin(9600) in the sketches.
In the sketches: AltSoftSerial BT;  (fixed pins on the UNO: RX = D8, TX = D9)
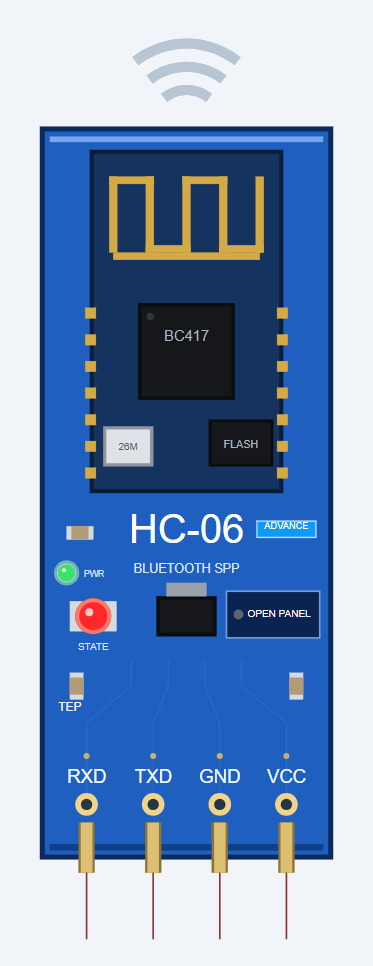
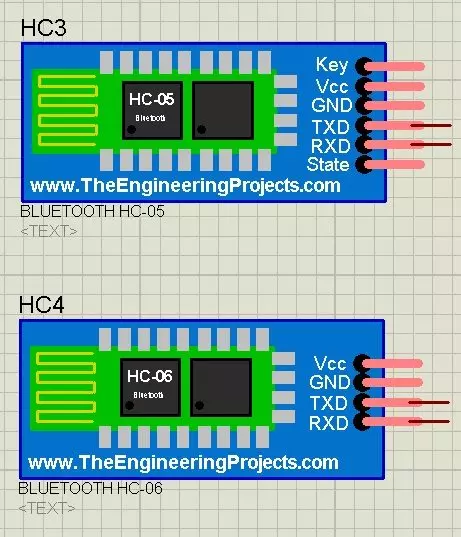
Board pin order in Proteus is the real one: HC-05 STATE RXD TXD GND VCC EN,
HC-06 RXD TXD GND VCC.
Real modules: VCC 3.6-6 V on the usual breakout; the module's RXD is a 3.3 V
input - use a divider (1 k / 2 k) from the Arduino's 5 V TX.

WHY AltSoftSerial AND NOT SoftwareSerial
SoftwareSerial can send but cannot RECEIVE in Proteus 8.5: it needs pin-change
interrupts, which the Proteus 8.5 ATmega328P model never runs. AltSoftSerial
(Paul Stoffregen, MIT licence) uses Timer1 and works in Proteus and on real
boards. Keep D10 free while it runs: digitalRead(10) / digitalWrite(10) change a
Timer1 register that AltSoftSerial uses for every bit it sends and corrupt the
output (that is why STATE goes to D12). With SoftwareSerial the module receives
(see its phone and the Simulation Log) but the Arduino reads nothing - use
AltSoftSerial, the hardware Serial port or an Arduino Mega.

THE VIRTUAL PHONE (both styles)
 * The module's name and address, its state: NOT CONNECTED, CONNECTING...,
   CONNECTED, LINKED TO <module> (connected to another HC-05/06), MASTER -
   SEARCHING, AT MODE <speed>, NO POWER; the role, UART settings and PIN.
 * The conversation: what the phone sent ("You: ..." / blue bubbles) and what
   the Arduino sent back through the module ("<name>: ..." / grey bubbles).
 * CONNECT / DISCONNECT and four commands: LED ON, LED OFF, STATUS, HELLO (each
   sent with CR LF).
The phone pairs with the module's own PIN. It cannot connect to a module that
is already linked to another module, is a master, or is in AT mode.
Board animation: the STATE LED blinks like the real one (HC-05: fast while
waiting, slow in AT mode, double blink when connected; HC-06: blinking /
steady), the PWR LED is on while VCC / GND are powered, the PCB antenna glows
blue and the waves ripple outwards (dark blue) while the module sends over the
air and inwards (light blue) while it receives.

HC-05 (HC05TEP / HC05ADVTEP)
AT mode: EN (KEY) high at power-up -> "full" AT mode at 38400 8N1 (until
AT+RESET or a power cycle); EN high while running -> "mini" AT mode at the data
UART speed (until EN goes low). Commands end with CR LF; replies are OK,
+KEY:value then OK, or ERROR:(code).
  AT  AT+RESET  AT+VERSION?  AT+ORGL  AT+ADDR?  AT+NAME? / =  AT+RNAME?<addr>
  AT+ROLE? / =0|1|2  AT+PSWD? / =  AT+UART? / =baud,stop,parity  AT+CMODE? / =
  AT+BIND? / =  AT+STATE?  AT+INIT  AT+INQ  AT+INQC  AT+PAIR  AT+LINK  AT+DISC
  AT+ADCN?  AT+MRAD?  AT+CLASS / IAC / INQM (accepted)
  Examples: AT+VERSION? -> +VERSION:2.0-20100601 OK; AT+UART? -> +UART:9600,0,0;
  AT+INQ -> +INQ:98d3:51:f5a3c1,1f00,7fff then OK; unknown -> ERROR:(0).
  AT+ROLE applies after AT+RESET. AT+ORGL restores the factory settings - note
  that this sets the data UART to 38400 and the name to H-C-2010-06-01.
Master (ROLE=1): after start-up it searches every second and connects to the
BIND address (CMODE=0) or to any slave (CMODE=1) that has the same PIN; STATE
goes high while connected, and it reconnects after the link is lost.

HC-06 (HC06TEP / HC06ADVTEP)
Slave only. While NOT connected everything on RXD is taken as a command: no line
ending needed, a command ends after a short pause (the module answers ~0.2 s
later); while connected, AT commands are passed on as data.
  AT -> OK   AT+VERSION -> linvorV1.8   AT+NAMExxx -> OKsetname
  AT+PINxxxx -> OKsetPIN   AT+BAUDn -> OK9600 ... (1=1200 ... 4=9600 ...
  8=115200 ... C=1382400; the new speed applies after the reply)
  AT+PN / AT+PE / AT+PO -> OK None / OK EVEN / OK ODD
  unknown commands get no reply.

PROPERTIES (double-click the module > Edit Properties; the same on Simple and
Advance)
  BTNAME    Bluetooth name                              default HC-05 / HC-06
  BTADDR    Bluetooth address (nap:uap:lap)             default 98d3:31:fd1a2b /
                                                                98d3:51:f5a3c1
  BTPIN     PIN / password                              default 1234
  BTBAUD    Data UART baud rate                         default 9600
  HC-05 only:
  BTROLE    Role (0 slave, 1 master)                    default 0
  BTCMODE   Connect mode (0 BIND address, 1 any)        default 0
  BTBIND    BIND address (master)                       default 0:0:0
These are the settings stored in the module when the simulation starts; AT
commands change them until the simulation stops. The panel style is chosen by
the device (Simple / Advance), not by a property. The Advance window settings
(theme, text size, open at Run, size) are on its Settings page.
The demos' Serial Monitors: BAUD 9600, THEME TEPDARK, AUTOOPEN YES; chat demo
quick buttons U3 = Hello from the master / AT+STATE? / AT+ROLE? / AT+ADDR?,
U4 = Hello from the slave / Hi master, all good here / AT / AT+VERSION (see the
Serial Monitor's article for all its properties).

LINKS.INI (OPTIONAL)
The Help page cards of the Advance devices open web pages. To point them
somewhere else without a new DLL, put a text file named links.ini next to
TEPBLUETOOTH.DLL with lines KEY=URL, for example:
  ARTICLE=https://www.theengineeringprojects.com/...
Keys: WEBSITE, FORUM, BUG_REPORT, FEATURE_REQUEST, ARTICLE, USER_GUIDE,
UPDATE_CHECK, DONATE. Only http:// and https:// links are used; lines starting
with # are comments. Cards whose link is not published yet say "Link coming soon".

TROUBLESHOOTING
* Phone shows "WRONG PIN" / the master never connects: the PINs differ (BTPIN
  property, AT+PSWD= on the HC-05, AT+PIN on the HC-06). The Advance Test page's
  LINK CHECK says which module is reachable and why not.
* Master never connects: check BIND matches the slave's address (BTADDR /
  AT+ADDR?) or use AT+CMODE=1; the slave must not be connected to a phone.
* The module answers but the Arduino prints nothing: SoftwareSerial - see above.
* Garbled replies from the Arduino: something reads or writes D10 - see above.
* No reply to HC-05 AT commands: use 38400 when EN was high at power-up, the data
  speed in mini AT mode, and end each command with CR LF.
* The round-trip test shows "No answer": the phone must be connected and your
  sketch must answer the line (the demo LED sketches answer all four commands).
* The part is not simulated / no phone: TEPBLUETOOTH.DLL is missing from MODELS
  and from the project folder. No monitor window: TEPSERIALMON.DLL is missing,
  or click OPEN MONITOR on the monitor part.
* Advance: the pop-up does not appear - click OPEN PANEL on the module board,
  use Proteus's Debug menu, or turn "Open the panel at Run" on its Settings page
  back on.
* Simple: the red X does not close the phone - the design still holds the v1.0
  symbol; delete the old TEPHC05.LIB / TEPHC06.LIB and the .IDX files in
  LIBRARY and re-pick the part.

BUG REPORTS AND FEATURE REQUESTS
Please post them in our forum with a screenshot, the Serial Monitor text, the
simulation log and (Advance) the Copy diagnostics text:
  https://www.theengineeringprojects.com/forum/category/hc-05-hc-06-proteus-library

SUPPORT US
This library is free. If it saves you time, please support our work:
  https://www.theengineeringprojects.com/donate

WEBSITE
  https://www.theengineeringprojects.com/

LICENCES AND THIRD-PARTY NOTES
* The HC-05 / HC-06 model (TEPBLUETOOTH.DLL), the symbols and artwork and the
  TEP Serial Monitor Advance (TEPSERIALMON.LIB / .DLL) are made by The
  Engineering Projects. The models use only standard Windows libraries; no
  Visual C++ redistributable is needed.
* TEP Arduino UNO V3 library (ArduinoV3TEP.LIB / .IDX): The Engineering
  Projects, https://www.theengineeringprojects.com/2023/10/arduino-library-for-proteus-v30.html
* AltSoftSerial 1.4 by Paul Stoffregen / PJRC.COM (MIT licence, see
  Arduino Code\libraries\AltSoftSerial\LICENSE.txt), shipped unmodified:
  https://github.com/PaulStoffregen/AltSoftSerial
* Arduino AVR core 1.8.6: the .hex files are built from the demo sketches, the
  AltSoftSerial library and the Arduino AVR core, which includes LGPL-licensed
  code. Its source code is available at
  https://github.com/arduino/ArduinoCore-avr/tree/1.8.6
* HC-05 / HC-06 are module designs sold by several makers (CSR BC417 Bluetooth
  chip); the model follows the HC-05 AT command set (firmware 2.0-20100601) and
  the HC-06 linvor V1.8 command set. Proteus is a product of Labcenter
  Electronics and is not included. Arduino is a trademark of Arduino SA.

MODEL SCOPE AND LIMITS
Not modelled: the radio itself (range, interference - every module in a design
can reach every other one), BLE, SPP profiles other than serial, HID and other
firmwares (e.g. HC-05 modules with firmware 3.0 may answer some commands
differently), supply current. Bytes take about 20 ms to cross the Bluetooth
link.

VERSION
TEP HC-05 / HC-06 library v1.1 (5 Oct 2026). Devices HC05TEP / HC06TEP (Simple)
and HC05ADVTEP / HC06ADVTEP (Advance), files TEPBLUETOOTH.LIB / TEPBLUETOOTH.DLL.
Demo monitor: TEP Serial Monitor Advance v1.0.1 (SERIALMONTEP).
v1.0 (30 Sep 2026): first release (TEPHC05.LIB, TEPHC06.LIB, TEPBLUETOOTH.DLL).Development1 release
 Development1 release
-
V1.1Download HC-05 and HC-06 Library for Proteus V1.1this page
V1.1 is the only release in the Download Center so far. When a newer version is published, it appears above with its own download page.
Installation10 steps
 Installation10 steps
From the download to a working project, in order. The steps follow what the package contains.
You will need
- Proteus Design SuiteProteus 7 or newer (Labcenter), on Windows
- Arduino IDE1.8 or 2.x, with the board of the tutorial chosen under Tools → Board
- Any archive toolWindows, macOS and Linux extract ZIP files on their own
Steps
- 1
Extract the archive
Right-click hc05-hc06-tep-v1-1-1dc43818571e43e9876c515ed30c1d1c.zip and choose Extract All (or open it with 7-Zip or WinRAR) into a folder you can find again. Keep its folder structure (HC05-HC06-TEP-v1.1) as it is.
- 2
Copy the library files into Proteus
Move ArduinoV3TEP.LIB, TEPBLUETOOTH.LIB and TEPSERIALMON.LIB and ArduinoV3TEP.IDX into the LIBRARY folder of your Proteus installation: C:\Program Files (x86)\Labcenter Electronics\Proteus 8 Professional\LIBRARY for Proteus 8, or the matching Proteus 7 folder. Older versions keep it under ProgramData\Labcenter Electronics. If Proteus is open, close it first.
- 3
Add the simulation model
Copy TEPBLUETOOTH.DLL and TEPSERIALMON.DLL into the MODELS folder next to LIBRARY, so the component can run, not only be drawn.
- 4
Restart Proteus and place the component
Start Proteus, open a schematic, press P (Pick Devices) and search for the component by the name used in the tutorial. It appears with its pins ready to wire.
- 5
Install the Arduino library
In the Arduino IDE choose Sketch → Include Library → Add .ZIP Library and pick the library, or copy its folder into Documents\Arduino\libraries. Restart the IDE to see its examples.
- 6
Open the sketch in the Arduino IDE
Open HC05_LED_Control.ino, HC05_Master_Chat.ino and HC06_LED_Control.ino and 3 more, select your board and port under Tools, then Verify. Sketch → Export Compiled Binary writes the HEX file a simulation needs.
- 7
Load the HEX file
In Proteus double-click the microcontroller, set Program File to HC05_LED_Control.hex, HC05_Master_Chat.hex and HC06_LED_Control.hex and 1 more and run the simulation. For real hardware, flash the same file with your programmer.
- 8
Open the example simulation
Open HC05-HC06-Chat-ArduinoUnoV3.pdsprj and HC05-HC06-LED-Control-ArduinoUnoV3.pdsprj in Proteus to see the wiring exactly as in the tutorial. Check the controller's Program File path, then press Play.
- 9
Use the data files
library.json hold the readings or settings the project uses; open them with Excel, a text editor or the script of the tutorial.
- 10
Follow the tutorial
HC-05 Library for Proteus V1.1 (HC-05 & HC-06 Bluetooth) explains every connection and setting in order; keep it open beside the files while you build.
FAQs9 questionsContact TEP
 FAQs9 questions
How do I download Download HC-05 and HC-06 Library for Proteus V1.1?
Wait for the 30-second guest countdown on this page, then press the download button; the file comes straight from our storage. Members who are logged in skip the wait. If the browser opens the file instead of saving it, use its Save as option. The download link is made for you when the countdown ends and works for 15 minutes; a saved or shared link stops working, so share this page instead.
What is inside the archive?
Download HC-05 and HC-06 Library for Proteus V1.1 comes as a ZIP archive of 30 files (1.3 MB, 2.9 MB unpacked) holding Proteus library files, simulation model DLLs, a Proteus simulation, an Arduino sketch, an Arduino library, compiled HEX firmware and data files. Open the File Structure tab for the full list of 30 files.
What should I do if the download does not start?
Check the browser's download list first; an ad blocker or a company firewall can also hold it back, so try another browser or network. If the file arrives incomplete, download it again. For an installation problem, read the Install tab or tell us in the comments with your software version and the exact error message.
Is this file free?
Yes. Every file in the TEP Download Center is free for learning, personal and student projects. If you share it, link back to this page or the tutorial so others find the latest version.
How do I check that the file arrived complete?
Compare its SHA-256 with the one on this page, 91219ddea0594b5a6af98d4340abb34945107f162fe6d61a8557afe34d9c59f4. In PowerShell run Get-FileHash "hc05-hc06-tep-v1-1-1dc43818571e43e9876c515ed30c1d1c.zip"; on macOS or Linux run shasum -a 256 "hc05-hc06-tep-v1-1-1dc43818571e43e9876c515ed30c1d1c.zip". The same value means the file is exactly the one in our storage; a different one means the download broke off, so download it again.
Do I need WinRAR to open the ZIP file?
No. Windows, macOS and Linux open ZIP archives on their own (Extract All, or double-click). WinRAR and 7-Zip work too. Extract the whole archive before using the files.
Where do I put the LIB and IDX files?
Both files go into the LIBRARY folder of your Proteus installation (Proteus 8: C:\Program Files (x86)\Labcenter Electronics\Proteus 8 Professional\LIBRARY; Proteus 7 has the same folder under its own name). Restart Proteus afterwards and search for the component with P.
Which Proteus version does the library need?
The tutorial names the Proteus version the library was made and tested with. Most TEP libraries work in Proteus 7 and Proteus 8; if the component does not appear after a restart, check that both the LIB and the IDX file were copied and that Proteus was fully closed while copying.
How do I get the HEX file into the simulation?
Compile the sketch in the Arduino IDE (Sketch → Export Compiled Binary gives you the HEX next to the sketch), then in Proteus double-click the board, set Program File to that HEX and run.
Members skip the wait. Log in or join TEP.

- 54Total downloads
- 4%Popularity
- ProteusCategory
- 0Comments
- ssyedzainnasirUploaded by
- 3 Oct 2026Uploaded at


 SHA-256
91219ddea0594b5a6af98d4340abb34945107f162fe6d61a8557afe34d9c59f4


 Need help with this file?
 Tags
Related Proteus
All Proteus tutorials




More Bluetooth project files
All Bluetooth tutorials



Comments
0