


How to Add Component Properties in Proteus


Hello friends, I hope you are doing well. This is the eighth tutorial in our series on how to create a Proteus library. In the previous tutorial, How to Use Make Device in Proteus to Create a New Part, we turned our Traffic Light Module into a real Proteus part, TRAFFICLIGHTTEP, stored it in USERDVC and placed it on the sheet as U1. The part works, but it carries no information beyond its name. Today, we give it properties. Our topic is how to add component properties in Proteus.
We will see what component properties are and what they are used for, open the Component Properties and Definitions page of Make Device again, add two property definitions of different kinds, explore every property type, option and visibility setting that Proteus 8.5 offers, store the part again, and check the result in the Edit Component dialogue and in the library file. Our two properties are LOGIC, a High/Low choice that will later tell the simulation model whether the lamps light on a high or a low pin, and VERSION, a read-only version number of the library.
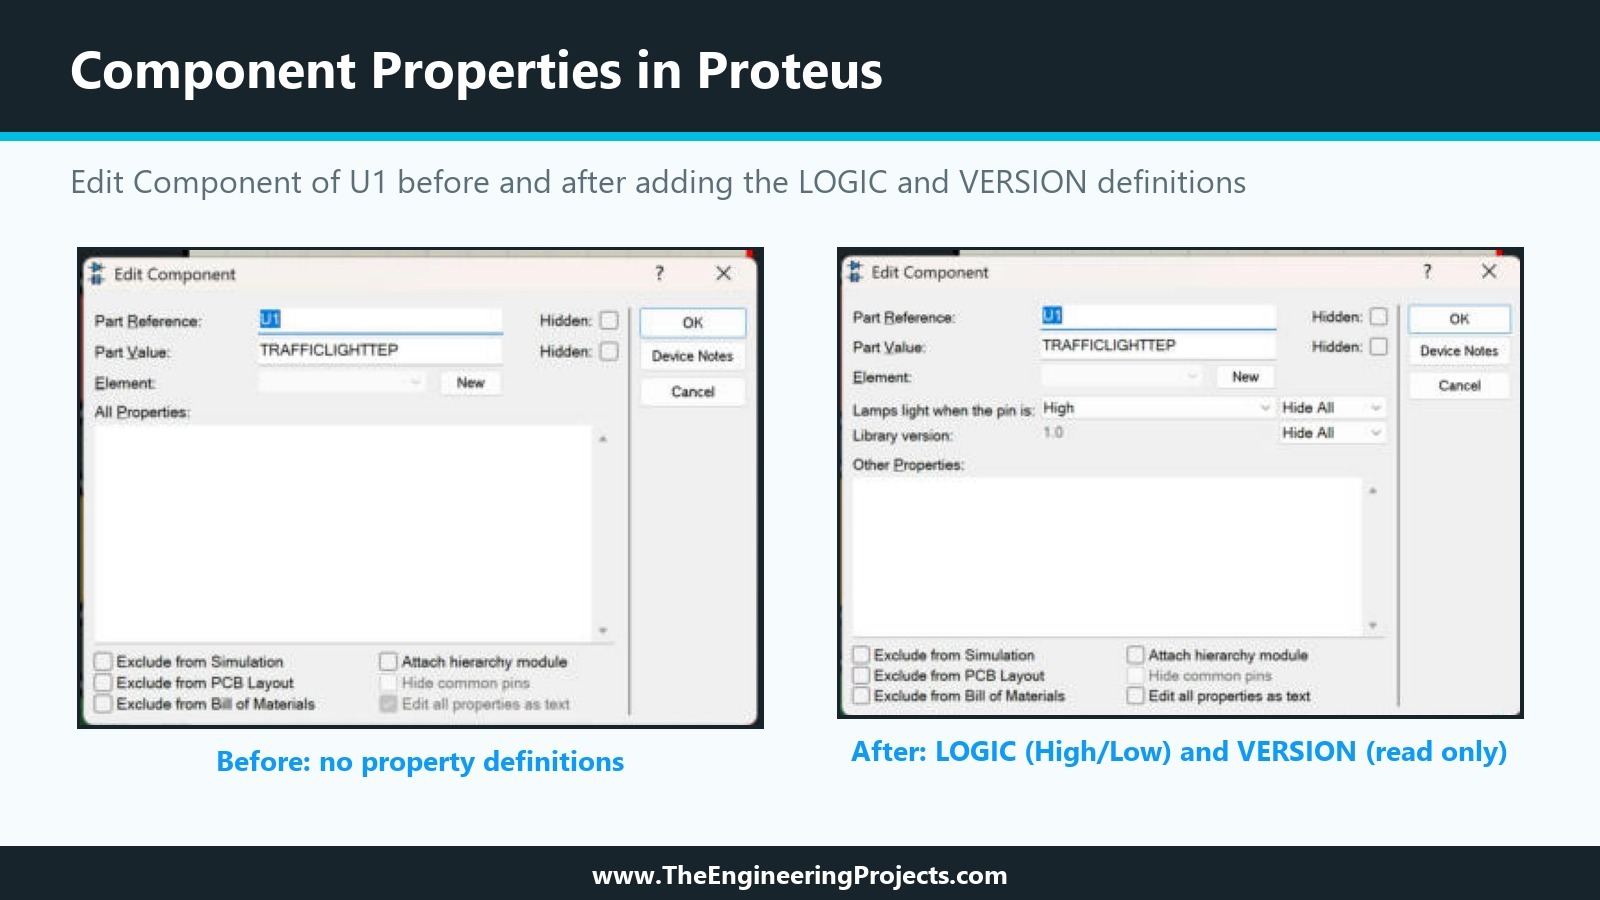
All of this was done in Proteus 8.5 Professional on our PC, with the part from the previous tutorial. The picture below shows the effect: the Edit Component dialogue of U1 before and after we added the two definitions.
What Are Component Properties in Proteus?
A property is a named value attached to a component, such as VALUE=10k or PACKAGE=DIL08. Proteus uses properties for almost everything that is not graphics. The help lists typical examples: PACKAGE properties for PCB design, PRIMITIVE, MODEL and MODFILE properties for simulation, and stock or supplier codes that can be shown in the Bill of Materials. Our HC-12 library from the first tutorial uses properties for its simulation link (PRIMITIVE and MODDLL) and for its settings at the start of a simulation (BAUD, CHANNEL, MODE and more).
A library part can define two things for each property:
- A property definition: the name, a description, the type of value (for example text, a number in a range, or a High/Low choice) and how the property behaves (normal, read-only, advanced or hidden).
- A property default: the value every newly placed component receives, and whether its name and value are shown on the schematic.
The help points out an important difference: definitions and defaults added through Make Device are stored in the library and reused in every design, while properties changed only on placed components, for example through the Bill of Materials property editor, apply only to the current schematic.
How to Add Component Properties in Proteus: Step by Step
We add our two properties, LOGIC and VERSION, in five steps. Short reference sections on property types, behaviour and visibility sit where you need them.
Step 1: Open Make Device on the Placed Part
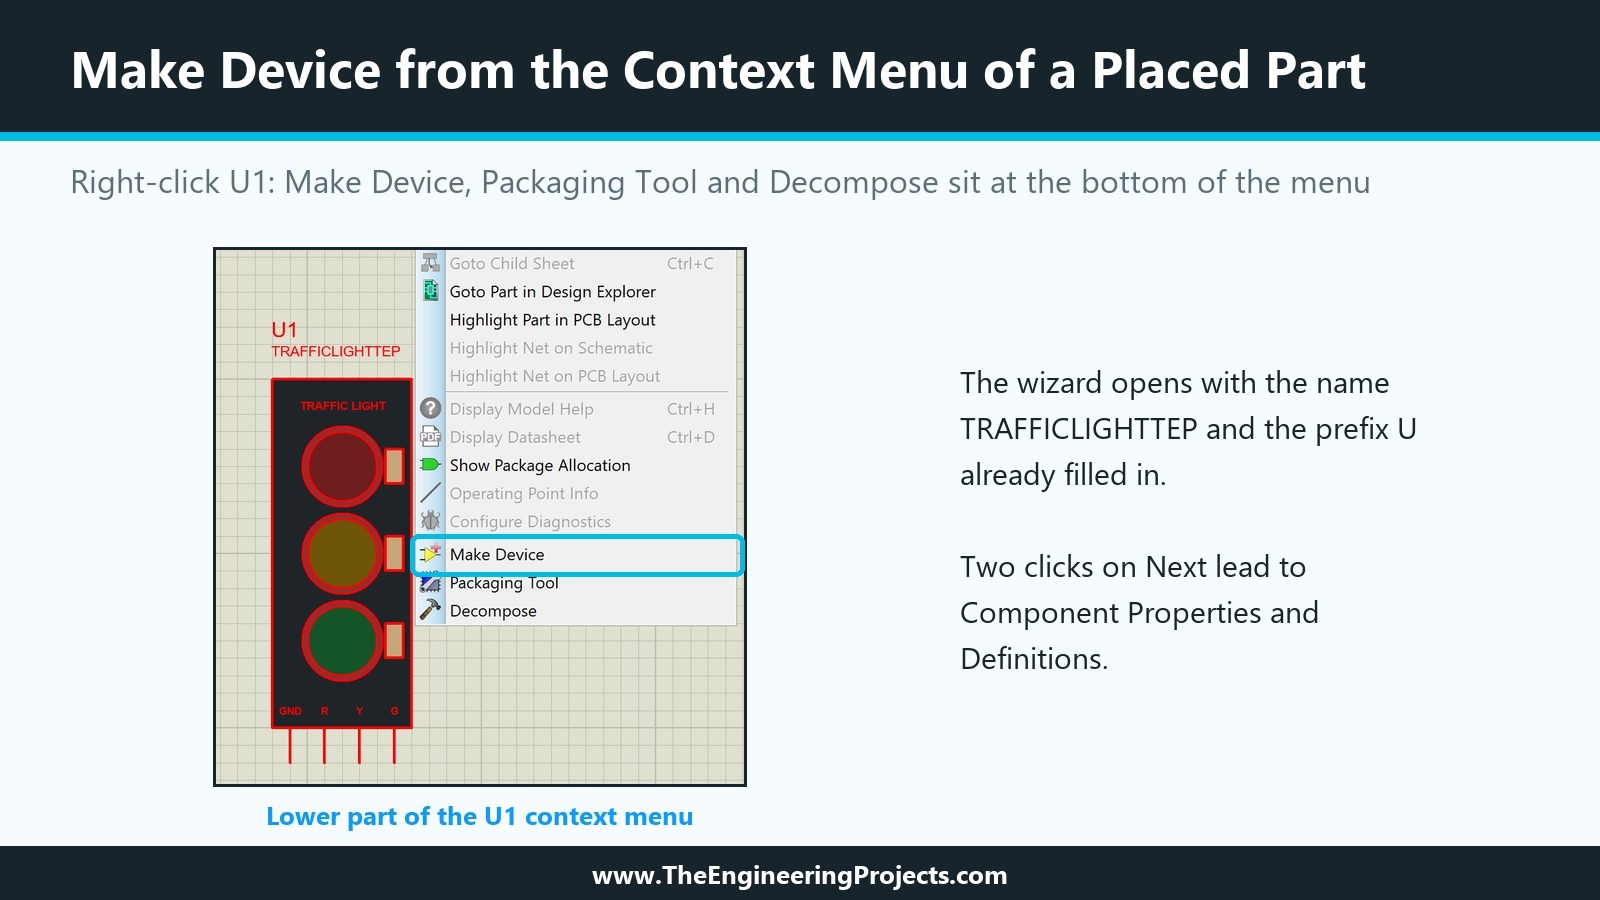
The help describes the route for editing the properties of an existing device: pick and place a component of it, tag it, run Make Device and click Next to the Component Properties page; there is no need to decompose it. Our U1 was already on the sheet. We right-clicked it; the context menu of a component offers Make Device directly, along with Packaging Tool and Decompose. Make Device opened with the name TRAFFICLIGHTTEP and the prefix U already filled in. Two clicks on Next brought us past the Packagings page to Component Properties and Definitions.
Step 2: Add a Property with New
The page has a list of the defined properties on the left, with New and Delete buttons below it and four arrow buttons that move a property to the top, up, down or to the bottom of the list. The order of the list is the order in which the properties appear in the Edit Component dialogue.
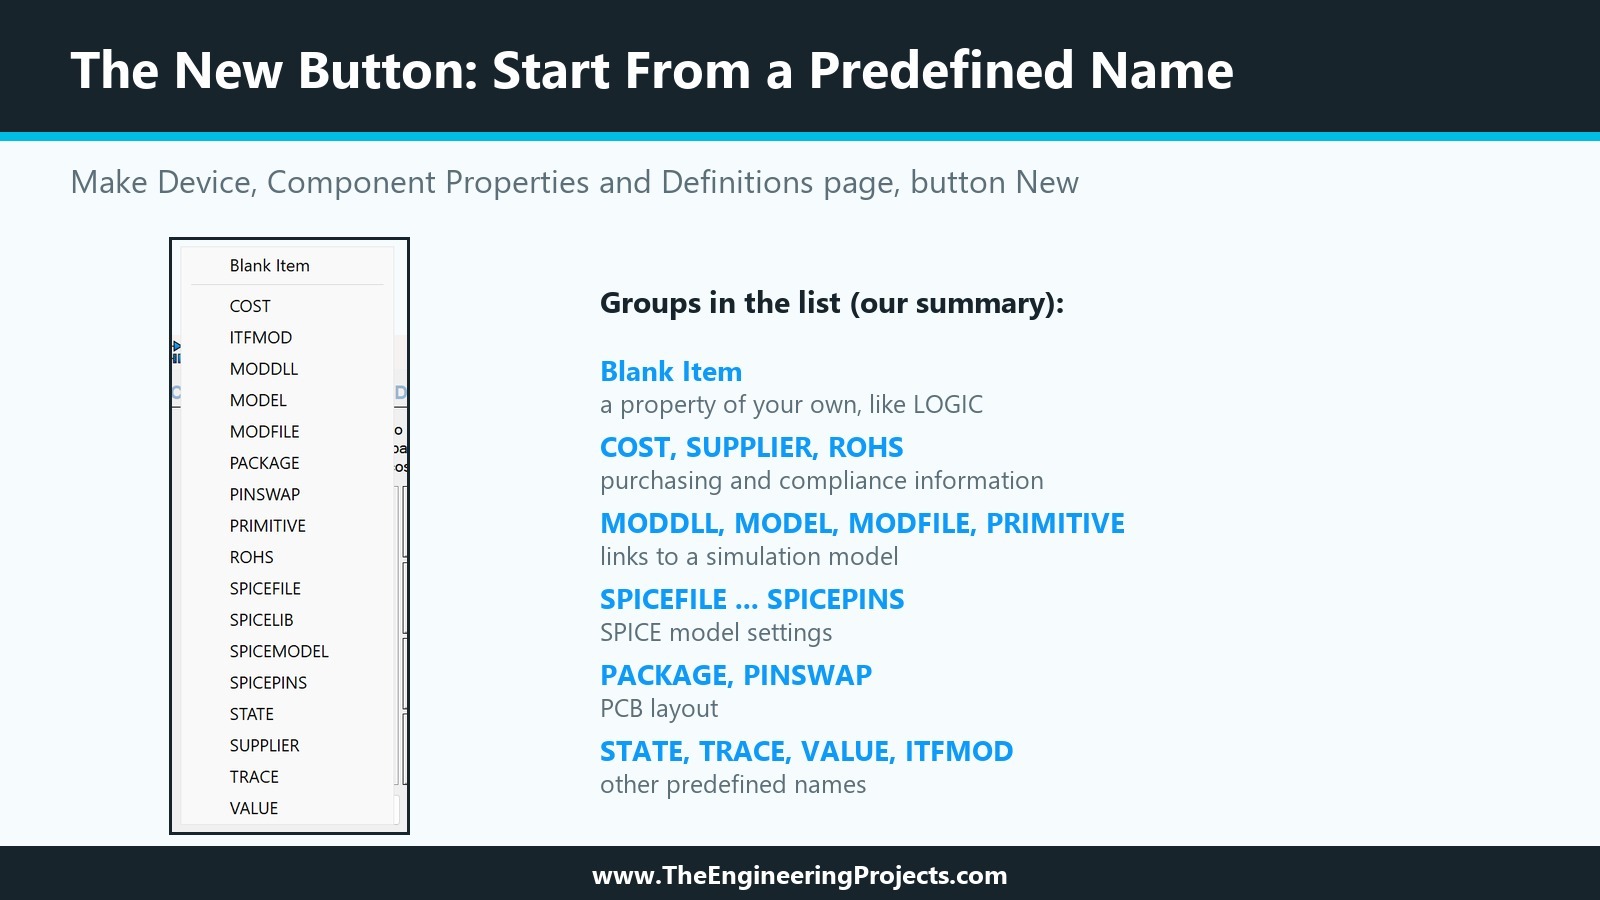
Clicking New did not create an empty property straight away. It opened a list of names to start from: Blank Item, COST, ITFMOD, MODDLL, MODEL, MODFILE, PACKAGE, PINSWAP, PRIMITIVE, ROHS, SPICEFILE, SPICELIB, SPICEMODEL, SPICEPINS, STATE, SUPPLIER, TRACE and VALUE. These are the default property definitions of Proteus; the help explains that they are kept in the file PROPDEFS.INI in the library folder and can be changed with Set Property Definitions on the System menu. For a property of our own, we chose Blank Item.
Step 3: Define the LOGIC Property
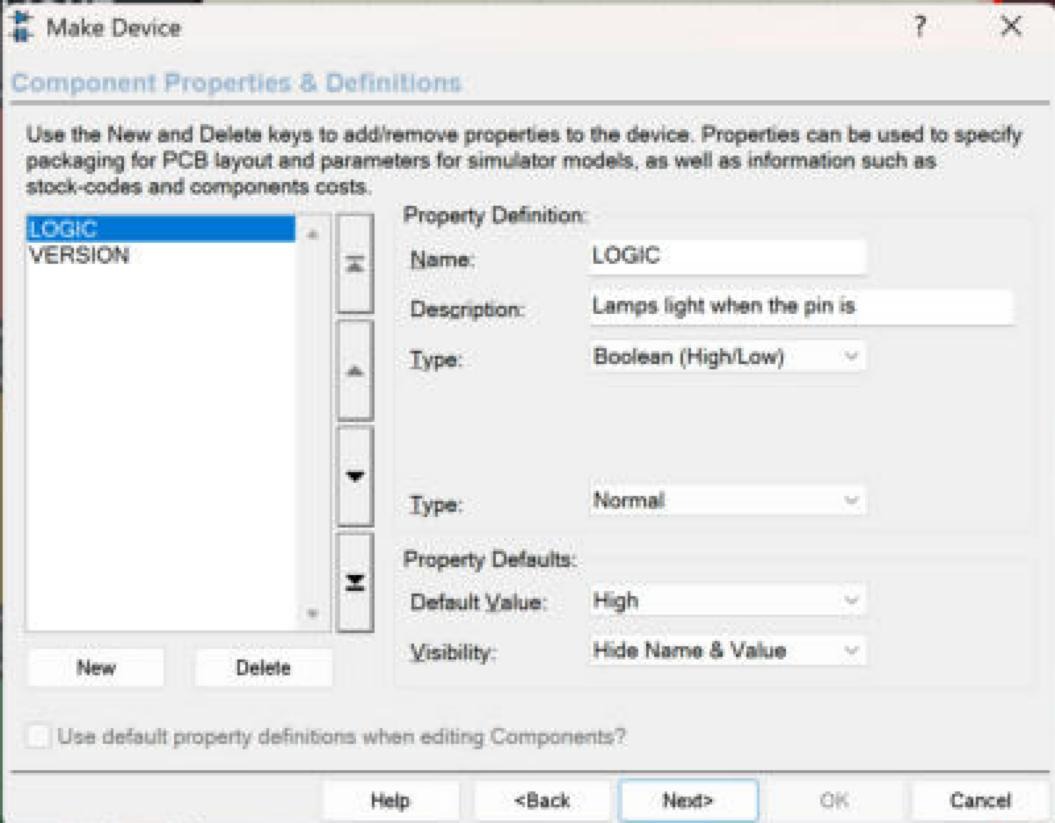
The right half of the page holds the definition and the defaults. For LOGIC we entered:
- Name: LOGIC. Property names are written in capitals by convention, like PACKAGE and PRIMITIVE.
- Description: "Lamps light when the pin is". As we will see, Proteus uses the description as the label of the field in the Edit Component dialogue, so we wrote it to read naturally in front of the value.
- Type (the first Type list): Boolean (High/Low), because the value is one of two logic levels.
- Type (the second list): Normal, so users can change the value.
- Default Value: once a Boolean type is chosen, this field becomes a list with (None), Low and High. We chose High, which matches the real module: a high pin lights the lamp.
- Visibility: Hide Name and Value, so the property does not clutter the schematic.
The Property Types of Proteus 8.5
The first Type list decides what kind of value a property holds and what control the Edit Component dialogue shows for it. In Proteus 8.5 it offers thirteen types:
| Type | Good for |
|---|---|
| String | Free text, such as a version, a supplier or a format like 8N1 |
| Boolean (Checkbox) | An on/off option shown as a tick box |
| Boolean (High/Low) | A logic level, like our LOGIC property |
| Boolean (Yes/No) | A yes/no option |
| Boolean (True/False) | A true/false option |
| Keyword (Non-Editable) | A choice from a fixed list of words |
| Keyword (Editable) | A list of suggested words that also accepts other text |
| Integer | A whole number |
| Float | A number, for example a frequency or a time |
| Filename | A file, such as a program or data file for a model |
| Logic State | A digital logic state |
| PCB Package | The PCB footprint of the part |
| Trace Mode | The simulation trace setting of a model |
The right column is our summary of what each type is meant for, judged from its name and from how the supplied parts use similar properties; we used String and Boolean (High/Low) ourselves. For numbers, the definition can also carry limits. Our HC-12 library shows how such a definition looks in the library: its channel property is stored as CHANNEL="Stored channel (1-127)",FLOAT,1,127, a number from 1 to 127.
Normal, Read Only, Advanced and Hidden Properties
The second Type list sets how a property behaves for the user. Proteus 8.5 offers four options:
- Normal: shown in the Edit Component dialogue and editable.
- Read Only: shown but greyed out, so users can see it but not change it. Ideal for information such as a version number.
- Advanced: for settings that are kept apart from the everyday ones; we did not use it for our part.
- Hidden: not shown in the dialogue at all. Our HC-12 library uses hidden properties for PRIMITIVE, MODDLL and STATE, so that the link to the simulation model cannot be broken by accident.
Step 4: Define the VERSION Property
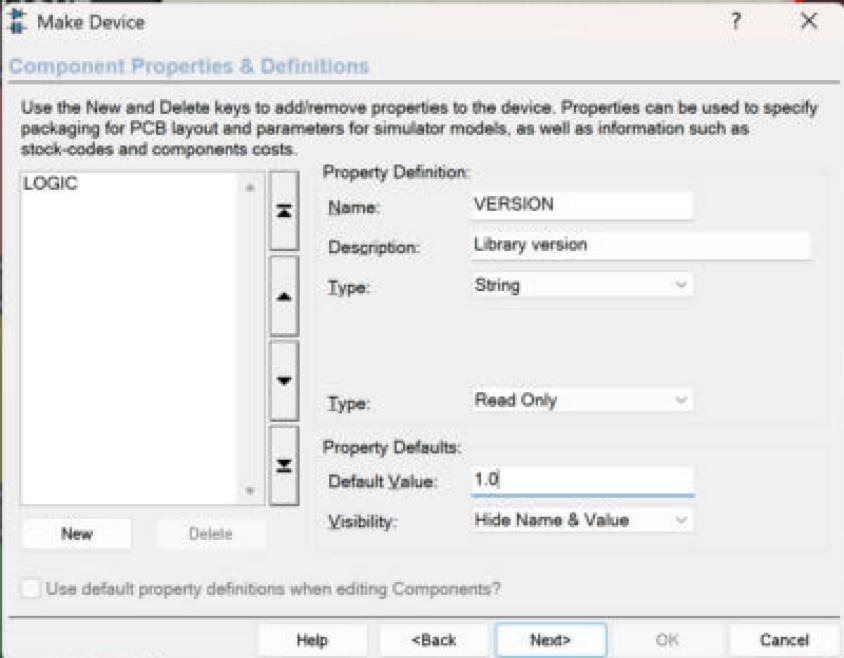
We clicked New again and chose Blank Item. At that moment, LOGIC appeared in the list on the left: a property is added to the list once you start the next one or select another entry. VERSION got these settings:
- Name VERSION, description "Library version".
- Type String, and in the second list Read Only.
- Default value 1.0, visibility Hide Name and Value.
A version property is a small thing that pays off later. When we publish an improved library, users can see at a glance which version a placed part comes from, without guessing from dates.
Visibility: What Appears on the Schematic
The Visibility list decides what a placed component shows next to its reference and value. Proteus 8.5 offers four choices: Show Name and Value, Hide Name, Hide Value, and Hide Name and Value. For a property that matters to the reader of a schematic, such as a resistor value or a crystal frequency, Show Name and Value or Hide Name is right. For internal settings like ours, Hide Name and Value keeps the drawing clean. The setting is only the default: each placed component has its own visibility list for each property in the Edit Component dialogue.
Step 5: Store the Part Again
We clicked Next twice to the Indexing and Library Selection page, where the category, sub-category, manufacturer, description, notes and the library USERDVC were all still set, and clicked OK. Proteus then asked two questions:
- "The device 'TRAFFICLIGHTTEP' already exists in disk library. Do you want to replace it?" We answered Yes.
- "Update all instances of device 'TRAFFICLIGHTTEP'? This will replace all instances of the device on the schematic with the version of the device currently held in the library." We answered OK.
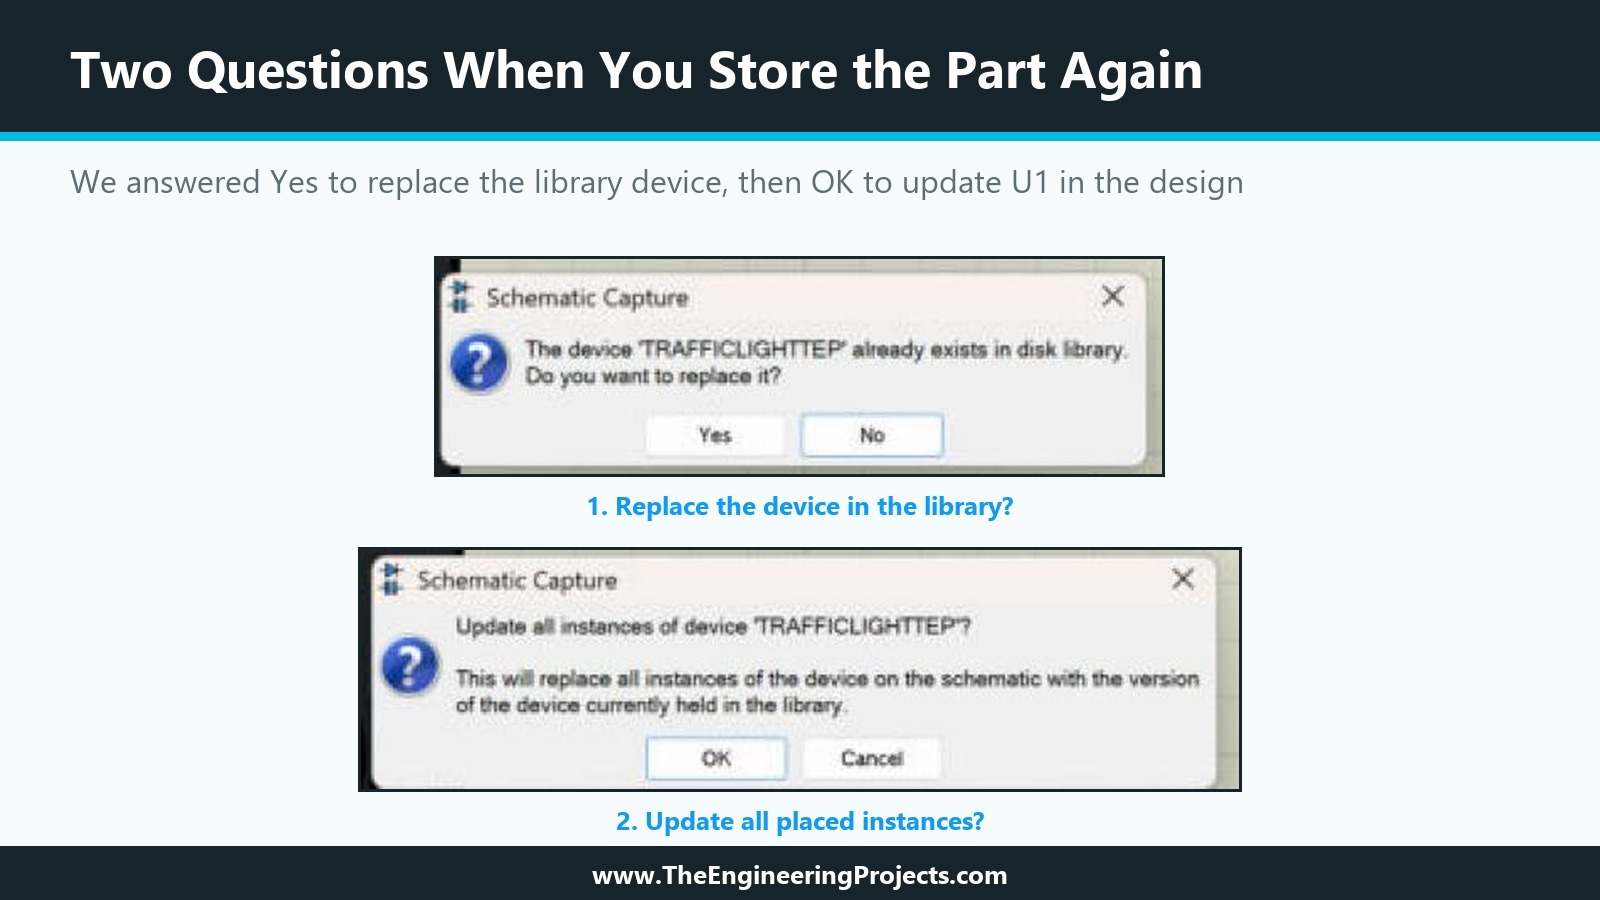
The first question protects the library; the second updates the design. Answer No to the first if you want to keep the old part and store the new one under another name instead.
The Result in the Edit Component Dialogue
Opening Edit Properties of U1 again showed the change. Before, the dialogue had only a free text area called All Properties. After, it showed two fields above a smaller area called Other Properties:
- Lamps light when the pin is: a drop-down list set to High, with its own visibility list set to Hide All.
- Library version: 1.0, greyed out because the property is read-only.
The descriptions became the labels, exactly as we hoped, and the defaults were filled in. U1 had no values for these properties before, so the update simply added them. The help warns that Proteus does not change properties that a placed component already has when a device is updated, because it cannot know which values were edited by hand. If you change a default later, components that already carry the property keep their old value.
What Proteus Stored in the Library
We read the device script back from USERDVC.LIB. The {*DEVICE} and {*INDEX} sections are unchanged; two new sections follow them:
{*DEVICE}
{PREFIX=U}
{NOTES=Made in the TEP tutorial series How to Create a Proteus Library. Simulation model follows later in the series.}
{*INDEX}
{CAT=Optoelectronics}
{SUBCAT=LEDs}
{MFR=The Engineering Projects}
{DESC=Traffic Light LED Module - red, yellow and green lamps, pins GND R Y G, pin HIGH lights the lamp}
{*PROPDEFS}
{LOGIC="Lamps light when the pin is",HILOW}
{VERSION="Library version",READONLY STRING}
{*COMPONENT}
{LOGIC=1}
{VERSION=1.0}- {*PROPDEFS} holds the definitions: the name, the description in quotes, and the type. LOGIC is stored as HILOW, the High/Low type; VERSION as READONLY STRING.
- {*COMPONENT} holds the defaults: LOGIC=1, which is High, and VERSION=1.0.
Compare it with the HC-12 script from the first tutorial, where hidden definitions such as {PRIMITIVE="Primitive Type",HIDDEN STRING} and defaults such as {PRIMITIVE=DIGITAL,HC12TEP} link the part to its model DLL. Our part will get the same two lines when its model exists. We will not add them yet: a part that names a model DLL which does not exist makes the simulation report "Model DLL not found". Until then, keep in mind that a part without any model property is not ignored either: if it sits in a simulated circuit, the simulation stops with "No model specified". The help's answer for parts that do not take part in a simulation, such as connectors, is the property PRIMITIVE=NULL.
One more observation: USERDVC.LIB grew from 11270 to 14878 bytes, and the file now contains both the old and the new version of the device. Proteus wrote the new version without removing the old data; we will look at what the Library Manager can do about that in the library tutorial.
How the Simulation Model Will Use LOGIC
A property only does something if a model or a tool reads it. Simulation models read the properties of their component by name when the simulation starts. In our HC-12 model, for example, the code reads the FORMAT property with a default of 8N1 if it is missing, and the BAUD, CHANNEL, MODE and POWER properties in the same way. When we write the model of our traffic light later in the series, it will read LOGIC once at the start and light a lamp when its pin is at the chosen level. That is why we defined LOGIC now, with a sensible default, before any model exists.
A Simple Property Plan for Your Own Parts
Before adding properties to a new part, sort them into three groups. It keeps the Edit Component dialogue short and the part safe to use.
| Group | Examples | Second Type | Visibility |
|---|---|---|---|
| Settings the user may change | LOGIC, a baud rate, a channel, a start-up value | Normal | Usually hidden on the sheet |
| Information the user should see | VERSION, the manufacturer of the model | Read Only | Hidden on the sheet |
| Internal links | PRIMITIVE, MODDLL, STATE | Hidden | Hidden |
Give every user setting a default that works without any change, write its description as a label, and choose the narrowest type that fits: a Boolean for two choices, a number with limits for a range, a keyword list for a few named options. The fewer free-text properties a part has, the fewer ways there are to break it.
Common Mistakes with Component Properties in Proteus
| Problem | Cause | Solution |
|---|---|---|
| A new property is missing after OK | It was still being edited and never reached the list | Check that every property appears in the list on the left before clicking Next |
| Placed parts keep an old default | Proteus does not overwrite existing property values on update | Change the value on the placed parts, or replace them |
| The Edit Component label is unclear | The description was written as a note, not as a label | Write the description so it reads well in front of the value |
| Users change the model link by accident | PRIMITIVE or MODDLL are Normal properties | Make model properties Hidden |
| The schematic is cluttered with property text | Visibility set to show names and values | Use Hide Name and Value for internal settings |
| Every simulation fails after adding model properties | The named DLL or model file does not exist yet | Add PRIMITIVE and MODDLL only together with the model |
In the Next Tutorial
Our part now has properties, and it lives in USERDVC together with whatever else is stored there. In the next tutorial, How to Create Your Own Library File in Proteus, we will open the Library Manager, create a library file just for our tutorial parts, copy our device and symbol into it, and look at the tools the Library Manager offers for keeping libraries tidy and backed up.
FAQ
How do I add a property to a component in Proteus?
Place and tag a component of the device, run Make Device, click Next to the Component Properties page, click New, choose Blank Item or a predefined name, fill in the definition and the default, then click Next twice and OK, and allow Proteus to replace the device and update the design.
What is the difference between a property definition and a property default?
The definition describes the property: its name, description, type and behaviour. The default is the value and visibility that newly placed components receive.
How do I make a read-only property in Proteus?
Choose Read Only in the second Type list of the property definition. The value is shown in the Edit Component dialogue but cannot be changed.
How do I hide a property in Proteus?
To keep it off the schematic, set Visibility to Hide Name and Value. To keep it out of the Edit Component dialogue as well, choose Hidden in the second Type list.
Why did my placed component not get the new default value?
When a device is updated, Proteus does not change property values that placed components already have, because it cannot know which were edited by hand. Change them on the components or place them again.
Where are the default property names of Proteus stored?
In PROPDEFS.INI in the library folder. Set Property Definitions on the System menu edits them.
That is all for today. Our Traffic Light Module now carries its own settings and version. If you have any questions, ask in the comments. Take care.
Comments
0