


How to Edit and Update an Existing Component in Proteus


Hello friends, I hope you are doing well. This is the eleventh tutorial in our series on how to create a Proteus library. In the previous tutorial, How to Create a PCB Footprint and Package in Proteus, we drew our own footprint, TRAFFICLIGHT-TEP, and linked it to our Traffic Light Module with the Visual Packaging Tool. The part is now complete for schematics and boards. But no library part stays unchanged for long: you find a mistake, a user asks for a feature, or you simply want a better look. Today, we change our part after it is already in use. Our topic is how to edit and update an existing component in Proteus.
We will look at the two ways Proteus offers for editing a device, decompose a placed copy of our module, add a TEP label to its drawing, raise its version number from 1.0 to 1.1 in the script, store it again and update the design. Then we check what the update did to a component that was already placed, which turned out to differ from what the help says, and we look at what repeated updates do to the size of a library file.
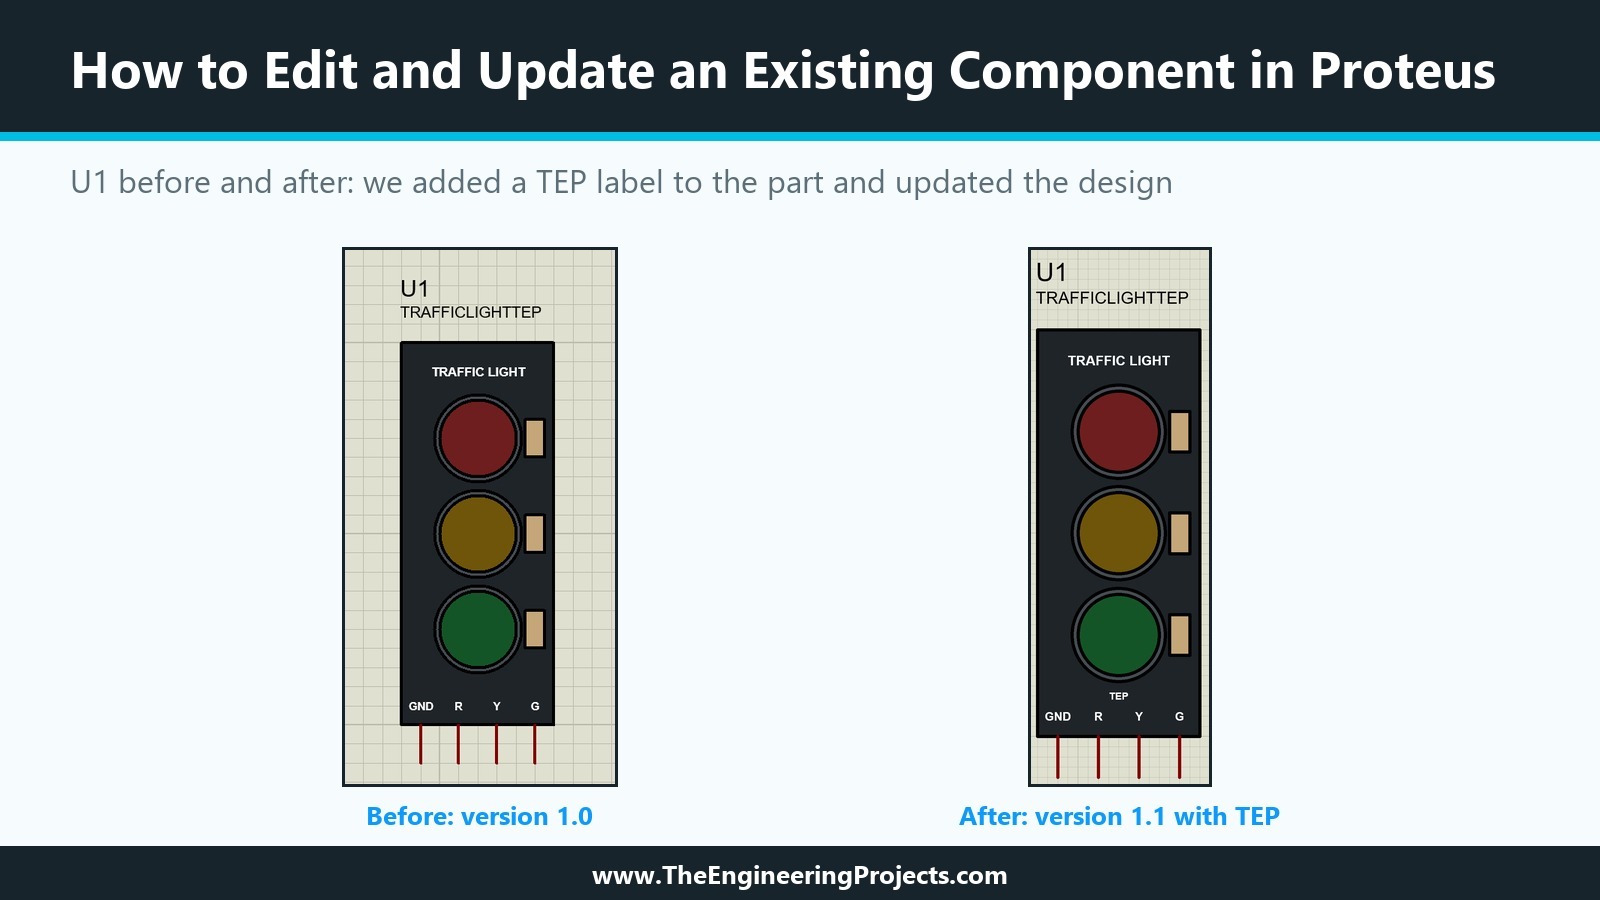
Everything in this tutorial was done in Proteus 8.5 Professional on our PC, in the same Traffic Light Module project. The picture below shows the result: U1 before the edit, and the same U1 after the update, with its new TEP label.
Two Ways to Edit a Proteus Device
The help describes two routes, and choosing the right one saves work:
- To change properties or packaging only, place and tag a component of the device and run Make Device (or the Packaging Tool for the footprint). There is no need to decompose the part. We used this route in the eighth and tenth tutorials, when we added the properties and the package.
- To change graphics or pins, place a component, tag it and choose Decompose. The part breaks into its 2D graphics, its pins, possibly an Origin marker and a text script with the device name, prefix, packaging and default properties. You edit the pieces and run Make Device again.
Today we need the second route, because we change the drawing. On the way, we also change a property default in the script, which shows that the script is a full description of the device that you can edit as text.
Before You Change a Library Part
Three checks are worth a minute before any edit:
- Is the library writable? Make Device only stores into writable libraries. Our TEPTUTORIAL is writable, as we kept it in the ninth tutorial. If you made your library read-only, switch it back with File Attribute in the Library Manager first.
- Do you have a backup? The Library Manager offers no undo. A Backup Libraries click, or a copy of the .LIB and .IDX files, takes seconds.
- Which designs use the part? As we saw in the first tutorial, every design carries its own copy of the parts it uses. An update reaches the open design when you allow it; other designs keep their old copy until the part is picked again there.
How to Edit a Proteus Part: Step by Step
Editing the graphics of our part took five steps: decompose a copy, edit the drawing, edit the script, tag everything and make the device again.
Step 1: Place a Copy and Decompose It
Our design already contains U1, which is also placed on the board from the previous tutorial. We did not want to take U1 apart, so we placed a second copy of TRAFFICLIGHTTEP from the object selector, which became U2, and decomposed that one. Right-clicking U2 shows Decompose at the bottom of its context menu, below Make Device and Packaging Tool.
After Decompose, U2 was no longer a component. On the sheet we found:
- all the 2D graphics of the drawing as separate shapes: the board, the rings, the lamps, the resistors and the texts,
- the four pins, with their names, numbers and electrical types,
- an Origin marker at the end of the GND pin, the point Proteus had used as the origin of the device, as we noted in the seventh tutorial,
- a text script above the board, starting with NAME=TRAFFICLIGHTTEP.
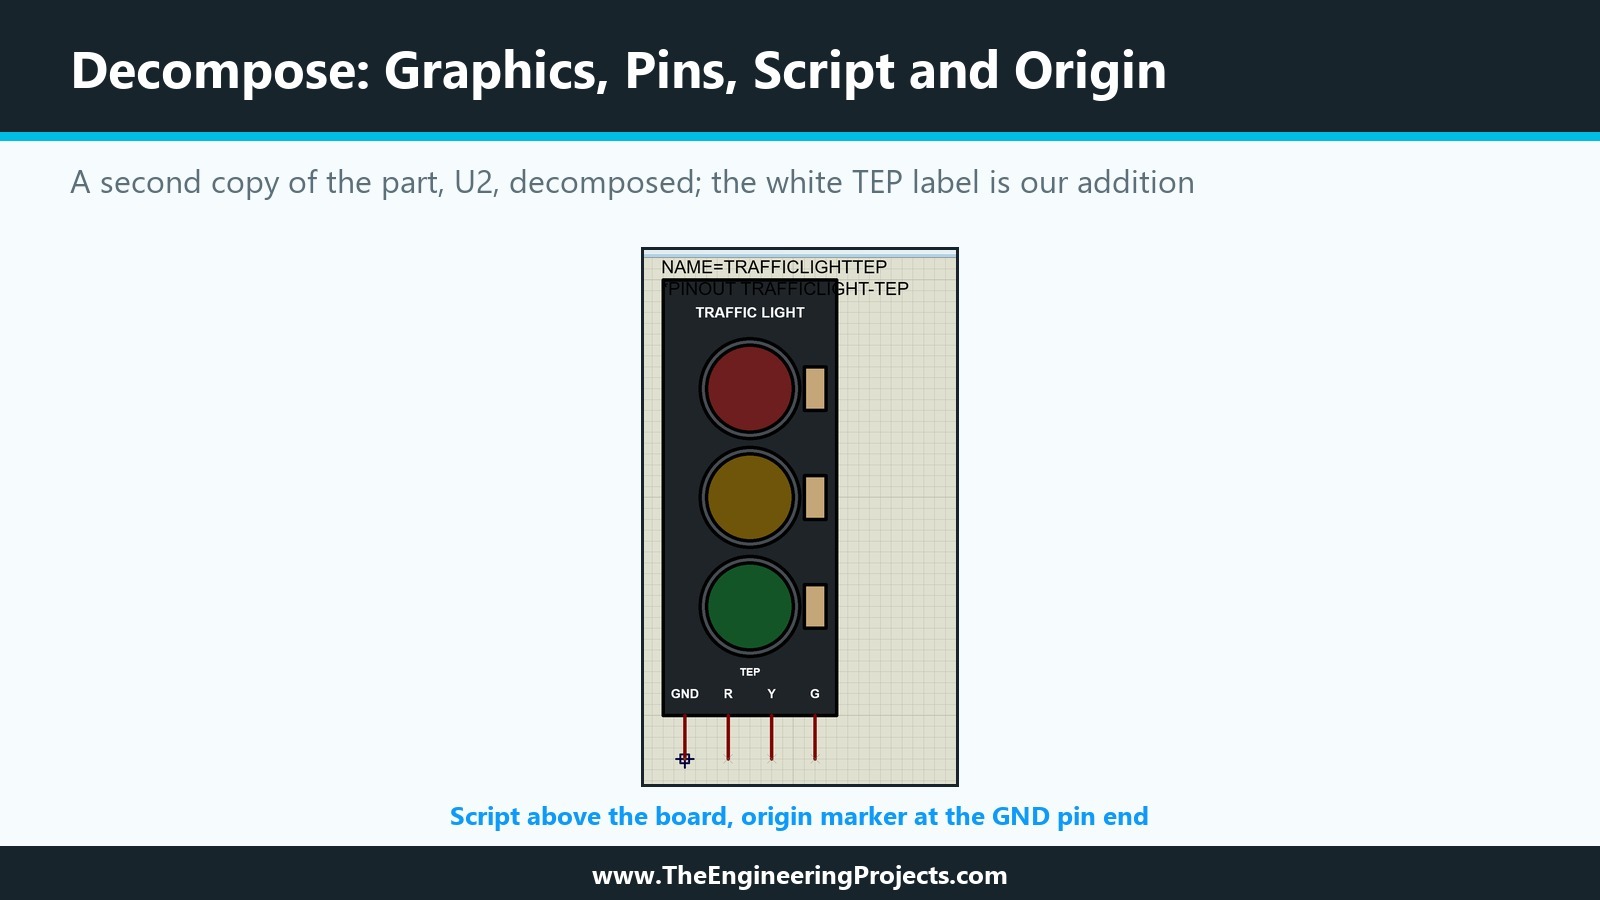
The script is drawn over the top of the board, so only its first lines can be read on the sheet. Right-click it and choose Edit Properties to see it in full.
Step 2: Edit the Graphics
Now the decomposed drawing can be edited like the drawing we made in the third tutorial. We added a small label: the text TEP, centred on the board between the green lamp and the pin names, 800 thou below the centre of the board. With the 2D Graphics Text tool we set Centre and Middle justification, a height of 60th and Bold, unticked Follow Global for the colour and picked white, so that it matches the other white labels of the board.
The same way, you could move a shape, change a colour, add a detail or delete one. Two rules from earlier tutorials still apply: shapes placed later are drawn on top of earlier ones, and colours that must not change belong on the Edit Style tab as local values.
Be Careful with Pins
Pins need more care than graphics. As the first tutorial explained, when a design is updated, Proteus keeps the wiring by matching pin positions or pin names. A pin that keeps its name and its position is always safe. A renamed pin that also moves can lose its wire in every design that uses the part, and the simulation model we write later will look for the pins by name. We left all four pins exactly as they were.
Step 3: Edit the Script
Right-click the script and choose Edit Properties. The Edit Script Block dialogue opens with the full text of the script, a Style tab, options for rotation and justification, and Import and Export buttons for an external file.
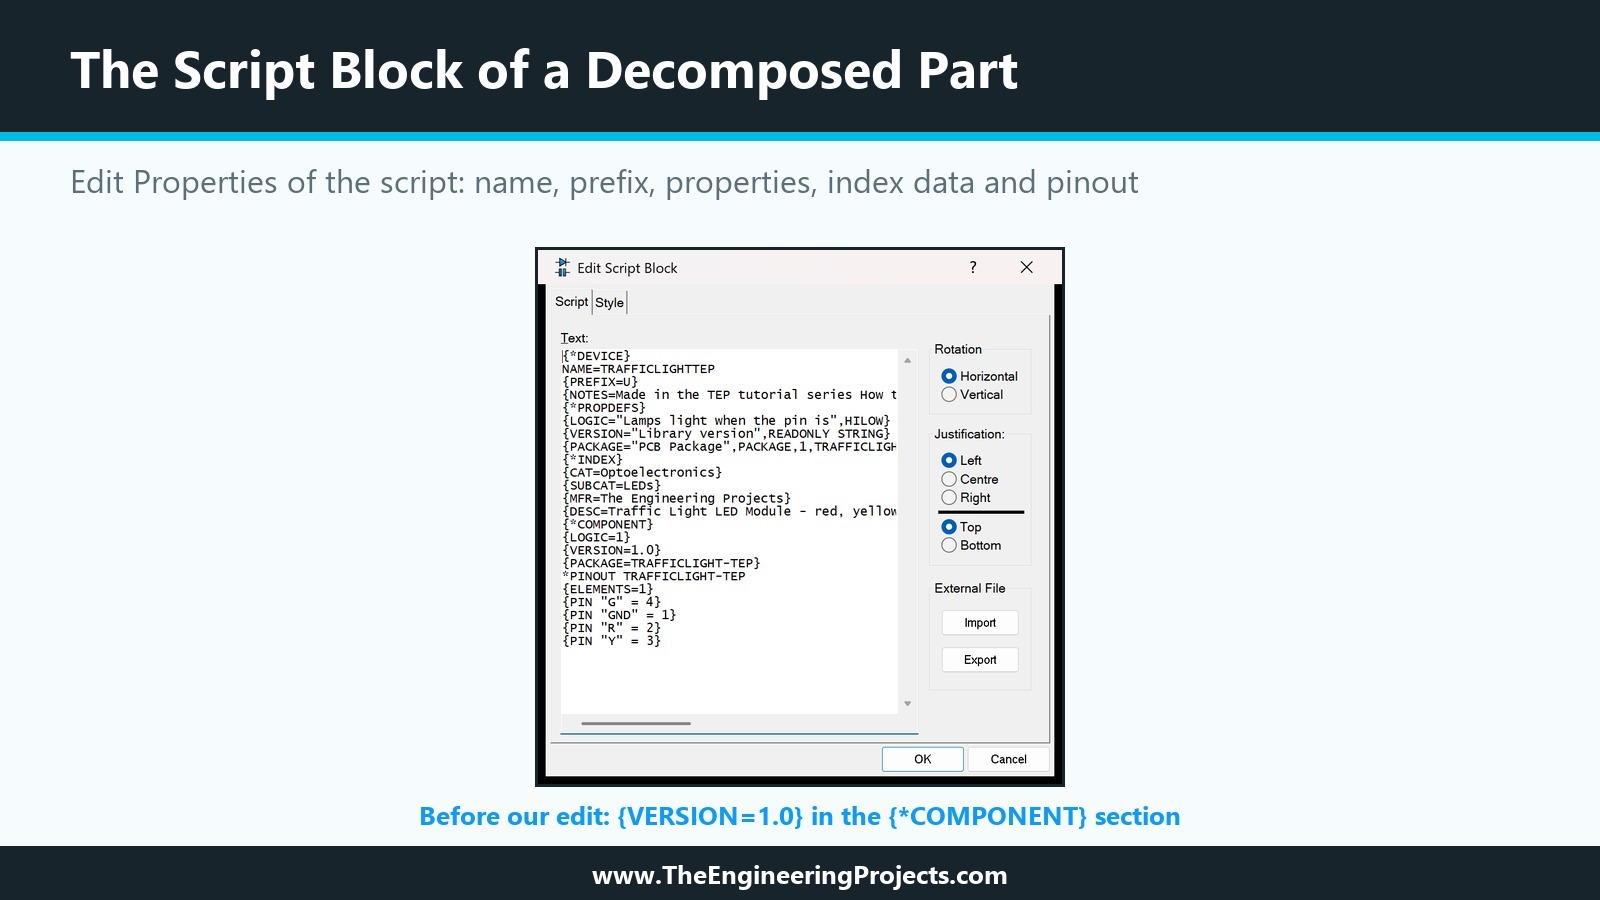
The script is the same text we read from the library in the earlier tutorials, with one extra line, NAME=TRAFFICLIGHTTEP, that carries the device name. Everything the Make Device wizard asks for is here: the prefix and notes in {*DEVICE}, the definitions in {*PROPDEFS}, the index data in {*INDEX}, the defaults in {*COMPONENT} and the pin map of our package after *PINOUT.
Because our drawing changed, it is a new version of the part. We changed the default of VERSION in the {*COMPONENT} section from 1.0 to 1.1, directly in the text, and clicked OK. Here is the script after our edit:
{*DEVICE}
NAME=TRAFFICLIGHTTEP
{PREFIX=U}
{NOTES=Made in the TEP tutorial series How to Create a Proteus Library. Simulation model follows later in the series.}
{*PROPDEFS}
{LOGIC="Lamps light when the pin is",HILOW}
{VERSION="Library version",READONLY STRING}
{PACKAGE="PCB Package",PACKAGE,1,TRAFFICLIGHT-TEP}
{*INDEX}
{CAT=Optoelectronics}
{SUBCAT=LEDs}
{MFR=The Engineering Projects}
{DESC=Traffic Light LED Module - red, yellow and green lamps, pins GND R Y G, pin HIGH lights the lamp}
{*COMPONENT}
{LOGIC=1}
{VERSION=1.1}
{PACKAGE=TRAFFICLIGHT-TEP}
*PINOUT TRAFFICLIGHT-TEP
{ELEMENTS=1}
{PIN "G" = 4}
{PIN "GND" = 1}
{PIN "R" = 2}
{PIN "Y" = 3}
Editing the script is quick, but it is plain text without any checks. A missing brace or a mistyped property type is not reported at this point. Change only what you understand, and check the result on the Component Properties page of the wizard in the next step.
Step 4: Tag Everything, Including the Script
Make Device builds the part from the tagged objects. All graphics, all pins, the Origin marker and the script must be tagged; if the script is left out, the wizard starts empty and the properties, index data and packaging have to be typed again.
Our first tag box tagged the board, the pins and our new label, but the script stayed black, because its text box reached beyond the tag box, and a tag box only tags objects that lie completely inside it. A click on the script with Ctrl held down did not add it either. We zoomed out one step, dragged a larger tag box around the whole area and checked that the script turned red as well. Look for the red script before you continue.
Step 5: Make Device and Update the Design
With everything tagged, we chose Make Device from the Library menu. Thanks to the script, the wizard came up filled in: the name TRAFFICLIGHTTEP and the prefix U on the first page, our package TRAFFICLIGHT-TEP on the Packagings page, and LOGIC, VERSION and PACKAGE on the Component Properties page, where the default of VERSION now read 1.1.
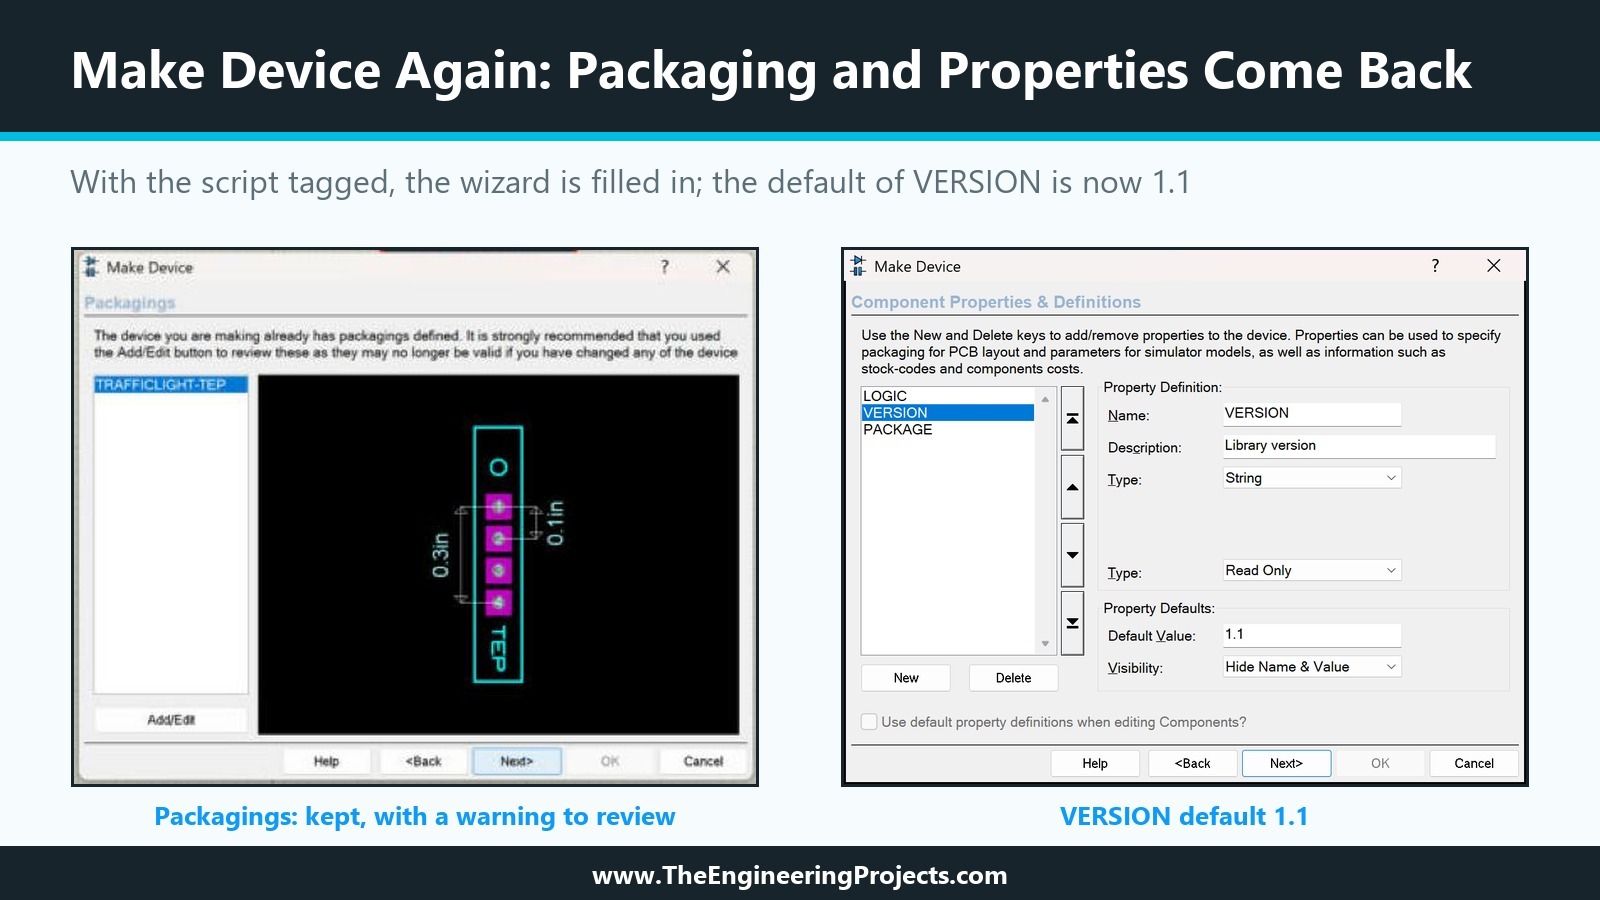
The Packagings page added a warning: the device already has packagings defined, and it is strongly recommended to review them with Add/Edit, because they may no longer be valid if the device has changed. Our pins were unchanged, so the pin map was still right. If you add, remove or rename pins, open the Visual Packaging Tool and check that every pad is still white.
On the last page, check the library once more. In the tenth tutorial, the Save Device To Library list was set to 74CBT, the first writable library; this time TEPTUTORIAL was already selected. We clicked it anyway and clicked OK. Proteus asked whether to replace the device in the disk library (Yes) and whether to update all instances of the device on the schematic (OK). U1 changed at once: it now shows the TEP label, as the picture at the top of this tutorial shows. Its wiring position did not move, because the pins were unchanged.
What Happens to the Properties of Placed Parts?
The help states that properties of components already placed are not modified by such an update, because Proteus cannot know which values were edited by hand. We expected U1 to keep VERSION 1.0. It did not. After the update, the Edit Component dialogue of U1 showed Library version 1.1, and with Edit all properties as text ticked, U1's own property list read {LOGIC=1}, {VERSION=1.1} and {PACKAGE=TRAFFICLIGHT-TEP}.
VERSION is read-only, so we tested a normal property too. We ran Make Device on U1 without decomposing, changed only the default of LOGIC from High to Low, stored the part and updated the design. Afterwards U1's LOGIC read Low. Then we set the default back to High in the same way, and U1 followed again.
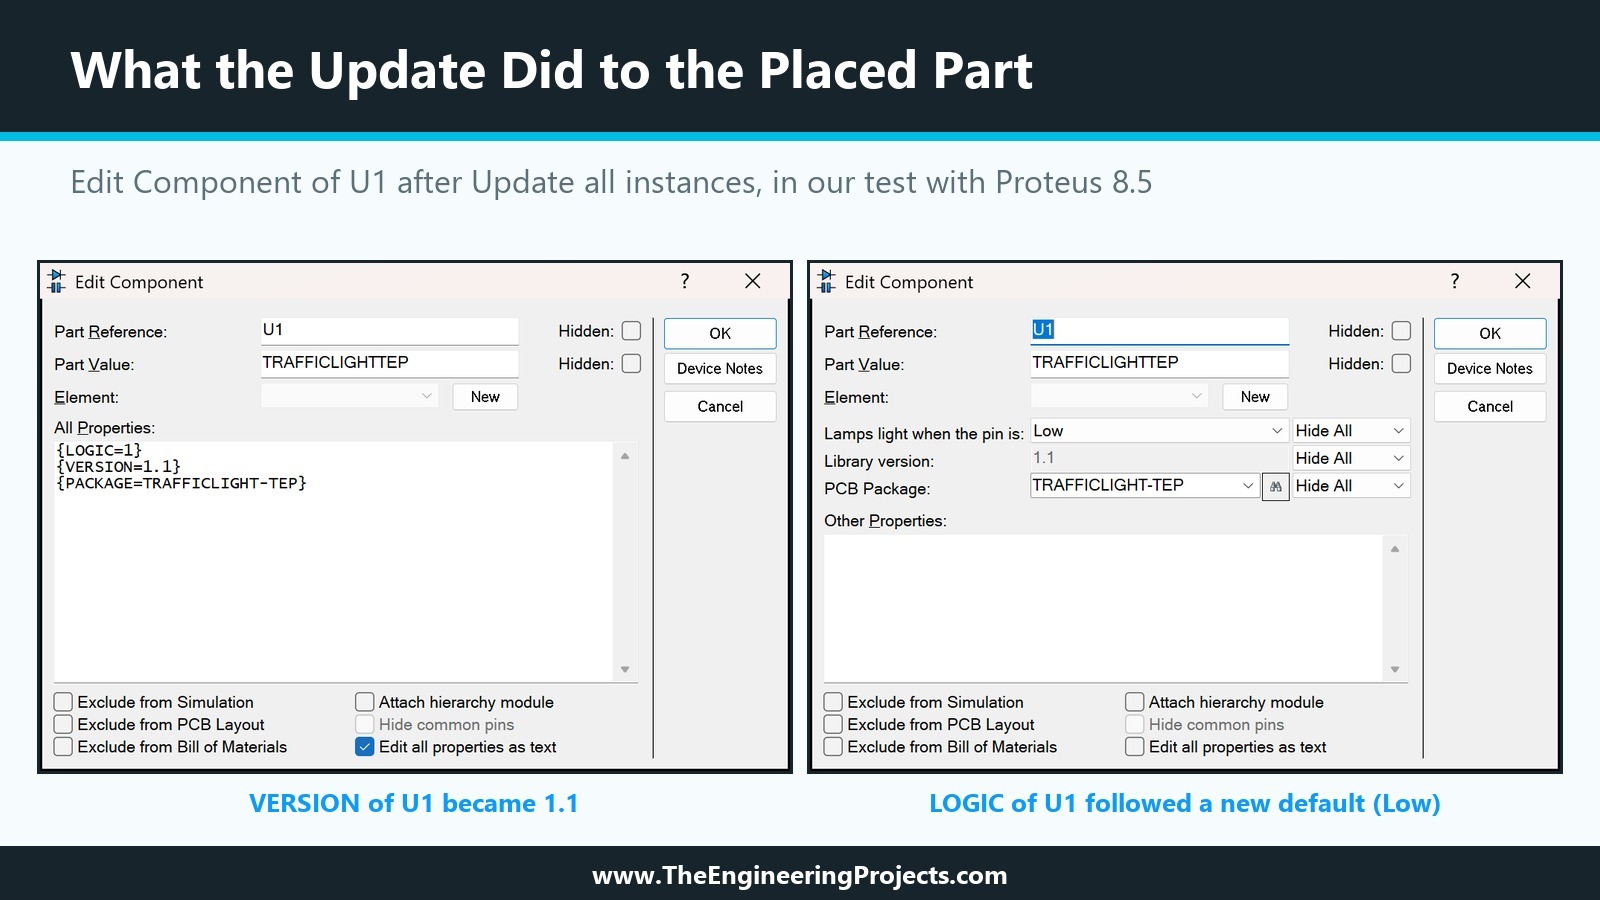
So in our test with Proteus 8.5, Update all instances also replaced property values of a placed component that we had never edited by hand. We did not test a value edited by hand, so we cannot tell whether Proteus keeps such values. The practical lesson is simple: after updating a library part, open the placed components and check the properties that matter, especially values that someone may have set on purpose, such as a baud rate or a logic level.
Why the Library File Keeps Growing
Every time Make Device stores a part, the new version is added to the library file, and the old one stays in it as dead space. During this tutorial we stored our part three times: once with the new label and version, and twice for the LOGIC test. TEPTUTORIAL.LIB grew from 13,792 to 26,308 bytes, and the file now contained nine copies of the device script, although the Library Manager still reported "1 Items (99 Free).".
What Pack Library Did
Pack Library is meant to remove that dead space. We backed up TEPTUTORIAL with Backup Libraries, which created TEPTUTORIAL.BAK with the same 26,308 bytes, and then chose Pack Library and answered Yes. The result was the same as with USERDVC in the ninth tutorial: a new file TEPTUTORIAL.TMP with 10,118 bytes appeared, and TEPTUTORIAL.LIB kept its 26,308 bytes. Twice now, on two libraries, Pack wrote a compact copy but did not replace the library file while Proteus was using it.
| Moment | TEPTUTORIAL.LIB | Other files |
|---|---|---|
| After the previous tutorial | 13,792 bytes | TEPTUTORIAL.IDX 197 bytes |
| After three stores in this tutorial | 26,308 bytes | TEPTUTORIAL.IDX 197 bytes |
| After Backup Libraries | 26,308 bytes | TEPTUTORIAL.BAK 26,308 bytes |
| After Pack Library | 26,308 bytes | TEPTUTORIAL.TMP 10,118 bytes |
How to Get a Compact Library File
The growth does no harm: Proteus uses the newest version, and a few kilobytes do not matter. When you want a compact file, for example before sharing a library, there is a way we have already seen work: in the ninth tutorial, moving our part into a brand new library produced a file with only the live version in it. Create a fresh library, copy the parts into it, check them, and use the new file.
Keep a Record of Your Versions
A part that changes needs a history, so that you and your users know what changed and when. Our part carries three helpers:
- The VERSION property, read-only, so every placed component shows which version it came from.
- The Device Notes on the last page of Make Device, readable from the Edit Component dialogue; a short change log fits there.
- A dump of the library, saved with the Dump Library window of the Library Manager after each release, as we suggested in the ninth tutorial.
Raise the version for every change that users can see or that affects the simulation, and write one line about it in the notes.
Updating Other Designs
The update question of Make Device only reaches the design that is open. The help explains how to bring a changed part into other designs: open the design and pick the part again with the Pick command; Proteus then replaces the copy in the design with the one from the library, matching pin positions or pin names so that the wiring stays connected. Do this for each design that should use the new version, and check the properties of the updated parts afterwards, as shown above.
Common Mistakes When Updating a Proteus Part
| Problem | Cause | Solution |
|---|---|---|
| Make Device starts with empty fields | The script was not tagged | Tag a box that encloses the whole script; check that it turns red |
| Wires come off after an update | Pins were renamed or moved | Keep pin names and positions; rewire if a change is unavoidable |
| The part lost its footprint mapping | Pins changed but the packaging was not reviewed | Open the Visual Packaging Tool from the Packagings page and check the pads |
| A value set on a placed part changed | Update all instances replaced property values | Check the properties of placed parts after every update |
| Other designs still show the old part | Each design keeps its own copy | Open them and pick the part again |
| The library file keeps growing | Old versions stay in the file | Harmless; copy the parts into a fresh library for a compact file |
| The part cannot be stored | The library is read-only | Make it writable with File Attribute, then store |
In the Next Tutorial
Our Traffic Light Module is complete as a drawing, a set of pins and properties, a footprint and a versioned library part, but it still has no simulation model: pressing Run gives "No model specified". In the next tutorial, Proteus Simulation Models Explained, we look at the kinds of models Proteus can use, primitives, schematic models, SPICE models and VSM DLL models, and decide which one our module needs.
FAQ
How do I edit an existing component in Proteus?
To change graphics or pins, place the part, right-click it and choose Decompose, edit the pieces, tag everything including the script and run Make Device. To change only properties or the package, run Make Device or the Packaging Tool on the placed part without decomposing it.
What does Decompose do in Proteus?
It breaks a placed component into its 2D graphics, pins, Origin marker and a text script with the device name, prefix, properties, index data and packaging, so that the part can be edited and made again.
How do I update all components after changing a library part?
When you store the part with Make Device, answer Yes to replace it in the library and OK to update all instances. Proteus updates the open design; other designs need the part to be picked again.
Does updating a part change the properties of placed components?
The help says no, but in our test with Proteus 8.5 the update replaced the values of VERSION and LOGIC on a placed component with the new defaults. Check the properties of placed parts after each update.
Why does my library file get bigger after every change?
Each store adds the new version of the part and leaves the old one in the file. Pack Library is meant to compact it; on our PC it left a .TMP file instead while Proteus used the library, so we copy parts into a fresh library when a compact file is needed.
Can I edit a part from the Labcenter libraries?
Their libraries are read-only and are replaced by updates. Store your edited copy in USERDVC or your own library, ideally under a new name, so that there is no confusion with the original.
That is all for today. Our Traffic Light Module is now at version 1.1, and we know how to change it safely. If you have any questions, ask in the comments. Take care.
Comments
0