


How to Create Your Own Library File in Proteus (Library Manager)


Hello friends, I hope you are doing well. This is the ninth tutorial in our series on how to create a Proteus library. In the previous tutorial, How to Add Component Properties in Proteus, we gave our Traffic Light Module two properties, LOGIC and VERSION, and stored the part again in USERDVC, the library Proteus provides for your own devices. Today, we give the part a library file of its own. Our topic is how to create your own library file in Proteus with the Library Manager.
We will open the Library Manager, learn how its two lists and its buttons work, create a new library file called TEPTUTORIAL, check it with Information, back up USERDVC, move our part into the new library, look inside it with Dump Library and make Proteus find the part in its new home. We also report what Pack Library and File Attribute did on our PC, including one result of Pack Library that did not match the help.
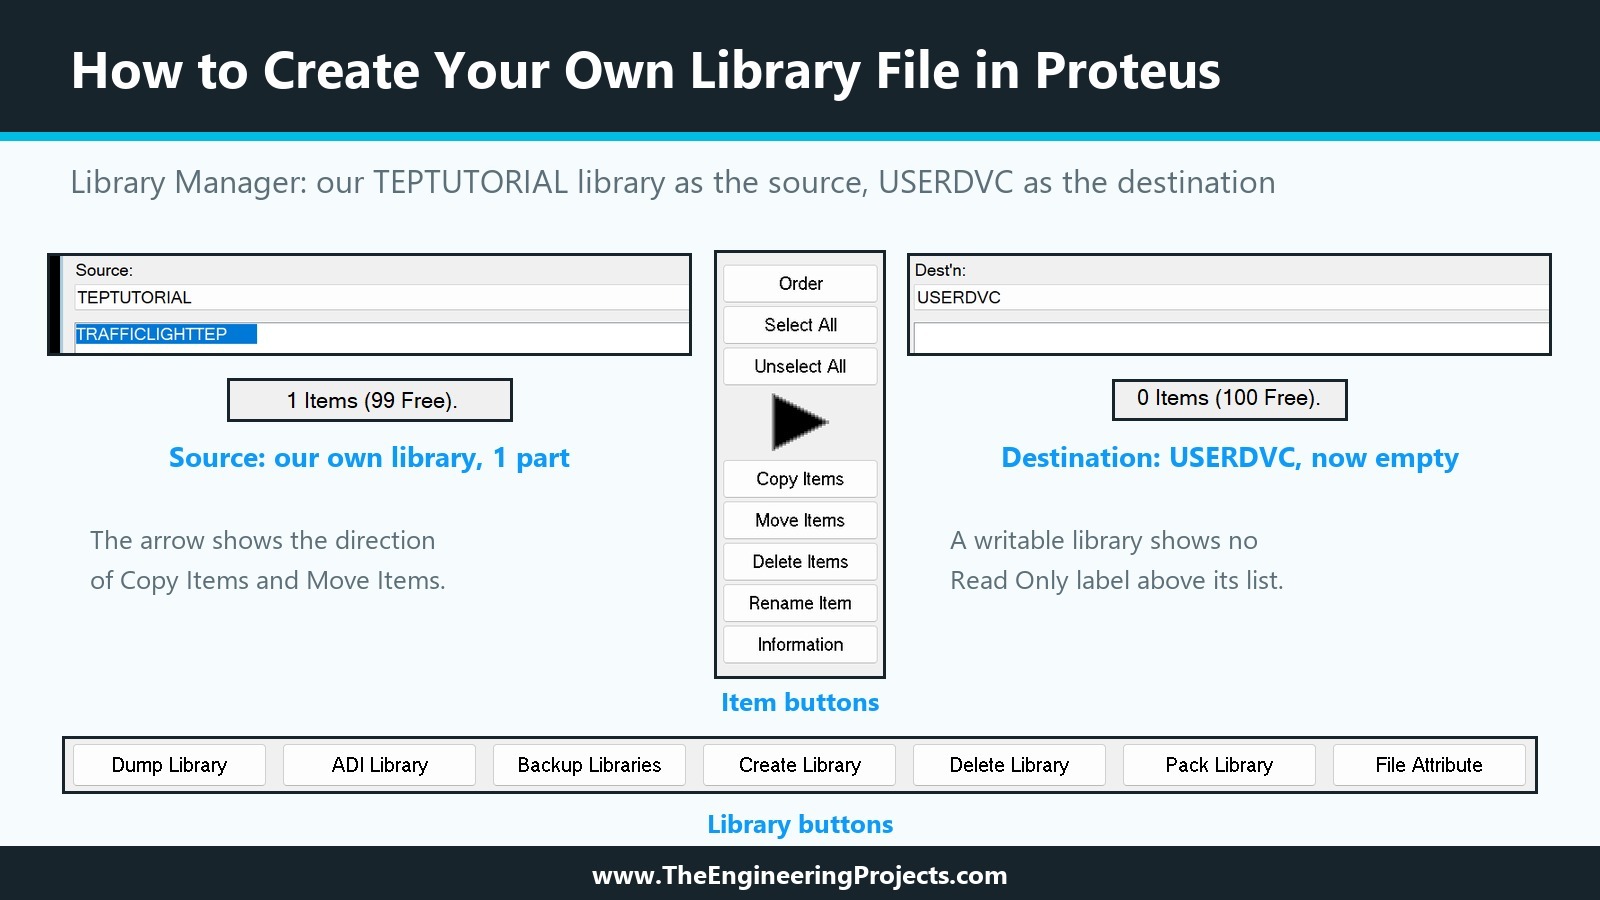
Everything in this tutorial was done in Proteus 8.5 Professional on our PC, with the part from the previous tutorials. The picture below shows the end result: our own library TEPTUTORIAL holding TRAFFICLIGHTTEP, and USERDVC empty again.
Why Create Your Own Library File in Proteus?
Since the seventh tutorial, our part has lived in USERDVC.LIB. As we saw in the first tutorial, Proteus installs three libraries as read/write for its users: USERDVC for devices, USERPKG for PCB packages and USERSYM for symbols. They are a fine place for a first part, but a part that you plan to keep and share deserves a file of its own, for several reasons.
- One file per project. TEPTUTORIAL will hold only the parts of this series. Our module libraries work the same way: the HC-12 module from the first tutorial comes as its own file, TEPHC12.LIB.
- Easy to share. A device library is a .LIB file with its .IDX index file. When you hand over your own pair, you hand over exactly your parts and nothing else.
- No collisions. If two people both ship a USERDVC.LIB, installing the second one replaces the first. The help also warns that two library files with the same name in different library folders lead to confusion, because nobody knows which one was loaded. A distinct name avoids both problems.
- Safe from updates. Labcenter's own libraries are read-only and are replaced when Proteus is updated, so nothing of yours should ever be stored in them.
- Easy to back up. One small file per project is easy to copy, date and compare.
How to Open the Library Manager in Proteus
The Library Manager is the last command of the Library menu in the schematic editor. In Proteus 8.5, it does not open a separate window; it opens a new tab next to Schematic Capture. The tab works on one kind of library at a time, and on our PC the kind followed the current mode. With Component mode active, the tab was called Device Libraries and listed device libraries such as 74ALS, ACTIVE and USERDVC. After we had used a 2D graphics tool, the same command opened a tab called Symbol Libraries, with SYSTEM as a read-only source and USERSYM as the destination, still holding the symbol TRAFFIC_LAMP_RED that we made in the fifth tutorial.
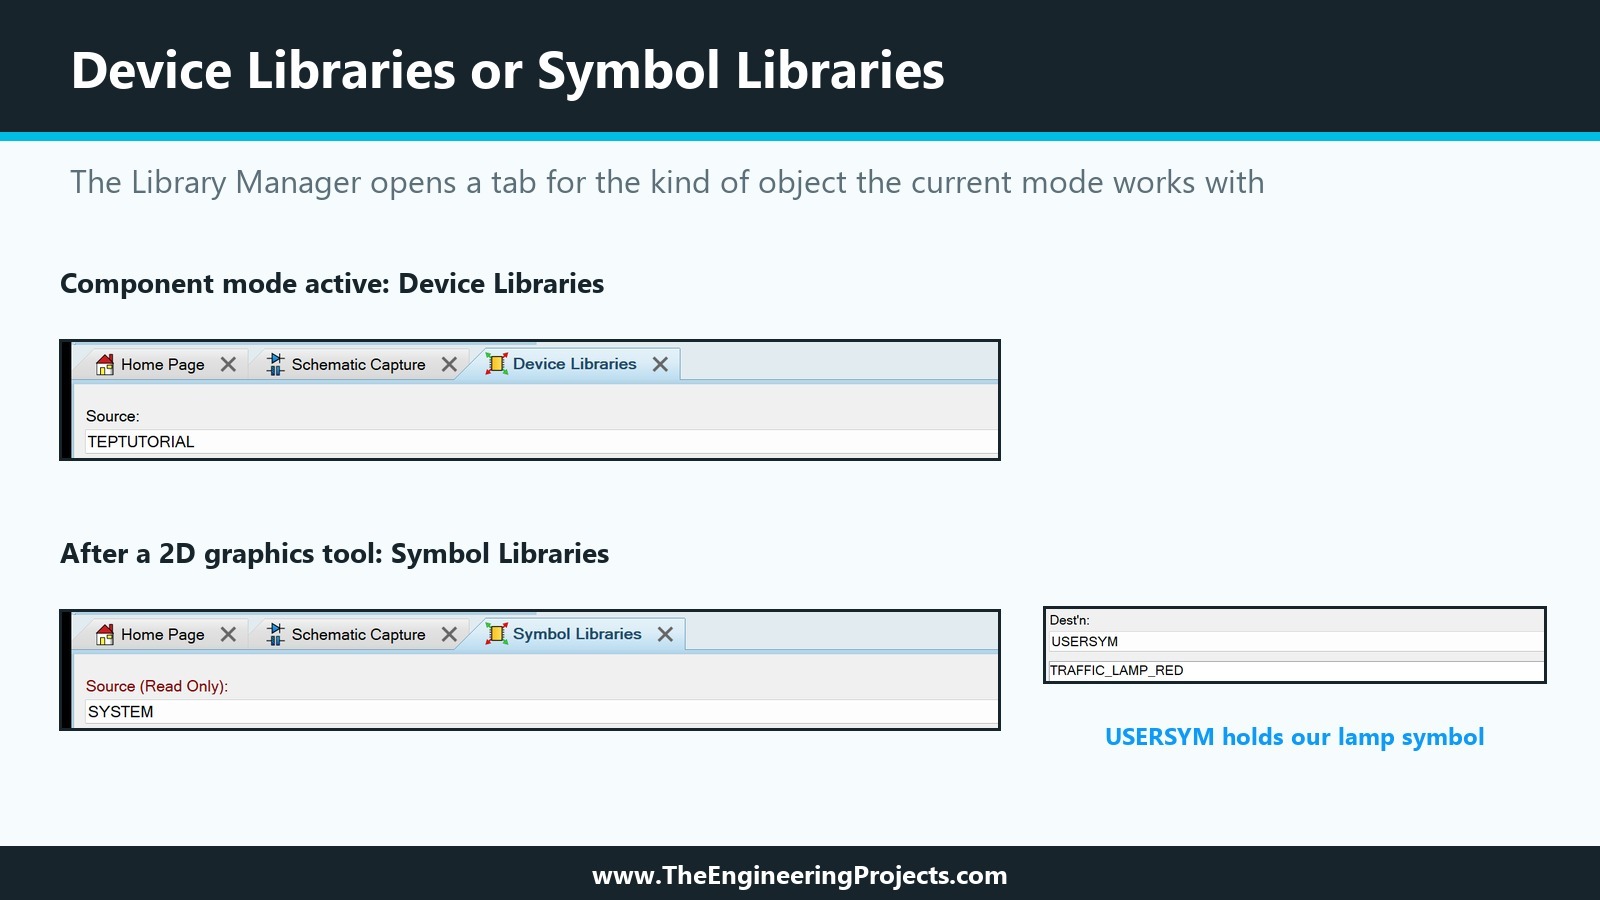
For this tutorial we need the device libraries, so select Component mode in the mode toolbar before you open the Library Manager. When you are done, close the tab with the cross on its title, like any other tab.
Source and Destination: How the Library Manager Works
The tab is divided into two large lists. The left one is labelled Source and the right one Dest'n, short for destination. Above each list, a drop-down selects the library it shows; below it, a line reports how many items the library holds and how many entries are still free in its index, for example "230 Items (970 Free)." for the read-only 74ALS library and "1 Items (99 Free)." for our finished TEPTUTORIAL.
The help explains the rules behind the two lists:
- The source is the library that received the input focus last. Clicking in one list makes it the source and the other the destination. The labels above the lists and the large black arrow between them show which way Copy Items and Move Items will work, so check the arrow before each copy or move.
- Read-only libraries can only be a source. Their label reads "Source (Read Only):". You can select one as the destination, but the buttons that would change it stay greyed out.
- The lists allow multiple selection. A click selects an item, a second click on a selected item unselects it, so several parts can be copied or moved in one go.
Labcenter's libraries are all read-only, which is why most buttons are greyed out when you first open the Library Manager with 74ALS as the source. They come to life as soon as a writable library such as USERDVC or your own is the source.
The Library Manager Buttons Explained
The buttons fall into two groups. The item buttons in the middle column act on the selected parts of the source library; the library buttons along the bottom act on the source library as a whole. The descriptions below follow the Proteus help; the last column says what we did with each button in this tutorial.
| Button | What it does | In this tutorial |
|---|---|---|
| Order | Sorts the list of libraries in the drop-downs | Not needed |
| Select All, Unselect All | Select or clear all items of the source | Used before Dump Library |
| Copy Items | Copies the selected items to the destination | Not used, see Step 4 |
| Move Items | Copies the selected items, then deletes them from the source | Moved our part |
| Delete Items | Deletes the selected items; they cannot be recovered | Not used |
| Rename Item | Renames the last selected item | Not used |
| Information | Shows the library data and the data of the selected item | Checked both libraries |
| Dump Library | Lists the library data and the scripts of the selected items | Read our part back |
| ADI Library | Applies an ASCII Data Import file to the selected items | Not used |
| Backup Libraries | Makes a .BAK copy of the source library | Backed up USERDVC |
| Create Library | Creates a new, empty, writable library | Created TEPTUTORIAL |
| Delete Library | Deletes the source library from the disk | Not used |
| Pack Library | Packs the source library | Tested on USERDVC |
| File Attribute | Switches the source library between read-only and writable | Kept TEPTUTORIAL writable |
Before using any of them, read the warning that opens the Library Manager help. It says that the Library Manager gives direct access to the libraries, that a whole library can be deleted at a stroke, and that it keeps no backups and offers no undo, undelete or recovery. Labcenter recommends backing up your own libraries every week and before any change. We follow that advice in Step 3.
How to Create Your Own Library File: Step by Step
Creating our library and moving our part into it took six steps, from Create Library to the restart that lets Pick Devices find the part.
Step 1: Create a New Library File with Create Library
In the Device Libraries tab, click Create Library. A Windows save dialogue called Create New Library opens in the LIBRARY folder of Proteus, with Library Files as the file type and the existing .LIB files in the list. Type the name of the new library in the File name box and click Save. We named ours TEPTUTORIAL.
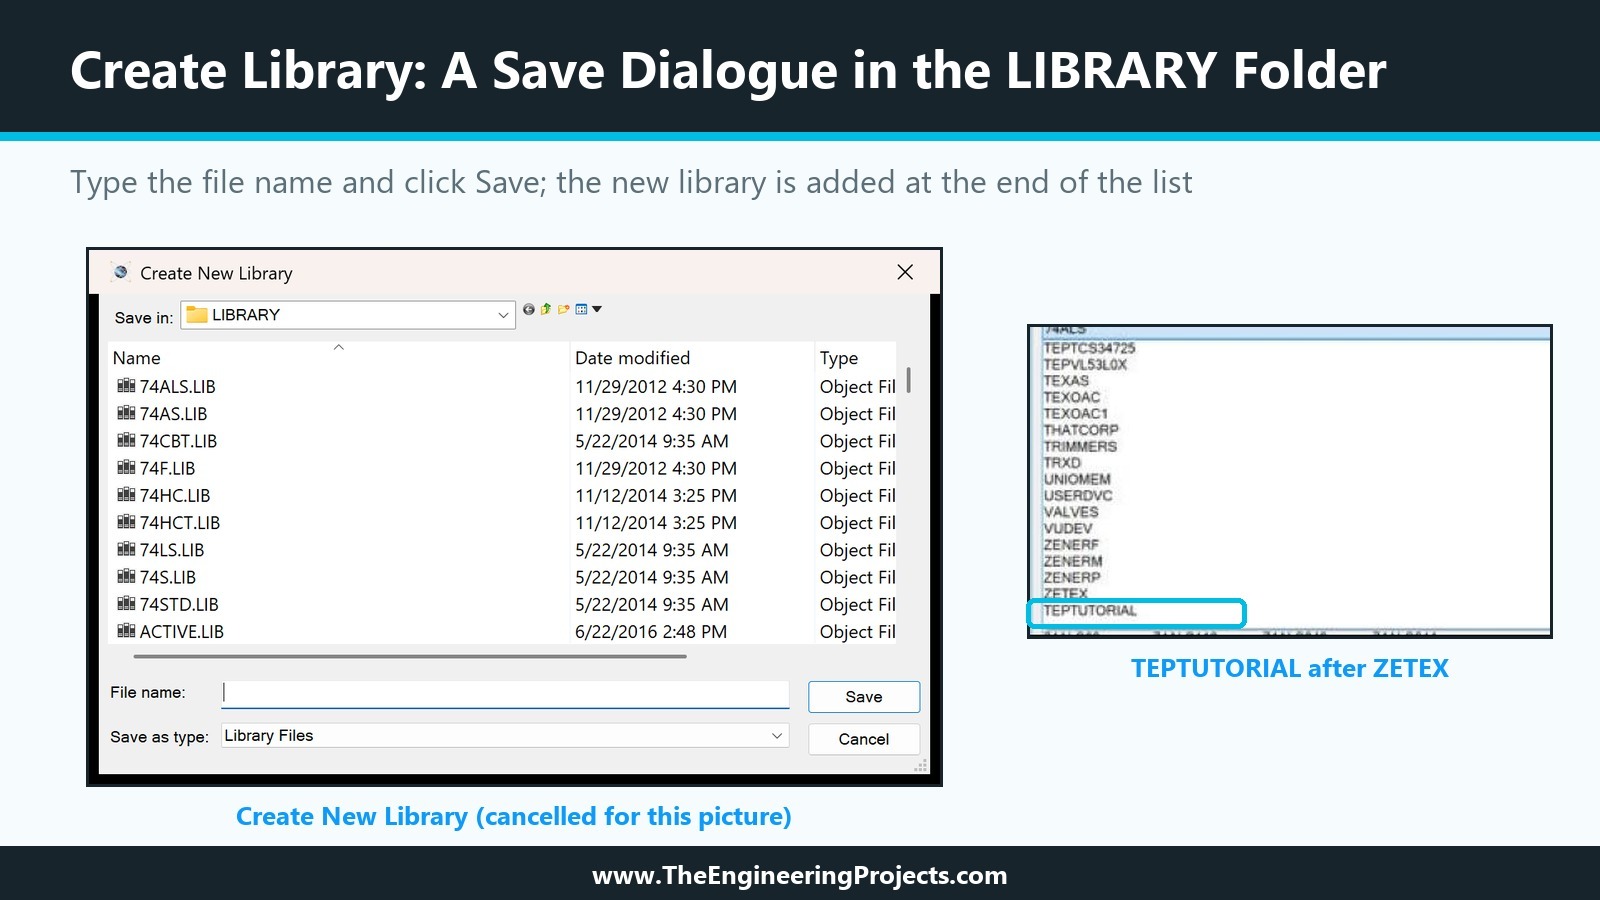
The new library appeared at once as the destination, empty, with "0 Items (100 Free).". In the LIBRARY folder, two new files appeared: TEPTUTORIAL.LIB with 8,032 bytes and TEPTUTORIAL.IDX with 44 bytes. An empty library is therefore not an empty file; 8,032 bytes is also the size USERDVC.LIB had before we stored our first device in it in the seventh tutorial.
The help adds that Proteus asks for the maximum number of objects of a new library and that this value cannot be changed afterwards. Our new library reports room for 100 objects, the same as USERDVC, which is plenty for a tutorial library. If you plan a large library, for example a whole family of modules, make sure the maximum fits before you start filling it.
One small detail: in the library drop-downs, TEPTUTORIAL was not sorted in with the others but added at the very end of the list, after ZETEX. The Order button sorts the list if you prefer it alphabetical.
How to Name Your Library
A few rules for the name, which users will later see in the Library column of Pick Devices:
- Make it unique across all your library folders, because two libraries with the same file name confuse Proteus and its users.
- Use capitals without spaces, like the supplied libraries.
- Start with a short prefix of your own, such as TEP, so that all your libraries stand together in a folder listing.
Step 2: Check a Library with Information
Select a library as the source and click Information. With nothing selected, the window shows the library alone: the full path of the file, the library version (4.00 on our PC), the maximum number of objects and the maximum number of prefixes. With an item selected, it adds the data of that item.
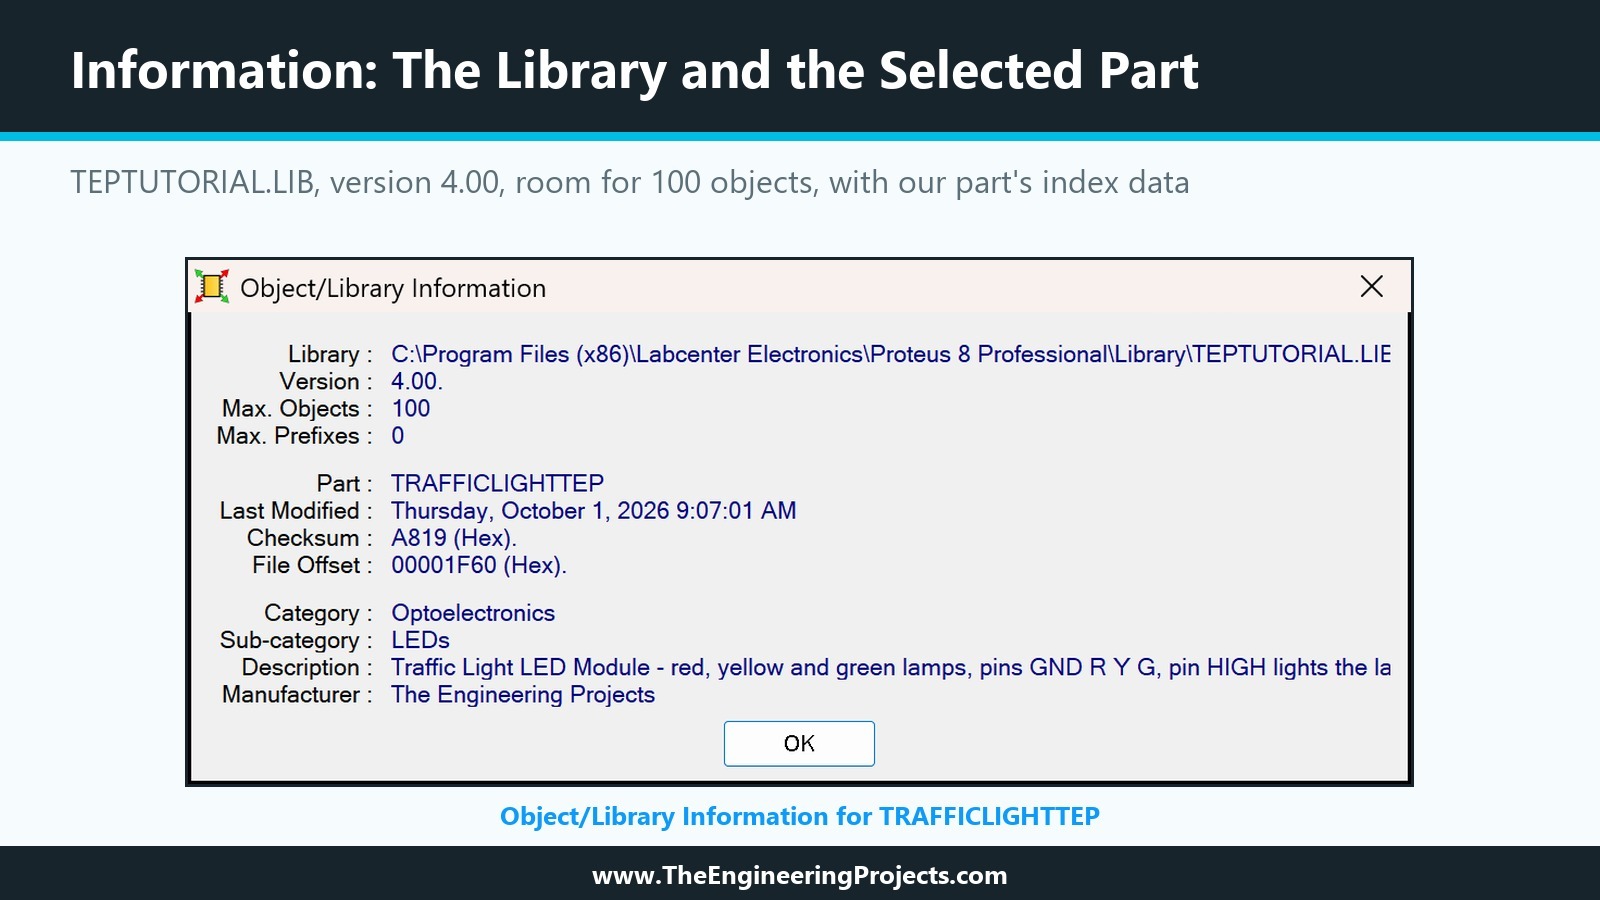
For our part in TEPTUTORIAL, the window lists the part name, the time it was last modified, a checksum, its position in the file (the file offset) and the index data we entered in the seventh tutorial: category Optoelectronics, sub-category LEDs, the description and the manufacturer, The Engineering Projects. The last modified time, 9:07:01 on 1 October 2026, is the moment of the move in Step 4, not of the original Make Device.
The library version matters when you exchange parts with older libraries. The help explains that copying a part from a newer library into an older one, for example from version 4 into version 3, ends with an error message. To bring an older library up to date, make it writable, place any part from it, run Make Device on that part and store it back into the same library; Proteus then updates the library to version 4.
Step 3: Back Up Before You Change a Library
Before moving anything, we backed up USERDVC. Select it as the source and click Backup Libraries. On our PC, Proteus gave no message at all, but a new file USERDVC.BAK appeared in the LIBRARY folder, with 14,878 bytes, exactly the size of USERDVC.LIB. According to the help, a library is restored by renaming the .BAK file to .LIB in Windows Explorer and restarting Proteus.
The help describes a second method that we recommend for anything important: copy your .LIB and .IDX files with Windows Explorer into a folder that Proteus does not use, ideally with the date in the folder name. Do not judge your backups by the file dates in the LIBRARY folder, though. During our tests, the time stamps of USERDVC.LIB and TEPTUTORIAL.LIB changed several times while their sizes stayed the same, even after read-only checks such as Information and Dump Library.
Step 4: Move Your Part into the New Library
Now the actual move. Select USERDVC as the source, where TRAFFICLIGHTTEP showed "1 Items (99 Free).", and TEPTUTORIAL as the destination. Click the part in the source list to select it and check that the arrow points from the source to the destination. Then click Move Items. Proteus asks once more, naming both libraries: "Move 1 Items From "USERDVC" To "TEPTUTORIAL"?". We answered Yes.
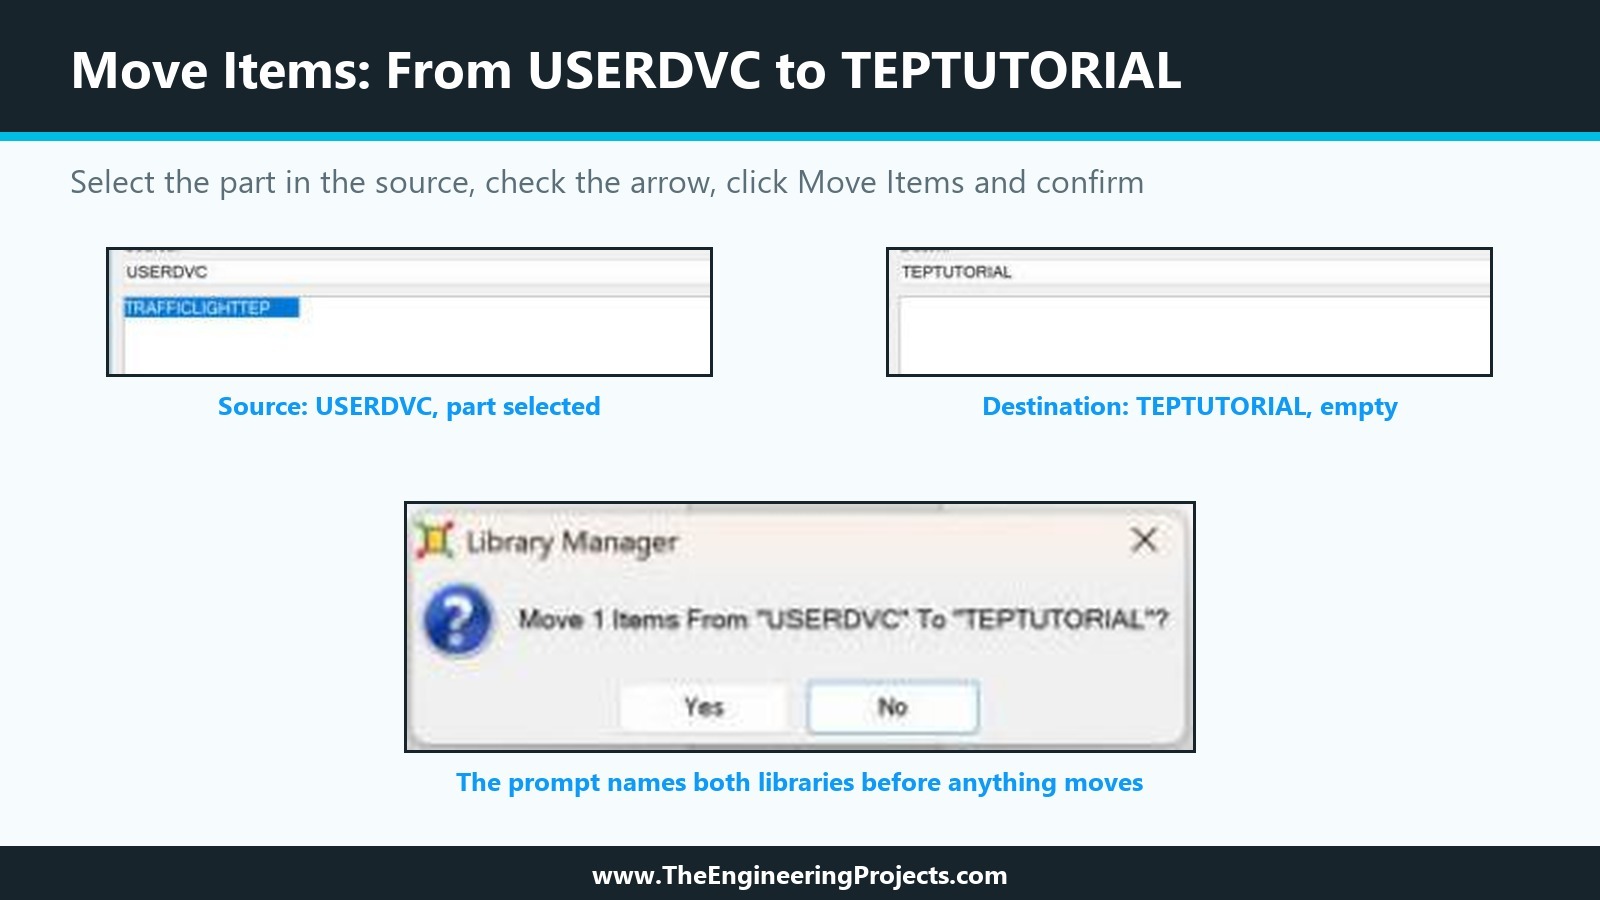
The lists changed at once: USERDVC showed "0 Items (100 Free).", and TEPTUTORIAL showed our part. On the disk, TEPTUTORIAL.LIB had grown from 8,032 to 9,836 bytes and TEPTUTORIAL.IDX from 44 to 197 bytes, the same index size USERDVC.IDX had with our part in it.
Move Items or Copy Items?
Move Items is a copy followed by a delete. The help explains that each item is first copied to the destination and only deleted from the source after a successful copy, so if the destination becomes full, the items not yet moved simply stay where they were. Copy Items would have left the part in both libraries. We chose Move on purpose: two devices with the same name in two libraries are confusing, because, as we saw in the first tutorial, the Pick command then loads the newer one. Keep each part in exactly one library.
One more observation: USERDVC.LIB still had 14,878 bytes after the move, although it no longer held any part. Removing a part from a library does not make the file smaller. Packing a library is meant for that, and we come back to it below.
Step 5: Look Inside a Library with Dump Library
Dump Library opens a text window with the contents of the source library. Our first try showed only the library information, because no item was selected. After Select All and a second click on Dump Library, the window listed the library data and, for each selected item, its name, time, file offset, checksum, size and the complete property script. Here is the dump of TEPTUTORIAL, copied exactly from the window:
LIBRARY INFORMATION
===================
Library file......: C:\Program Files (x86)\Labcenter Electronics\Proteus 8 Professional\Library\TEPTUTORIAL.LIB
Library version...: 4.00.
Number of objects.: 1
Maximum objects...: 100
Number of prefixes: 0
Maximum prefixes..: 0

1 SELECTED OBJECTS
==================
Object name.......: TRAFFICLIGHTTEP
Last modified.....: Thursday, October 1, 2026 9:07:01 AM
File offset (hex).: 00001F60 (Hex).
Checksum (hex)....: A819 (Hex).
Size (bytes)......: 1,804
Properties........: {*DEVICE}
                    {PREFIX=U}
                    {NOTES=Made in the TEP tutorial series How to Create a Proteus Library. Simulation model follows later in the series.}
                    {*INDEX}
                    {CAT=Optoelectronics}
                    {SUBCAT=LEDs}
                    {MFR=The Engineering Projects}
                    {DESC=Traffic Light LED Module - red, yellow and green lamps, pins GND R Y G, pin HIGH lights the lamp}
                    {*PROPDEFS}
                    {LOGIC="Lamps light when the pin is",HILOW}
                    {VERSION="Library version",READONLY STRING}
                    {*COMPONENT}
                    {LOGIC=1}
                    {VERSION=1.0}
The script is the one we built in the seventh and eighth tutorials: the {*DEVICE} section with the prefix and notes, the {*INDEX} section that Pick Devices searches, the property definitions in {*PROPDEFS} and their defaults in {*COMPONENT}. The move did not change a single line.
The numbers also add up. The dump gives the size of our part as 1,804 bytes, and the empty library had 8,032 bytes; together they make 9,836 bytes, exactly the size of TEPTUTORIAL.LIB after the move.
The Dump window has buttons to copy the text to the clipboard or save it as a file. Saving a dump with every release of a library is a cheap way to record what each version contained. The help also mentions that holding Ctrl while clicking Dump Library lists only the names of the items, which is useful for long libraries.
Step 6: Restart Proteus and Find the Part in Pick Devices
Right after the move, we opened Pick Devices and typed "traffic". Our part was still listed in USERDVC, with its old date. Proteus had not yet loaded the change. We saved the project, closed Proteus, started it again and repeated the search. This time the Library column showed TEPTUTORIAL, and the tooltip over the result named the disk library TEPTUTORIAL.LIB, with the time of the move as its creation time.
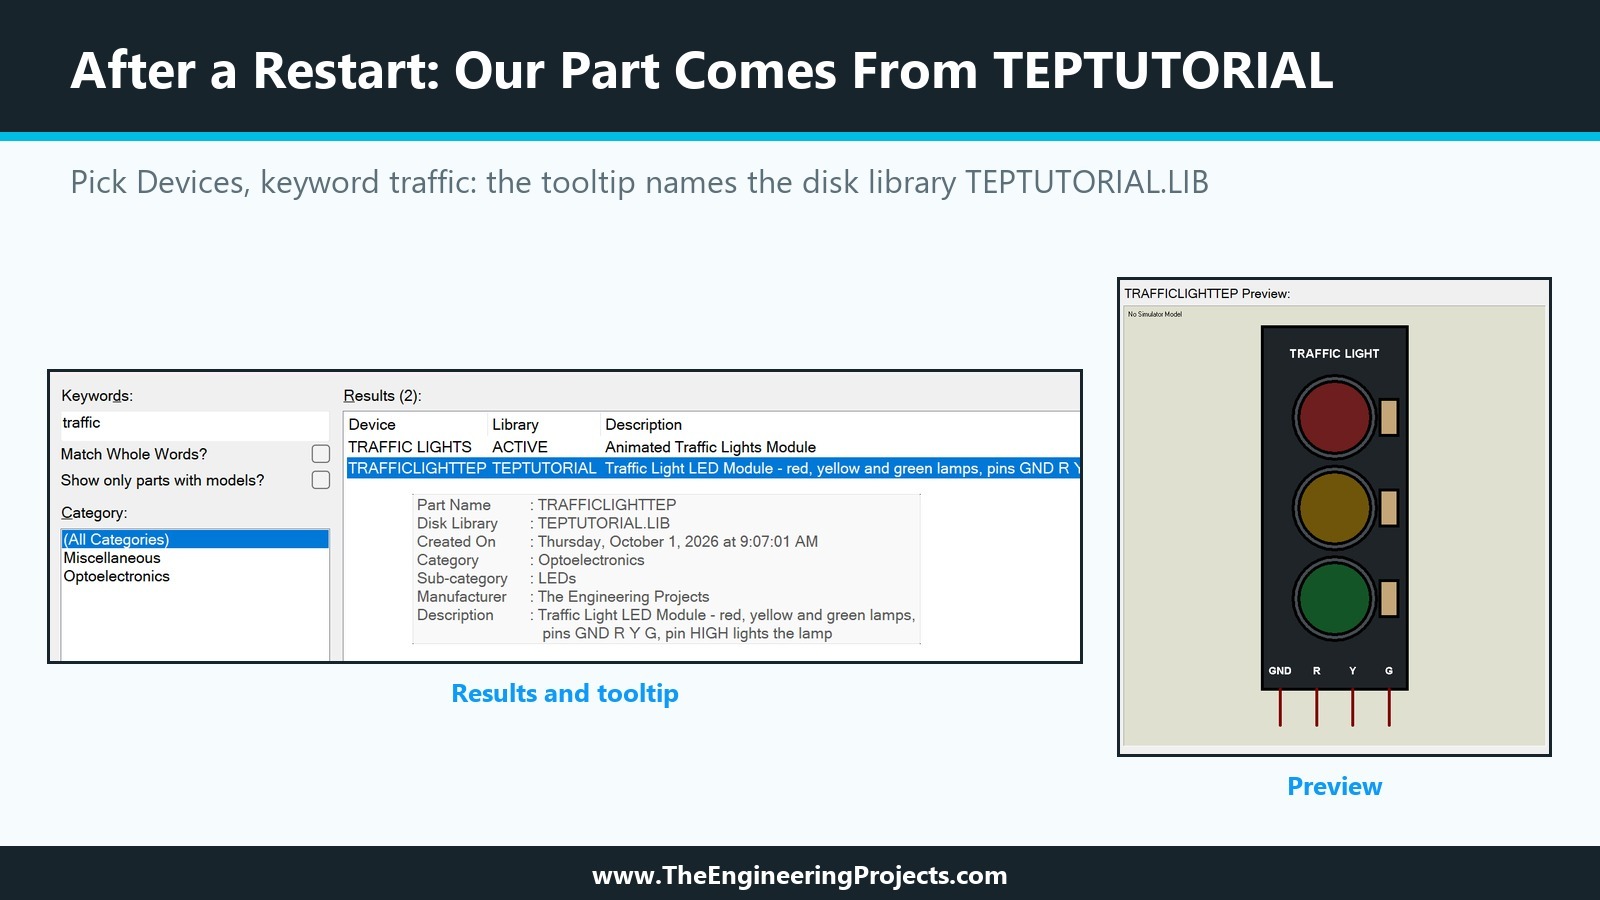
So after any change made with the Library Manager, restart Proteus before you test the result in Pick Devices. It is the same rule the System Settings dialogue states for changes of the library folders.
Our design did not notice any of this. U1 on the sheet stayed exactly as it was, because, as we saw in the first tutorial, a design carries its own copy of every part it uses. When we pick the part again in a later tutorial, Proteus will take it from TEPTUTORIAL.
What Pack Library Did on Our PC
The help describes Pack Library in two sentences: it packs the source library, and the existing library is renamed to a .BAK file. It only works on writable libraries. We tested it on USERDVC before the move, while the library still held both the old and the new version of our part from the eighth tutorial, in 14,878 bytes.
Proteus asked "Pack library "USERDVC"?", and we answered Yes. No error appeared. Yet USERDVC.LIB kept its size of 14,878 bytes and its old time stamp, and a new file appeared next to it: USERDVC.TMP, with 9,836 bytes. At that moment, another program on our PC could not even read USERDVC.LIB, because Proteus was using it.
The size of the .TMP file is telling: 9,836 bytes is exactly the size of a library holding our one part, as TEPTUTORIAL showed later. Our interpretation, which the help does not confirm, is that Proteus wrote the packed copy but could not swap it in for the open library file. Nothing was lost; the original library stayed intact, and we kept the .TMP file in place. If you pack a library, compare the file sizes in Windows Explorer afterwards before you rely on the result. Here are the files of both libraries at the end of this tutorial:
| File | Size (bytes) | What it is |
|---|---|---|
| USERDVC.LIB | 14,878 | USERDVC, now empty but not smaller |
| USERDVC.BAK | 14,878 | Our backup from Step 3 |
| USERDVC.TMP | 9,836 | Left behind by Pack Library |
| TEPTUTORIAL.LIB | 9,836 | Our new library with one part |
| TEPTUTORIAL.IDX | 197 | The index of our new library |
Read-Only or Writable: The File Attribute Button
File Attribute switches the source library between read-only and writable. For TEPTUTORIAL, it asked "Make library "TEPTUTORIAL" read-only?". We answered No, because this library will keep changing: the coming tutorials add a package, a simulation model and animation symbols.
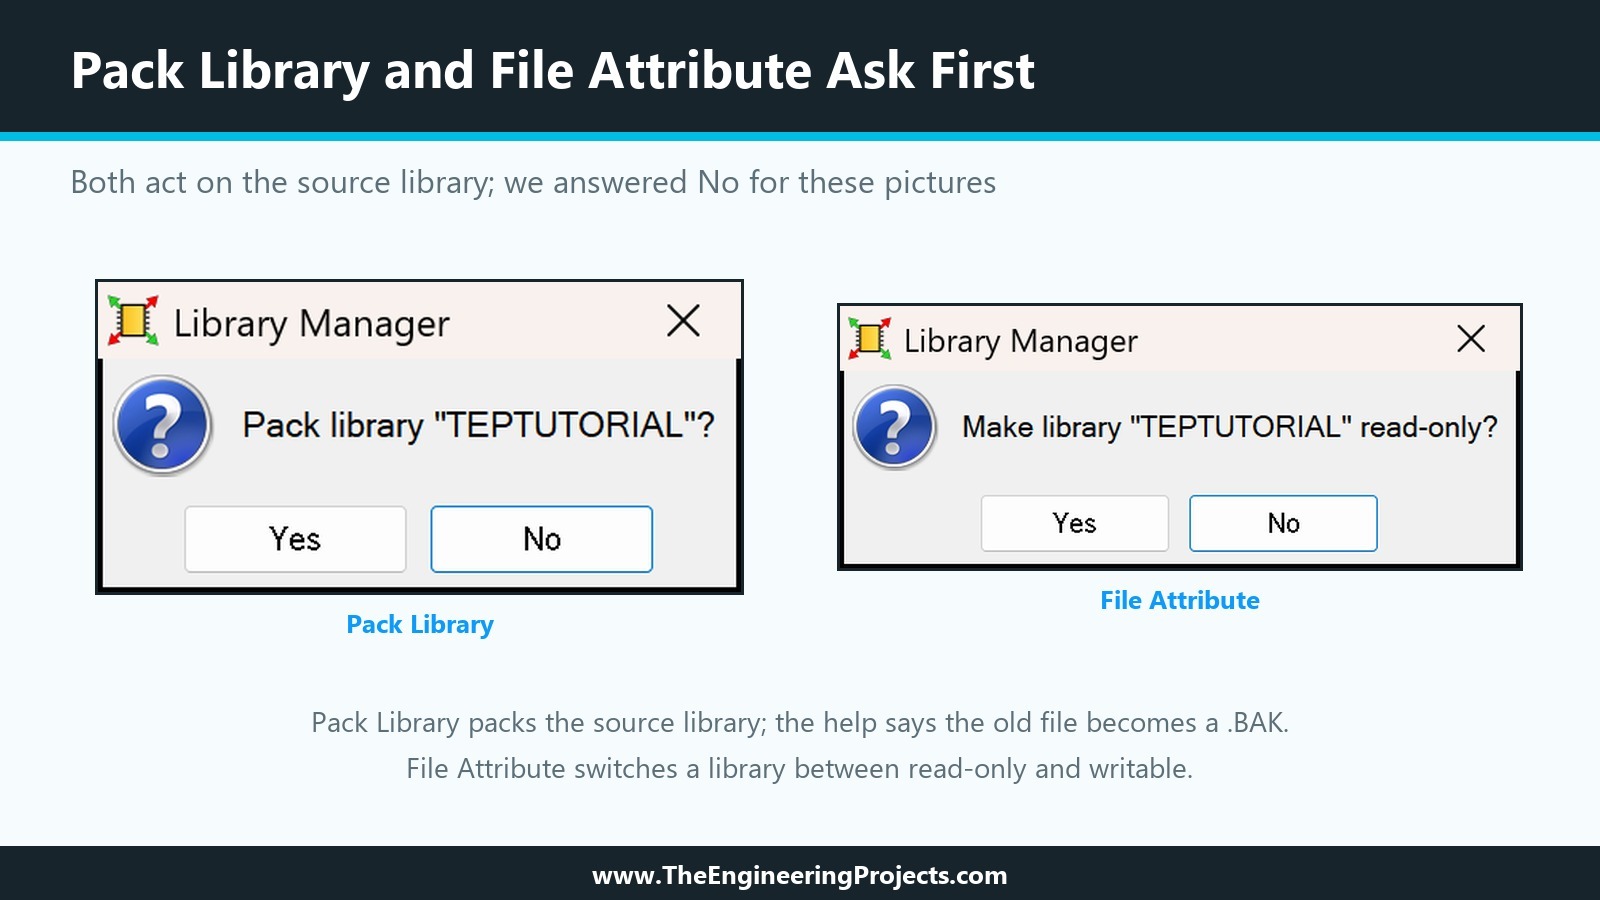
Once a library is finished, making it read-only protects it from accidental changes. Keep in mind what read-only means in practice: the library can only be a source in the Library Manager, and, as we saw in the seventh tutorial, Make Device only offers writable libraries in its Save Device To Library list. To store a new version of a part, switch the library back to writable first.
Delete Items, Rename Item and Delete Library: Use With Care
Three buttons can destroy work, and the help is blunt about them. Deleted items cannot be recovered unless you have a backup. Delete Library removes the whole source library from the disk, again without undo. Rename Item changes the name of a part in the library, but designs that already use the part are not updated; the part has to be picked again under its new name. All three work only on writable libraries, which is one more reason to make finished libraries read-only. We did not need any of them in this tutorial.
How to Share Your Own Proteus Library File
A device library consists of two files that always travel together: TEPTUTORIAL.LIB and TEPTUTORIAL.IDX. Whoever receives them closes Proteus, copies both files into a library folder, which System Settings lists on its Global Settings tab, and starts Proteus again. Our tutorial How to Add New Library in Proteus 8 shows this installation step by step. A part with a simulation model also needs its model file in a model folder; our Traffic Light Module will get one later in the series, and the last tutorial puts everything together into a package that others can install.
Common Mistakes with the Proteus Library Manager
| Problem | Cause | Solution |
|---|---|---|
| Copy Items and Move Items are greyed out | The source or destination is read-only, or nothing is selected | Select a writable library and the items to copy |
| Your part is not in the list | The tab shows symbol libraries, not device libraries | Select Component mode before opening the Library Manager |
| Pick Devices still shows the old library | Proteus has not reloaded the libraries | Restart Proteus |
| The same part appears in two libraries | Copy Items was used instead of Move Items | Delete the extra copy, after a backup |
| A library file did not shrink | Removed parts leave their space in the file | Pack the library, then check the file size |
| A part was deleted by mistake | The Library Manager has no undo | Restore the .BAK file or your own copy, then restart Proteus |
| Make Device does not offer your library | The library is read-only | Make it writable with File Attribute |
In the Next Tutorial
Our Traffic Light Module now has a library file of its own, but it still has no PCB footprint. In the next tutorial, How to Create a PCB Footprint and Package in Proteus, we will open the Packagings page of Make Device again, use the Visual Packaging Tool to link the part to a four-pin header footprint, map the pins GND, R, Y and G to its pads and store the result in TEPTUTORIAL.
FAQ
How do I create a new library in Proteus 8?
Open the Library menu and choose Library Manager, then click Create Library, type a file name in the Create New Library dialogue and click Save. Select Component mode first if you want a device library.
Where does Proteus save a new library file?
In the LIBRARY folder that the Create New Library dialogue opens, which on our installation is the Library folder inside the Proteus folder under Program Files (x86). A device library consists of a .LIB file and a matching .IDX file.
How do I move a part from USERDVC to my own library?
In the Library Manager, select USERDVC as the source and your library as the destination, select the part, check the arrow, click Move Items and confirm. Then restart Proteus.
Why does my new library not appear in Pick Devices?
Proteus loads the libraries when it starts. Restart it after creating a library or moving parts, and check that the library is in a folder listed under Library folders in System Settings.
How do I back up a Proteus library?
Click Backup Libraries with the library as the source to get a .BAK copy, or copy the .LIB and .IDX files to another folder with Windows Explorer. To restore a .BAK file, rename it to .LIB and restart Proteus.
What does Pack Library do in Proteus?
According to the help, it packs the source library and keeps the old file as a .BAK. On our PC, with the library in use, it left a .TMP file and did not change the library file, so check the file sizes after packing.
That is all for today. Our Traffic Light Module now lives in its own library file, TEPTUTORIAL, ready to grow with the rest of the series. If you have any questions, ask in the comments. Take care.
Comments
0