Hello friends, I hope you’re all well and healthy. In today’s tutorial, we will be going through a simple, yet effective practice to design a 4-way traffic light simulation in Proteus software. This project is designed for undergrad engineering students with majors in electronics, electrical and mechatronics engineering. It is also useful for people that want to learn the basics of circuit design and Arduino programming.
4-Way Traffic Light Control using Arduino:
Traffic lights are an integral part of the world’s transportation systems. Over the years a number of different algorithms regarding traffic lights have been developed. The algorithm being used at any place for the purpose of controlling traffic takes into account of various factors, such ...
Hello friends,hope you are fine and enjoying your lives. In today's tutorial, we will know How to Upload Bootloader in Atmega328 using Arduino UNO, which is quite simple and easy and a basic level tutorial. We all know that, Arduino UNO uses Atmega328 as a microcontroller and have you ever thought of using ATmega328 alone instead of using complete Arduino UNO. If you haven't thought yet then think now :) Yes we can use Atmega328 alone instead of using it as a whole with Arduino board. But that's not the topic of today's tutorial and I am gonna cover it soon that How can we use Atmega328 alone.
So now the questions arises that what we are gonna do with the rest of the Arduino board? As we have taken the Atmega328 out of it now there's no use of res ...
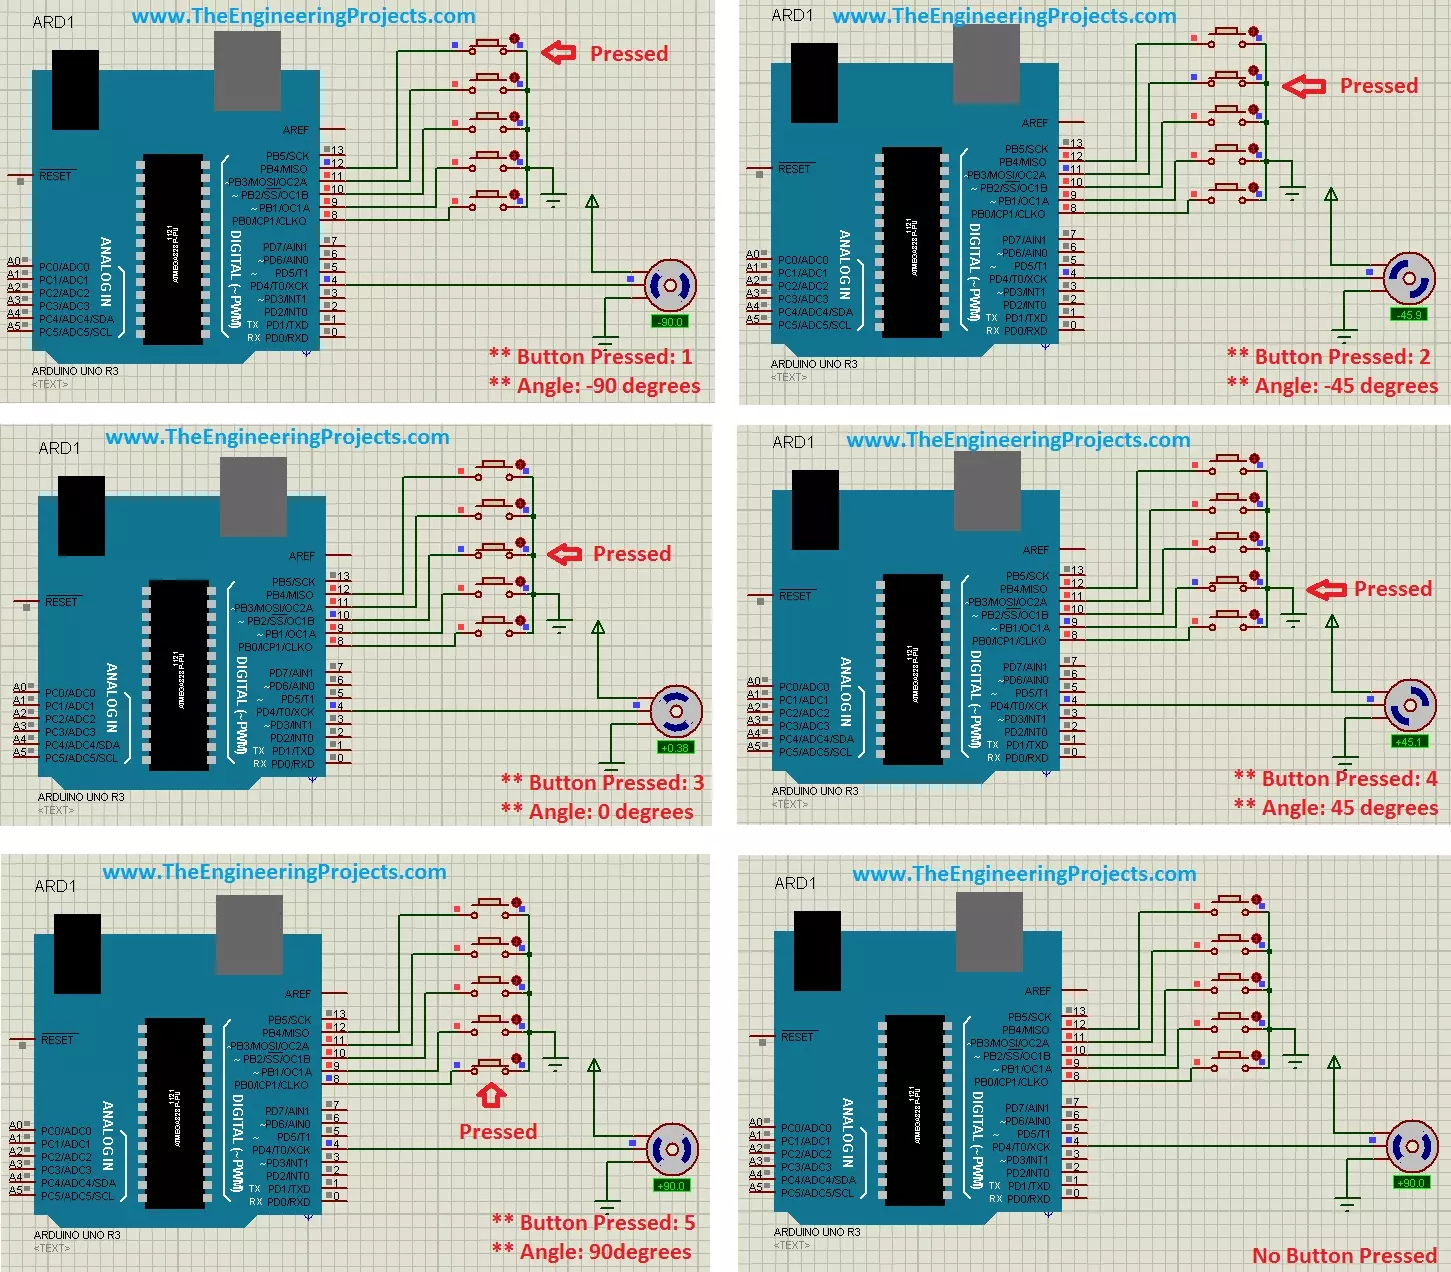
Hello friends, hope you all are fine and having fun with your lives. Today's post is about the Controlling of Servo Motor with Arduino in Proteus ISIS. Servo Motor is a common motor used in engineering projects for precise circular motion. We can move the servo motor at any desired angle, which is not possible in the case of other motors i.e. Stepper or DC.
For example, suppose I want to move an antenna at a precise angle of 47.5 degrees then if I use DC Motor, I have to use an encoder. So, in such cases instead of using a DC motor, I will prefer Servo Motor.
I have already posted Angle Control of Servo Motor using 555 Timer in which I have controlled servo motor using 555 timer and another tutorial about Controlling of Servo Motor using PIC Micro ...
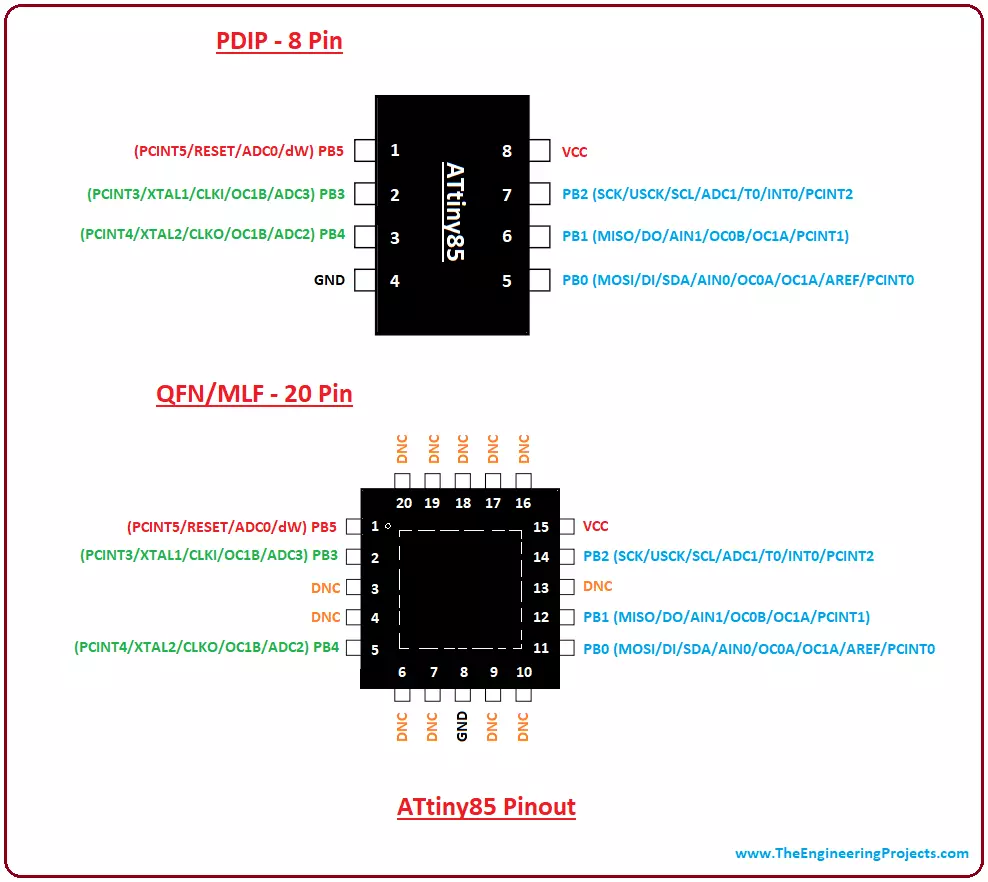
Hey Guys! Hope you are doing well. I am back to give you a daily dose of valuable information. Today, I'll discuss the details on the Introduction to ATtiny85. It is an 8-bit AVR microcontroller, introduced by Microchip, and is based on RISC CPU. It comes with 8-pin interface (PDIP) and falls under the category of low power controllers. Programmable watchdog timer and 10-bit ADC converter are added in the device that makes it suitable for sensor interfacing and resetting the device in case it gets stuck in an infinite loop.
Microchip never fails to satisfy the requirements of any individual by providing flawless microcontroller modules that are directly or remotely connected with automation and embedded systems. With the invention of these tiny o ...
Hi Friends! Hope you are doing great. Today, I am going to give you a detailed Introduction to Arduino Uno. It is a microcontroller board developed by Arduino.cc and is based on Atmega328 Microcontroller. The first Arduino project was started in Interaction Design Institute Ivrea in 2003 by David Cuartielles and Massimo Banzi with the intention of providing a cheap and flexible way for students and professionals to learn embedded programming.
Arduino UNO is a very valuable addition in electronics that consists of a USB interface, 14 digital I/O pins(of which 6 Pins are used for PWM), 6 analog pins and an Atmega328 microcontroller. It also supports 3 communication protocols named Serial, I2C and SPI protocol. You should also have a look at this vid ...
Hi Guys! Hope you’re well today. I welcome you on board. Happy to see you around. In this post today, I’ll detail the Introduction to Arduino Sensor Shield.
Arduino Sensor Shield is a board compatible with the Arduino Boards and comes with the standard header layout. It is used to connect sensors, servos, LCD with the Arduino board without soldering. This board is connected with the Arduino Board using the jumper wires.
I suggest you read this post all the way through as I’ll be discussing the complete Introduction to Arduino Sensor Shield.
Let’s get started.
Introduction to Arduino Sensor Shield
Arduino Sensor Shield is a board used to connect sensors, servos, LCD with the Arduino Board without the requirement of soldering.
Using Arduino ...
Hey Fellas! Hope you are getting along with life pretty well. This post is another addition in this Arduino Tutorial for Beginners series. Today, I'll discuss How to use analogWrite in Arduino? The analogWrite is mainly used to update the status of analog pins and is also used to map the analog values on the PWM (Pulse Width Modulation) pins.
You can check the article that I have posted previously on How to use analogRead in the Arduino - this command addresses the analog pins on the board and reads its status, while today's one does the exact opposite.
In this post, I'll try to break down each and everything related to analogWrite in simple steps, so you can grab the main idea pretty well. Let's jump right in.
How to use analogWrite in Arduino?
...
Hello friends, I hope you all are fine and having fun with your lives. Today, I am going to share a very basic and introductory tutorial named How to use Arduino Serial Read. I am sharing this tutorial because I am getting a lot of emails in which users normally ask about basic Arduino tutorials as they are very new to them. So, I thought of sharing this very basic Arduino tutorial in which we are going to have a look at how we can use the Arduino Serial Read command.
I selected this tutorial as my first tutorial in this list of Arduino basic tutorials because learning to use Serial port is very necessary as it's one of the best troubleshooting tools for your code. I have also given a Proteus Simulation in which I have received the incoming data f ...
In today's post, I am gonna share a new Arduino Library for Seven Segment Display. In my recent project, I got a chance to work on seven segment displays, I have worked on them using PIC microcontroller but haven't got a chance to use them with Arduino. So, now as usual when I started working on them, I started searching for Arduino Library but I kind of got disappointed after getting quite heavy libraries for seven segments, and after a lot of search I thought of designing my own Arduino library for seven segment display, which I am gonna share in this post. :)
It's not very advanced library as we know seven segment displays are not too complex, so its quite simple and using it you can quite easily display any numerical digit on the seven segment ...
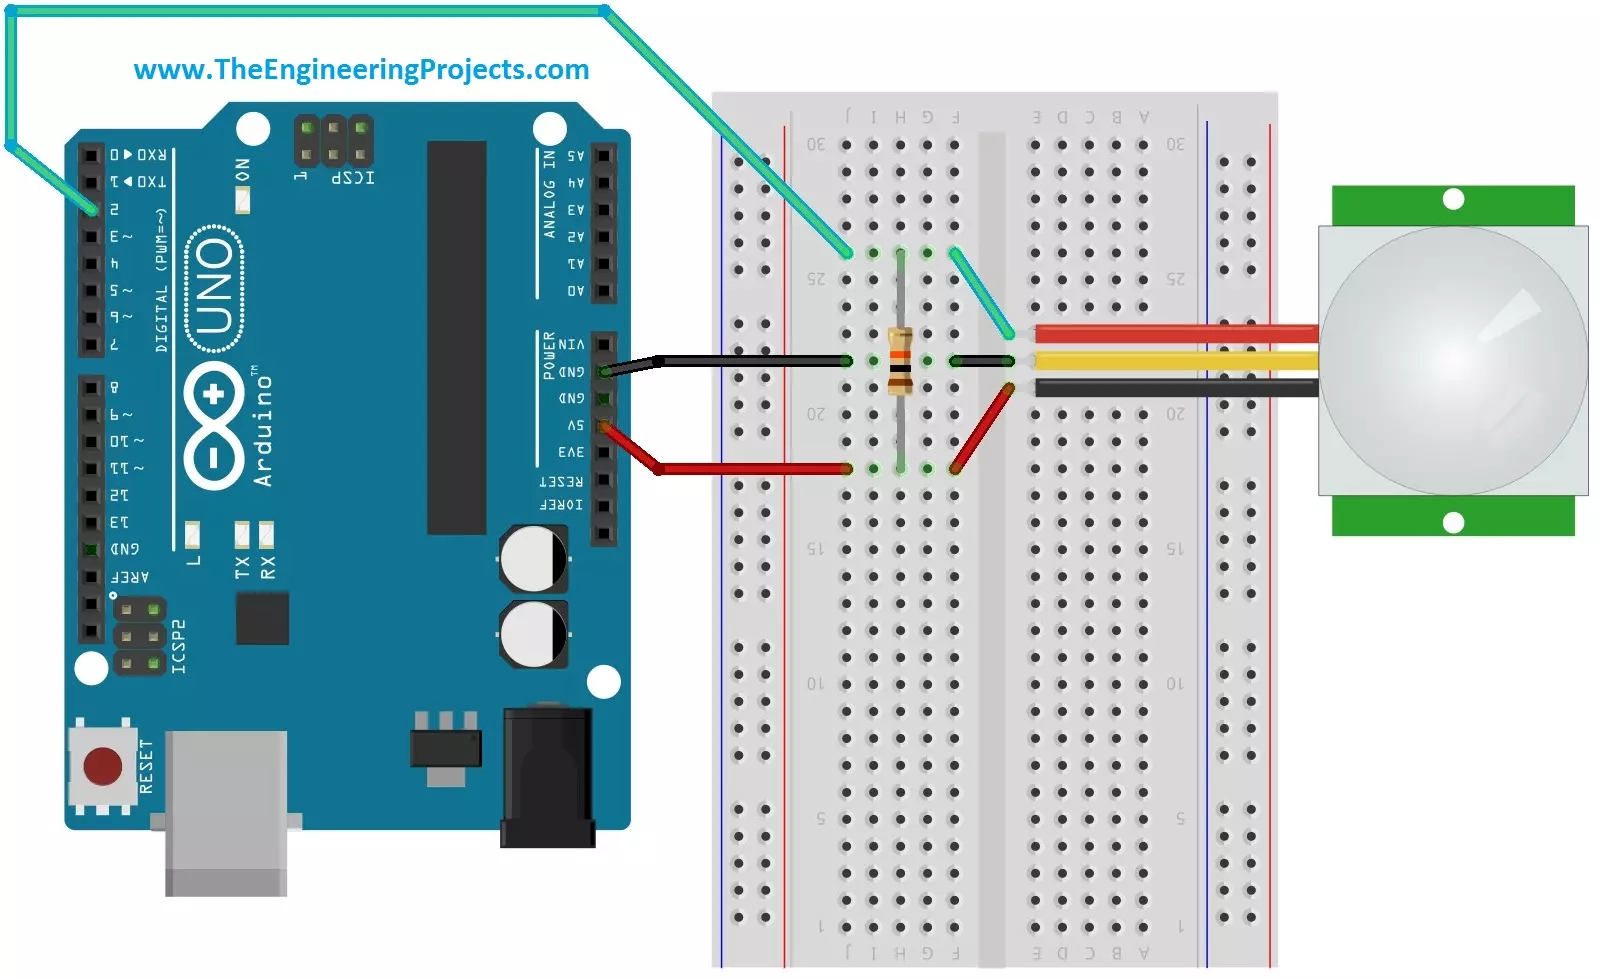
Hello friends, i hope you all are fine and enjoying. Today i am going to share a new project tutorial which is Interfacing PIR sensor with Arduino. First of all lets, have a little introduction about the basics and working of the PIR sensor. PIR sensors are in fact a Passive Infrared Sensor. PIR sensors are actually electronic sensors and they are used for motion detection. They are also used to detect the Infrared waves emitting from a particular object. You should also have a look at PIR Sensor Library for Proteus, using this library now you can easily simulate your PIR Sensor in Proteus software.
PIR sensors are widely used in motion detection projects now a days. Since my today's tutorial is about interfacing of PIR sensor with Arduino micro c ...