Hello friends, i hope you all are fine and enjoying. Today i am going to share a new tutorial which is Interfacing Arduino with HC05 Bluetooth module. First of all lets have a little introduction about HC-05 Bluetooth module. HC-05 is a bluetooth module, which was designed for wireless data communication. This little module is capable of both sending and receiving data but it performs only one thing at a time, which means at a particular time it can only send or receive data but can't do the both tasks.
In order to send or to receive data, you have to make one module as a master and the other module as a slave. If both the modules are acting as master then, data will not transmit and if both the modules are acting as a slave then, again data will ...
Hello Everyone! Hope you’re well today. I welcome you on board. In this post today, I’ll walk you through the Introduction to Arduino USB Host Shields.
With Arduino USB host shield you can interface the USB device to your Arduino board. This USB host shield is based on MAX3421E which is mainly known as the USB host controller that contains the analog circuitry and digital logic required to apply the USB full speed peripheral to USB specifications rev. 2.0.
Moreover, this shield is compatible with TinkerKit which projects you can plug this TinkerKit module with the Arduino Boards.
Introduction to Arduino USB Host Shields
Arduino USB host shield is used to connect a USB device with the Arduino Board. Simply put, USB host shields provide the USB ...
Hi Guys! Hope you’re well today. I welcome you on board. In this post today, I’ll walk you through the Introduction to Arduino Esplora.
Looking like a videogame controller, the Arduino Esplora is an electrical device that contains an Arduino Leonardo board (microcontroller) and a number of outputs and inputs. There are a colored LED and a buzzer as outputs. And there is a light sensor, four buttons, a joystick, a microphone, an accelerometer, and a temperature sensor as inputs. In other words, it is just like another Arduino Board with integrated actuators and sensors.
Just stay with me for a little while, as I’m going to document the complete Introduction to Arduino Esplora covering pinout, working, pin description, how it’s different than othe ...
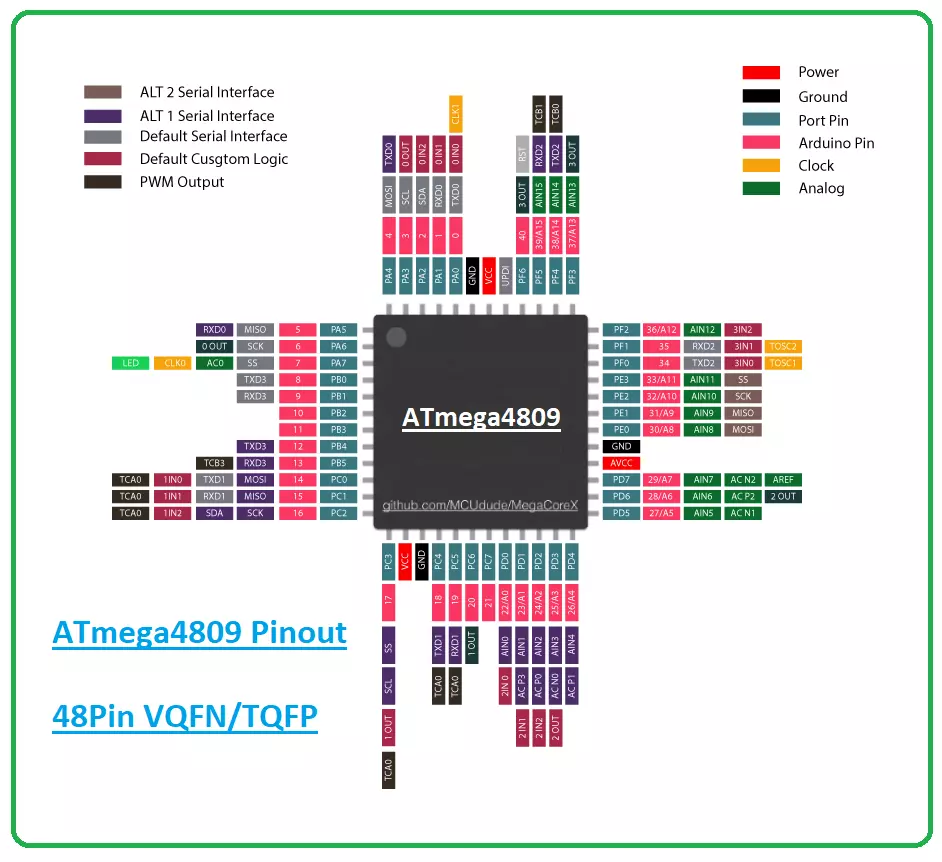
Hi Guys! I welcome you on board. Happy to see you around. In this post today, I’ll walk you through the Introduction to ATmega4809.
The ATmega4809 is a type of microcontroller that belongs to the megaAVR® 0-series. It features an AVR® processor with a clock speed running at up to 20 MHz. It comes with a Flash memory size up to 48 KB, 256 bytes of EEPROM, and 6 KB of SRAM. It is available in 28-, 32-, 40-, or 48-pin packages.
I suggest you buckle up as I’ll detail the complete Introduction to ATmega4809 covering datasheet, pinout, features, power ratings, and applications.
Let’s get started.
Introduction to ATmega4809
The ATmega4809 microcontroller belongs to the megaAVR® 0-series that contains an AVR processor.
The series carries low power ...
Hello Everyone, hope you all are fine and having fun with your lives. Today, I am going to interface GPS Module with Arduino in Proteus ISIS software. Recently, I have shared this amazing GPS Library for Proteus, using which you can quite easily simulate your GPS Module in Proteus software. Today, I am going to interface this GPS Module with the Arduino UNO board and will simulate the result in Proteus software. I am going to use TinyGPS Library and will get Longitude and Latitude out of this GPS Module.
So, if you are new to GPS and you haven't yet installed the GPS Library for Proteus, then you must first download that library and install it. I am using Arduino board in today's tutorial but you can use any other microcontroller as well like PIC ...
Hello friends, hope you all are fine and having fun with your lives. Today, I am going to share a new project named LPG Gas Leak Detector using Arduino in Proteus ISIS. Before reading this tutorial, you must first download the Gas Sensor Library for Proteus because we are gonna use that Library and will simulate the Gas Sensor in Proteus.
In this library you will find eight sensors and all of them works exactly the same so that's why we are gonna use one of them. For LPG Gas Leak Detector Project I have used MQ-2 sensor which is used for detection of LPG gas. I have also used Arduino UNO board which you can simulate in Proteus using Arduino Library for Proteus. Moreover, I have also placed an LCD which will display either LPG gas Leak Detected or ...
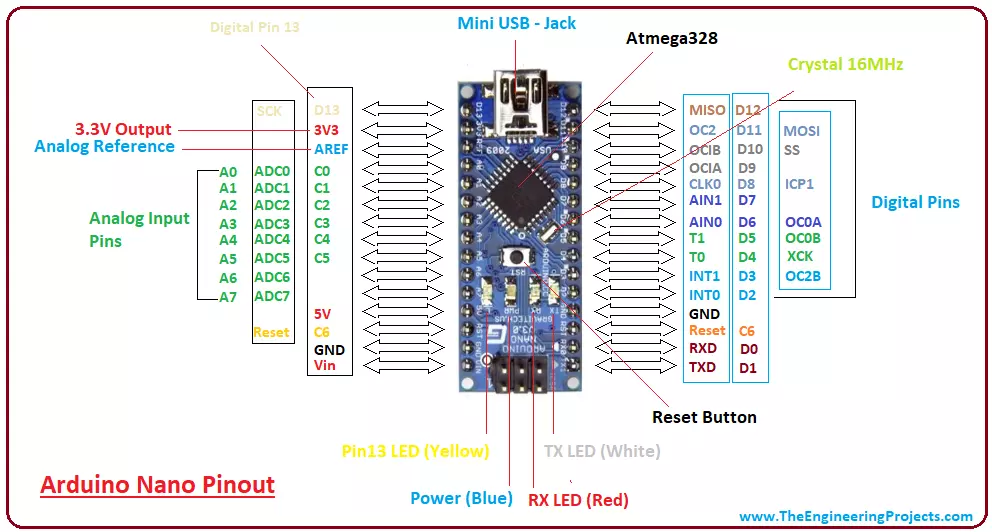
Hi Friends! I hope you are doing fine. Today, I am going to give you a detailed Introduction to Arduino Nano. We will also discuss Arduino Nano Pinout, datasheet, drivers & applications. It is a Microcontroller board developed by arduino.cc and based on Atmega328p / Atmega168.
Arduino boards are widely used in robotics, embedded systems, automation, Internet of Things(IoT) and electronics projects. These boards were initially introduced for students and non-technical users but nowadays Arduino boards are widely used in industrial projects.
Any kind of technical support and help is readily provided by the Arduino community. I have also designed this video tutorial on Arduino Nano:
Here's the figure showing the key points of Arduino Nano:
...
Security systems are widely suggested for homes as well as other locations. Everybody wants to take necessary steps to prevent infiltration at home, thus this security is necessary. Intruders nowadays may take advantage of almost any illegal activity and wreak havoc on a property's security. The security of one's home is a critical concern that everyone faces in the current day.
While there are certain devices on the market that may considerably help protect your house, some of them are excessively costly and need constant maintenance. Many devices regarding smart home security systems are available in the market but these are not user friendly according to the budget, the device we designed provides the user with a better interface with the help ...
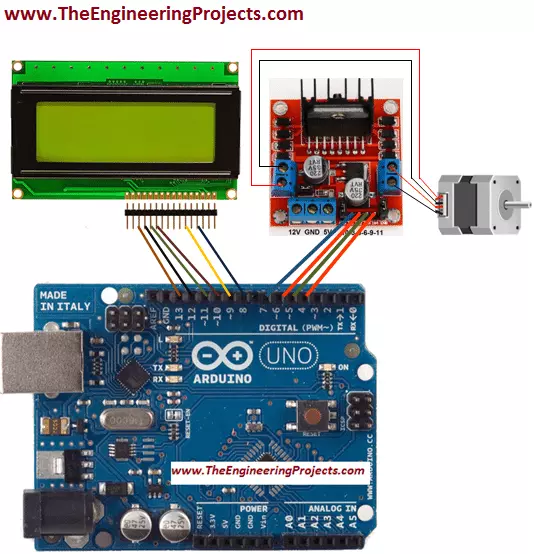
Hello friends! I hope you all will be absolutely fine and having fun. Today, I will elaborate you that how can we make a simple algorithm for Stepper Motor Direction Control using Arduino. In my previous tutorials I made algorithm for DC Motor Direction Control using Arduino, DC Motor Direction Control using Matlab, DC Motor Speed Control using Arduino and DC Motor Speed Control using Matlab. Now, in this tutorial I will control a stepper motor using Arduino by entering the different commands through its serial port.
Before going into the detail of this tutorial, you must know the basic difference between stepper and DC motors. DC motors have only two input terminal one is positive and the other one is negative. You just have to provide the powe ...
In this tutorial, we will walk through the process of interfacing a pH sensor with an Arduino UNO in Proteus. To make the project more practical and user-friendly, an LCD is included so that both the sensor’s voltage output and the calculated pH value can be displayed clearly in real time. This allows the user to easily monitor the readings without needing additional software or serial monitoring tools.
The term pH, short for “potential of Hydrogen,” indicates the concentration of hydrogen ions (H⁺) in a solution and is used to determine whether it is acidic, neutral, or alkaline. A pH of 7 represents neutrality, values below 7 indicate acidity, and values above 7 represent alkalinity. Monitoring pH is essential in several fields—such as water quality testing, agriculture, food processing ...