Hello everyone! I hope you all will be absolutely fine and having fun. Today, I am going to tell you about how to design an algorithm for Servo Motor Control using Arduino. First of all I would like to tell you a bit about the servo motors. Servo motors are small devices having an output shaft. We can adjust this shaft in different angular positions by continuously sending the servo coded signal. Servo motor maintains the angular position of the shaft as long as the coded signal is present at the input. If the applied coded signal changes, angular position of the shaft of a servo motor also changes correspondingly. If you are working on Servo Motor then i would suggest you to must have look at this tutorial Servo Motor control in Proteus, as its a ...
Update: We have created a new version of this library, which you can check here: Sound Detector Library for Proteus V2.0.
Hello friends, I hope you all are doing great. In today's tutorial, I am going to share a new Sound Sensor Library for Proteus. We are presenting this library for the first time and I would give the credit to our team, without their support it won't be possible. Proteus doesn't have this module in its library and it is used in a lot of Engineering Projects these days.
This sound sensor is used to detect the sound in the surroundings and is normally known as the Sound Detector sensor. It won't recognize the sound. As we can't produce the sound in Proteus, that's why we have placed a TestPin. When this TestPin is HIGH, that m ...
Hey Friends! Hope you are doing well. Today, I am going to give you a detailed Introduction to Arduino Pro Mini. It's a microcontroller board developed by Arduino.cc and is based on the Atmega328 microcontroller.
Arduino Pro Mini is quite similar to Arduino UNO in overall functionality however the main difference lies in its size and built-in programmer. Arduino Pro Mini is very small in size & it lacks a built-in programmer & USB Port. Arduino Uno comes with two onboard voltage regulators (i.e. 5V and 3.3V) while Arduino Pro Mini comes with a single voltage regulator.
There are two versions of Arduino Pro Mini available, first one operates at 5V & runs at 16MHz while the second one is of 3.3V runs at 8MHz.
Arduino boards are mainly u ...
Hi Fellas! I am back to give you a daily dose of valuable information. Today, I'll give you a detailed Introduction to IRF3205. It is an N-Channel HEXFET Power MOSFET that comes in a TO-220AB package and operates on 55V and 110A. It is mainly used for dynamic dv/dt rating and consumer full bridge applications.
Additionally, it falls under the category of ultra LOW on-resistance devices based on Advanced Process Technology, making it a building block of the electronic applications where fast switching is a major concern.
In this post, I'll cover each and everything related to this transistor, its main features, working, pinout, and applications. Let's get down to the nitty-gritty of this tiny component.
Introduction to IRF3205
IRF3205 is an N- ...
Hello everyone! I hope you all will be absolutely fine and having fun. Today, I am going to give you an Introduction to LM741. It belongs to the series of general purpose amplifiers. It supports larger range of input voltages. LM741 provides high gain and short circuit protection as well. Its pins configuration is very similar to UA709 and there is no need of frequency compression in LM 741.
LM741 can be used as a comparator in order to determine the levels of applied input voltages i.e. either smaller or larger input voltages are applied at its input terminal. LM741 is an op-amp IC having 8 different pins, which will be explained later in this tutorial. LM-741 has a very wide range of applications e.g. function generator, comparator, DC amplifie ...
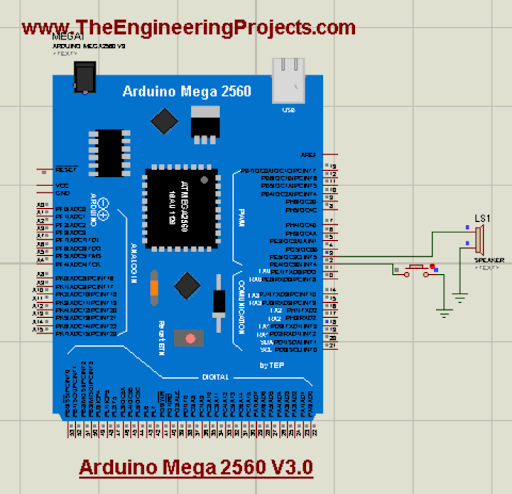
Hello readers! I hope you are doing great. Today, we are discussing the latest library for proteus. In the tutorial, we will look at the Arduino Mega 2560 library for Porteus V 3.0, which is one of the most versatile and useful microcontrollers from the Arduino family. We have shared the previous versions with you before this; these were the Arduino Mega 2560 library for Proteus and the Arduino Mega 2560 library for Proteus V2.0. The current version is better in structure and does not have a link to the website so you may use it in your projects easily.
Here, I will discuss the detailed specifications of this microcontroller. After that, I will show you the procedure to download and install this library in the Proteus and in the end, we’ll create a mini project using this microcontroller ...
Hi Guys! Happy to see you here. Thank you for viewing this read. In this post today, I’ll walk you through the complete Introduction to BC550. BC550 is a low-power low-frequency general-purpose bipolar transistor. It is mainly used to drive loads under 100mA. BC550 carries three terminals where a small current across one terminal is used to control the large current across the remaining terminals. It’s primarily used for amplification and switching purposes. Transistors are critical components and building blocks of modern electronic circuits. Bipolar junction transistors are divided into two main types named NPN transistors and PNP transistors. The BC550 falls under the category of NPN transistors and is available in a plastic TO-92 case. I sugge ...
Hello friends, hope you all are fine and having fun with life. Today, I am going to share DC Motor Direction Control with Arduino. I have designed a complete simulation in Proteus, which will help you in understanding the controlling of DC motor. I would recommend you to first read How to Control relay in Proteus ISIS which will help you in understanding the functionality of relays because in today's tutorial, I have used relays to do the DC Motor Direction Control. I have already posted a tutorial on DC Motor Drive Circuit in Proteus ISIS.
So, for DC Motor Direction Control, I have used Arduino UNO baord, so you should also download this Arduino Library for Proteus so that you can use Arduino boards in Proteus software. I have also provide the si ...
Hi Friends! Hope you’re well today. I welcome you on board. Today, I’ll walk you through the Introduction to INA219.The INA219 is a current sensor module that incorporates the I2C protocol for submitting the data obtained through sensing current, voltage, and power. It is a bi-directional zero drift current/ power sensing module mainly used in digital multimeters and power profilers.
I suggest you read this post all the way through as I’ll detail the complete Introduction to INA219 covering datasheet, pinout, features, and applications.
Let’s get started.
Introduction to INA219
INA219 is a current/power sensor module mainly employed to sense the power, voltage or current where up to 128 samples can be averaged together to get filtering in noisy environments. This data is then s ...
Hello geeks, Welcome to our new project. As most readers have already seen the coffee vending machine or maybe you are drinking coffee while reading this article and if you are a tinker or a geek, it must have come to your mind how to make a coffee vending machine on your own. In today's tutorial, we are going to learn how to make a Smart Coffee Vending Machine using Arduino with Proteus Simulation for the same.
We can use this project for an engineering project’s showcase for electronics, electrical engineering students, and can be used in offices as well.
Coffee is the second most popular drink in the world and it is one of the oldest beverages of the world. According to Wikipedia, more than 2 billion cups of coffee are consumed every day in the ...