Hello friends, I hope you all are doing great. Today, I am going to share the nRF5340 Audio DK Library for Proteus, so you can run a Bluetooth LE simulation of Nordic Semiconductor's LE Audio development kit. The nRF5340 on it has two Arm Cortex-M33 cores - one for your application, one for the radio - with 1 MB of flash and 512 KB of RAM, and the kit adds an audio DSP, a microphone, audio jacks, five buttons and five LEDs. With this library the kit runs your Arduino sketch in Proteus 8.5, reads its buttons, lights its LEDs and talks to a phone over Bluetooth LE.
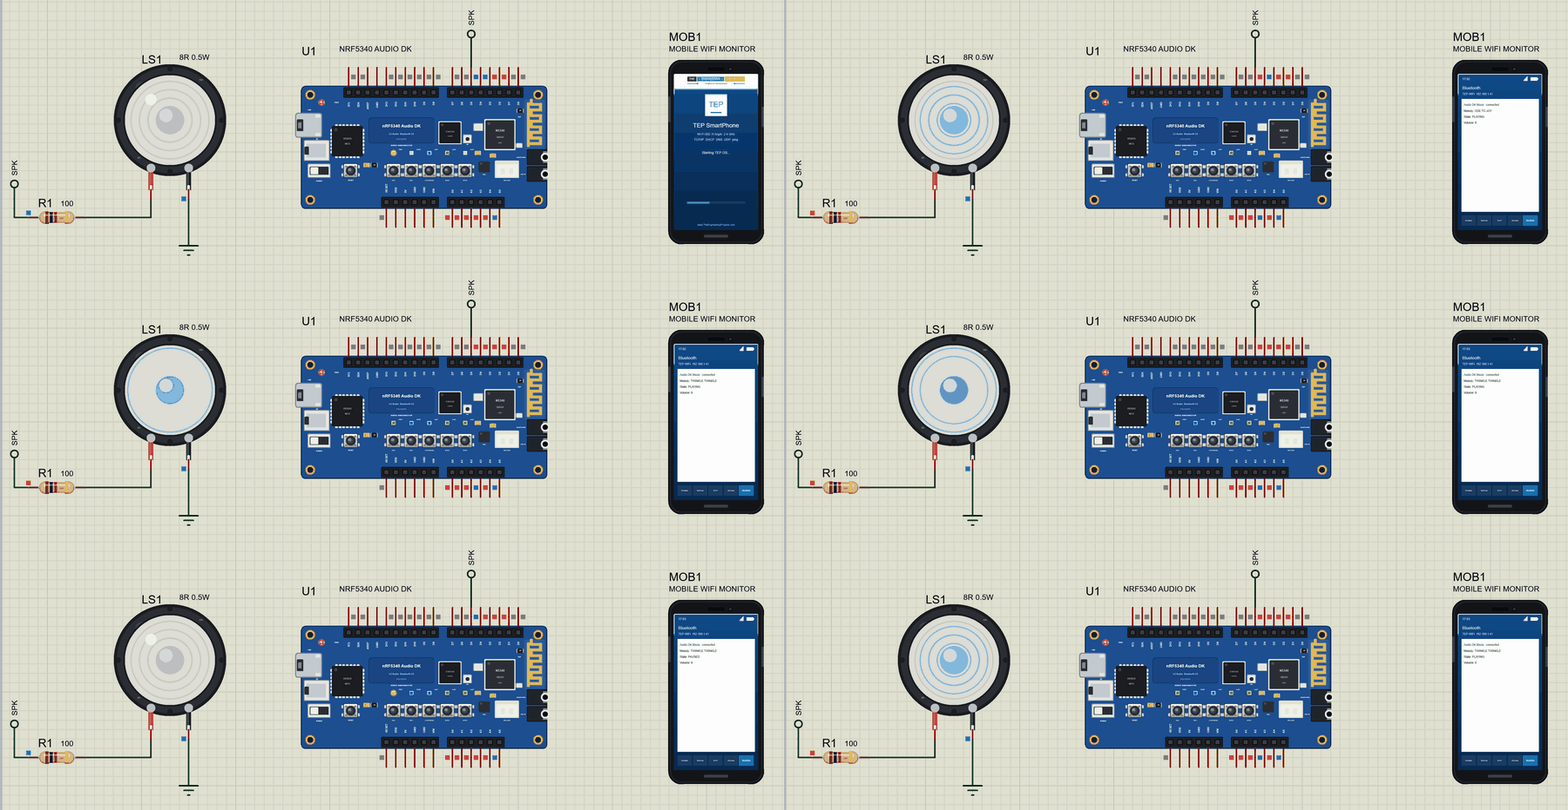
nRF5340 Audio DK Library for Proteus
Latest version: V1.0 (November 2026, this tutorial)
Other new Arduino boards: UNO R4 WiFi · Nano ESP32 · UNO WiFi Rev2 · Nano 33 IoT · UNO Q · UNO R4 Minima · Nano Every · MKR WiFi 1010 · Nano RP2040 Connect · STM32 Black Pill · Nucleo-F401RE · STM32 Blue Pill · Teensy 4.1 · Arduino Due · Arduino Leonardo · Arduino Micro · BBC micro:bit V2 · GIGA R1 WiFi · MKR WAN 1310 · Nano 33 BLE Sense · XIAO nRF52840 Sense · RAK4631 WisBlock · Nano Matter · nRF52840 DK · nRF5340 DK · nRF9151 DK · nRF7002 DK · Nordic Thingy:53 · xG24 Dev Kit · xG24 Explorer Kit · Thunderboard BG22 · SiWx917 Dev Kit · B-L475E-IOT01A · NUCLEO-WB55RG · NUCLEO-WL55JC1 · NUCLEO-H743ZI2 · SAM R21 Xplained Pro · FRDM-MCXN947 · Portenta H7 · LP-CC2652R7 · PSoC 6 WiFi-BT · Feather nRF52840 · Thingy:91 X · xG26 Dev Kit · nRF52 DK · nRF52833 DK · nRF52840 Dongle
RF modules: nRF24L01 · nRF24L01 PA LNA · CC1101 · RFM69HCW · HC-12 · 433MHz RF · XBee
Temperature and weather sensors: DHT11 / DHT22 · DS18B20 · BME280 · BMP280 · SHT31 · AHT20 · BME680 · MLX90614 · MAX6675
Helping Tools
- Laptop WiFi Monitor: a laptop on the Wi-Fi of your design: a browser, a TCP / UDP terminal and ping
- Mobile WiFi Monitor: a smartphone that opens the pages of your board and sends it commands
- Serial Monitor Advance: a serial terminal window for the UART of your board
For the demo we built a Bluetooth music box. The kit's PLAY/PAUSE, VOL- and VOL+ buttons play three melodies on a small speaker, the RGB LED shows whether a melody is playing, three LEDs show the volume, and a phone shows the melody and the volume.
NOTICE: Proteus has no nRF5340 model, so our team has put a lot of effort into building this board ourselves: the pins, the five buttons, the five LEDs and Bluetooth LE are all our own model, and your sketch compiles with our free TEP Boards for Proteus add-on. Your feedback is the fuel that keeps us going, so please tell us what you think in the comments below. And if our free libraries help you, you can buy us a coffee. So, let's get started with the nRF5340 Audio DK Library for Proteus:
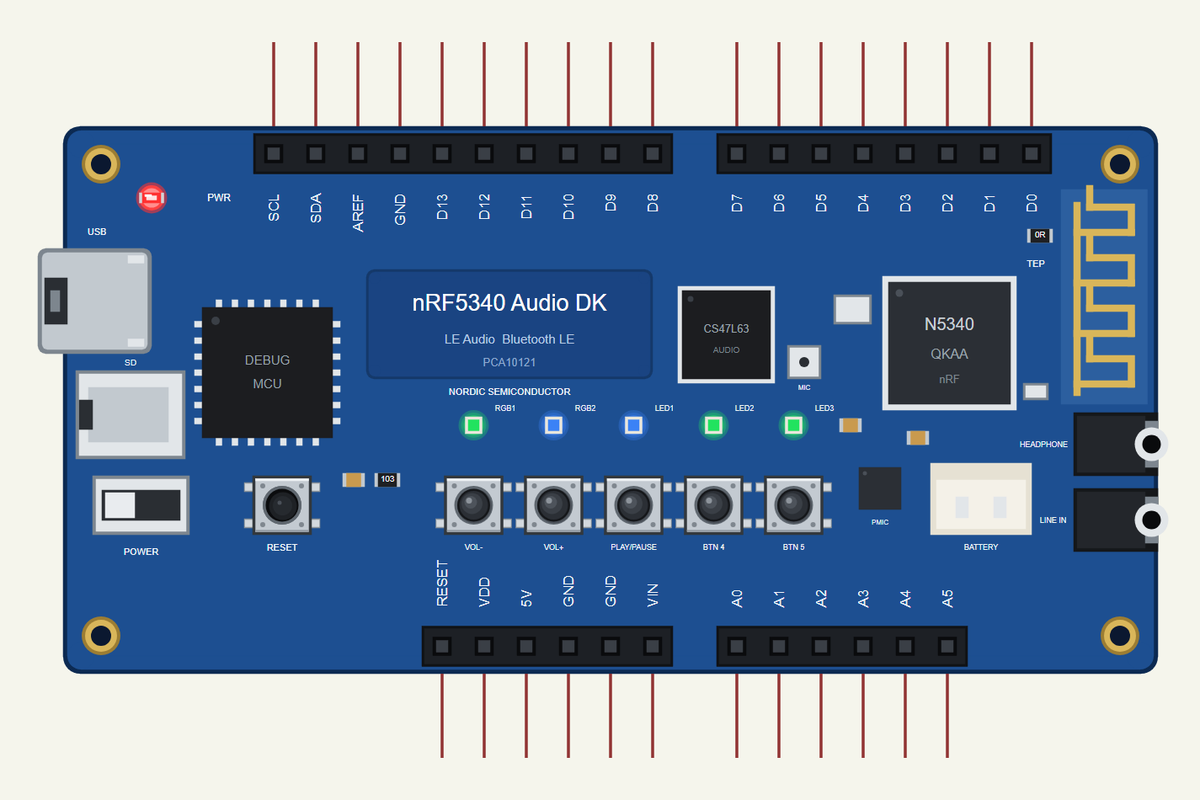
What is the nRF5340 Audio DK?
The nRF5340 Audio DK (PCA10121) is Nordic Semiconductor's development kit for LE Audio, the new Bluetooth audio standard behind Auracast broadcasts and better wireless earbuds. One kit can be a headset or a gateway: it receives or sends audio streams, plays them through its CS47L63 audio DSP and headphone output, or records them from its microphone and line input. Next to the audio parts it has the nRF5340, an nPM1100 power chip for a battery, an SD card slot, a built-in debugger, five buttons, two RGB LEDs and three single LEDs.
| Part | The real nRF5340 Audio DK | In the library |
|---|---|---|
| SoC | nRF5340: two Cortex-M33 cores, 1 MB flash, 512 KB RAM | your Arduino sketch |
| Radio | Bluetooth LE with LE Audio (Auracast, CIS, BIS) | ArduinoBLE |
| Audio | CS47L63 DSP, microphone, LINE IN and HEADPHONE jacks | drawn |
| Buttons | VOL-, VOL+, PLAY/PAUSE, BTN 4, BTN 5 | all five, clickable |
| LEDs | RGB1, RGB2, LED1 blue, LED2 and LED3 green, active HIGH | all five |
| Storage and power | SD card slot, nPM1100 PMIC, battery connector | drawn |
Two Cores in One Chip
The nRF5340 splits its work: the application core runs your program at up to 128 MHz, while the network core at 64 MHz handles the Bluetooth radio. For audio that matters: the radio timing never has to wait for your code, and your code never stalls while a packet goes out. Our library runs your Arduino sketch, and the Bluetooth side is part of the model. For the general nRF5340 kit with four buttons and four LEDs, see our nRF5340 DK Library for Proteus.
Buttons and LEDs on the Header
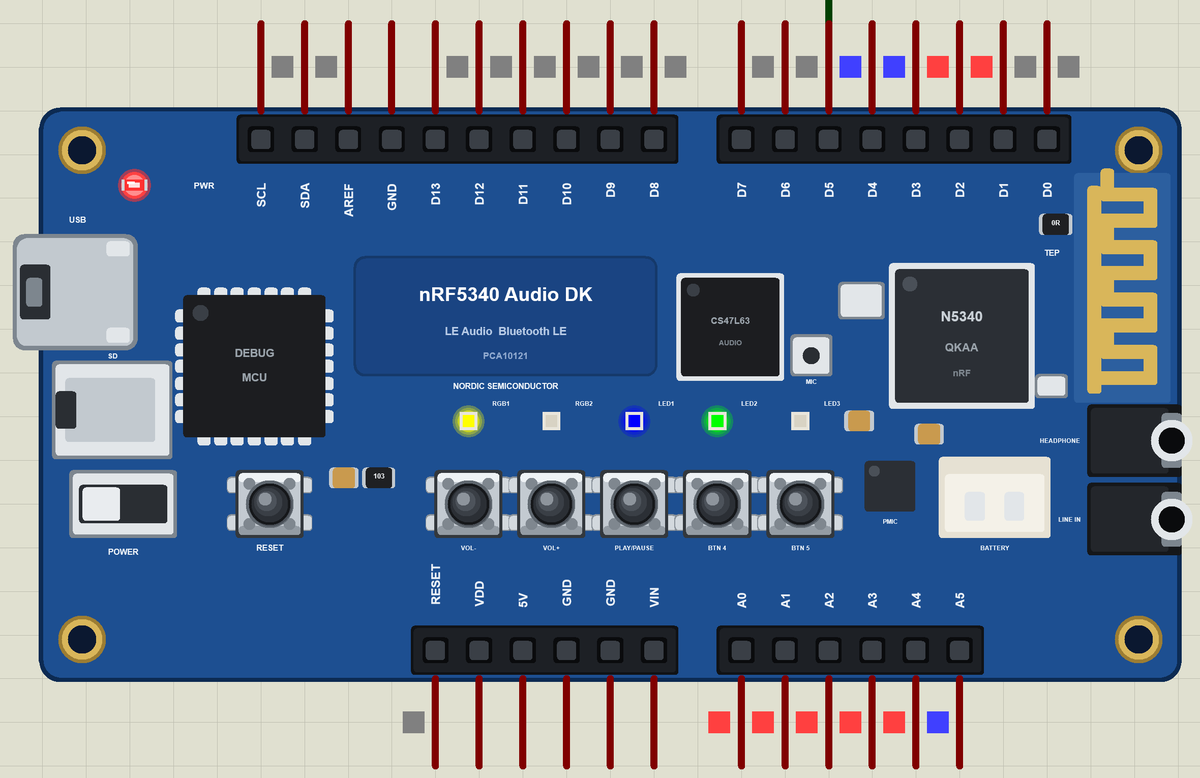
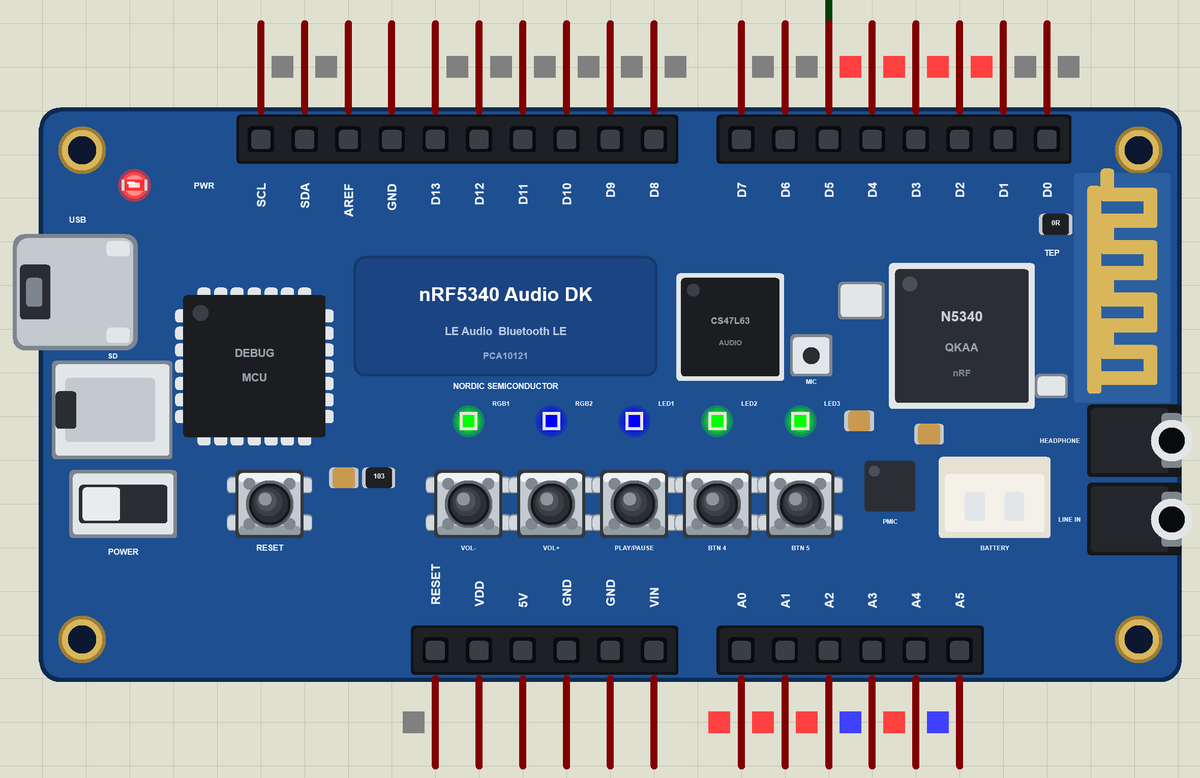
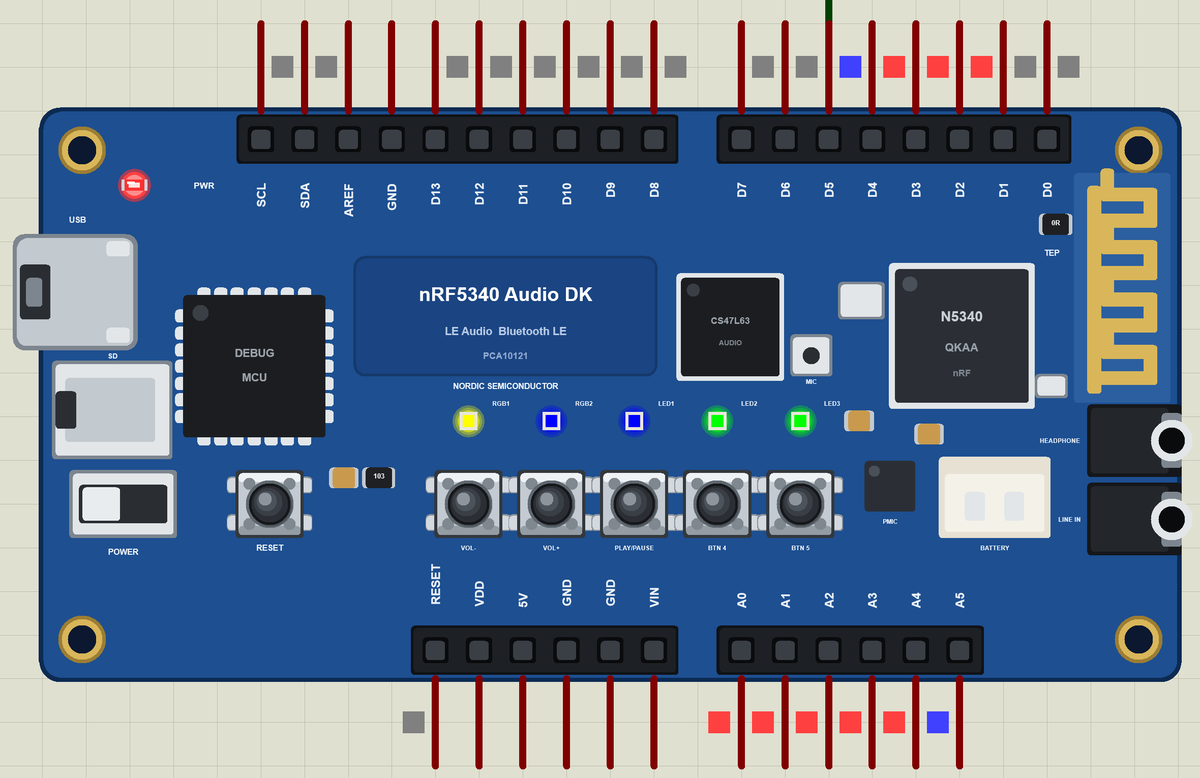
On the Audio DK, several header pins are also wired to the buttons and LEDs. PLAY/PAUSE, BTN 5 and BTN 4 sit on A0, A1 and A2; RGB1 sits on A3 to A5; LED1, LED2 and LED3 sit on D2, D3 and D4. Our model wires them the same way, so a sketch that reads A0 sees the PLAY/PAUSE button. VOL-, VOL+ and RGB2 have pins of their own and are not on the header.
LEDs That Light When HIGH
Most Nordic kits light their LEDs when the pin is LOW. The Audio DK is different: all its LEDs light when the pin is HIGH, so digitalWrite(LED1, HIGH) switches LED1 on. Its buttons work as usual: they read LOW while pressed.
Serial1 the Other Way Round
The kit's second serial port uses D0 as TX and D1 as RX - the reverse of most Arduino boards. A module's RX goes to D0 and its TX to D1. The library follows the real kit here too, so a wiring that works in the simulation works on the board.
Where Is It Used?
The Audio DK is the reference platform for LE Audio products: true wireless earbuds, hearing aids, Auracast speakers, conference systems and audio gateways. Developers start with Nordic's nRF5340 Audio application and change it into their own product.
A simulation lets you build the control logic before the kit is on the desk: the buttons, the LEDs, the Bluetooth service and the speaker. When the sketch works in the Proteus simulation, the real kit only has to confirm it.
Features of the nRF5340 Audio DK Library for Proteus
- The board as it looks: the blue kit with the nRF5340 and its antenna, the CS47L63, the microphone, the two jacks, the SD card slot, the PMIC and battery connector, the debugger with its USB port, the power switch, RESET, the five buttons, the five LEDs and the header, drawn compact, with our small TEP signature.
- Your sketch: a .hex for "Nordic nRF5340 Audio DK (TEP Proteus)" with D0 to D13, A0 to A5, the buttons and the LEDs by name.
- Animated buttons and LEDs: click the five buttons; the RGB LEDs mix any colour and the LEDs glow.
- Modules on the header: digital I/O, analogRead, PWM with your own frequency, interrupts, Serial1, Wire and SPI.
- Bluetooth LE: ArduinoBLE, with our phone as the central.
- A complete package: about 4.0 MB with the part, the add-on, the mini speaker, the resistor, the phone and the demo, without the source code of the models.
The nRF5340 Audio DK in Proteus Simulation
Search NRF5340 in Pick Devices; the device NRF5340 AUDIO DK is in TEPAUDIODK.LIB (Microprocessor ICs, Bluetooth Boards), with the prefix U. The USB port opens the serial monitor.
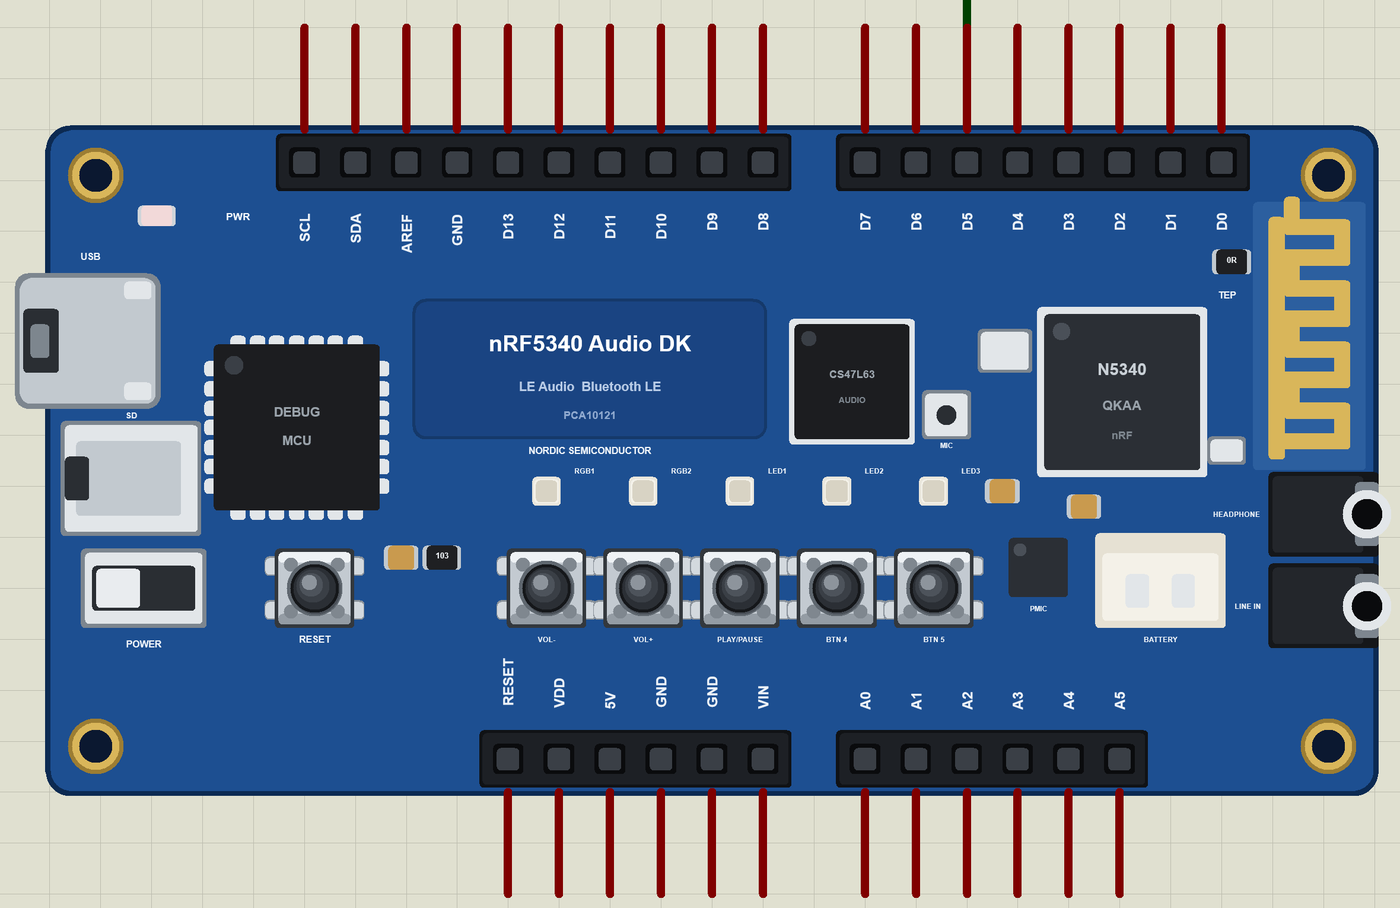
The Pins
| Pins | The real kit | What the library does with them |
|---|---|---|
| D0, D1 | P1.09, P1.08 | Serial1 TX and RX, or GPIO |
| D2, D3, D4 | P0.31, P1.00, P1.01 | GPIO, PWM - and LED1, LED2, LED3 |
| D5 to D9 | P1.14, P1.07, P1.11, P1.10, P1.13 | GPIO, PWM, interrupt, pulse timing |
| D10 to D13 | P1.12, P0.09, P0.10, P0.08 | GPIO, PWM; SPI SS, MOSI, MISO, SCK |
| A0, A1, A2 | P0.04, P0.05, P0.06 | analogRead or GPIO - and PLAY/PAUSE, BTN 5, BTN 4 |
| A3, A4, A5 | P0.07, P0.25, P0.26 | analogRead or GPIO - and RGB1 red, green, blue |
| SDA, SCL | P1.02, P1.03 | Wire |
| VOL-, VOL+, RGB2 | P0.02, P0.03; P0.28 to P0.30 | not on the header |
Download nRF5340 Audio DK Library for Proteus
Click the button below to download nRF5340-Audio-DK-Library-for-Proteus-v1.0.zip (about 4.0 MB, without the source code of the models):
nRF5340 Audio DK Library for Proteus V1.0- README.txt: installation, the demo, the pins, the properties, troubleshooting and the limits.
- Proteus Library Files:
TEPAUDIODK.LIB, the mini speaker and the resistor (TEPSPEAKER.LIB,TEPRESISTOR.LIB) and the phone and laptop (TEPMOBILE.LIB,TEPLAPTOP.LIB). - Proteus Model Files:
TEPNET.DLL,TEPSPEAKER.DLLandTEPRESISTOR.DLL. - Arduino Code: the demo sketch and the TEP Boards for Proteus add-on 1.84.0, with ArduinoBLE.
- Proteus Simulation: the demo project, its HEX file and copies of the DLLs.
No Proteus yet? Read How to Download and Install Proteus 7 and 8. New to libraries? Follow How to Install a New Library in Proteus.
How to Install nRF5340 Audio DK Library for Proteus
- Close Proteus and extract the whole zip file, for example to your Desktop.
- Copy the files from Proteus Library Files into the LIBRARY folder of Proteus.
- Copy the DLLs from Proteus Model Files into the MODELS folder, replacing an older
TEPNET.DLL. - Delete
TEPAUDIODK.IDXfrom the LIBRARY folder if it is there. - For your own sketches, copy Arduino Code\TEP Boards for Proteus\hardware into your Arduino sketchbook (Documents\Arduino) and restart the Arduino IDE; the board is Nordic nRF5340 Audio DK (TEP Proteus).
- Start Proteus, press P and search for NRF5340.
Demo: a Bluetooth Music Box in Simulation
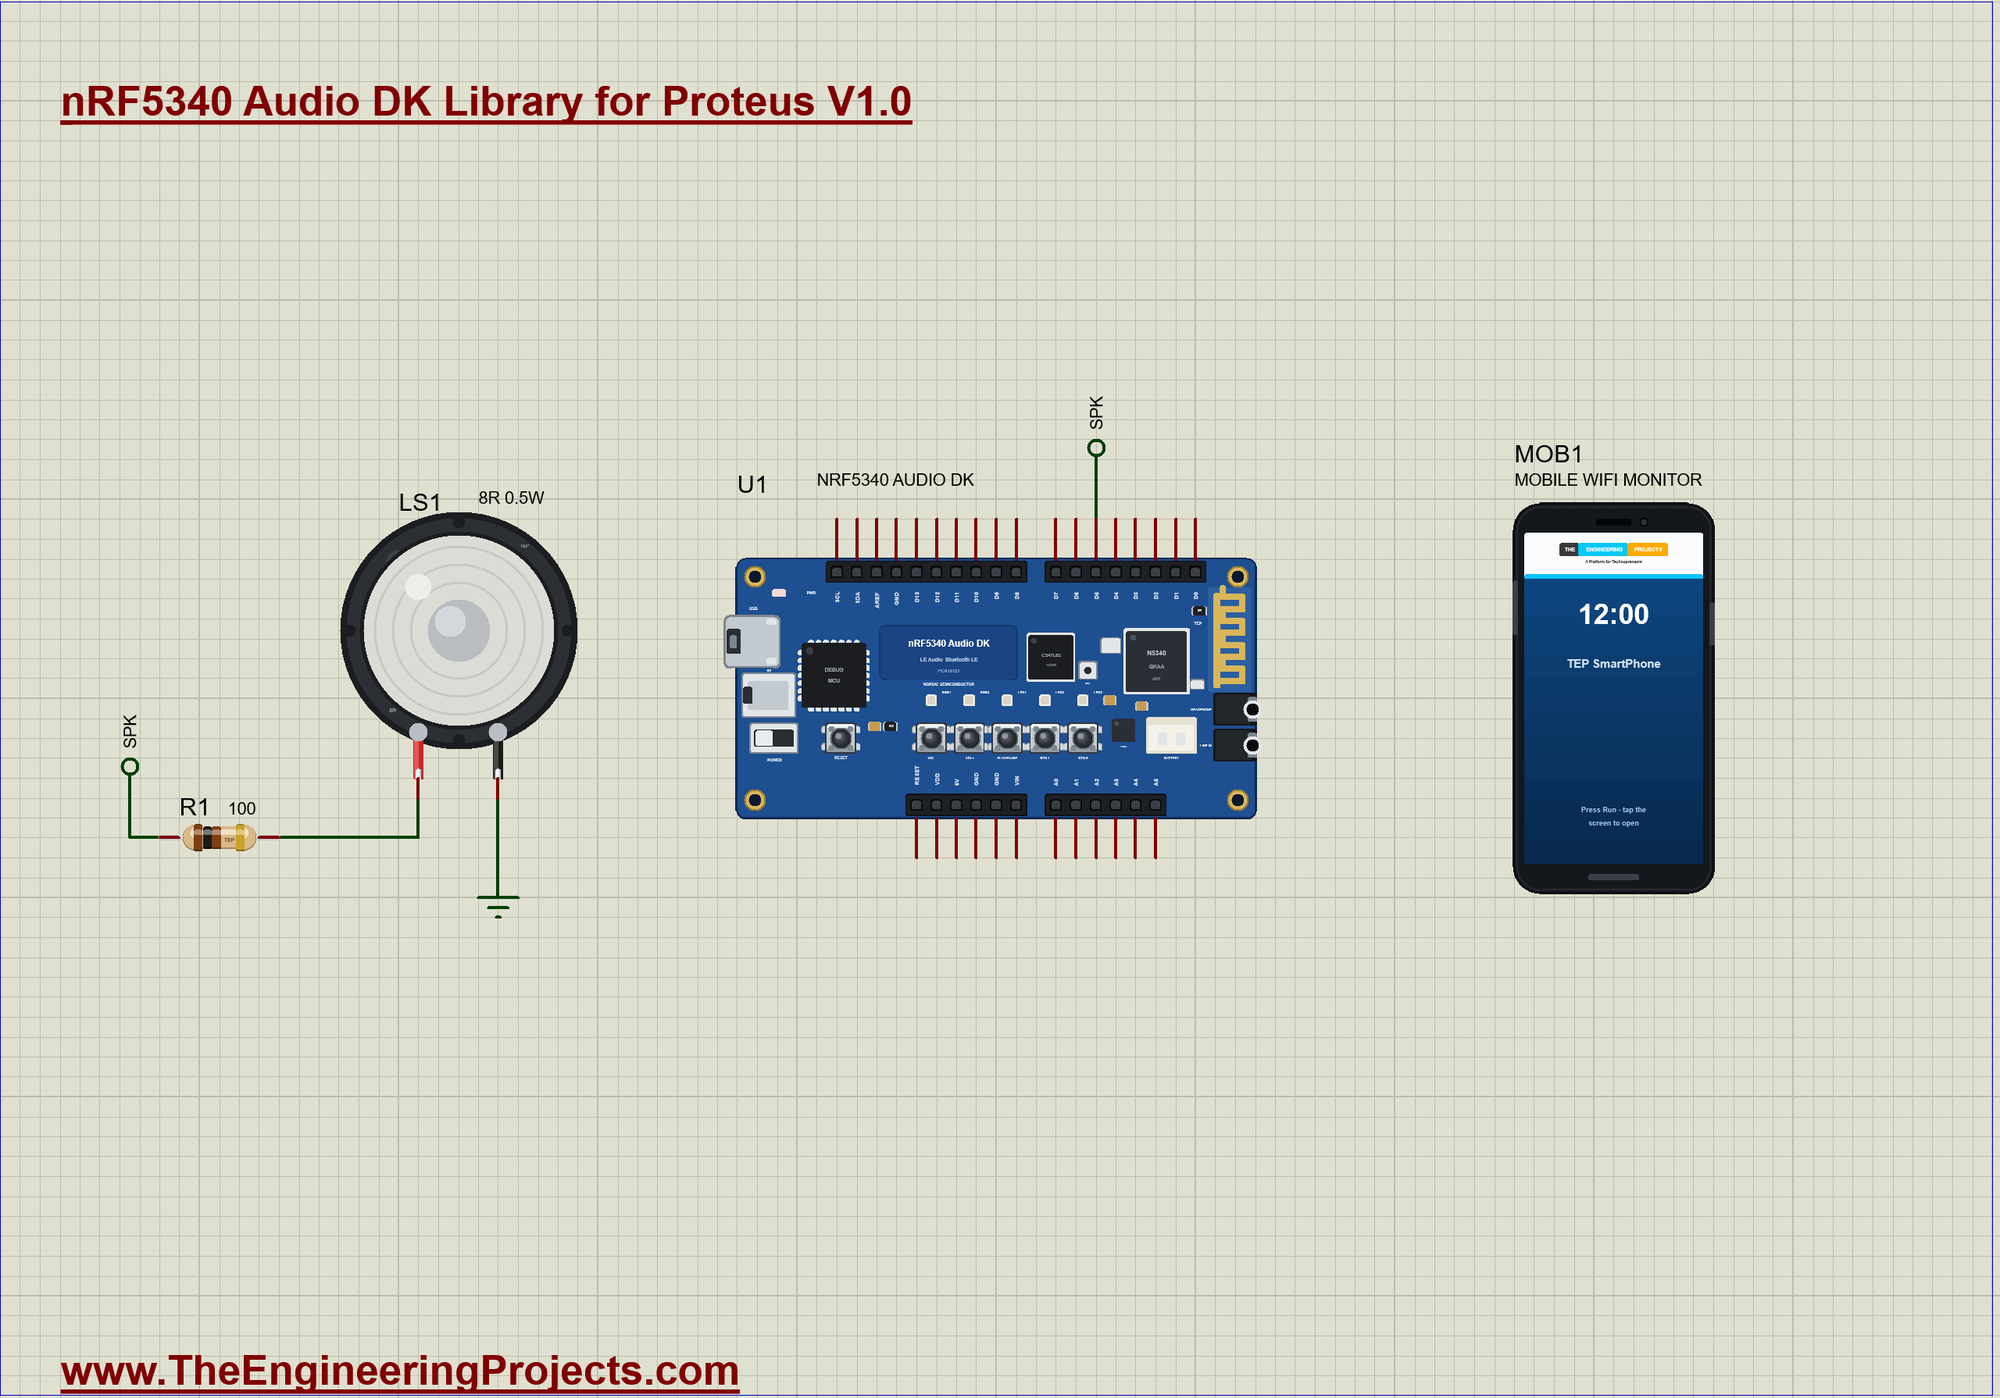
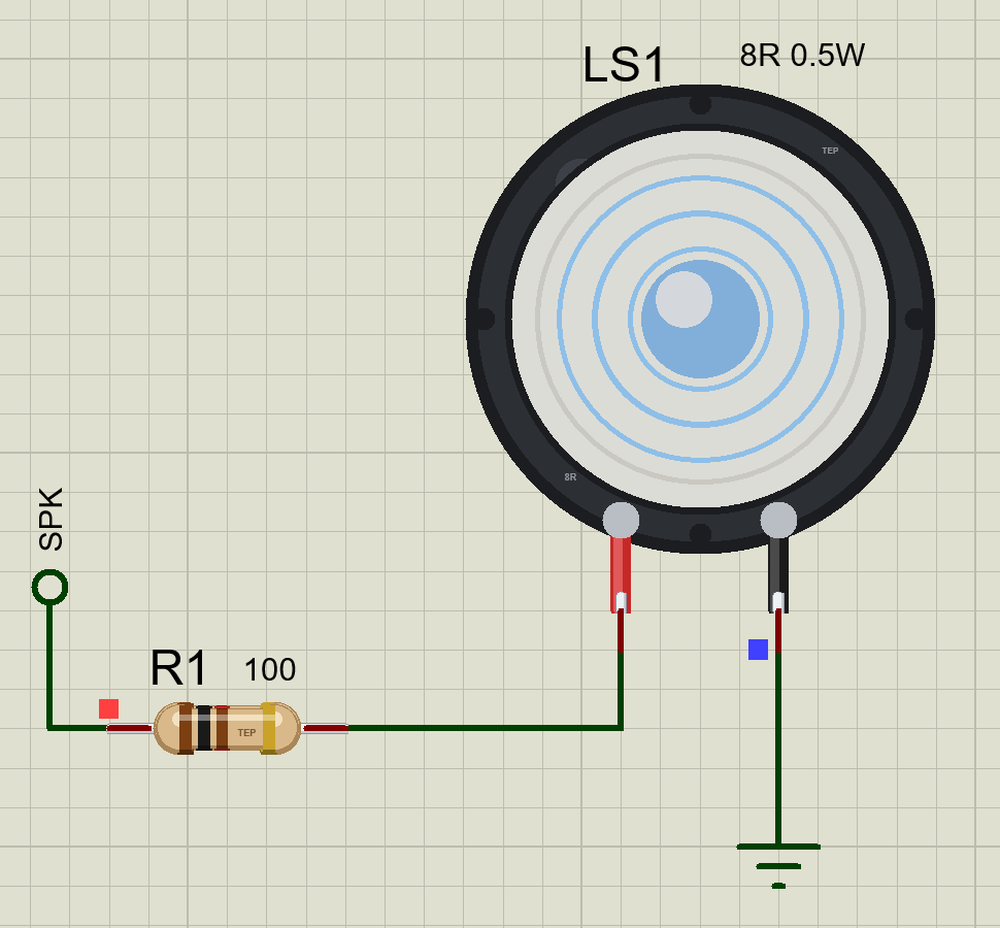
The Audio DK is built around sound, and its buttons already say VOL-, VOL+ and PLAY/PAUSE. Our demo gives them something to play: three melodies stored in the sketch, played note by note on our Mini Speaker Library for Proteus - a 28 mm 8 ohm speaker, drawn at its true size. A phone shows the melody, the state and the volume.
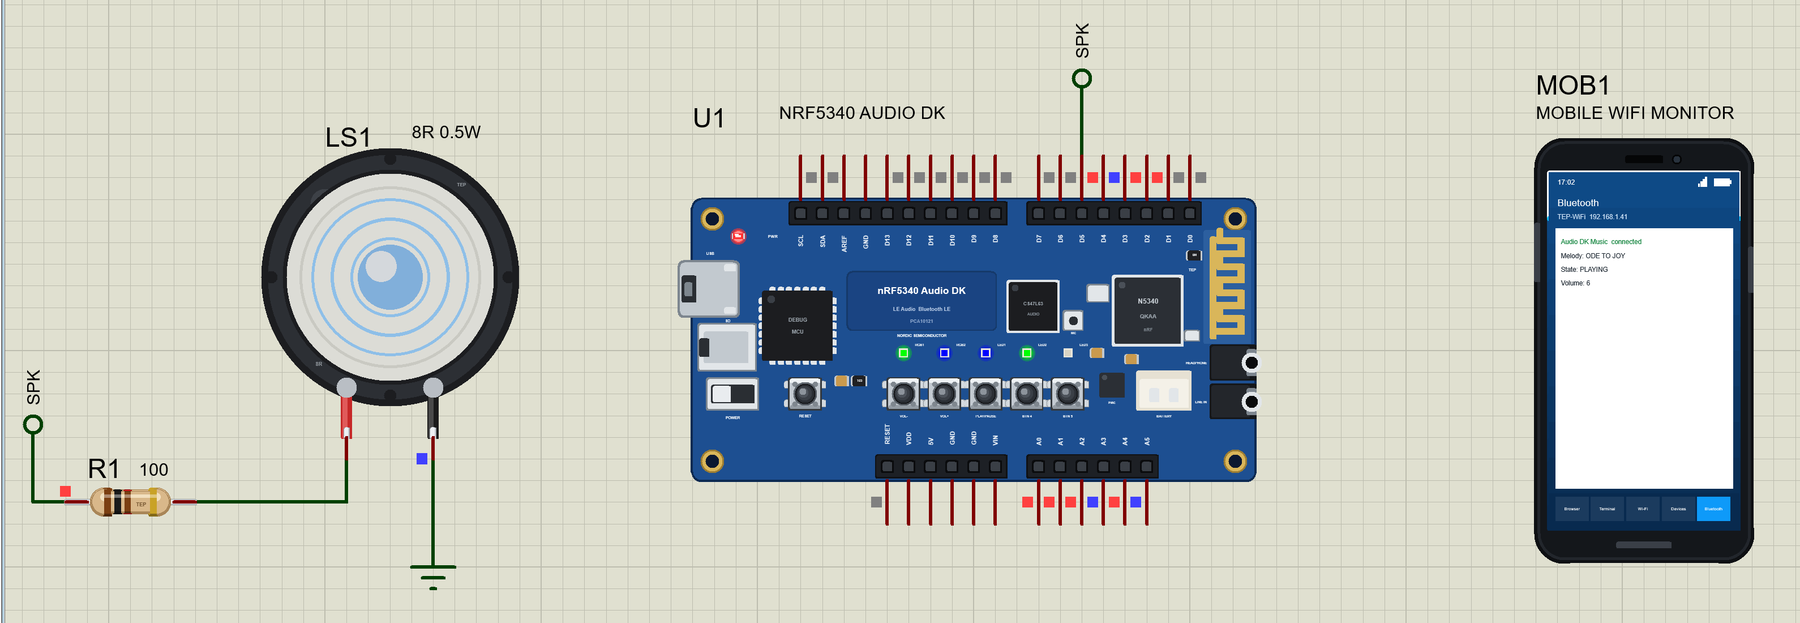
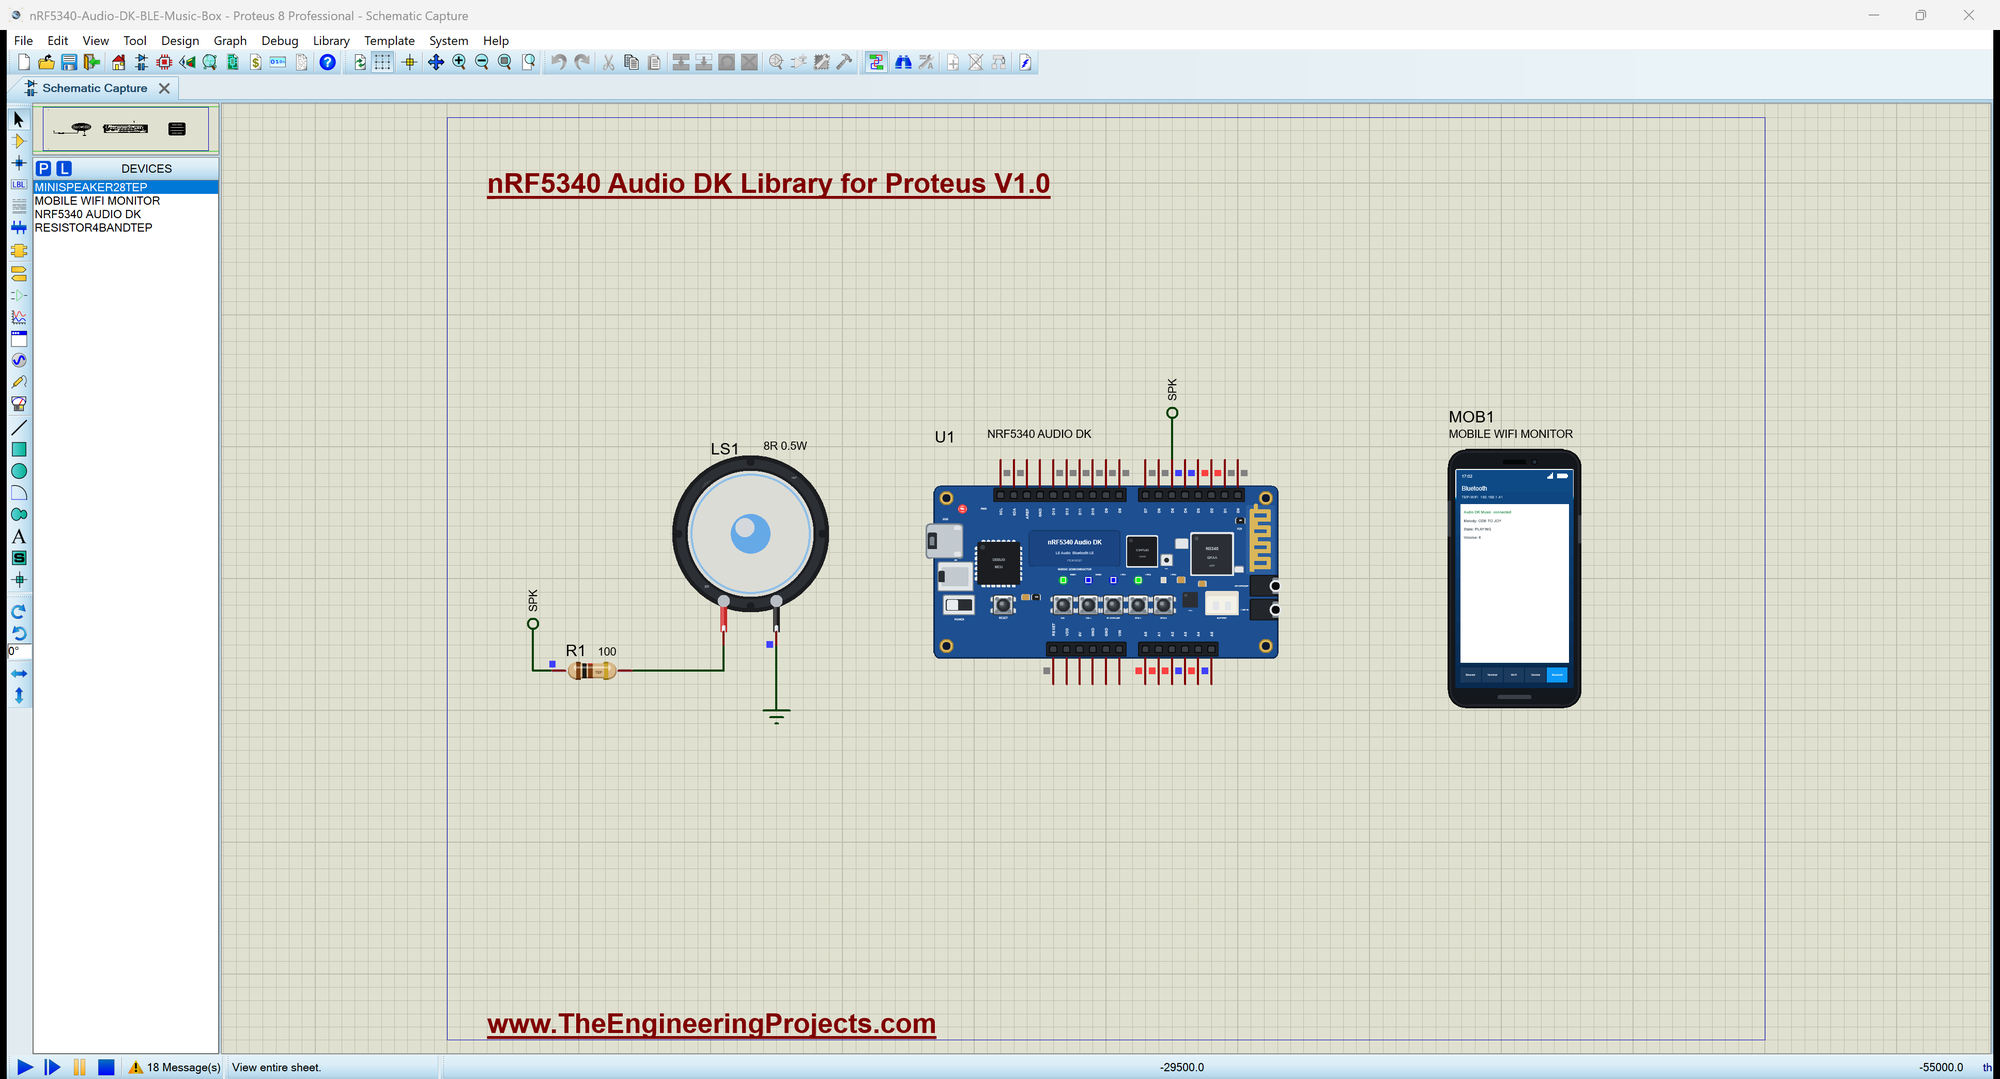
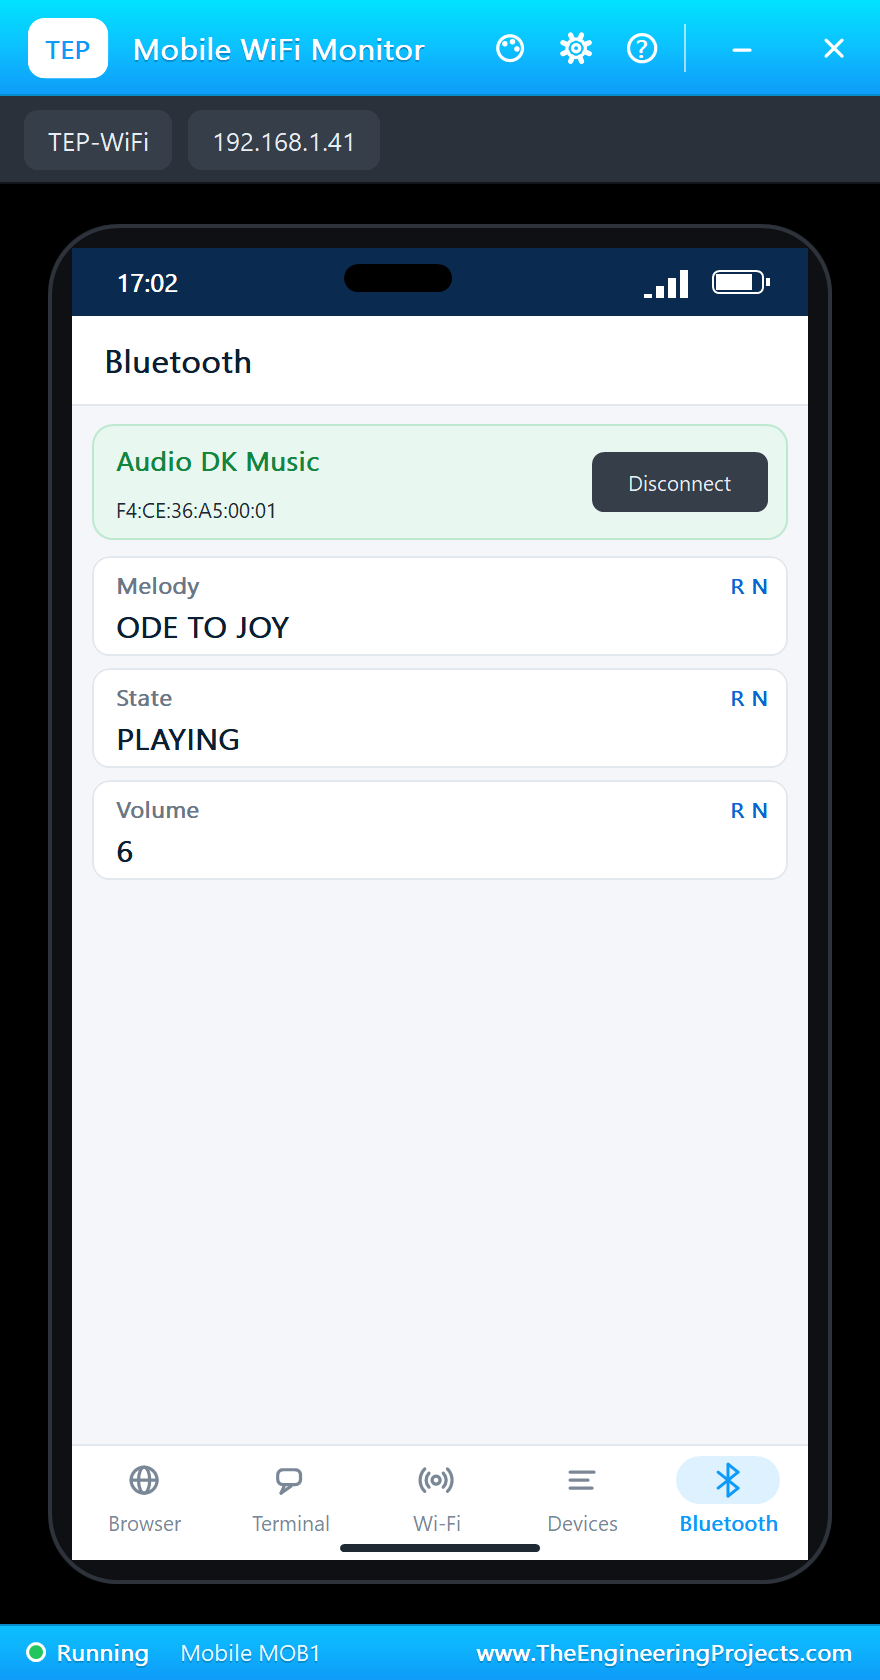
Open nRF5340-Audio-DK-BLE-Music-Box.pdsprj. U1 runs AudioDK_BLE_Player.hex; D5 drives LS1 through R1, a 100 ohm part from our Resistor Library for Proteus; MOB1 is our Mobile WiFi Monitor, the phone.
| Button | What it does | LEDs |
|---|---|---|
| PLAY/PAUSE | plays the melody, pauses, goes on | RGB1 green playing, yellow paused |
| VOL-, VOL+ | the volume, 0 to 10 | LED1 from 1, LED2 from 4, LED3 from 8 |
| BTN 5, BTN 4 | the next melody, the previous melody | - |
| (the phone) | connects over Bluetooth LE | RGB2 blue |
Why a Resistor?
The speaker's coil is only 8 ohm. Straight on a 3.3 V pin it would ask for about 400 mA, far more than any GPIO can give. The 100 ohm resistor keeps the current near 30 mA - quiet, but safe for the pin. A real product puts a small amplifier between the pin and the speaker; on the Audio DK that job belongs to the CS47L63.
The Melodies
A melody is a list of notes: a frequency in hertz (0 for a rest) and a length in eighth notes, with {0, 0} at the end. Here is the start of the table:
struct Note { unsigned int hz; byte eighths; };
const Note ODE[] = {{659, 2}, {659, 2}, {698, 2}, {784, 2}, {784, 2}, {698, 2}, {659, 2}, {587, 2}, {523, 2}, {523, 2}, {587, 2}, {659, 2},
                    {659, 3}, {587, 1}, {587, 4}, {0, 0}};
A Note at a Volume
sound() plays one note. ledcChangeFrequency() sets the pitch and ledcWrite() the duty: a wider pulse puts more power into the speaker, so the duty is the volume:
void sound(unsigned int hz) {                               // a tone at the volume, or silence
  if (hz == 0 || volume == 0) { ledcWrite(SPEAKER, 0); return; }
  ledcChangeFrequency(SPEAKER, hz, 8);
  ledcWrite(SPEAKER, volume * 128 / 10);                    // the duty: 0 .. 50 % (128 of 255) for volume 0 .. 10
}
Colours and the Volume Bar
showPlayer() sets RGB1 for the state and turns the volume into a bar of three LEDs. On this kit HIGH means on:
void showPlayer() {
  if (playing) rgb1(0, 1, 0); else rgb1(1, 1, 0);           // green playing, yellow paused
  digitalWrite(LED1, volume > 0 ? HIGH : LOW);              // the volume bar
  digitalWrite(LED2, volume >= 4 ? HIGH : LOW);
  digitalWrite(LED3, volume >= 8 ? HIGH : LOW);
  stateChar.writeValue(playing ? "PLAYING" : "PAUSED");
}
Playing Without delay()
playNotes() runs from the loop. It starts the next note only when the last one is over, so Bluetooth and the buttons keep working while the music plays. The end of a melody starts the next one:
void playNotes() {                                          // the next note when the last one is over
  if (!playing || millis() < noteEnds) return;
  const Note n = MELODIES[song][noteK];
  if (n.eighths == 0) { startSong((song + 1) % N_MELODIES, F("NEXT (the melody ended)")); return; }
  sound(n.hz);
  noteEnds = millis() + (unsigned long)n.eighths * EIGHTH_MS;
  noteK++;
}
The Buttons
Each press calls onButton() with the button's number:
void onButton(byte k) {
  if (k == 0) setVolume(volume - 1);                        // VOL-
  else if (k == 1) setVolume(volume + 1);                   // VOL+
  else if (k == 2) {                                        // PLAY/PAUSE
    playing = !playing;
    if (!playing) sound(0); else noteEnds = 0;
    Serial.println(playing ? F(">> PLAY") : F(">> PAUSE"));
    showPlayer();
  }
  else if (k == 3) startSong((song + N_MELODIES - 1) % N_MELODIES, F("PREVIOUS"));   // BTN 4
  else startSong((song + 1) % N_MELODIES, F("NEXT"));       // BTN 5
}
The Bluetooth Service
Three characteristics carry the melody, the state and the volume, each with a readable 0x2901 name for the phone:
BLEService musicService("19B100A0-E8F2-537E-4F6C-D104768A1214");
BLEStringCharacteristic songChar("19B100A1-E8F2-537E-4F6C-D104768A1214", BLERead | BLENotify, 20);
BLEStringCharacteristic stateChar("19B100A2-E8F2-537E-4F6C-D104768A1214", BLERead | BLENotify, 12);
BLEIntCharacteristic volumeChar("19B100A3-E8F2-537E-4F6C-D104768A1214", BLERead | BLENotify);
Run the Simulation
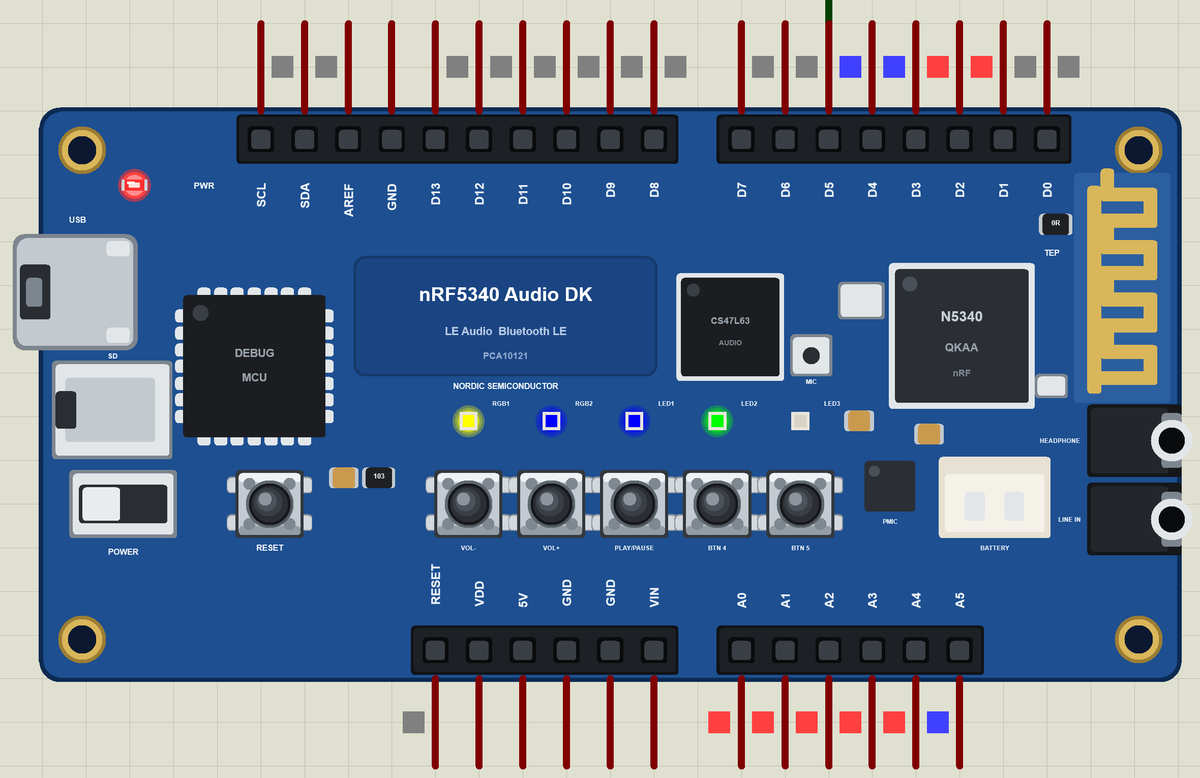
Press Run. The serial monitor - the same window as our TEP Serial Monitor Advance for Proteus - shows the name the kit advertises. RGB1 is yellow: nothing plays yet, and LED1 and LED2 show the volume of 6:
nRF5340 Audio DK Bluetooth Music Box - The Engineering Projects
Advertising as "Audio DK Music"   PLAY/PAUSE = play, VOL- / VOL+, BTN 4 / BTN 5 = previous / next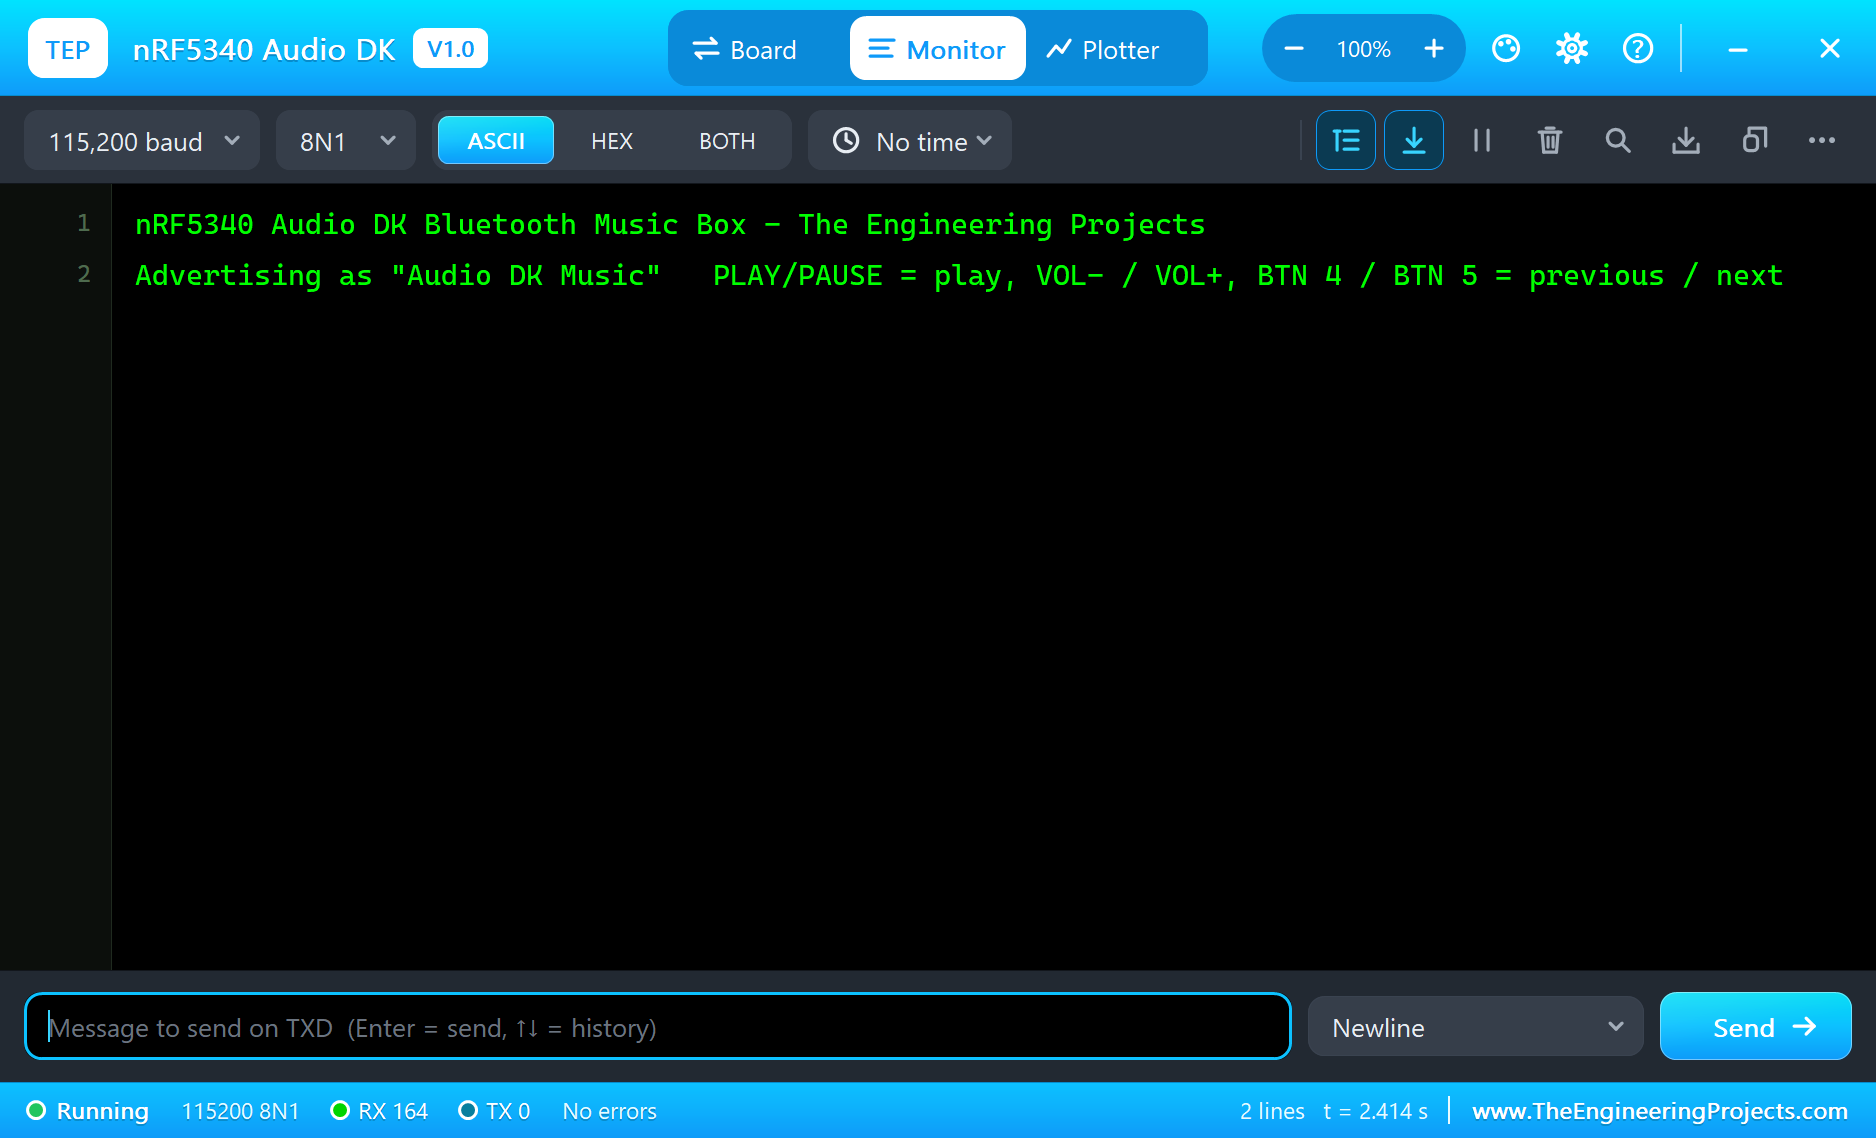
Connect the Phone
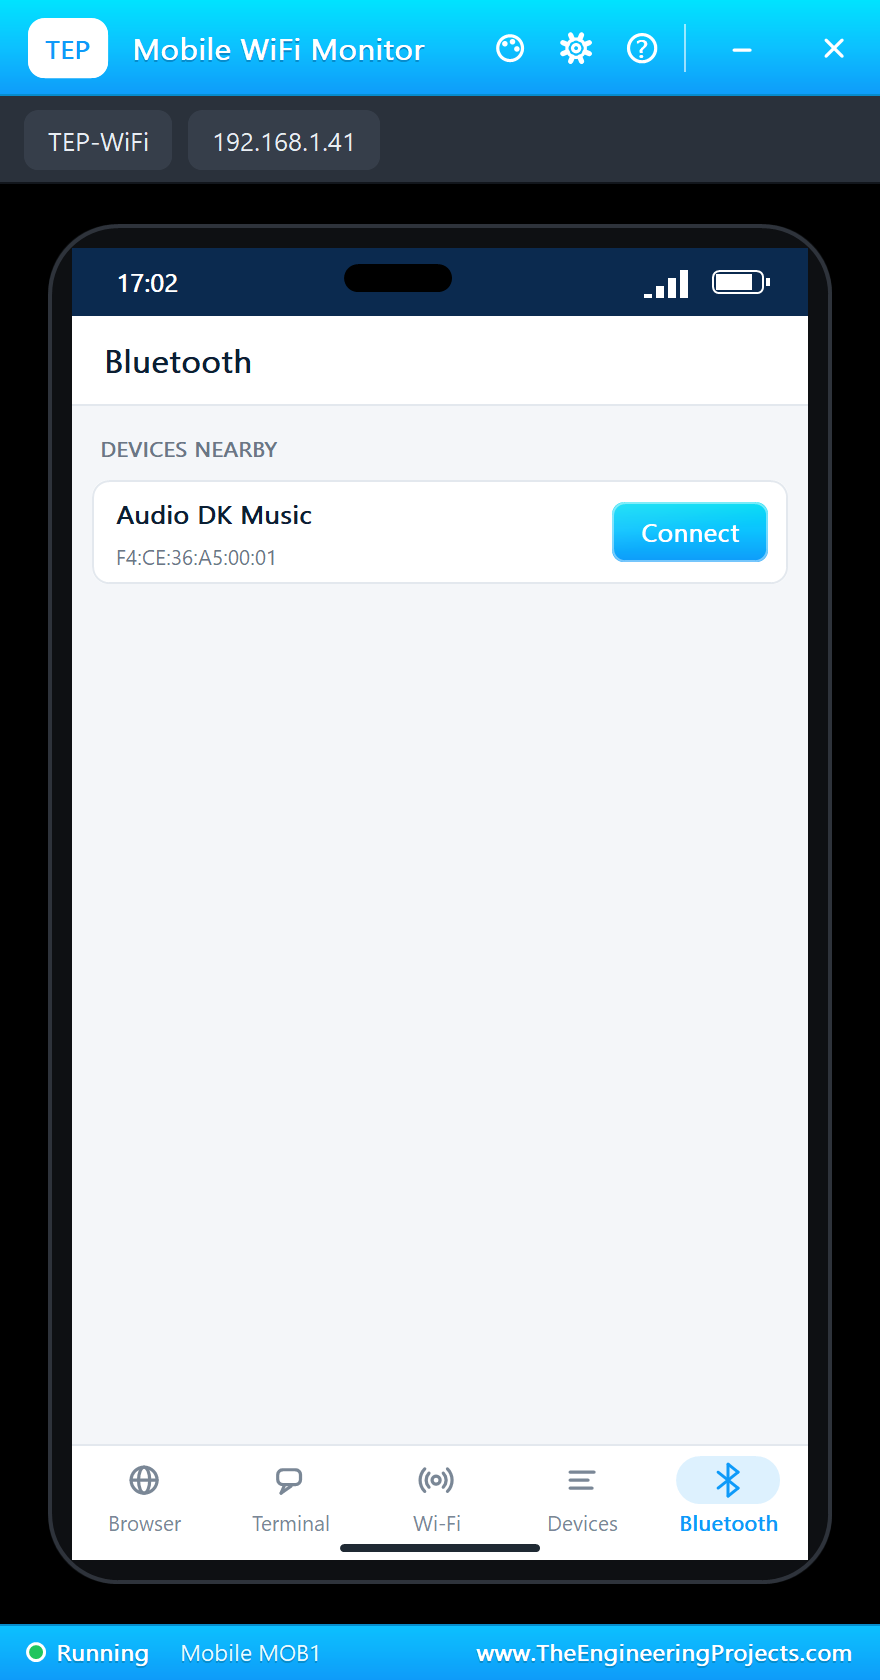
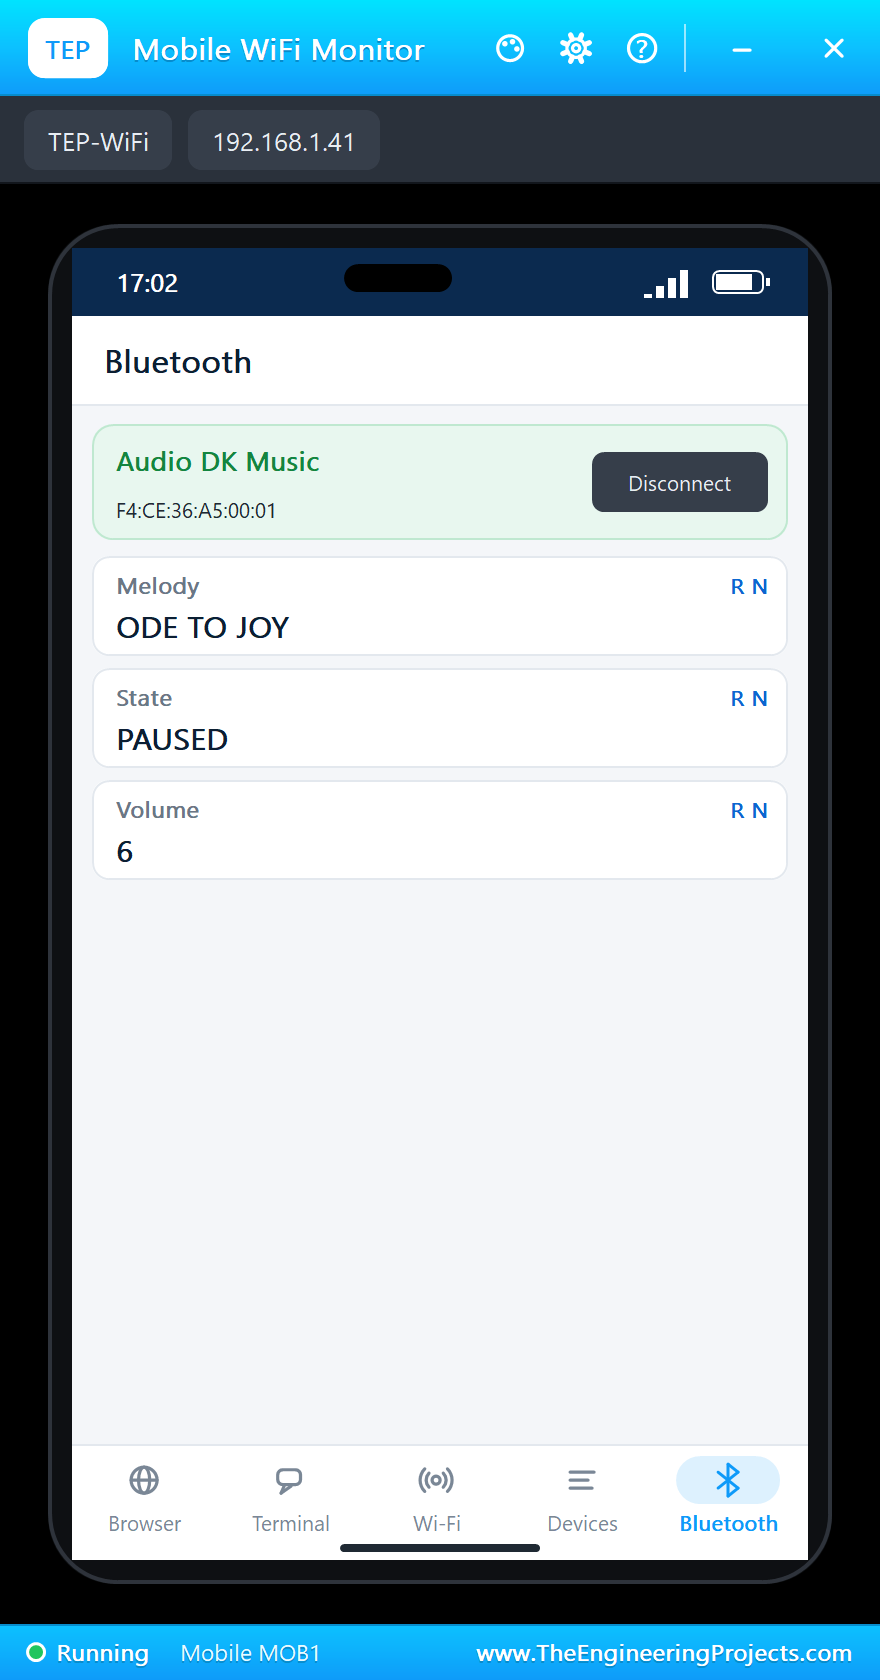
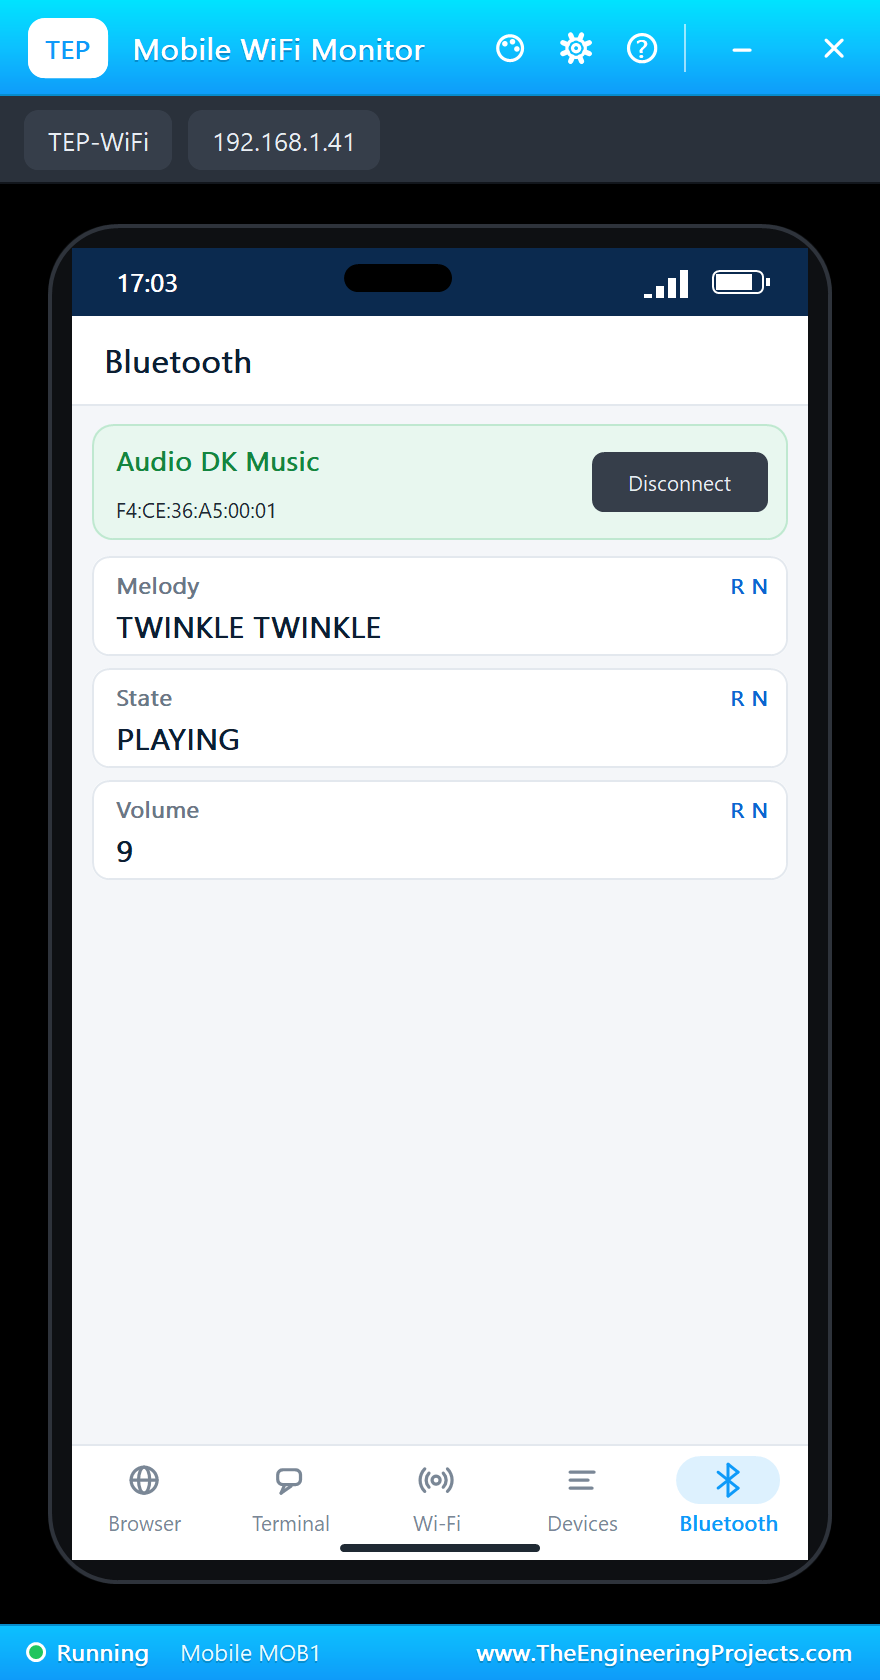
On the phone open the Bluetooth app, press SCAN and connect to "Audio DK Music". RGB2 lights blue and the phone shows the melody, the state and the volume:
Play
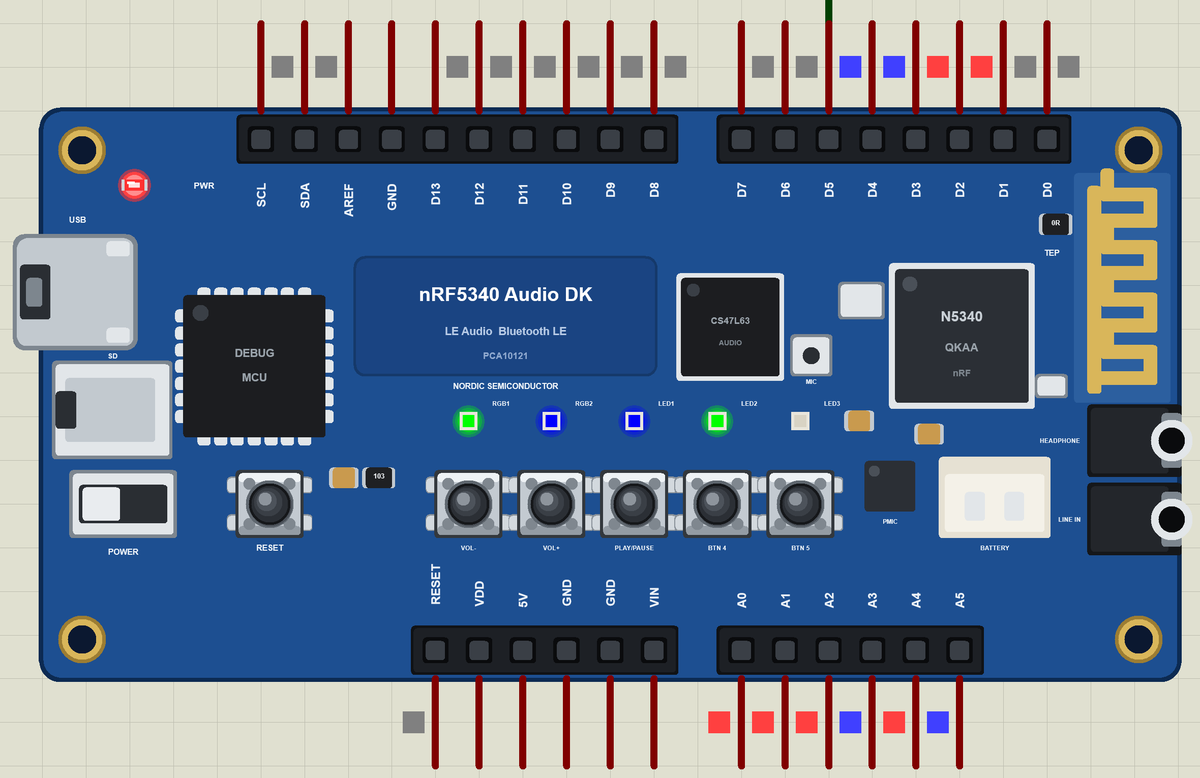
Click PLAY/PAUSE: ODE TO JOY starts, RGB1 turns green and the speaker's cone moves with every note - your PC's speaker plays the melody too. Here is the complete circuit while the simulation runs:
Louder
Click VOL+ three times: 7, 8, 9. At 8 LED3 joins the bar, and the speaker gets a wider pulse:
The Next Melody
The melodies are short, so ODE TO JOY had already ended and TWINKLE TWINKLE started by itself. Click BTN 5: JINGLE BELLS, and the phone follows at once:
>> VOLUME 9
>> NEXT (the melody ended) 2/3: TWINKLE TWINKLE
>> NEXT 3/3: JINGLE BELLS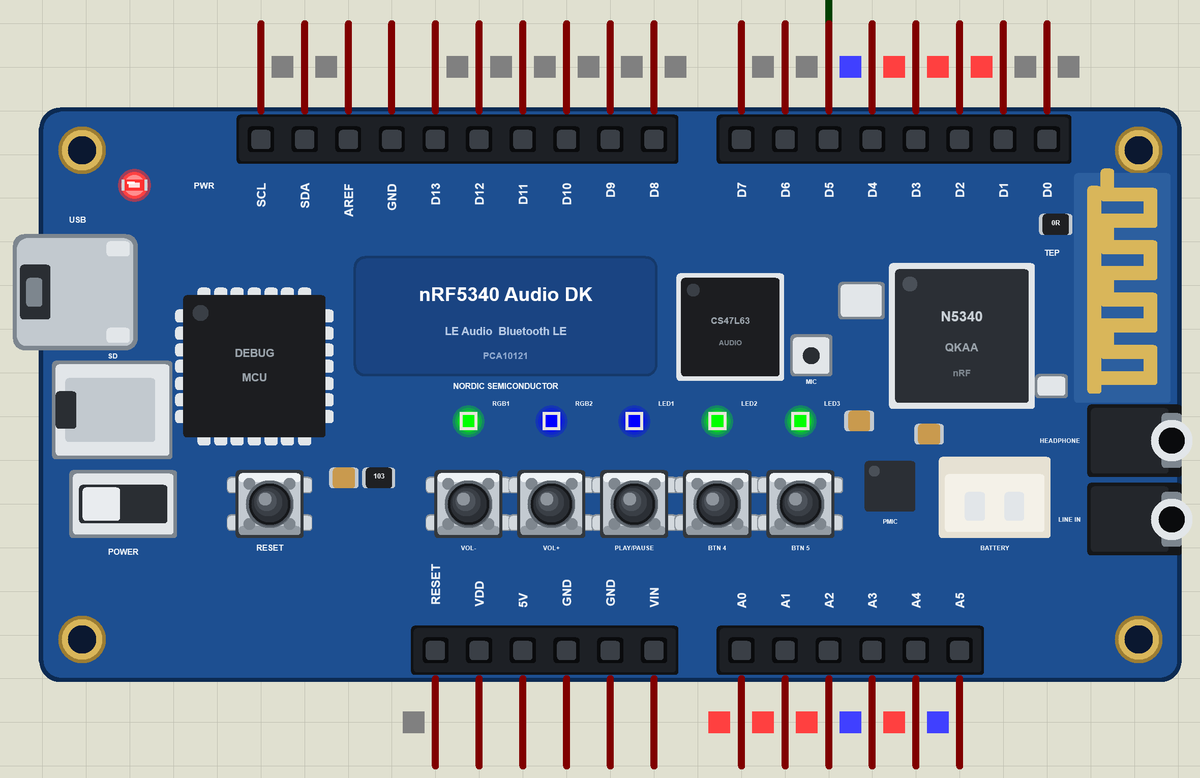
Pause and Go On
Click PLAY/PAUSE again: the music stops and RGB1 turns yellow. VOL- takes the volume back to 8, and one more PLAY/PAUSE goes on with the next note; when the melody ends, the next one starts:
>> PAUSE
>> VOLUME 8
>> PLAY
>> NEXT (the melody ended) 3/3: JINGLE BELLS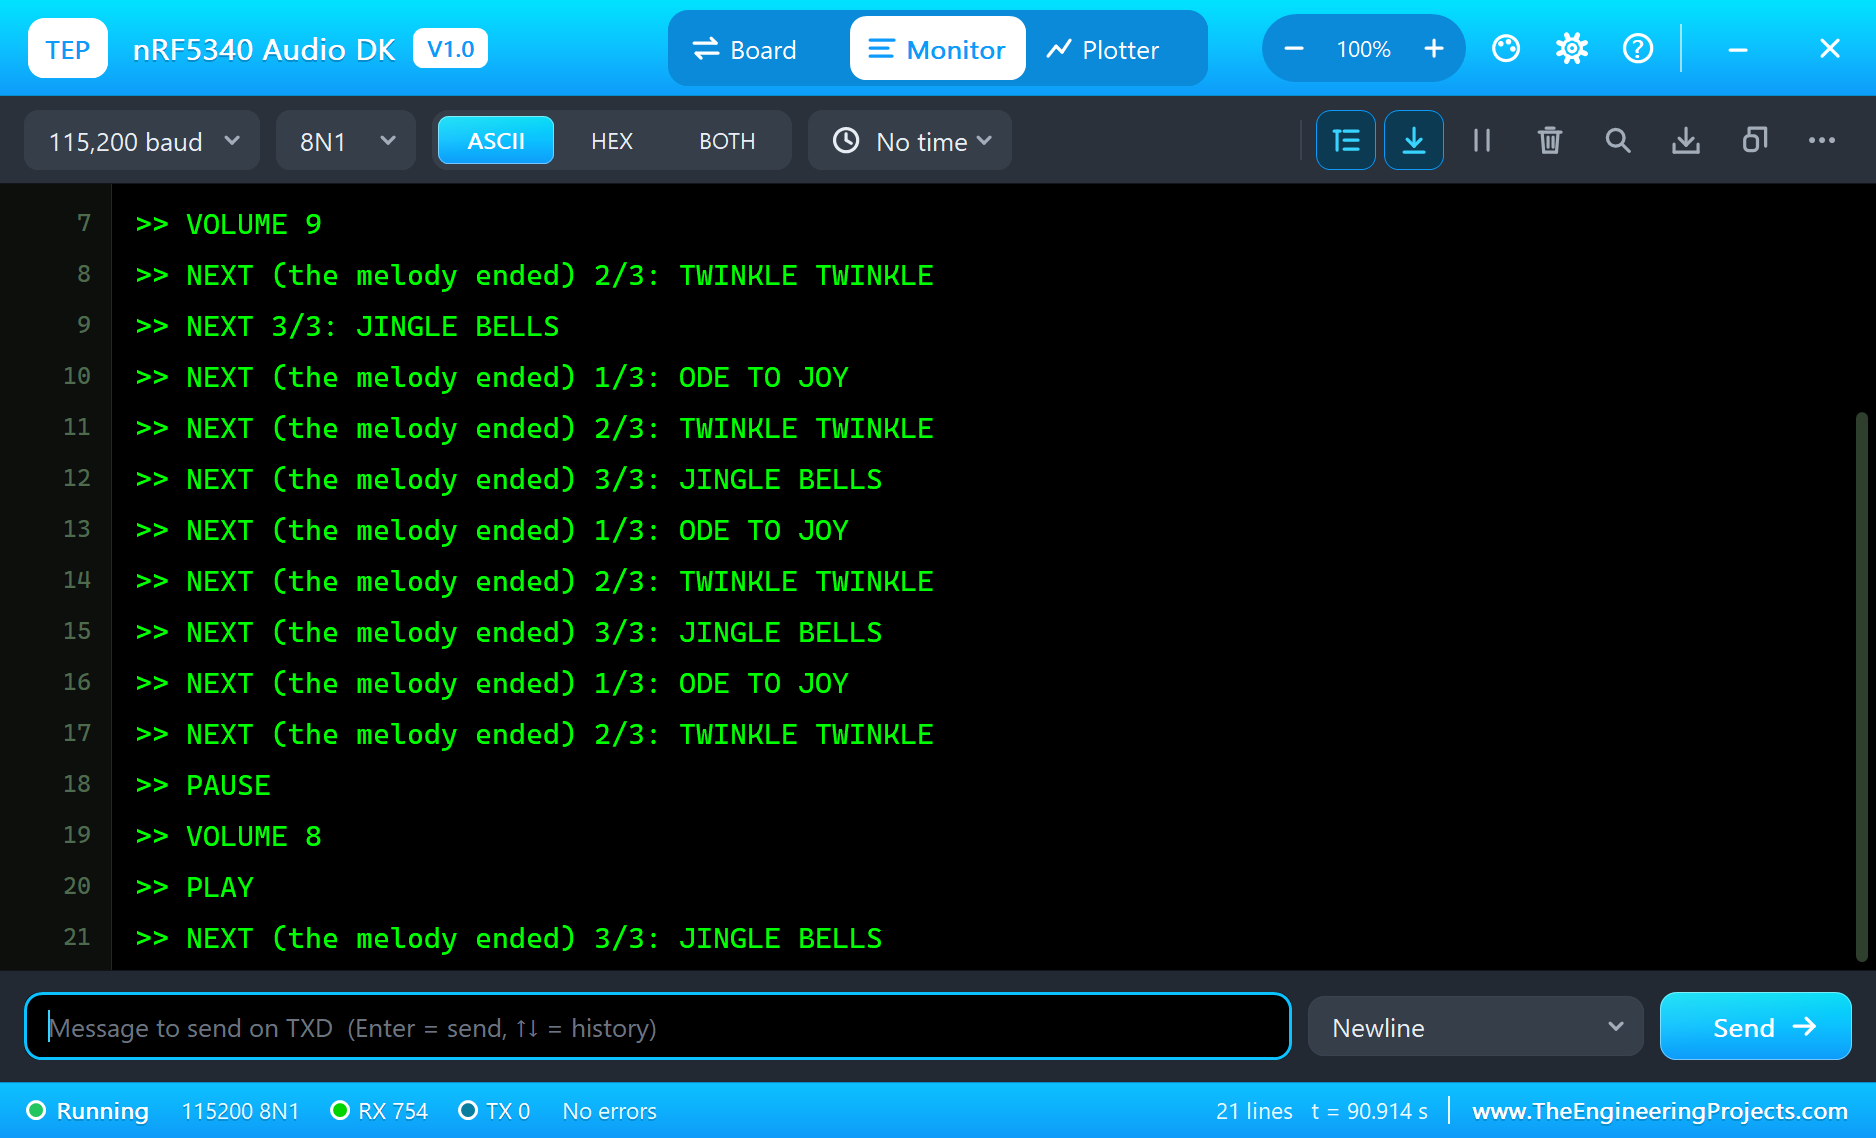
How a Speaker Plays a PWM Tone
A PWM pin is either fully on or fully off, yet the speaker plays a clean note. The coil and the cone cannot follow the sharp edges; they move at the pulse's repetition rate, which is the note's frequency. A 50 % duty puts the most power into the fundamental tone, a narrow pulse much less - that is why our volume control changes the duty from 0 to 50 %, not above.
Notes and Frequencies
Every note has a frequency: A4, the tuning note, is 440 Hz, and each octave doubles it. The melodies use the octave above middle C - C5 is 523 Hz, E5 659 Hz, G5 784 Hz. The mini speaker's resonance is near 600 Hz, so these notes are loud and clear; below it the speaker gets weak, as the Mini Speaker library's pop-up shows.
LE Audio in a Few Words
Classic Bluetooth audio connects one phone to one headset. LE Audio adds the LC3 codec, which sounds better at a lower data rate, and two new ways to send sound: connected streams to one or more devices, and Auracast broadcasts that any number of listeners can join, like a radio station. The Audio DK is built to try all of that; our simulation covers the control side - buttons, LEDs, sound on a pin and a Bluetooth LE service.
Notifications Instead of Polling
The phone could ask the kit for the melody every second, but that wastes radio time. With BLENotify the kit tells the phone when the melody, the state or the volume changes, and the phone shows it at once.
Try It Yourself
- Use BTN 4 for the previous melody and test it in the simulation.
- Add a fourth melody - a list of notes and a name is all it needs.
- Blink RGB1 while the volume is 0.
- Add a writable characteristic so the phone can choose the melody.
Ideas to Extend the Music Box
- Show the melody on an I2C OLED display on SDA and SCL.
- Remember the volume in EEPROM.
- Make VOL- and VOL+ change the tempo while PLAY/PAUSE is held.
- Play a short chime when the phone connects.
Your Own Sketches
Write the sketch in the Arduino IDE with the board Nordic nRF5340 Audio DK (TEP Proteus), use Sketch > Export Compiled Binary and set the part's PROGRAM property to the .hex.
Moving to a Real nRF5340 Audio DK
- Install Nordic's nRF Connect SDK, or Zephyr with the board nrf5340_audio_dk/nrf5340/cpuapp.
- Connect a small speaker through a transistor or an amplifier module to D5 - or use the kit's own headphone output.
- Start from Nordic's Bluetooth peripheral samples and Zephyr's PWM and GPIO APIs.
- Move the logic of the demo across: the melodies, the buttons, the LEDs and the service.
- Program the kit through the debugger's USB and test with a phone app.
The pins, the colours and the Bluetooth service stay the same; on the real kit Nordic's SDK takes the place of the Arduino calls. And once the control side works, the kit's own audio hardware can take over from the speaker on a pin. For a much smaller Nordic board, see our nRF52840 Dongle Library for Proteus.
Things to Know Before Using a Real nRF5340 Audio DK
- 3.3 V logic: the header is 3.3 V; never drive a speaker straight from a pin.
- Shared pins: a module on A0 to A5 or D2 to D4 shares them with the buttons and LEDs.
- Power: the kit runs from USB or its battery.
- LE Audio: streams need Nordic's nRF5340 Audio application, not the simulation.
Properties of the nRF5340 Audio DK
| Property | What it does |
|---|---|
| PROGRAM | the sketch: a .hex from TEP Boards for Proteus (board "Nordic nRF5340 Audio DK") |
| MONITOR, BAUD, AUTOOPEN | the built-in serial monitor: on, its baud rate (115200), open at Run |
Troubleshooting
- The phone finds nothing: call
BLE.begin(), set a local name andBLE.advertise(); callBLE.poll()in loop(). - The speaker stays silent: call
ledcAttach(5, 1000, 8)once, thenledcChangeFrequency()andledcWrite()with a duty above 0. - An LED stays dark: the Audio DK's LEDs light when the pin is HIGH.
- analogRead(A0) reads 1023: A0 to A2 carry the buttons' pull-ups.
- A number goes wrong above 32767: int is 16 bits in the simulation - use long.
Limitations of the Simulation
- Bluetooth LE: the kit is a peripheral only, with one phone as the central; LE Audio streams are not modelled.
- The CS47L63, the microphone, the jacks, the SD card, the PMIC and USB audio are drawn, not modelled.
- Your sketch gets 8 KB of RAM in the simulation, and int is 16 bits there.
- nRF5340 and Nordic Semiconductor are names of Nordic Semiconductor ASA, CS47L63 of Cirrus Logic and Arduino of Arduino, and the Bluetooth word mark belongs to Bluetooth SIG; this library is not made or endorsed by them or by Labcenter.
- Tested in Proteus 8.5 in November 2026 (the demo as shipped, about 90 s of simulation). Proteus 7 is not supported.
So, that was all about the nRF5340 Audio DK Library for Proteus. I hope it helps you try your Bluetooth audio ideas in a simulation before the kit is on your desk - the buttons, the LEDs, the speaker and the phone, all on one sheet. If you have any questions, ask in the comments and I will help you out. Till the next tutorial, take care and have fun!