How to Use a Raspberry Pi as A Media Server


Welcome to the next tutorial of our Raspberry Pi programming course. Our previous tutorial taught us to set up a webserver in raspberry pi. We also looked at configuring addclient and deploying apps to our repositories. This tutorial will teach us to set up a free media server on Raspberry Pi.
Using a Raspberry Pi as a multimedia server requires:
- An operating system and miniDLNA program installed on your Raspberry Pi,
- You can attach various cleanly formatted and fragmented hard disks to your Raspberry Pi for storing and streaming media files.
- A basic understanding of how to use a computer, Client-server architecture skills, familiarity with Unix terminal and Secure shell, and a passion for computing and the media are a must!
Even if you lack some of the expertise mentioned above and experience, we can still attempt to accomplish this task, and you will gain new knowledge in the process!
This can be done in a variety of ways. It's a mix of free and paid options. While we're here, we'll learn how to use the DLNA protocol to run a public media server on a Raspberry Pi. Let's get right down to business right away.
What Exactly Is a Multimedia Server?
It's possible to store information in the form of files on a media server at a central location. It doesn't matter if it's a document, image, film, ebook, or scripting file stored on a conventional media server; everything it contains is a file. It merely allows you to store data in a more orderly fashion. Accessing data should necessitate you navigating it on your own.
A media server sits on top of the file server. Media items such as photos, music, and videos can be accessed with this application. In addition, it enables network playback. There's no need to worry about where the video files are kept. You don't have to do anything more than type in your questions and wait for the results to appear. For example, you can search for all the music by a particular artist or musician. These new features improve the media server's usability, manageability, and overall appeal.
What is DLNA?
Let's have a look at the DLNA, shall we? When it comes to digital living, DLNA (Digitized Living Network Alliance) is the acronym. SONY with Intel collaborated to create a multimedia transfer protocol standard. Its primary purpose is to set guidelines for media distribution via the Internet. Smart gadgets like android Tv, smartphones, and set-top boxes that can share multimedia content are all DLNA-compliant. Microsoft Media Player, VLC, and Plex will all be DLNA-enabled in the future.
Computers can now be used as multimedia servers thanks to the DLNA standard. A DLNA server and a DLNA client are necessary for DLNA to function. Media sharing is a server-to-client process that occurs at all times. Servers and clients cannot independently share material. Clients and servers are two terms you may hear used interchangeably. What do you think about their appearance? Any DLNA-enabled device can serve as a DLNA client. Smart devices that can stream media over the Internet are one example. Setting up a DLNA server does not necessitate a large server. Any of your friends can access it and set up their server with it. The Windows Player is capable of serving as a Digitized Living Network Alliance server. In addition, many NAS devices are equipped with DLNA server programs that allow users to view multimedia files stored on them. Free multimedia services can be built on the Raspberry Pi using the miniDLNA software.
How Do We Setup MiniDLNA on a Raspberry Pi?
Because of its small size, it can be run on any Raspberry model. Let us set up a miniDLNA service on our RPi and transfer multimedia files to external smart devices via the network.
A better grasp of the setup procedure is gained by splitting this topic into four primary subsections.
- Install miniDLNA on your Raspberry Pi.
- Create directories for the storage of databases and logs.
- Configuring of miniDLNA for media files to be picked up.
- Rebooting the miniDLNA service.
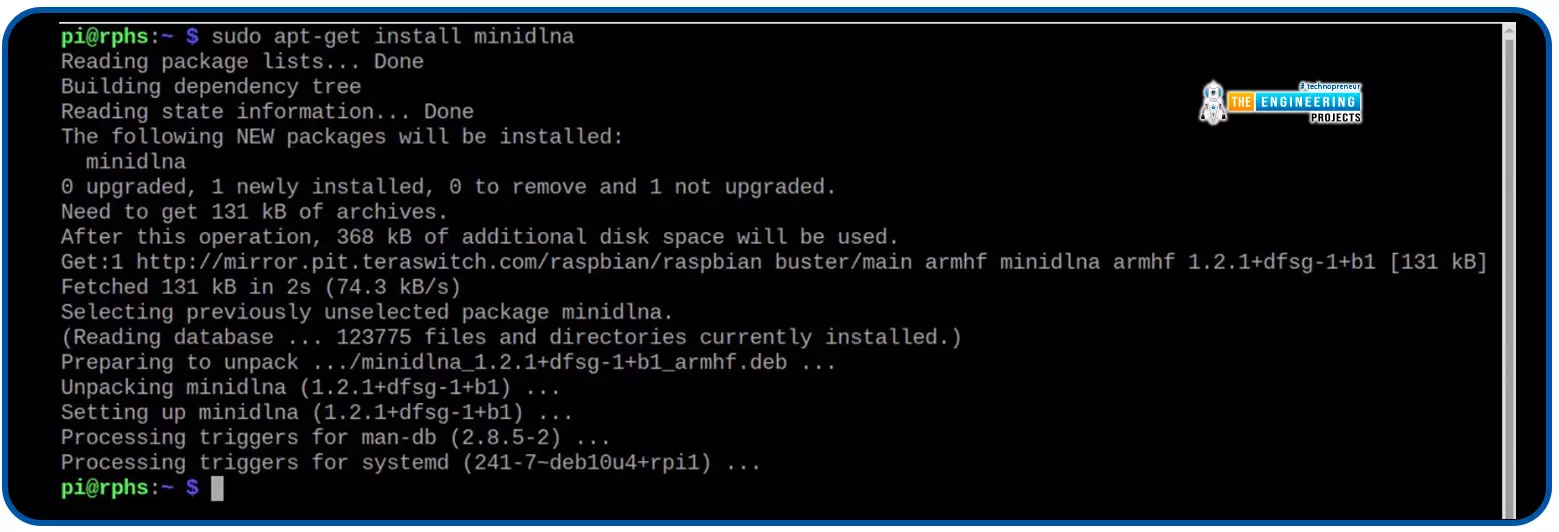
Install miniDLNA on your Raspberry Pi
Install miniDLNA:
It's as easy to set up as any other application. Let's do an apt installation.

Minidlna's DB and logs should be stored in this directory:
/mnt/data-ext4/ is where we'll create all of the directories we need for our demonstration purposes.


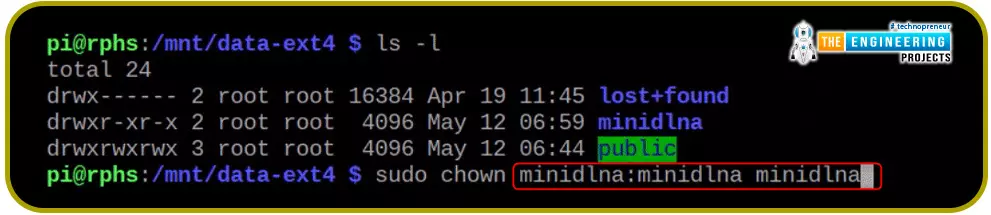
Adding the group and user to the minidlna directory ownership list:
Inside the minidlna folder, we can write to a folder instead of root, as shown by the permissions below. In general, it's not a good idea to offer complete access to everyone. s Instead, new users and groups are created, and the ownership is transferred to them. Therefore, the database and logs are stored in this folder.

Ownership can be changed with the command shown. In the chown command, the user and the group are permitted to access the folder.
MiniDLNA directories must have the necessary permissions set.
Minidlna folder ownership after the chown command is shown here.

Create directories for the storage of databases and logs
Set up an entirely new subdirectory named "Music" inside the "public" folder you just created. The 'public' folder has all permissions for all the users, so the sudo word isn't necessary anymore. This folder is owned by 'user' and group 'pi,' and no one else has to write access to this folder.

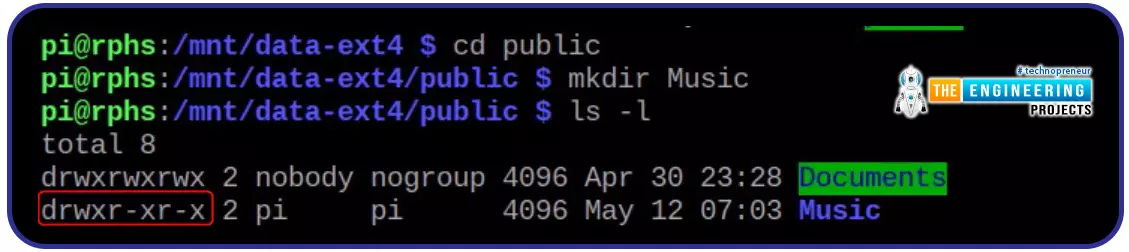
The write permissions of the Music directory need to be fixed:
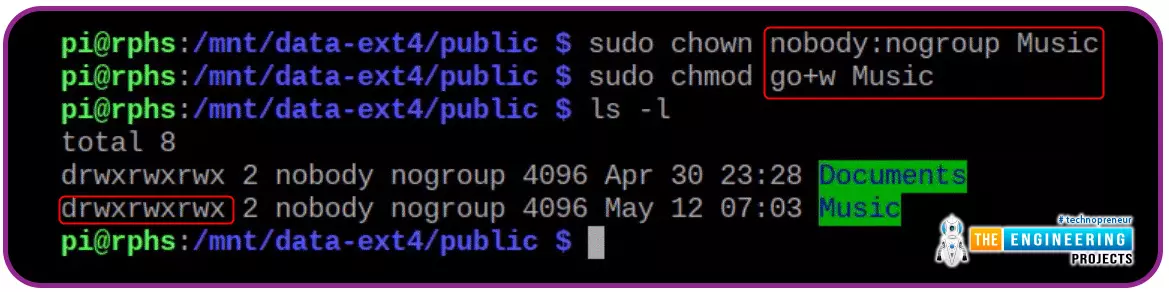
You can use the same 'chown' command to make the Music folder owned by everyone and grant write access. Everyone acknowledges the file/directory because nobody and no group are users.
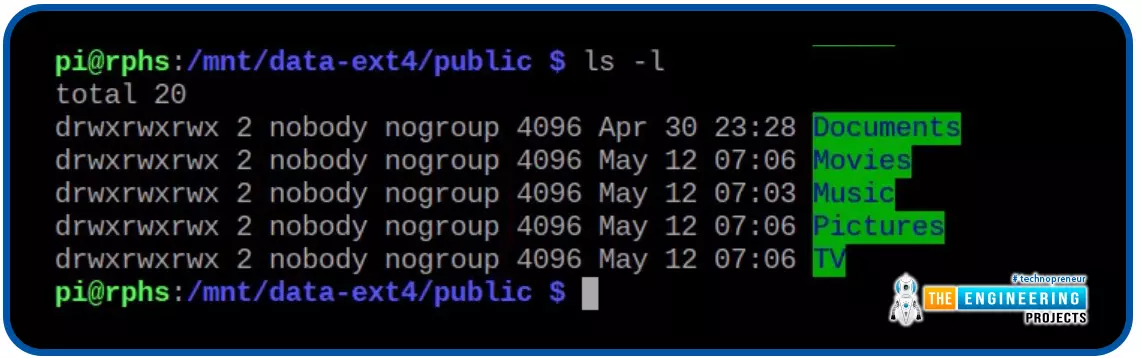
Organize multimedia content by creating a few additional folders:
Likewise, you can reorganize your multimedia files in any way you see fit by creating new folders. For demonstration, we will establish a couple of extra subdirectories.
Add a few extra subdirectories inside the /mnt/NTFS public folder. Then, add some audio and video files to each of these folders.
The miniDLNA configuration file should be set up as follows:
Now tell miniDLNA where to find the media files. Modify the configuration file in your preferred text editor.

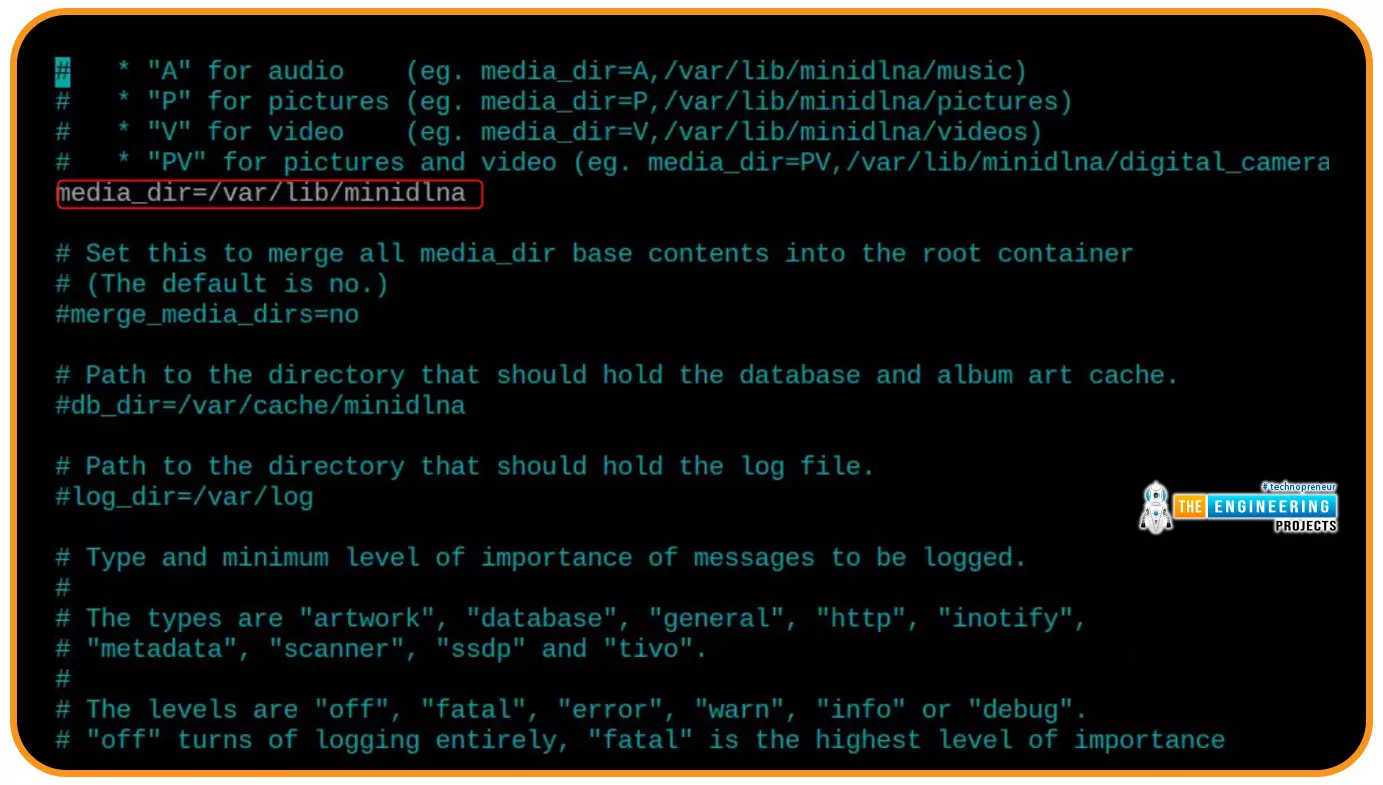
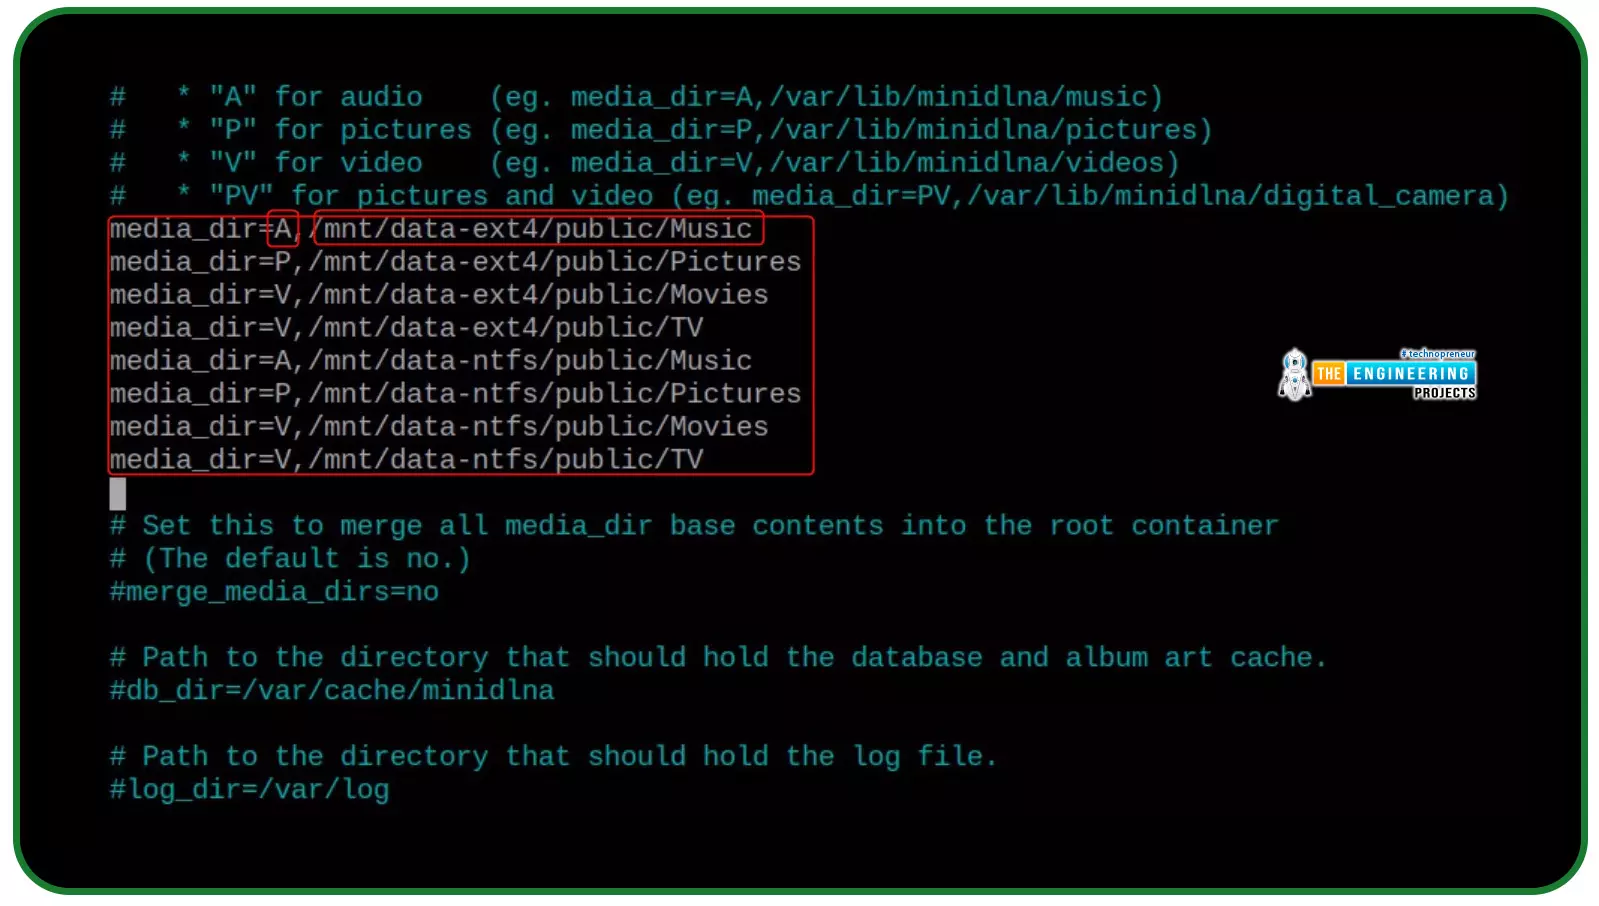
The media directories should be configured at this point:
Make a list of all additional folders you've made to contain multimedia files in the line where you see 'media dir.' Just after the equal sign is a letter, ',' include the location of the files.
A: Audio
P: Picture
V: Video
PV: Pictures and Videos
Use the following steps to set up a database and log storage location:
Navigate a little farther down the page to specify where the DB and logs will get saved. Quit the editor and save the modifications you've just made.

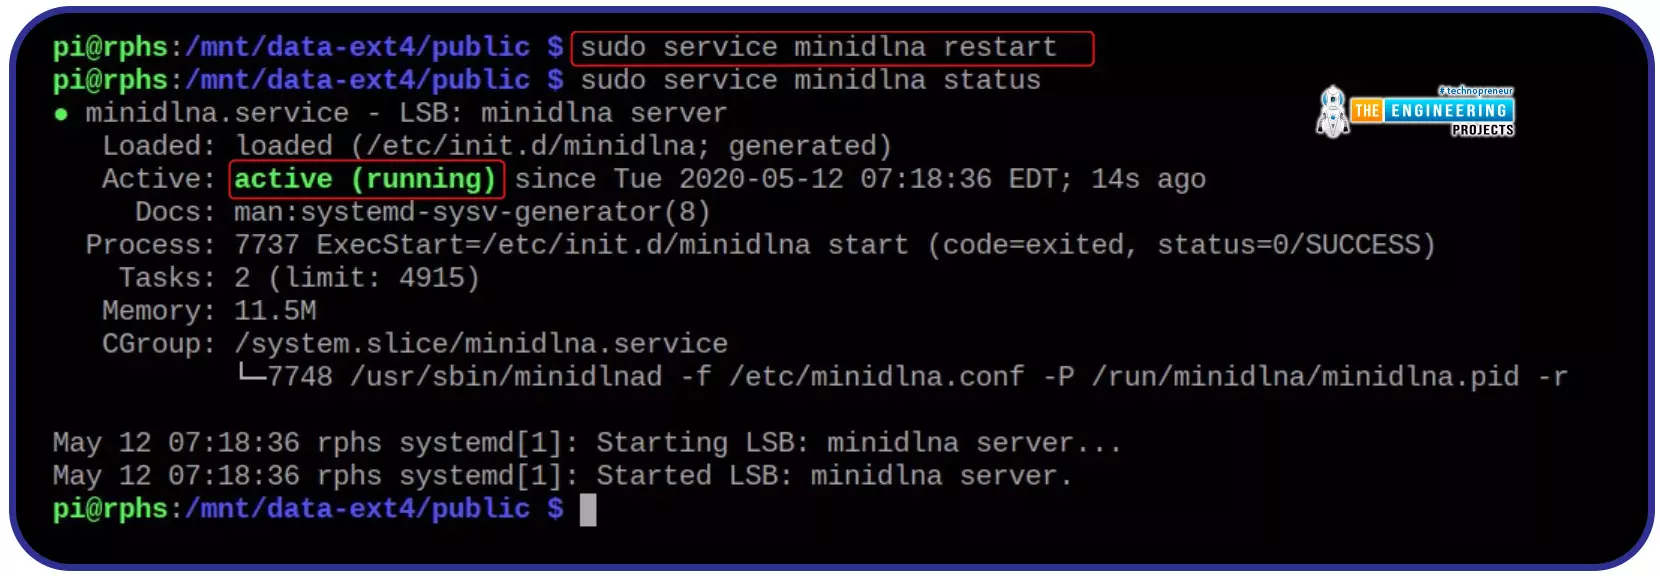
Restart the minidlna service:
Restart your minidlna server for the modifications to be reflected in the database and take effect. If everything is okay, the program should be functioning. Please check the status of the server.

Allow only a limited number of users to watch at once:
Analyze the logs to confirm that everything is functioning as intended.

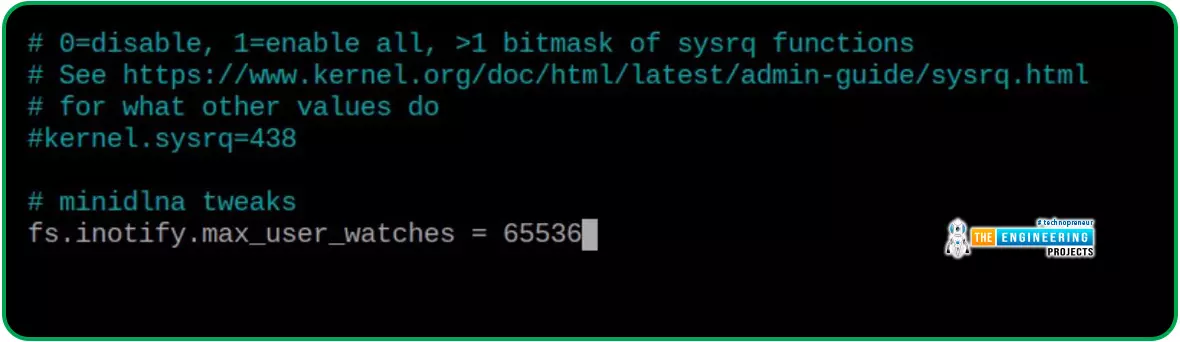
Just keep an eye out for warning logs. There are claims it can manage up to 8192 folders and subfolders. If you have a more extensive selection, you can change the value of your collection to make it more valuable.
/proc/sys/fs/inotify/max_user_watches. But, this will not survive a reboot.
Permanently limit the number of people who can watch a video:
To keep the value set indefinitely. Modify the document /etc/sysctl.conf.

At the very end, add the following sentence:

This can be accomplished in a variety of ways. Here's an easy one:


It's done. However, keep in mind that indexing and cataloging massive data will take longer. The cataloging process might take a little longer at times.
Use Plex to set up a media server for your home.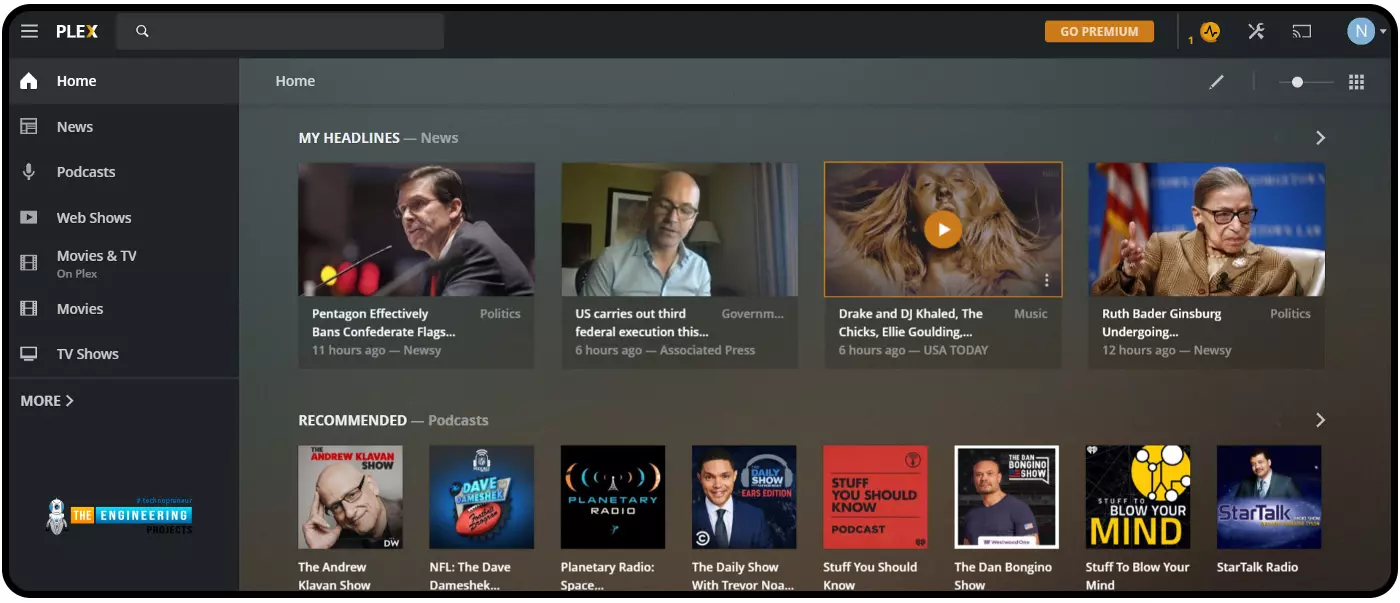
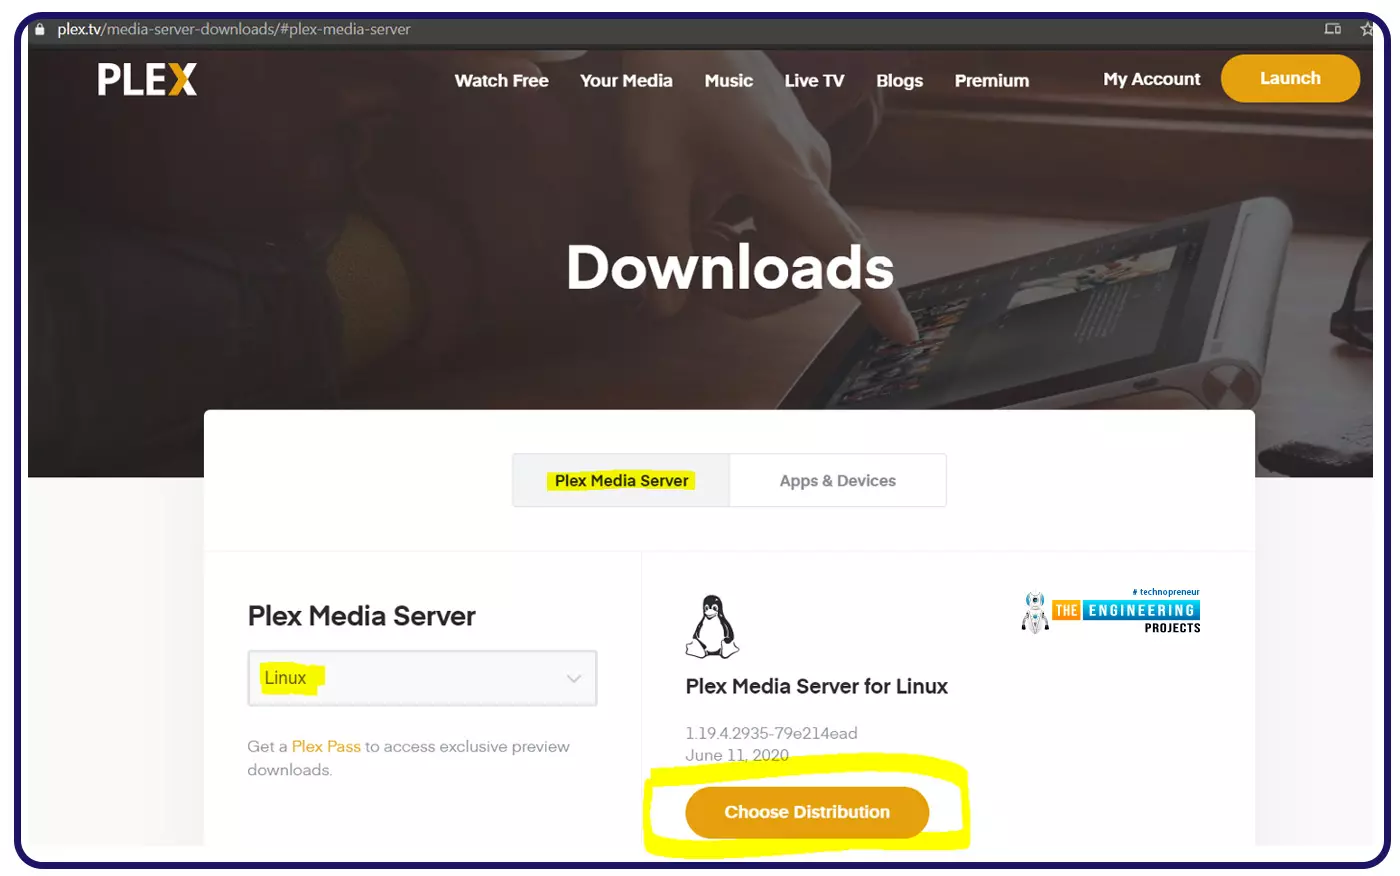
Download the Plex Media Server Package
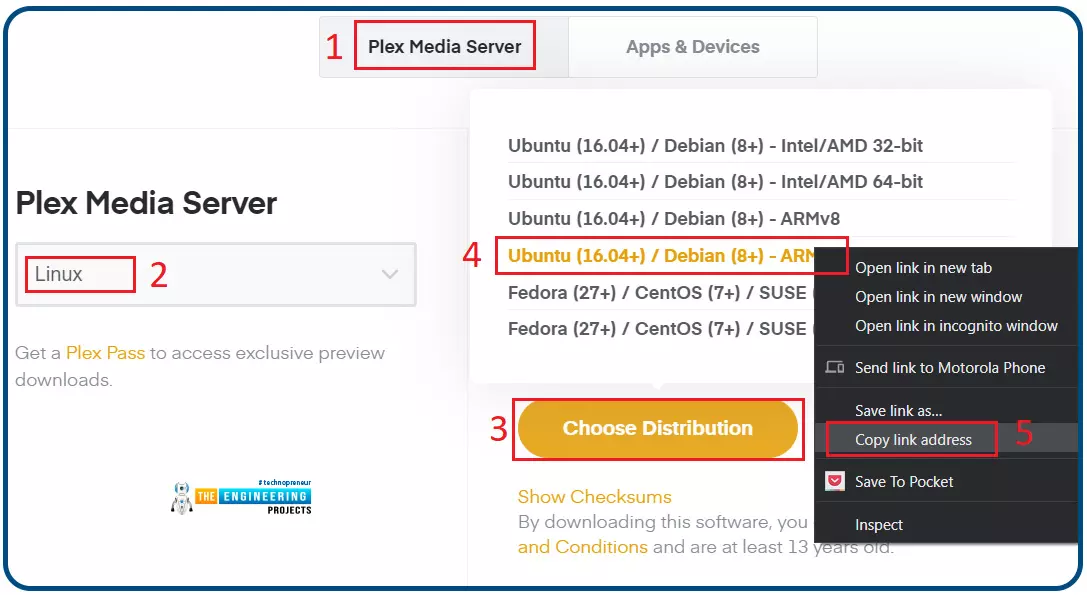
Choose Plex Media Server from the menu button of the official website, then Linux from the left-hand platform drop-down, and select the Choose Distribution button there.
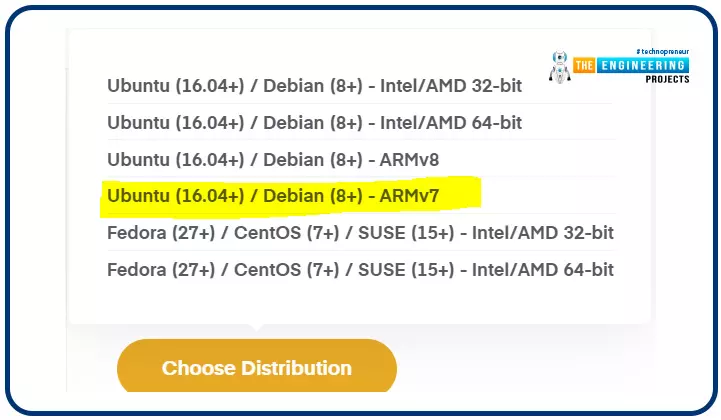
If you're looking for an ARMv7-based distribution, choose Ubuntu (16.04+) or Debian (8+), then save the image. Then follow the steps below to install.
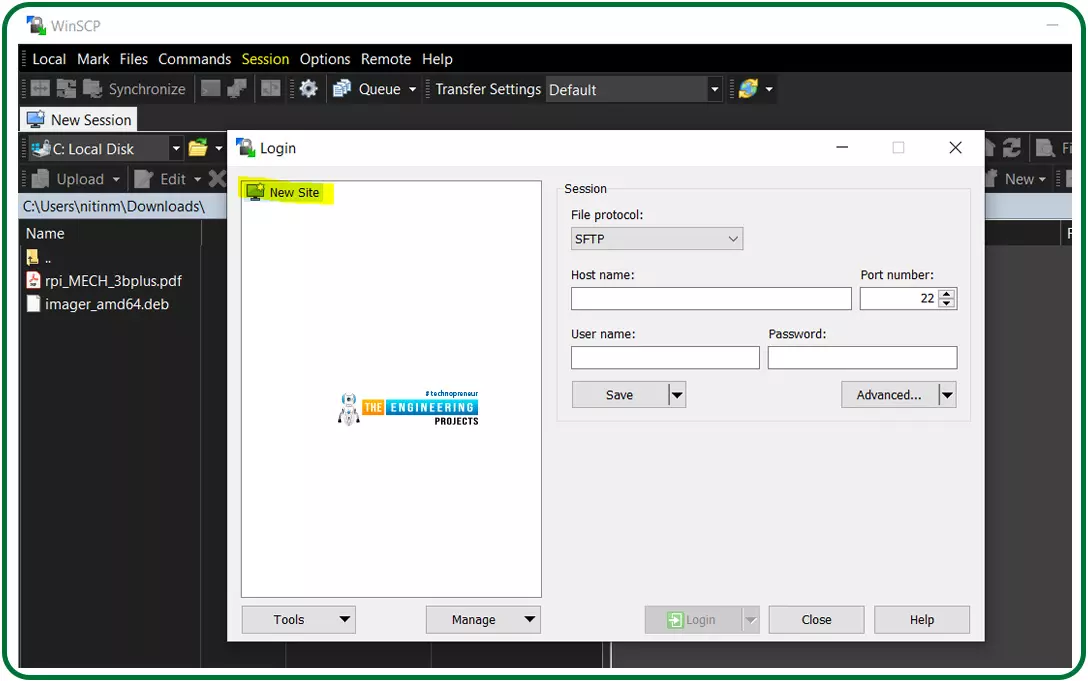
Method 1:Using the WinSCP utility on a Windows Pc.
Installing WinSCP is as simple as going to the official website and downloading the software. Run the program you downloaded and installed after it has finished downloading and installation.
- First, go to the Session > New Site option.
- File Transfer Protocol: SFTP
- Enter the hostname
- Enter username
- Enter password
- Login
Once you've logged in, you should see the local Computer system files on your left side and the Raspberry Pi system files on the other side.
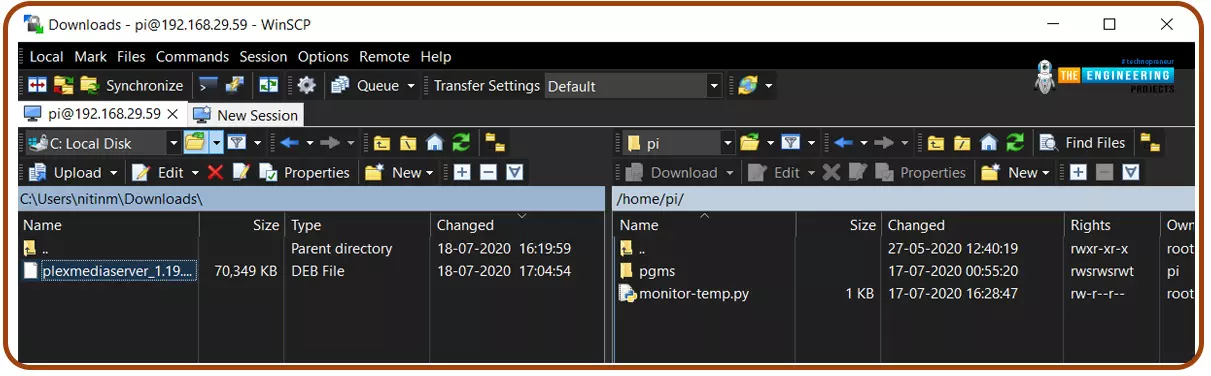
Locate the Plex Storage Server you already downloaded, right-click on it, and select Upload. On the raspberry home directory, the file will be stored there.
Method 2: Use a secure shell to access the wget command in raspberry pi.
Using a secure shell, you may download plex with the wget command from your Raspberry Pi. Direct access to the application file is required to download the entire package. Copy the link address of the application by right-clicking on it and selecting "Copy Link Address."
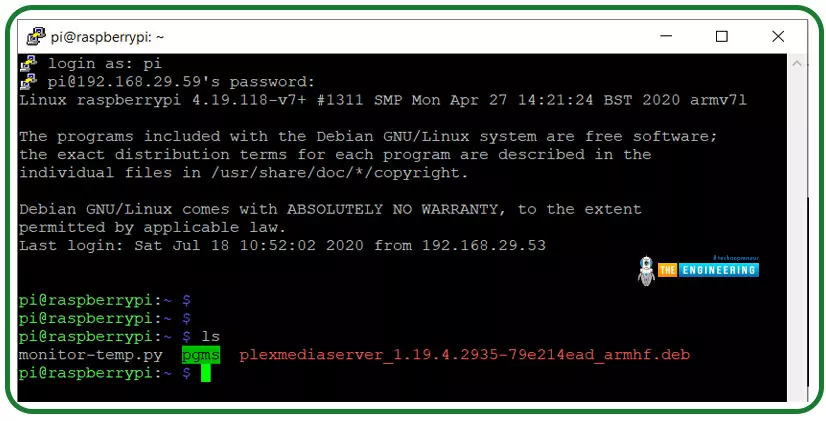
To download a specific package, run wget accompanied by the URL link and press return on your pi terminal.

The package is saved to the current working directory after downloading.
Install Plex on the Raspberry Pi
Connect to the Pi through a secure shell using PuTTY. You should be in the root directory. The program 'ls' output will reveal the file that was previously.
We'll now use the dpkg tool to complete the installation.

IMPORTANT: The filename must match exactly what appears in the secure shell terminal. The reference name of the command is just for illustrative purposes.
Press the return key then you'll be prompted for additional verification. Please accept them, and it'll be deployed as intended. Once the server has been set up, it may be found at:

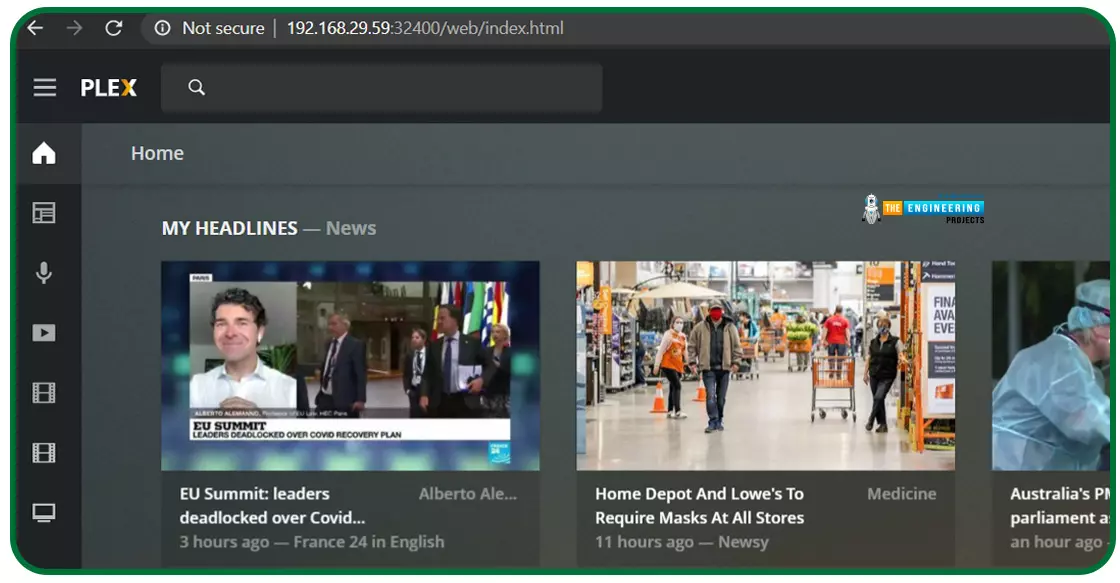
Whenever you launch the service for the first time, it will prompt you to check in to the Plex account. Once you've entered your username and password, the page should reroute to the local server.
Setting up an external HDD for use with Plex
The OS makes it more difficult to mount a hard drive in headless mode. Using this method, you should be able to get everything you need to get this working.
Use the following command to make a new directory in the media directory:

To make a copy of your system's /etc/fstab, type the command:

To identify the external HDD, type the command:

The name may differ if you're looking for the sda2 (/dev/sda2).
Type the command below to obtain the partition Block ID:


There is a LABEL to identify this drive and its type as NTFS, which you can see by looking at the printout. You may also get it as ext4, depending on the format.
The following command is used to modify the /etc/fstab file:

Insert this line in the file:

This UUID is the one that we acquired when we checked the id of the block in the steps above. Ntfs or ext4 should be the file system on the attached drive.
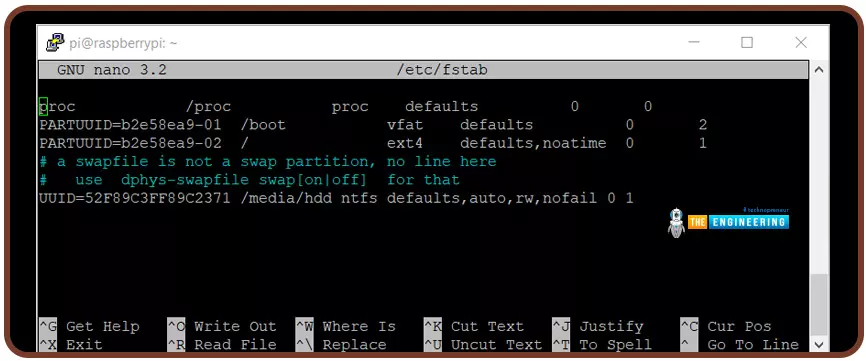
Hit Ctrl + O to save the file, followed by Ctrl + X to quit; the file is saved.
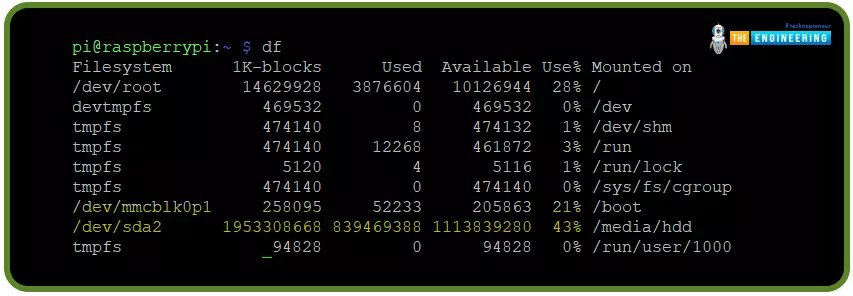
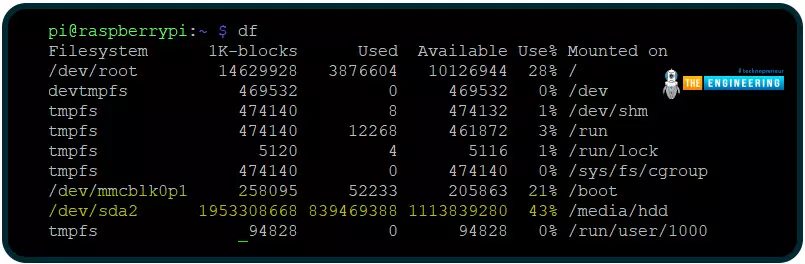
Reboot the Pi while the HDD is still plugged, and then run the df program once more to make everything work as it should. A working /media/HDD mount is still required.
If something goes wrong during this stage, getting the server up and running again will be more challenging.
How can we upload media to the Plex server?
The Plex app can is found on the Internet by browsing the following address:

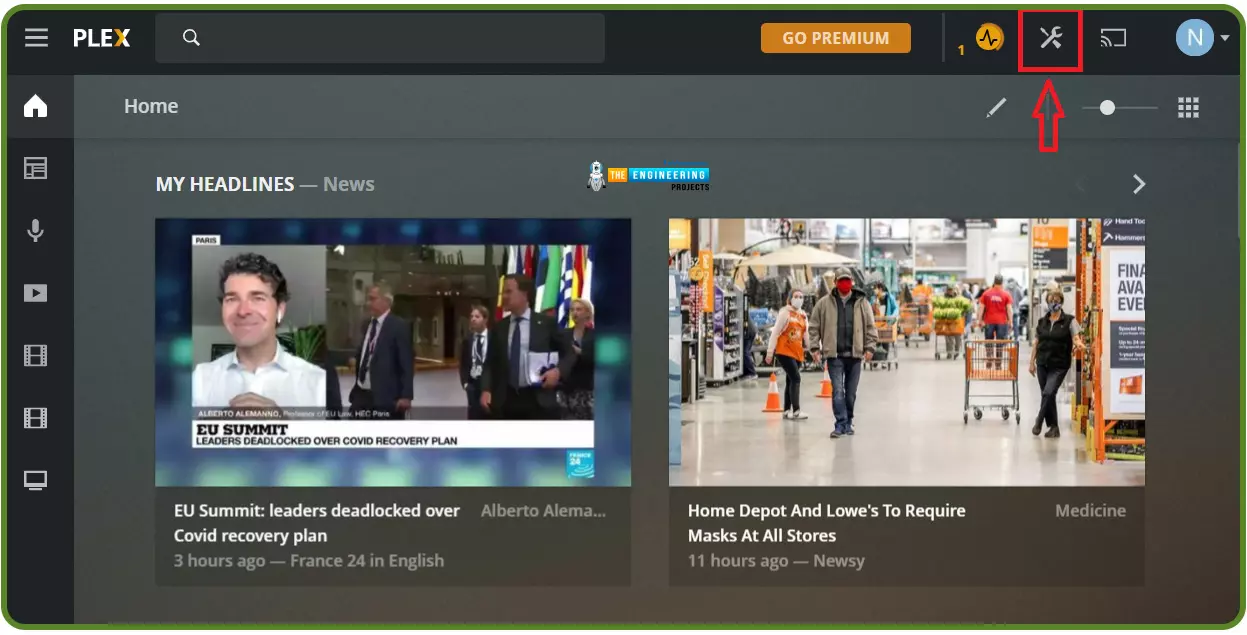
Then, click the settings button displayed below.
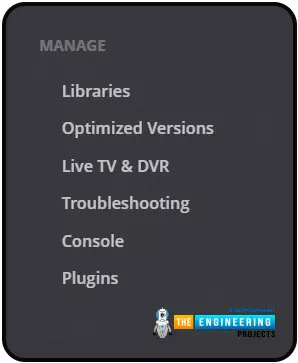
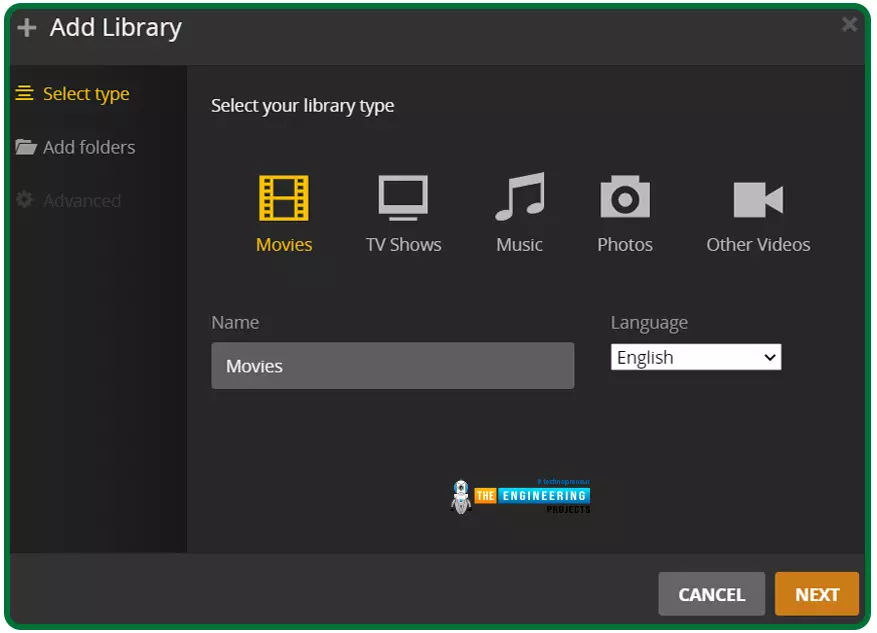
Navigate to MANAGE > LIBRARIES from the left menu. Libraries are now clearly visible. Select "Add Library" from the drop-down menu. You should now be able to select a media type from a new popup:
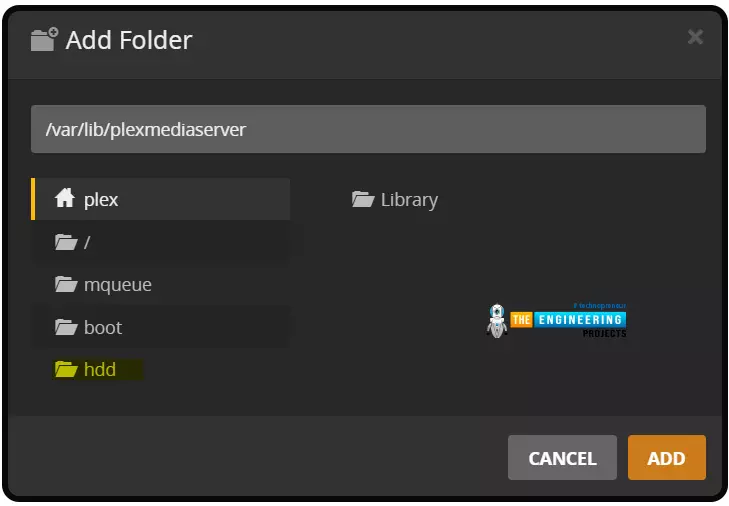
Click Next, then Browse for a Multimedia Folder to select the files you want to use. The hard drive will be as seen in the image below. To upload media, click Add and then choose the media directory from which you want to add it.
At this point, the service should begin searching for your files. Depending on the content and the volume of data in the folder, this could take a while to accomplish.
How can we stream on smart devices?
The server-side plex setup is now complete and operational. You can now choose from a variety of ways to consume your media.
- If you have a Smart TV, you can use the Plex client application for streaming. Get the plex application installed, and sign in. In your Wireless connection, the application will find the server for you. You can now begin streaming and listening to the files.
- You can download the mobile application from the google play store and log in with your details. The server on your local wireless network should be detected automatically by the application. Is it possible to begin viewing the media? However, it is required that you purchase either a plex pass or a one-time unlock the key to consume the multimedia files using your Android phone. If you expect to stream a lot, this is a good investment.
- If you have a desktop or laptop computer, you can access the application through the internet browser at:

You'll be able to watch movies, web series, and live TV through the client application and your local media files.
Conclusion
This tutorial taught us to set up a free media server on Raspberry Pi. It is now possible to stream and organize your media files attractive and portable manner. In the following tutorial, we will learn how to use a raspberry pi as a DNS server.