How to Setup a Web Server in Raspberry Pi 4?


Hello friends, I hope you all are doing great. Today, we are going to share the 2nd tutorial of Section-VIII in the Raspberry Pi Programming Course. In the previous tutorial, we interfaced a Barcode Scanner with Raspberry Pi 4. In today's tutorial, we will discuss how to set up a web server in raspberry pi. So, let's get started:
Components Required
We are going to use the following components, in today's project:
- Ethernet cable
- MicroSD card
- Keyboard
- Mouse
- HDMI cable
- Monitor
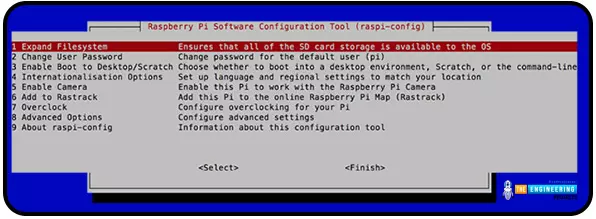
Expand FileSystem
When configuring a Raspberry Pi, select the expand FileSystem option to ensure that all of the Micro SD storage is allocated for the operating system and modify the default Pi passwords to protect your server from attackers.
On Your Raspberry Pi, Install a Web Server (Nginx)
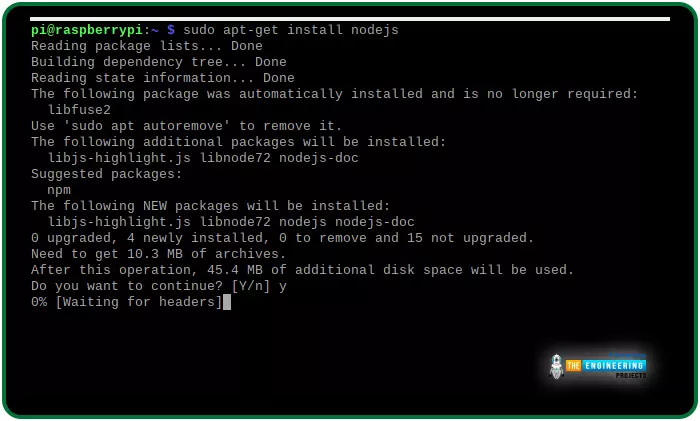
Next, we will install the web server. As a result of its minimal memory footprint and compatibility with Node.js, We use Nginx as our web server. Apache or Lighttpd web servers could also be used.
- Make sure your Pi is updated before you begin installing anything by executing the following commands:

- Apt-get can then be used to install Nginx:

- To start the server, enter the following command when the installation is complete:

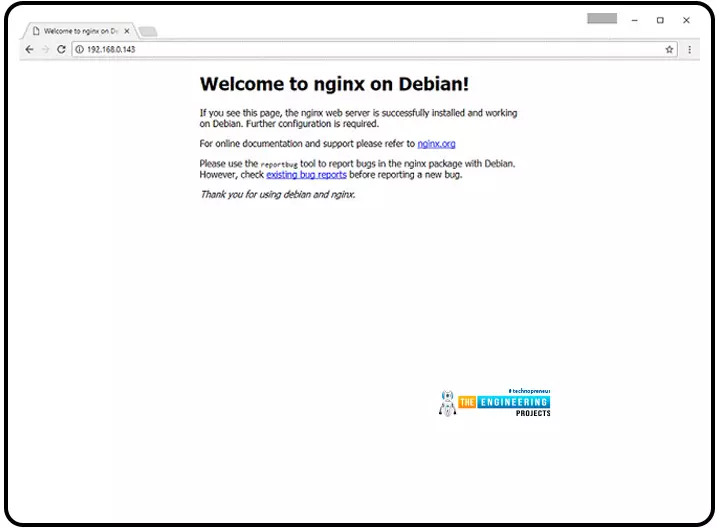
Run ifconfig to discover the IP address of your Rpi. Your ethernet adapter's output will be found under eth0.
After discovering the IP addresses, you can direct your browser to it and expect to receive the default Welcome message for Nginx.
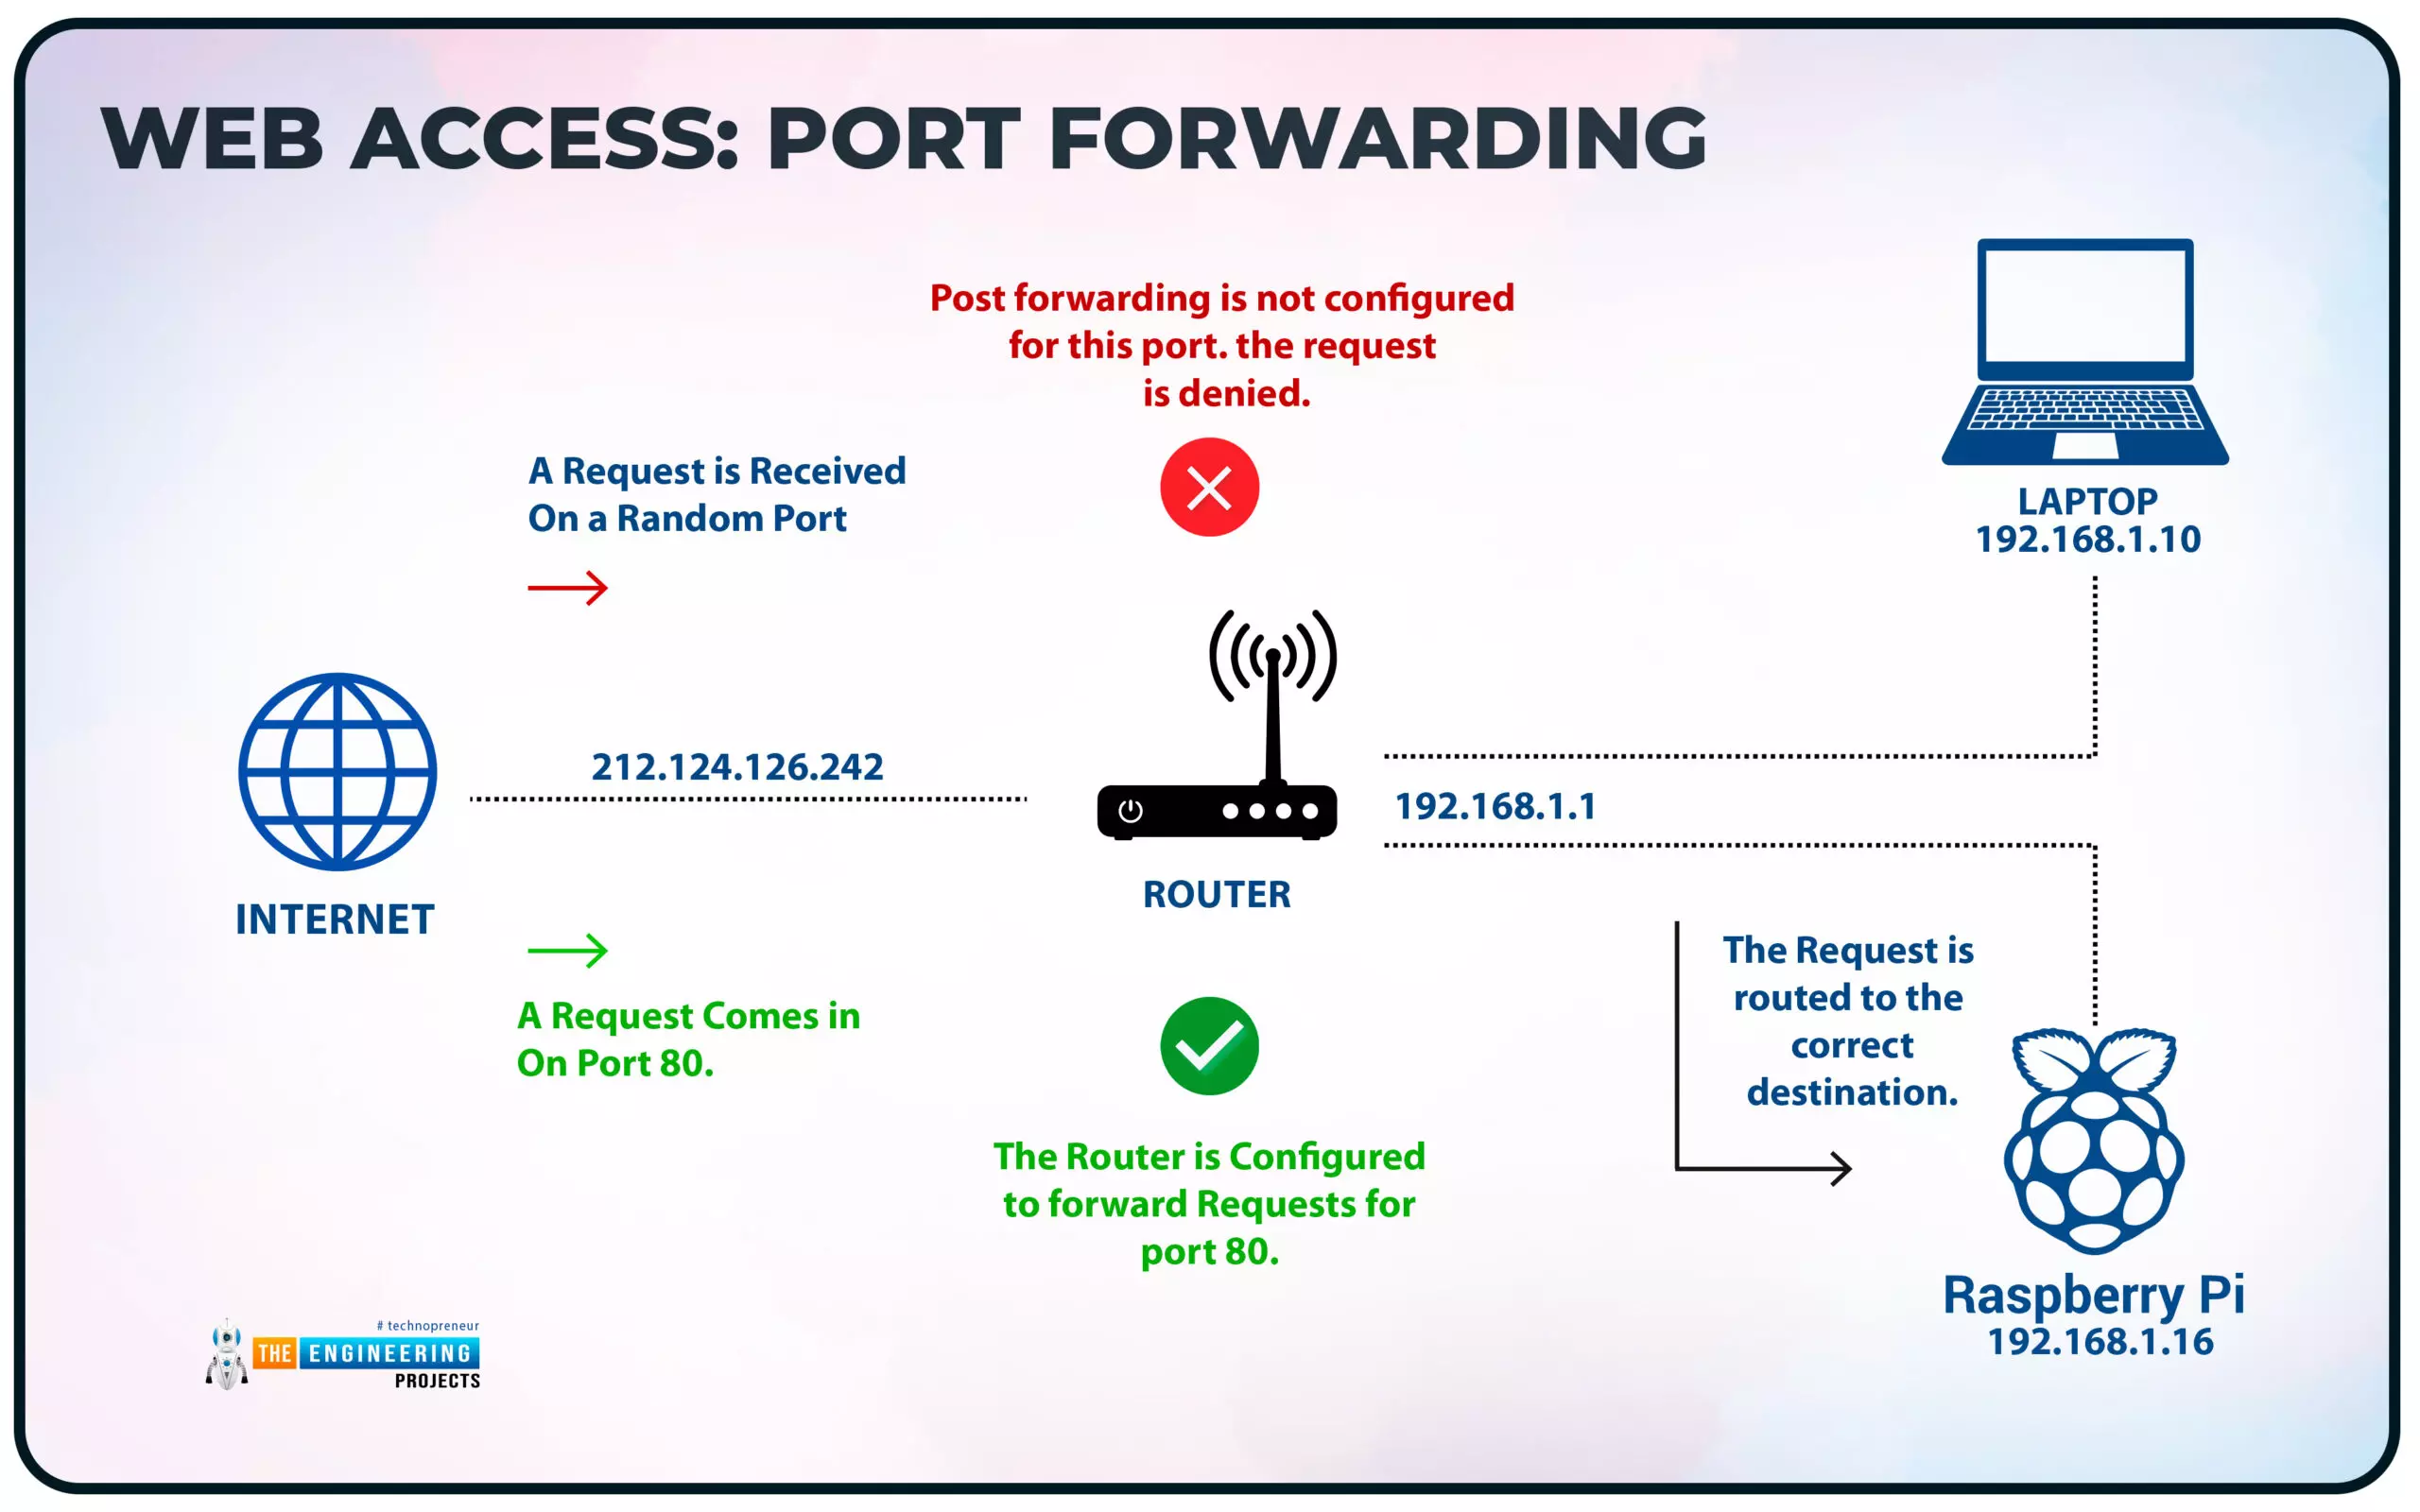
Web Access: Port Forwarding
If you don't intend to get access to your Raspberry Pi from elsewhere in your local area network, the following step is unnecessary. Those who wish to connect to their server from a different area should nevertheless be able to do so.
It is common for devices connected to a router in a domestic home networking environment to appear hidden from view. The external IP address of your network can only be used to access your router. Those devices can receive incoming traffic depending on your router's decision-making abilities.
As soon as you access a web page, the router understands that the response traffic is associated with that connection, and it will allow it through. It's possible to get around this by using a router that blocks incoming traffic that isn't part of a currently open connection (like whenever an external device tries to connect to a local device). This is a critical network safety precaution!
From the outside, how can you access your Pi's onboard network? What you need to do is to use port forwarding. Incoming connections on specific ports must be allowed to travel through the gateway and then sent to the specified device. Default by HTTP and SSH protocols use ports 80 and 22. Therefore, opening these ports in your router will enable users to access the web app and secure connections to manage the server.
Enable and forward a port on your gateway using the advanced configuration settings on the admin site. A simple search for "Forwarding," "Port Forwarding," or "Network Address Translation" will yield the results you need.
For Hypertext transfer protocol, one port must be opened, and a different port must be opened for secure shell protocol. The central concept is to have your Rasp Pi forward traffic addressed to the two ports: port 80 for Hypertext transfer protocol traffic and port 22 for Secure shell protocol traffic. Here's an illustration of what your router's setup page may look like if you applied this:
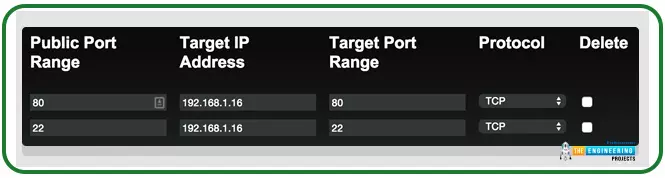
In case the IP address of your rasp pi is 192.168.1.16, you'll need to configure port forwarding. We use this address to forward all incoming connections to the Internet.
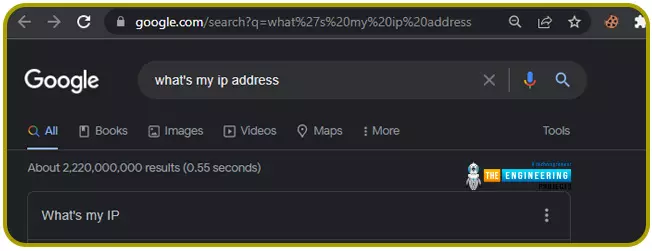
The external Internet address of your router can be found on Google by searching "what's my IP address."
Establish a Secure shell connection using the command below once you've left your router's network to confirm if forwarding is working.

Similarly, you may check for Hypertext transfer protocol forwarding by redirecting your web browser to the external IP address. However, it's essential to know that port forwarding lets anyone with knowledge of the external IP of your router access this port.
Static IPs aren't necessary with dynamic Domain name servers. It's a straightforward procedure. You can use your router to set up a dynamic Domain name server, or you can use a Raspberry Pi to do it.
How can we set up Dynamic DNS?
Install ddclient

Cloudflare's API is used to connect to the newest version of ddclient. After downloading directly from Sourceforge, we'll copy and paste the program.

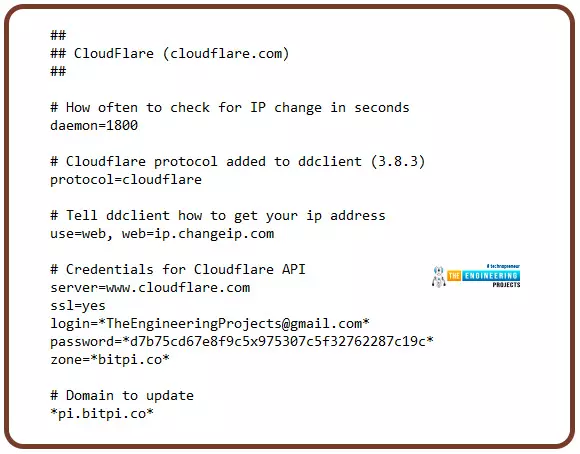
ddclient configuration for Cloudflare
To configure the Cloudflare protocol, we need to set up ddclient. Cloudflare details like our address, API secret and time zone, and records will be required to make the changes.

The values procured are as such:

Using the asterisks marks, we will alter the script with the change above:
We will test to ensure that our hostname is updated correctly. Here is the command we'll use:

The following notice will appear on our screens:

Full-Stack JavaScript Framework Installation
This section will teach you how to run JavaScript in a full-stack environment on Nginx. Installing Node.js and MongoDB is required to perform this.
Installing Node.js on a Raspberry Pi has never been easier.

Once the installation is complete, use Node -v to see if it's working.
You can now install MongoDB simply by entering the command:

To maintain database integrity, you must stop the service on the Raspberry Pi before you can turn the raspberry pi off.

Deploy your application
Developing an application locally and later pushing any modifications to a BitBucket repository is possible. The pre-installed version of Git on Raspberry pi 4 makes it easy to download and run your most recent program code.
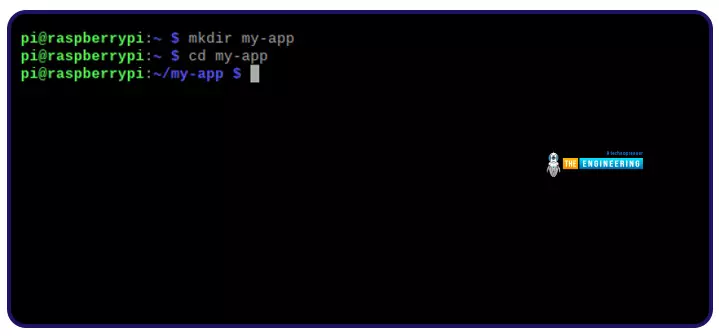
Scaffolding the Project
Let's create a Git repo and add some program code to it. We will start an application using the generator-angular-full stack, which scaffolds the server and client code.
This is how you get angular running on your computer:

A new directory is created for your application:

And then build the app:

Push the Code to the Repository.
The following instructions will walk you through setting up a BitBucket repository.
- To create a repository, you first need to visit the Bitbucket website and click the Create button.
- Select a repo for your workspace.
- Click on the Project menu or the "Create new project" button to begin a new task in your workflow.
- The uniform resource allocation of your repo will include the name you give it, so be creative! To minimize the size of the consistent resource allocation, make sure the name of your repo does not exceed 62 characters in length. A dash will be appended to the end of any non-alphanumeric characters in your repository name.
- If you don't want your repo to be accessible to the general public, you should set it to private.
- Do not include a README when you have files already existing in the repository. You can always use the default choice or choose one of the README alternatives.
- Choosing a version monitoring system is step seven. When in doubt, stick with Git as your default system.
- Create a new project by clicking the Create button.
Next, create a directory on your computer's hard drive:

As a result, the code can be committed and pushed:

The grunt-build-control tool is included with the generator to keep track of your builds. Add the BitBucket config to Gruntfile.js in the root folder of your app:

Create a folder for distribution by running the following command:

The code should be committed and pushed to your repository's build branch.

Create a secure shell Key
Your code is already on a server for your convenience. You will require a secure shell key for your Raspberry before using it on your BitBucket account for deployment. As a result, login to the Raspberry desktop and generate a public/private key from the terminal:

Afterward, launch the agent:

Also, provide the agent with the key:

Now you need to output the content of the public key:

Now copy and paste it into BitBucket.
Configure your BitBucket account by clicking on your profile image. Click on the Add keys tab under the SSH section of SECURITY.Repository Cloning
A /var/www folder can serve as a place to store all of your application's code, but it's not a necessity.

To eliminate the need for sudo, you can make your Raspberry user the owner and www-data the group when you place the files inside the webroot:

Cloning your repo build branch and installing the required dependencies is now possible.

Now you may launch your application in production mode:

Open a web browser and type in the device's Internet protocol address to see if it works.
Nginx Reverse Proxy configuration
One final step must be taken before the application can be accessed from the outside world. Even though Nginx listens on port 80 to receive Hypertext transfer protocol requests for your Raspberry Pi, the Node app will be listening on another port. Configure Nginx to reverse proxy to recognize requests for your app and pass them forward to Node.
The sites-available subdirectory is where Nginx stores the configuration files for all of the applications it serves:

Download and modify the config file from here.

With Nginx set as a server proxy, the finished config file will look like the following:

Creating a symlink inside the sites-enabled directory where Nginx searches for activated configurations during runtime is required to enable this config.

To make these modifications effective, you must reload the service.

As a result of the server "name my-app.dev" command you specified earlier, your app is now available to receive hypertext transfer protocol traffic addressed to the my-app.dev domain. You must now figure out how to make the traffic you transmit from outside this domain name resemble this domain name as your final challenge. The host file eliminates the need to purchase a domain and link it to your Internet address.
The external Internet address of your router should be entered on the workbench from which you intend to visit the site, and the host my-app.dev should be entered in the same place. The correct domain name will be included in the Host hypertext transfer protocol header in any HTTP communication you send to my-app.dev.
Output
If you want to keep the servers running, you can install pm2 on your Raspberry Pi, and In the event of an error, you can erase the MicroSD card and start over.
What are the advantages of the Raspberry pi webserver?
A JavaScript application can be accessed beyond your network since deployment is possible on your new home development server.
Managing the equipment you use for development while working from far is a huge benefit.
What are the applications of a webserver?
PI Server Applications' responsibility is to gather, store, and retrieve mathematical and text data.
Engineers can analyze and evaluate the entire plant with the help of this Software. It all begins with the PI Server Applications. Numbers and strings are all handled by computers in the same way: collected, stored, and retrieved. Additionally, the PI Information Archive serves as a data provider for Windows-based apps used by researchers, engineering teams, and other plant staff to access the plant data contained in the Archive's database. In most cases, the PI Servers Application runs on a network of computers running different software packages.
The following are some examples of PI Server Applications:
- Core Subsystem
- PI-Data Archives
- Point Database Subsystems
- Update Managers
- Snapshot Subsystems
- Subroutines
- PI-Network Managers
- Performance Equations Schedulers
Conclusion
This tutorial taught us to set up a webserver in our Raspberry pi. We also learned how to configure and create a repository for our app and deploy it. However, In the following tutorial, we will learn how to use a raspberry pi as a media server.