Smart Attendance System using RFID with Raspberry Pi 4


First, we will design a database for our website, then we will design the RFID circuit for scanning the student cards and displaying present students on the webpage, and finally, we will design the website that we will use to display the attendees of a class.
Components
- RFID card kit
- Breadboard
- Jumper wires
- Raspberry pi 4
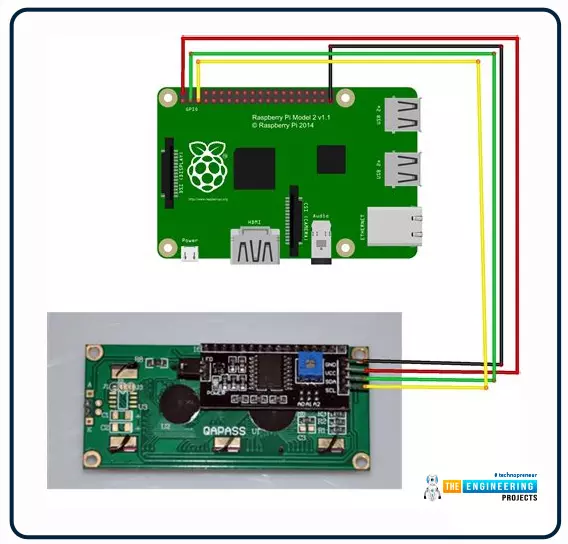
- I2C LCD screen
Design a database in MySQL server
Additionally, the Database server offers a DBMS that can be queried and connected to and can integrate with a wide range of platforms. High-volume production environments are no problem for this software. The server's connection, speed, and encryption make it a good choice for accessing the database.
There are clients and servers for MySQL. This system contains a SQL server with many threads that support a wide range of back ends, utility programs, and application programming interfaces.
We'll walk through the process of installing MySQL on the RPi in this part. The RFID kit's database resides on this server, and we'll utilize it to store the system's signed users.
There are a few steps before we can begin installing MySQL on a Raspberry Pi. There are two ways to accomplish this.

sudo apt update
sudo apt upgrade
Installing the server software is the next step.
Here's how to get MySQL running on the RPi using the command below:

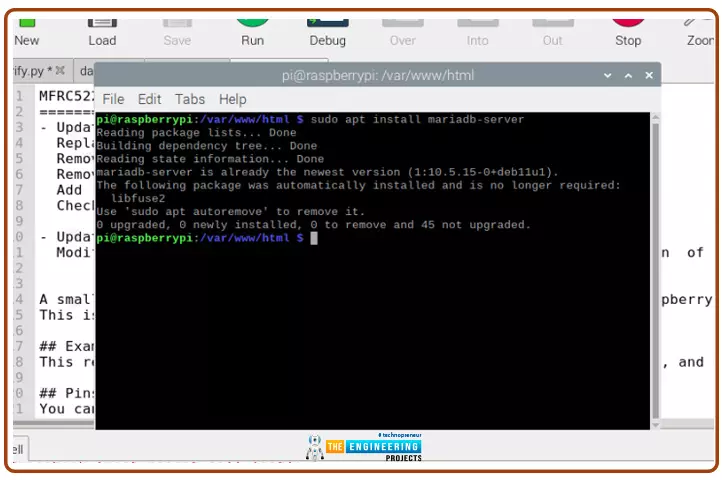
sudo apt install MariaDB-server
Having installed MySQL on the Raspberry Pi, we'll need to protect it by creating a passcode for the "root" account.
If you don't specify a password for your MySQL server, you can access it without authentication.
Using this command, you may begin safeguarding MySQL.

sudo mysql_secure_installation
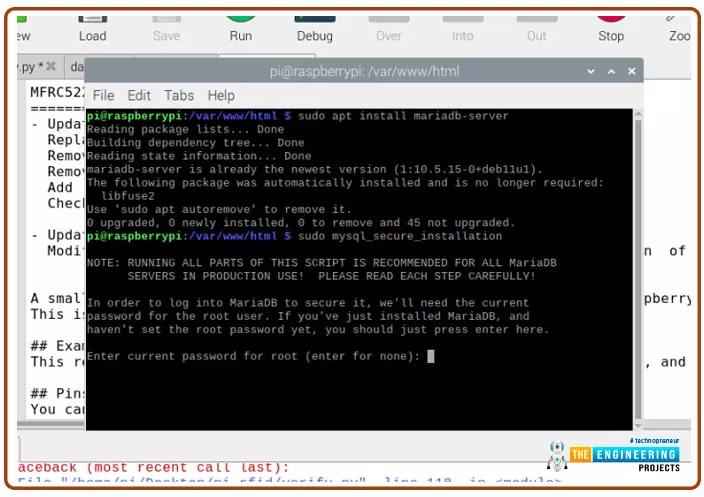
Follow the on-screen instructions to set a passcode for the root account and safeguard your MySQL database.
To ensure a more secured installation, select "Y" for all yes/no questions.
Remove elements that make it easy for anyone to access the database.
We may need that password to access the server and set up the database and user for applications like PHPMyAdmin.
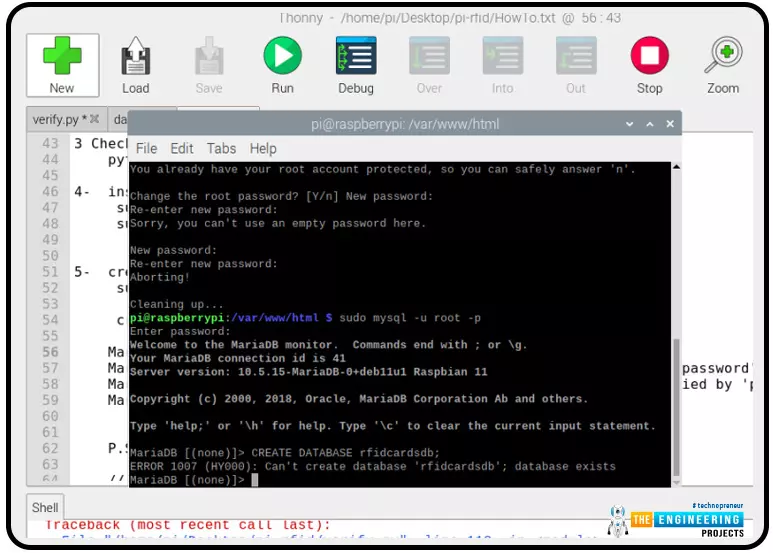
For now, you can use this command if you wish to access the Rpi's MySQL server and begin making database modifications.

sudo MySQL –u root -p
To access MySQL, you'll need to enter the root user's password, which you created in Step 3.
Note: Typing text will not appear while typing, as it does in typical Linux password prompts.
Create, edit, and remove databases with MYSQL commands now available. Additionally, you can create, edit, and delete users from inside this interface and provide them access to various databases.
After typing "quit;" into MySQL's user interface, you can exit the command line by pressing the ESC key.
Pressing CTRL + D will also exit the MYSQL command line.
You may proceed to the next step now that you've successfully installed MySQL. In the next few sections, we'll discuss how to get the most out of our database.
Creating database and user
The command prompt program MySQL must be restarted before we can proceed with creating a username and database on the RPi.
The MySQL command prompt can be accessed by typing the following command. After creating the "root" user, you will be asked for the password.

To get things started, run the command to create a MySQL database.
The code to create a database is "CREATE DATABASE", and then the name we like to give it.
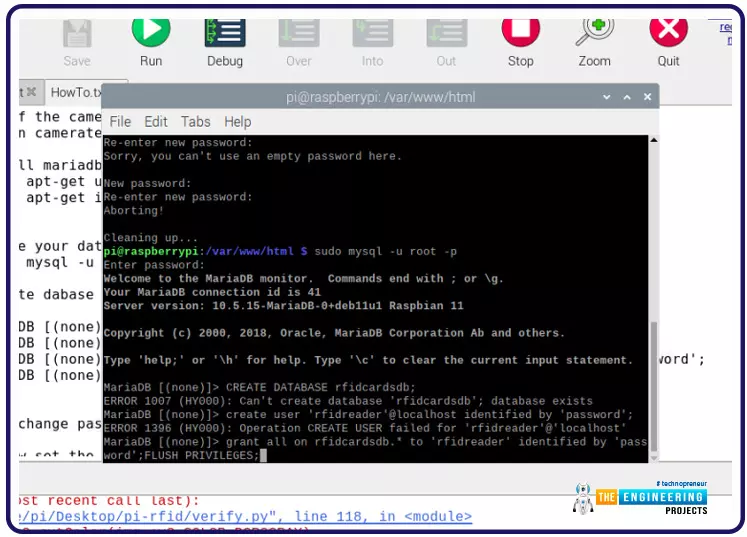
This database would be referred to as "rfidcardsdb" in this example.
To get started, we'll need to create a MySQL user. The command below can be used to create this new user.
"rfidreader" and "password" will be the username and password for this example. Take care to change these when making your own.

create user “rfidreader" @localhost identified by "password."
We can now offer the user full access to the database after it has been built.
Thanks to this command, " "rfidreader" will now have access to all tables in our "rfidcardsdb" database.
grant all on rfidcardsdb.* to "rfidreader" identified by "password."
We have to flush the permission table to complete our database and user set up one last time. You cannot grant access to the database without flushing your privilege table.
The command below can be used to accomplish this.
Now we have our database configured, and now the next step is to set up our RFID circuit and begin authenticating users. Enter the “Exit” command to close the database configuration process.
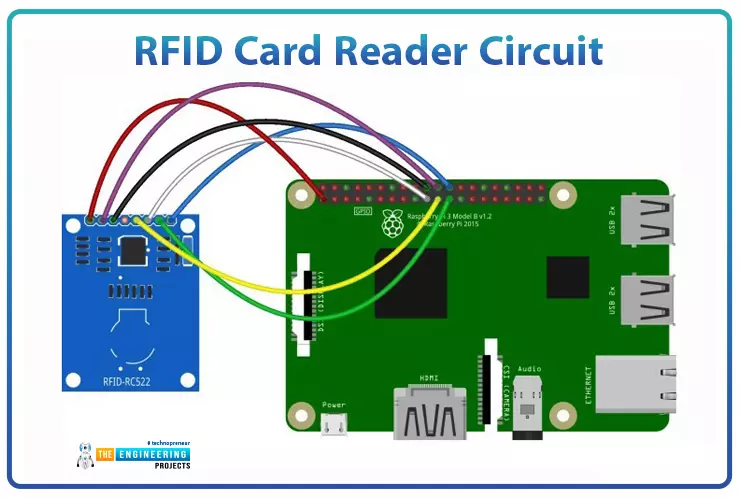
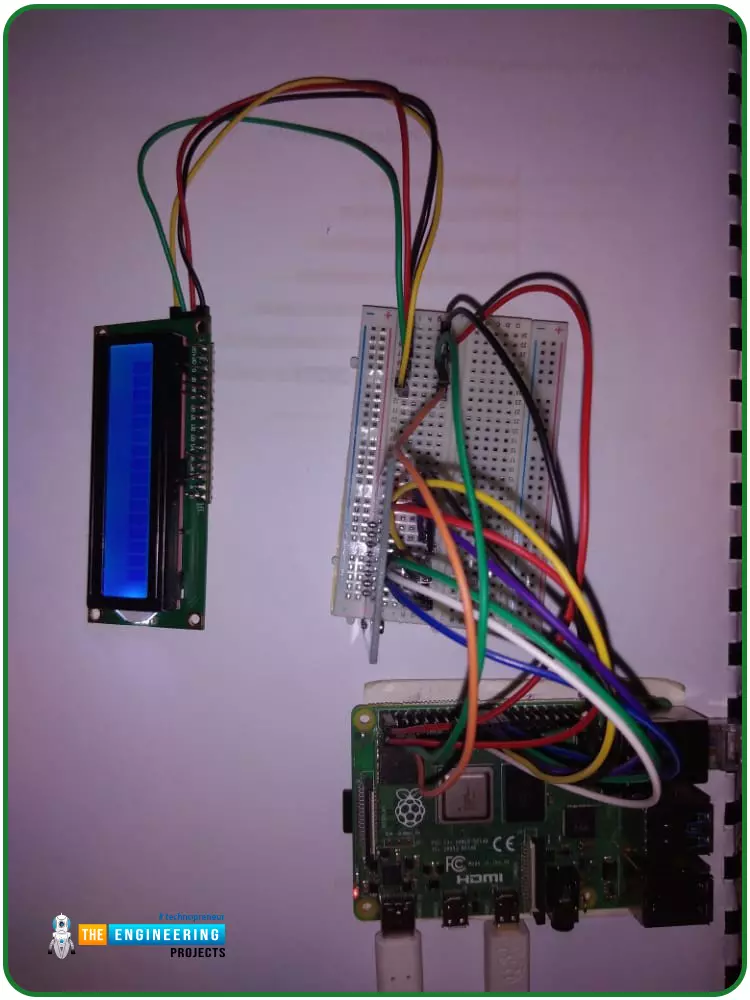
The RFID card circuit

An RFID reader reads the tag's data when a Rfid card is attached to a certain object. An RFID tag communicates with a reader via radio waves.
In theory, RFID is comparable to bar codes in that it uses radio frequency identification. While a reader's line of sight to the RFID tag is preferable, it is not required to be directly scanned by the reader. You can't read an RFID tag that is more than three feet away from the reader. To quickly scan a large number of objects, the RFID tech is used, and this makes it possible to identify a specific product rapidly and effortlessly, even if it is sandwiched between several other things.
HOW RFID CARD READERS AND WRITERS WORK
There are major parts to Cards and tags: an IC that holds the unique identifier value and a copper wire that serves as the antenna:
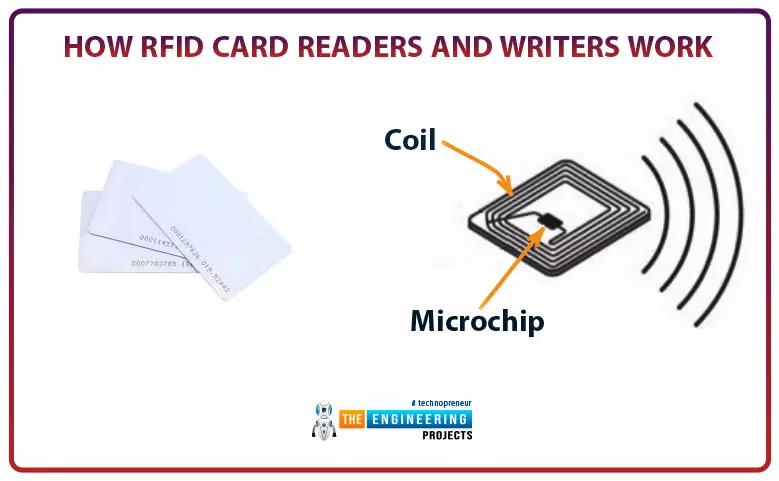
Another coil of copper wire can be found inside the RFID card reader. When current passes through this coil, it generates a magnetic field. The magnetic flux from the reader creates a current within the wire coil whenever the card is swiped near the reader. This amount of current can power the inbuilt IC of the Card. The reader then reads the card's unique identifying number. For further processing, the card reader transmits the card's unique identification number to the controller or CPU, such as the Raspberry Pi.
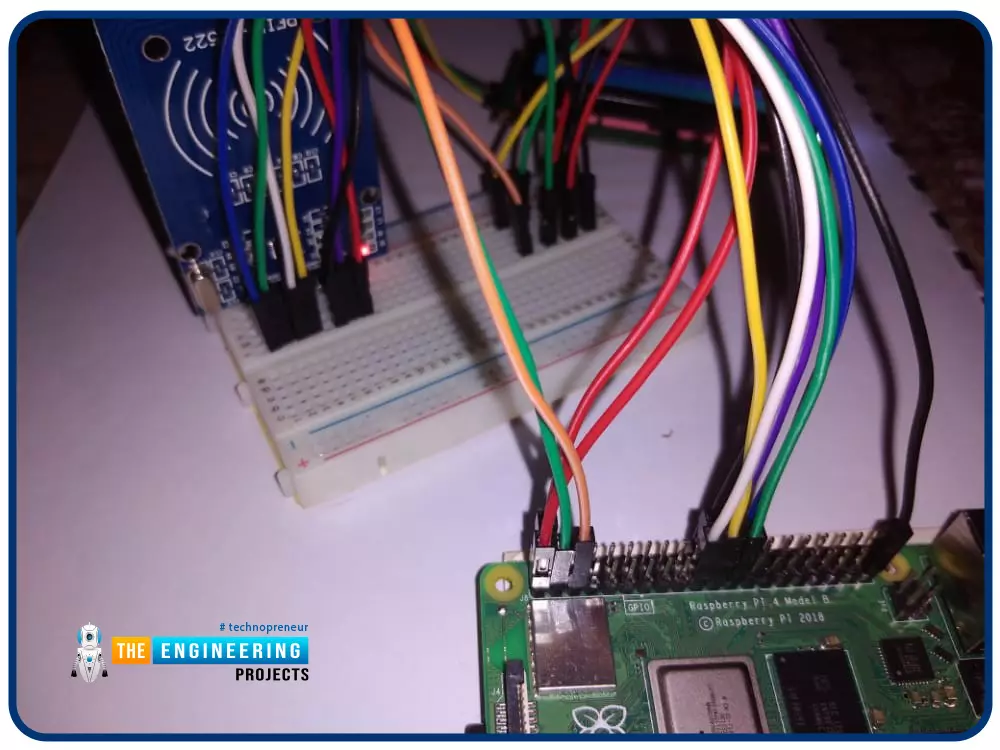
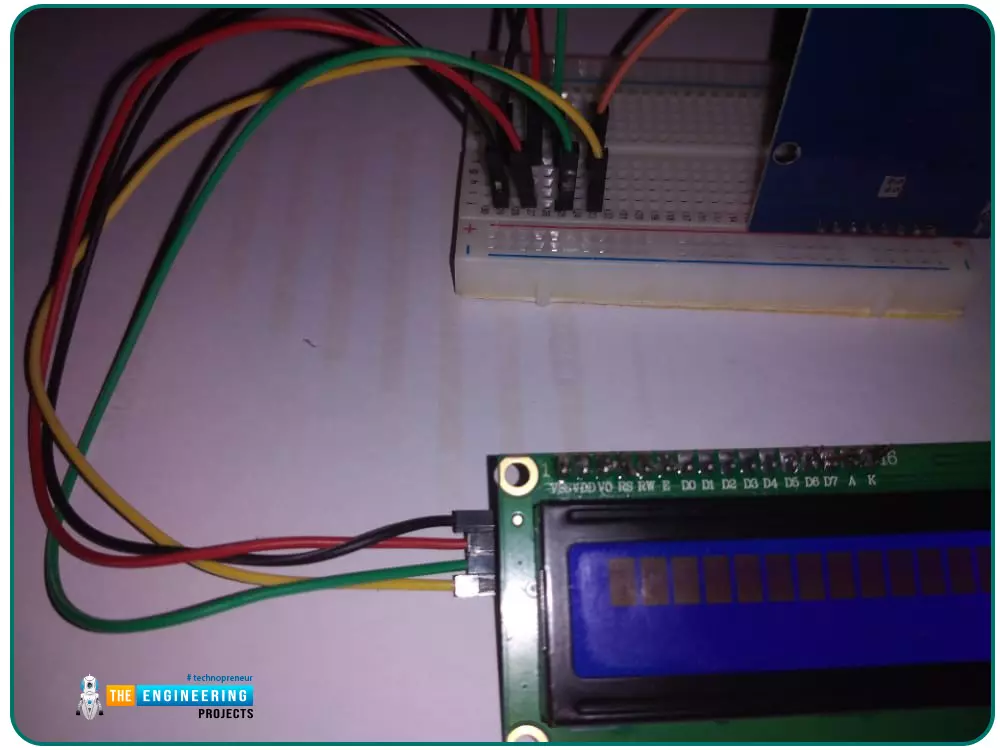
RFID card reader circuit
Connect the reader to the Raspberry the following way:
use the code spi bcm2835 to see if it is displayed in the terminal.
lsmod | grep spi

SPI must be enabled in the setup for spi bcm2835 to appear (see above). Make sure that RPi is running the most recent software.
Make use of the python module.

sudo apt-get install python
The RFID RC522 can be interacted with using the Library SPI Py, found on your RPi.
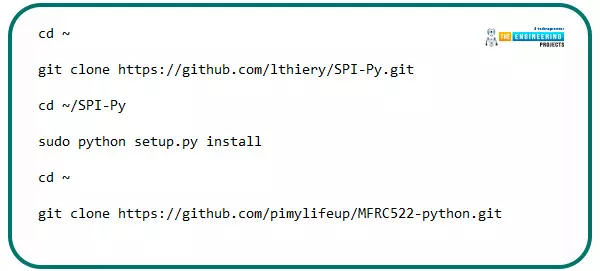
cd ~
git clone https://github.com/lthiery/SPI-Py.git
cd ~/SPI-Py
sudo python setup.py install
cd ~
git clone https://github.com/pimylifeup/MFRC522-python.git
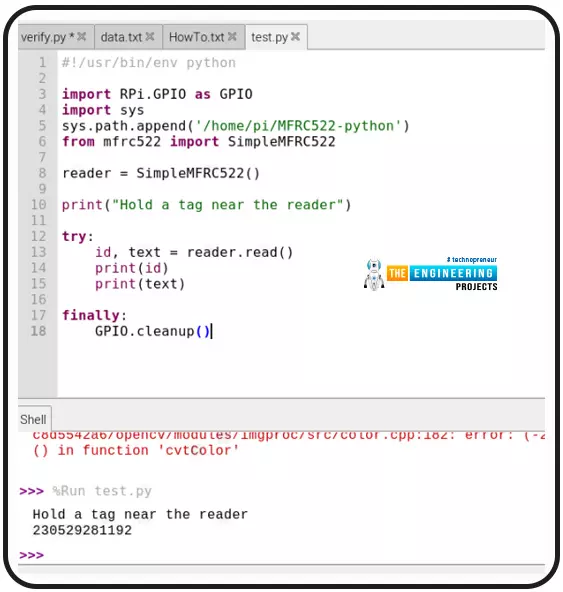
To test if the system is functioning correctly, let's write a small program:
cd ~/
sudo nano test.py
now copy the following the code into the editor
import RPi.GPIO as GPIO
import sys
sys.path.append('/home/pi/MFRC522-python')
from mfrc522 import SimpleMFRC522
reader = SimpleMFRC522()
print("Hold a tag near the reader")
try:
id, text = reader.read()
print(id)
print(text)
finally:
GPIO.cleanup()
Register card
Here we will write a short python code to register users whenever they swipe a new card on the RFID card reader. First, create a file named addcard.py.

copy the following code.
import pymysql
import cv2
from mfrc522 import SimpleMFRC522
import RPi.GPIO as GPIO
import drivers
display = drivers.Lcd()
display.lcd_display_string('Scan your', 1)
display.lcd_display_string('card', 2)
reader = SimpleMFRC522()
reader = SimpleMFRC522()
id, text = reader.read()
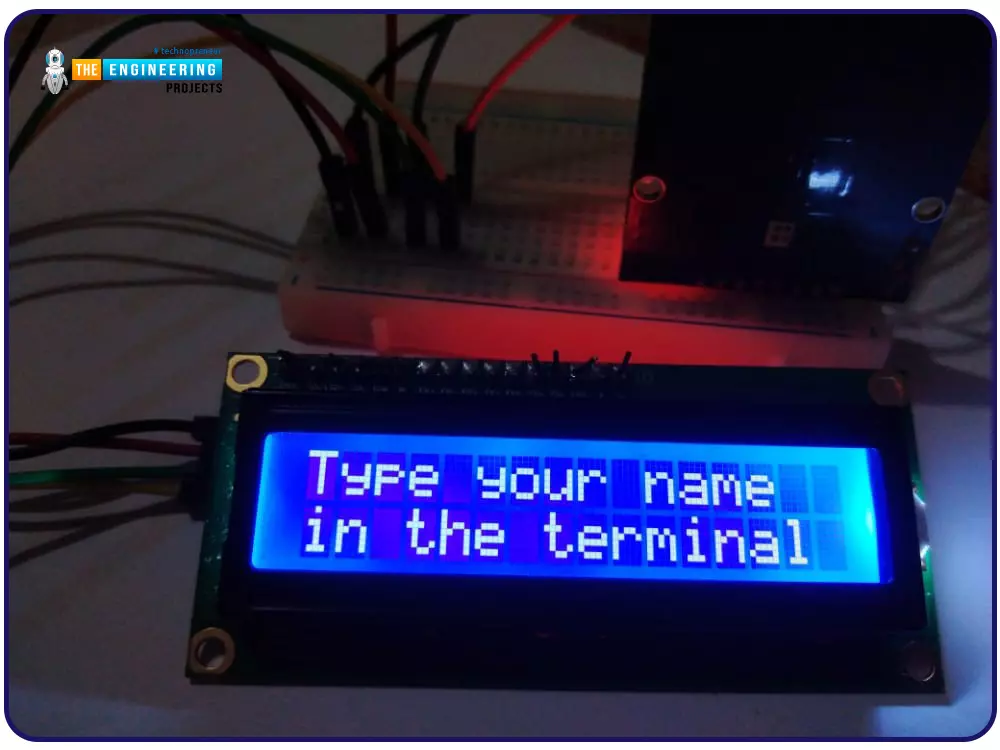
display = drivers.Lcd()
display.lcd_display_string('Type your name', 1)
display.lcd_display_string('in the terminal', 2)
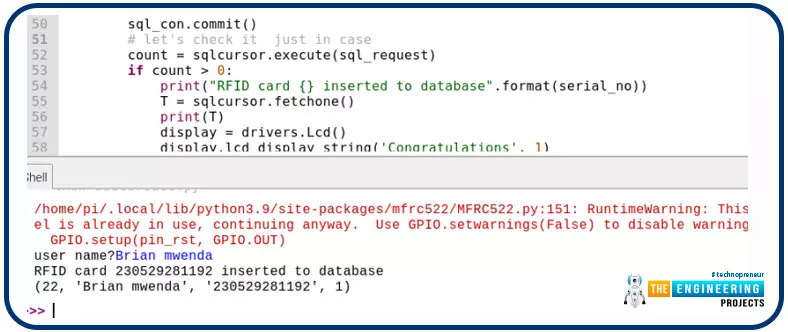
user_id = input("user name?")
# put serial_no uppercase just in case
serial_no = '{}'.format(id)
# open an sql session
sql_con = pymysql.connect(host='localhost', user='rfidreader', passwd='password', db='rfidcardsdb')
sqlcursor = sql_con.cursor()
# first thing is to check if the card exist
sql_request = 'SELECT card_id,user_id,serial_no,valid FROM cardtbl WHERE serial_no = "' + serial_no + '"'
count = sqlcursor.execute(sql_request)
if count > 0:
print("Error! RFID card {} already in database".format(serial_no))
display = drivers.Lcd()
display.lcd_display_string('The card is', 1)
display.lcd_display_string('already registered', 2)
T = sqlcursor.fetchone()
print(T)
else:
sql_insert = 'INSERT INTO cardtbl (serial_no,user_id,valid) ' + \
'values("{}","{}","1")'.format(serial_no, user_id)
count = sqlcursor.execute(sql_insert)
if count > 0:
sql_con.commit()
# let's check it just in case
count = sqlcursor.execute(sql_request)
if count > 0:
print("RFID card {} inserted to database".format(serial_no))
T = sqlcursor.fetchone()
print(T)
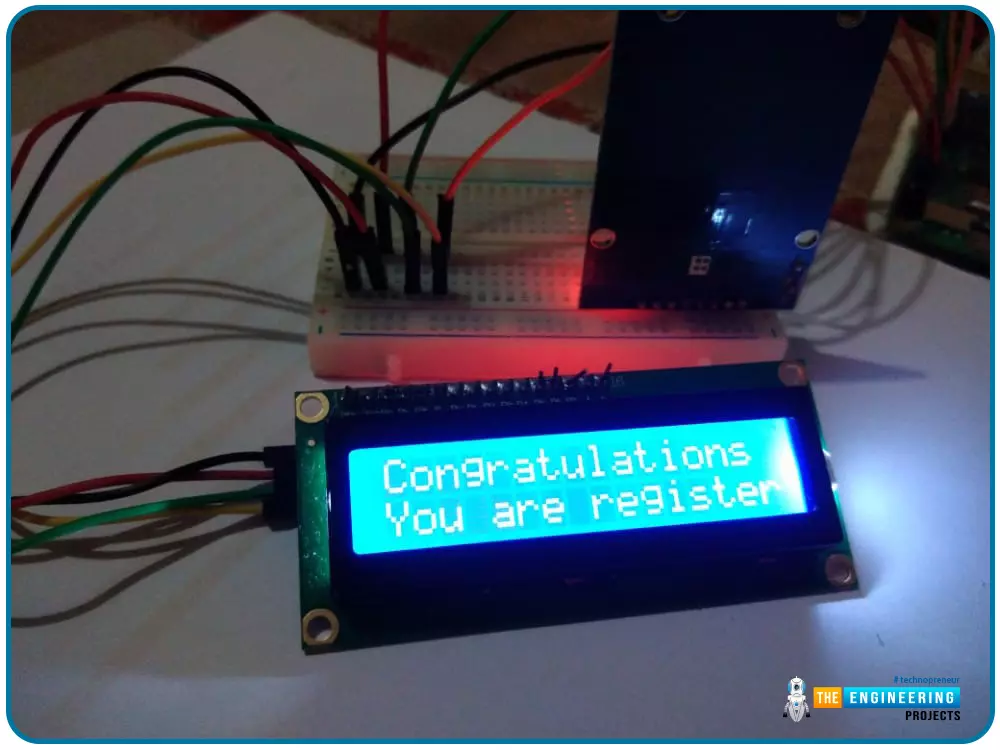
display = drivers.Lcd()
display.lcd_display_string('Congratulations', 1)
display.lcd_display_string('You are registered', 2)
GPIO.cleanup()
The program starts by asking the user to scan the card.
Then it connects to the database using the pymysql.connect function.
If we enter our name successfully, the program inserts our details in the database, and a congratulations message is displayed to show that we are registered.
Creating the main system
Using the LCD command library, you can:
- Install git
sudo apt install git
- Download and install the repo on your Raspberry Pi.
cd /home/pi/
git clone https://github.com/the-raspberry-pi-guy/lcd.git
cd lcd/
- Then begin installation with the following
sudo ./install.sh
After installation is complete, try running one of the program files
cd /home/pi/lcd/
Next, we will install the mfrc522 library, which the RFID card reader uses. This will enable us to read the card number for authentication. We will use:
Pip install mfrc522
Next, we will import the RPI.GPIO library enables us to utilize the raspberry pi pins to power the RFID card and the LCD screen.
Import RPi.GPIO
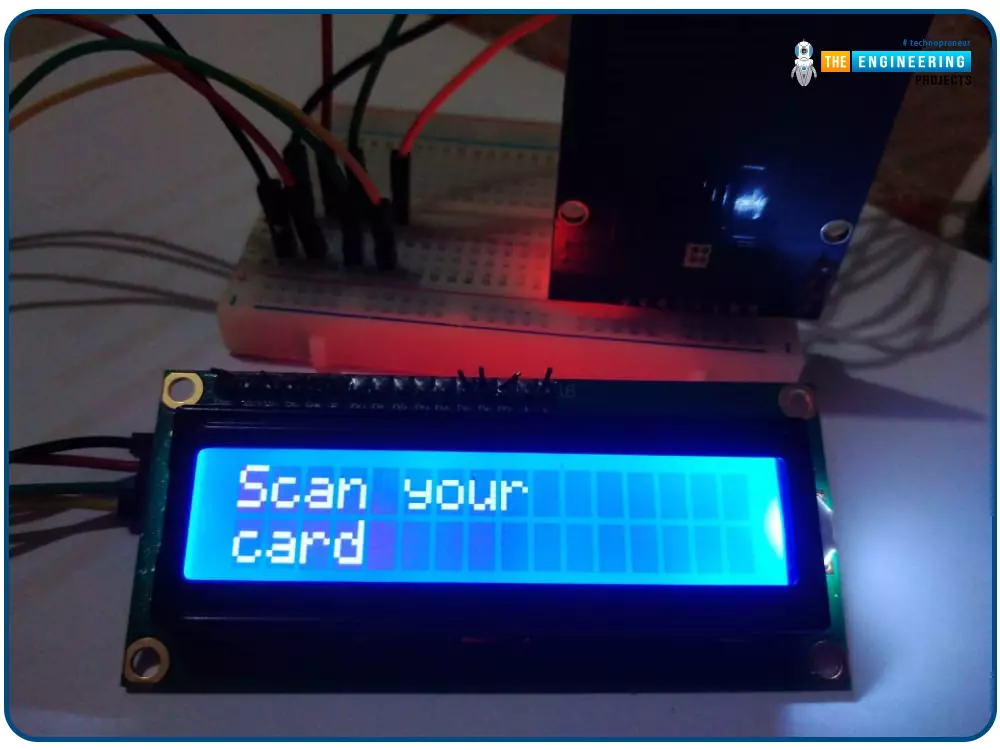
We will also import the drivers for our LCD screen. The LCD screen used here is the I2C 16 * 2 LCD.
Import drivers
Then we will import DateTime for logging the time the user has swiped the card into the system.
Import DateTime

In order to read the card using the rfid card, we will use the following code:
reader = SimpleMFRC522()
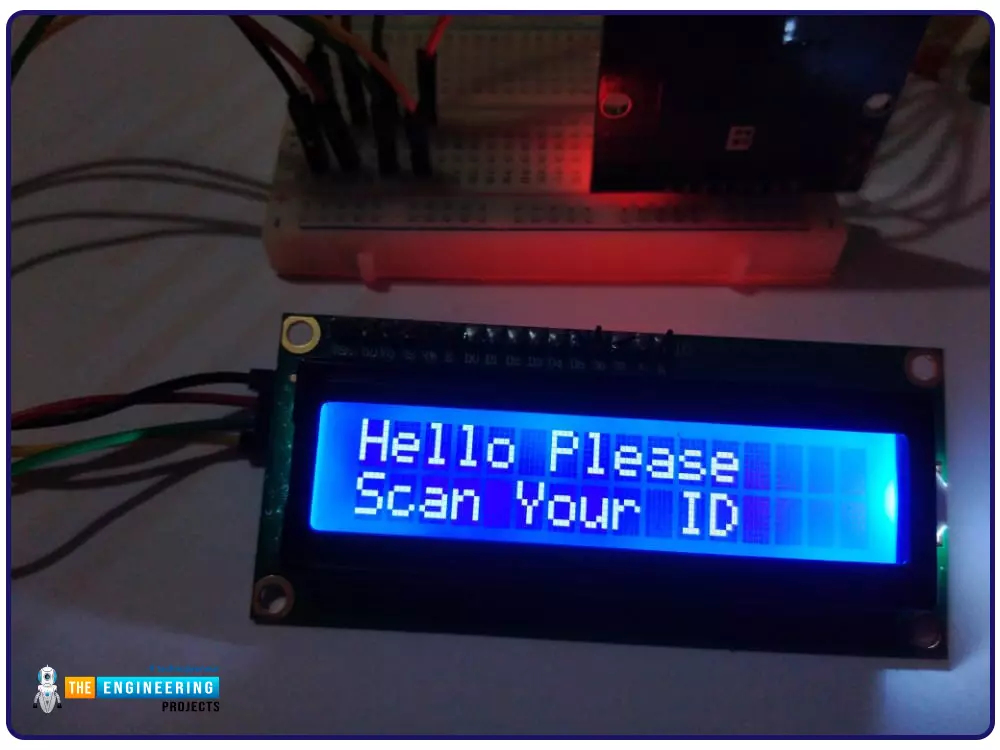
display = drivers.Lcd()
display.lcd_display_string('Hello Please', 1)
display.lcd_display_string('Scan Your ID', 2)
try:
id, text = reader.read()
print(id)
display.lcd_clear()
finally:
GPIO.cleanup()
The LCD is divided into two rows, 1 and 2. To display text in the first row, we use:
Display.lcd_display_string(“string”,1)
And 2 to display in the second row.

After scanning the card, we will connect to the database we created earlier and search whether the scanned card is in the database or not.
If the query is successful, we can display if the card is in the database; if not, we can proceed, then the user needs to register the card.

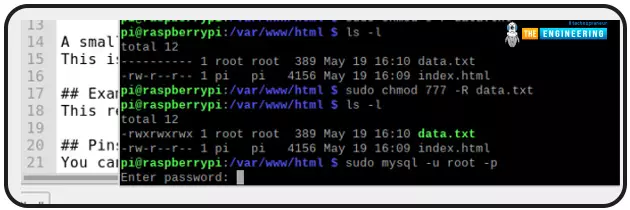
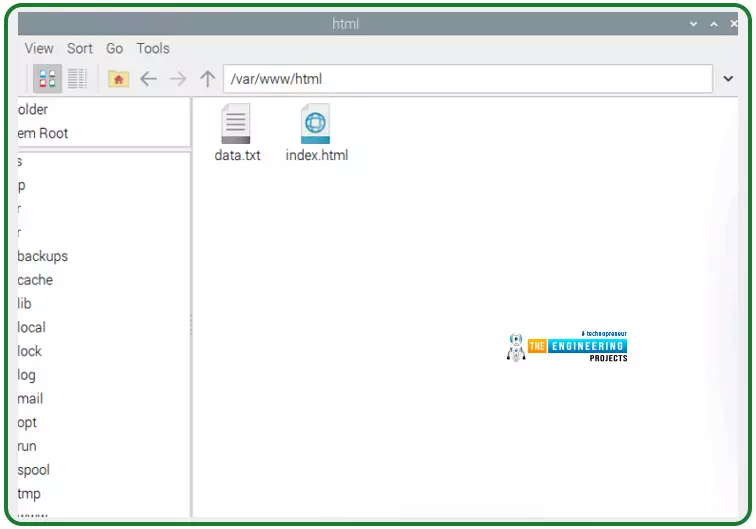
If the user is registered, the system saves the logs, the username and the time the card was swapped in a text file located in the/var/www/html root directory of the apache server.
Note that you will need to be a superuser to create the data.txt file in the apache root directory. For this, we will use the following command in the Html folder:
Sudo touch data.txt
Then we will have to change the access privileges of this data.txt file to use the program to write the log data. For this, we will use the following code:
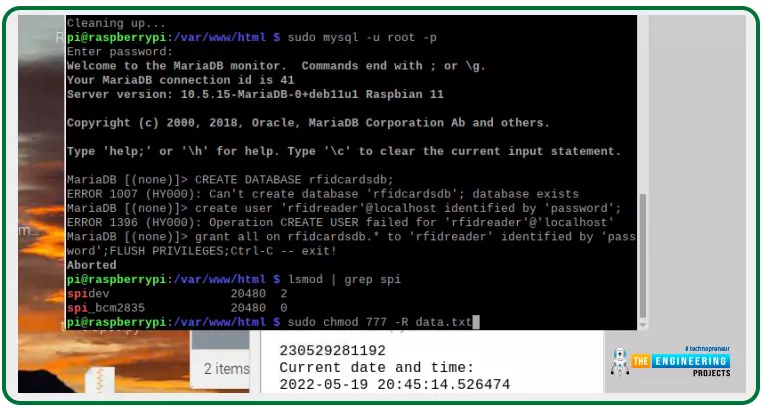
Sudo chmod 777 –R data.txt
The next step will be to display this data on a webpage to simulate an online attendance register. The code for the RFID card can be found below.
#! /usr/bin/env python
# Import necessary libraries for communication and display use
import RPi.GPIO as GPIO
from mfrc522 import SimpleMFRC522
import pymysql
import drivers
import os
import numpy as np
import datetime
# read the card using the rfid card
reader = SimpleMFRC522()
display = drivers.Lcd()
display.lcd_display_string('Hello Please', 1)
display.lcd_display_string('Scan Your ID', 2)
try:
id, text = reader.read()
print(id)
display.lcd_clear()
# Load the driver and set it to "display"
# If you use something from the driver library use the "display." prefix first
try:
sql_con = pymysql.connect(host='localhost', user='rfidreader', passwd='password', db='rfidcardsdb')
sqlcursor = sql_con.cursor()
# first thing is to check if the card exist
cardnumber = '{}'.format(id)
sql_request = 'SELECT user_id FROM cardtbl WHERE serial_no = "' + cardnumber + '"'
now = datetime.datetime.now()
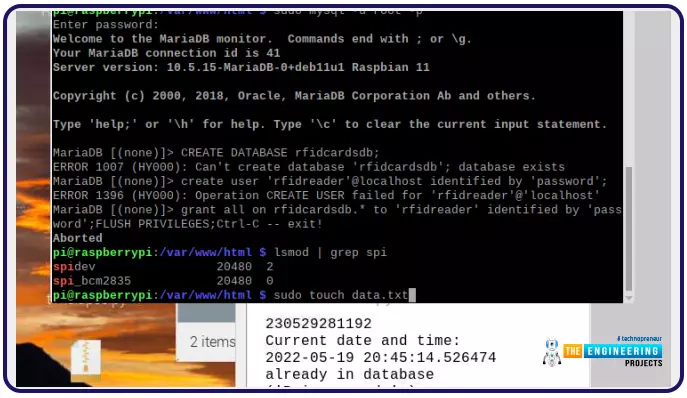
print("Current date and time: ")
print(str(now))
count = sqlcursor.execute(sql_request)
if count > 0:
print("already in database")
T = sqlcursor.fetchone()
print(T)
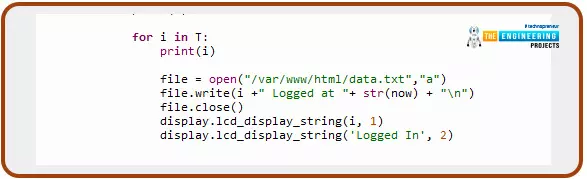
for i in T:
print(i)
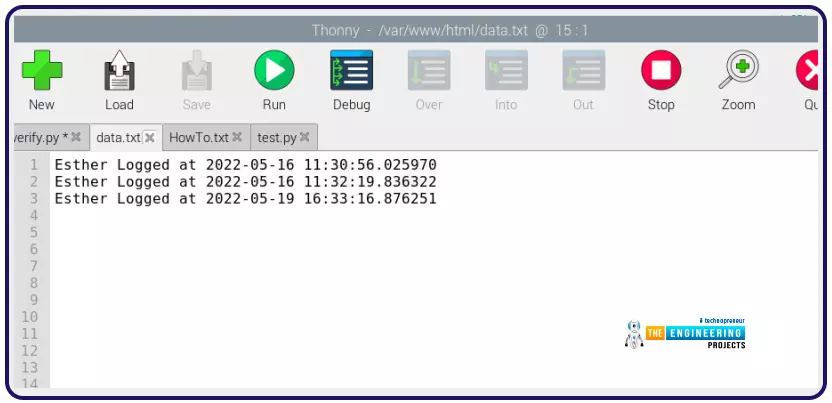
file = open("/var/www/html/data.txt","a")
file.write(i +" Logged at "+ str(now) + "\n")
file.close()
display.lcd_display_string(i, 1)
display.lcd_display_string('Logged In', 2)
else:
display.lcd_clear()
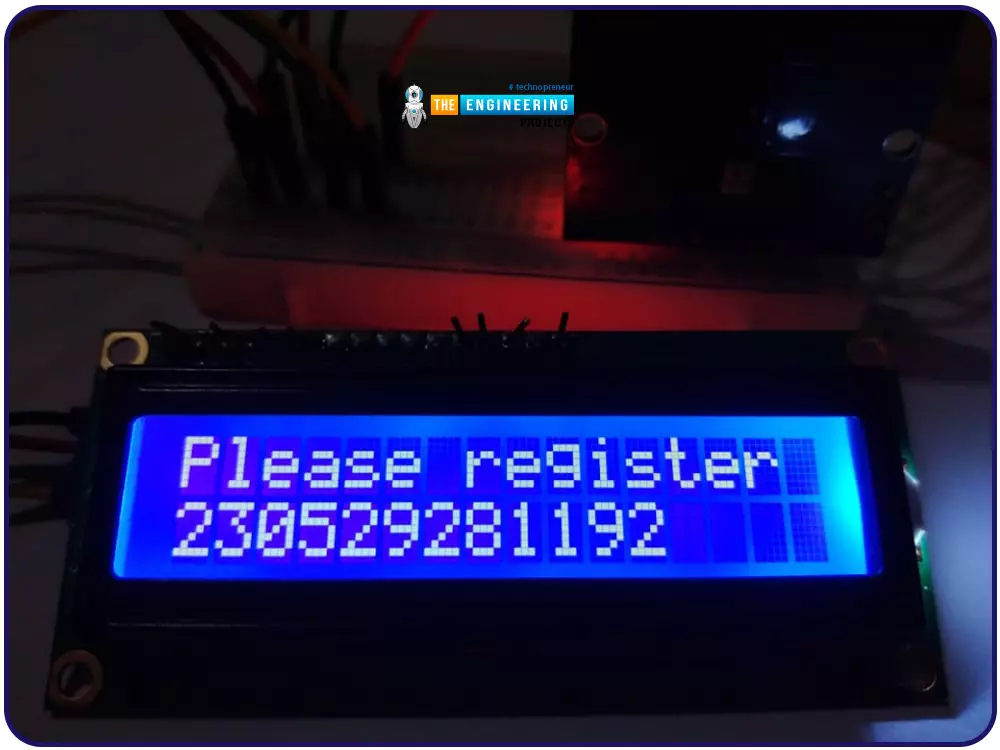
display.lcd_display_string(“Please register”, 1)
display.lcd_display_string(cardnumber,2)
except KeyboardInterrupt:
# If there is a KeyboardInterrupt (when you press ctrl+c), exit the program and cleanup
print("Cleaning up!")
display.lcd_clear()
finally:
GPIO.cleanup()
Building the website
Now we are going to design a simple website with Html that we are going to display the information of the attending students of a class, and to do this, we will have to install a local server in our raspberry pi.
Installing Apache Web Server
Web, database, and mail servers all run on various server software. Each of these programs can access and utilize files located on a physical server.
A web server's main responsibility is to provide internet users access to various websites. It serves as a bridge between a server and a client machine to accomplish this. Each time a user makes a request, it retrieves data from the server and posts it to the web.
A web server's largest issue is to simultaneously serve many web users, each of whom requests a separate page.
For internet users, convert them to Html pages and offer them in the browser. Whenever you hear the term "webserver," consider the device in charge of ensuring successful communication in a network of computers.
How Does Apache Work?
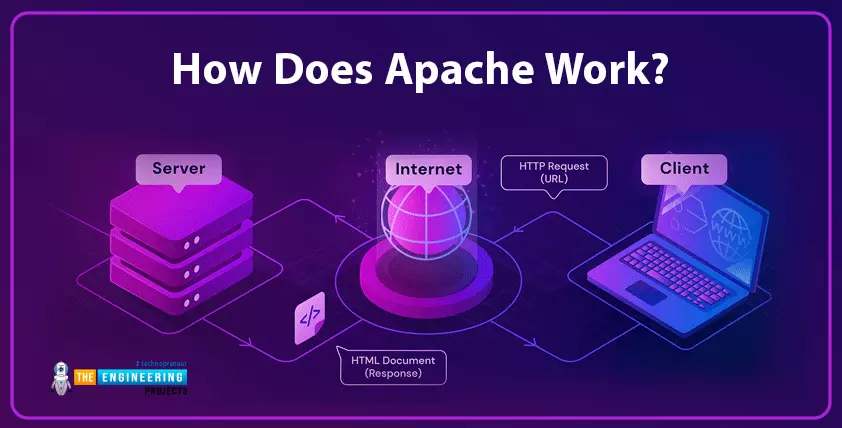
Among its responsibilities is establishing a link between a server and a client's web browser (such as Chrome to send and receive data (client-server structure). As a result, the Apache software can be used on any platform, from Microsoft to Unix.
Visitors to your website, such as those who wish to view your homepage or "About Us" page, request files from your server via their browser, and Apache returns the required files in a response (text, images, etc.).
Using HTTP, the client and server exchange data with the Apache webserver, ensuring that the connection is safe and stable.
Because of its open-source foundation, Apache promotes a great deal of customization. As a result, web developers and end-users can customize the source code to fit the needs of their respective websites.
Additional server-side functionality can be enabled or disabled using Apache's numerous modules. Encryption, password authentication, and other capabilities are all available as Apache modules.
Step 1
To begin, use the following code to upgrade the Pi package list.

sudo apt-get update
sudo apt-get upgrade
Step 2
After that, set up the Apache2 package.

sudo apt install apache2 -y
That concludes our discussion. You can get your Raspberry Pi configured with a server in just two easy steps.
Type the code below to see if the server is up and functioning.

sudo service apache2 status
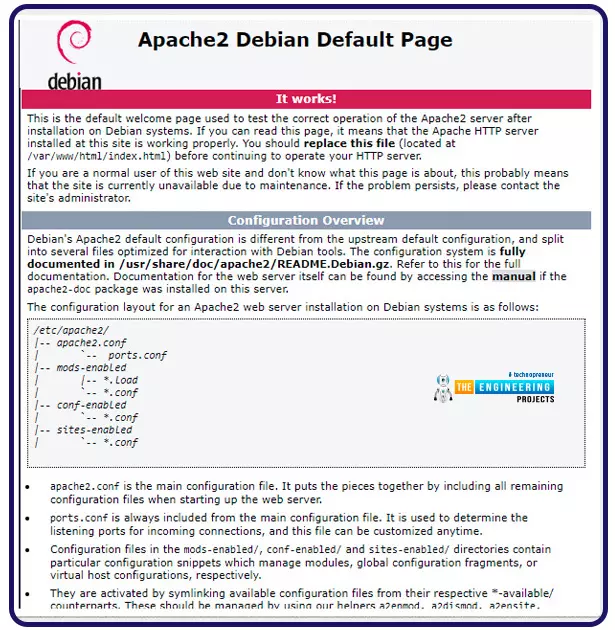
You can now verify that Apache is operating by entering your Raspberry Pi's IP address into an internet browser and seeing a simple page like this.
Use the following command in the console of your Raspberry Pi to discover your IP.
hostname-i
Only your home network and not the internet can access the server. You'll need to configure your router's port forwarding to allow this server to be accessed from any location. Our blog will not be discussing this topic.
Setting up HTML page for editing.
The standard web page on the Raspberry Pi, as depicted above, is nothing more than an HTML file. First, we will generate our first Html document and develop a website.
Step 1
Let's start by locating the Html document on the Raspbian system. You can do this by typing the following code in the command line.

cd /var/www/html
Step 2
To see a complete listing of the items in this folder, run the following command.

ls -al
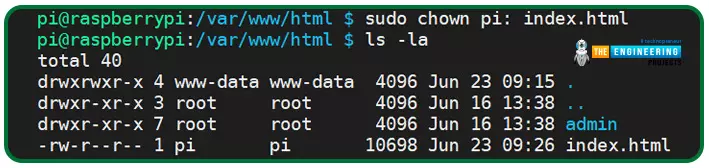
The root account possesses the index.html file; therefore, you'll see every file in the folder.
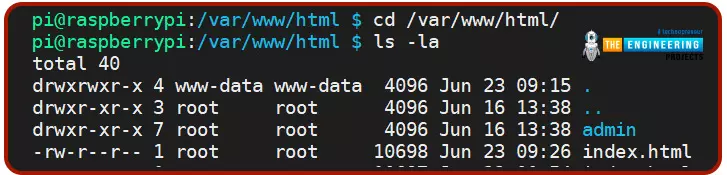
As a result, to make changes to this file, you must first change the file's ownership to your own. The username "pi" is indeed the default for the Raspberry Pi.

sudo chown pi: index.html
To view the changes you've made, all you have to do is reload your browser after saving the file.
Building your first HTML page
Here, we'll begin to teach you the fundamentals of HTML.
To begin a new page, edit the index.html file and remove everything inside it using the command below.

sudo nano index.html

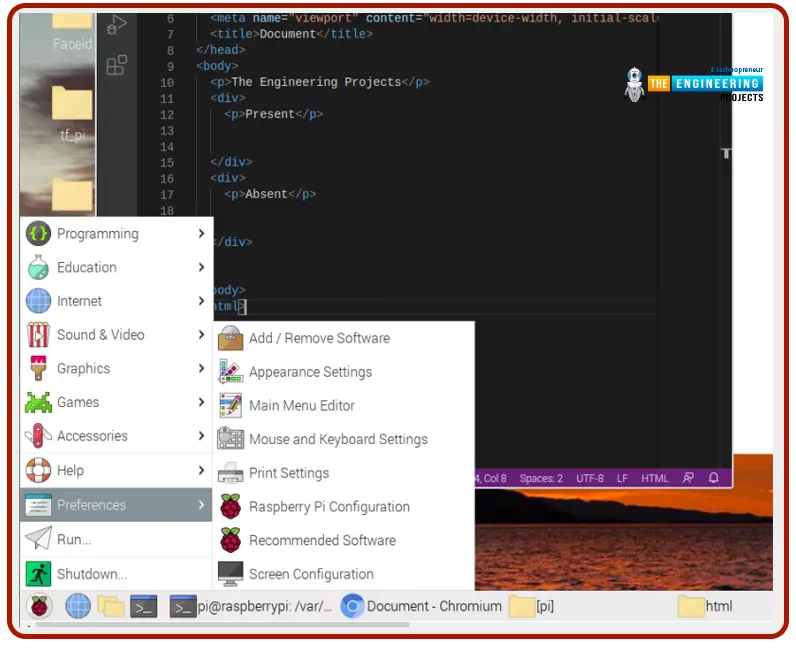
Alternatively, we can use a code editor to open the index.html file and edit it. We will use VS code editor that you can easily install in raspberry pi using the preferences then recommended software button.
HTML Tags
You must first learn about HTML tags, which are a fundamental part of HTML. A web page's content can be formatted in various ways by using tags.
There are often two tags used for this purpose: the opening and closing tags. The material inside these tags behaves according to what these tags say.
The p> tag, for example, is used to add paragraphs of text to the website.
<p>The engineering projects</p>

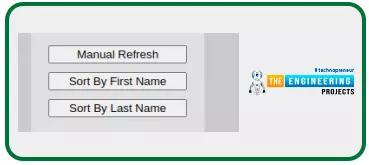
Web pages can be made more user-friendly by using buttons, which can be activated anytime a user clicks on them.
<button>Manual Refresh</button>
<button>Sort By First Name</button>
<button>Sort By last Name</button>
The basic format of an HTML document
A typical HTML document is organized as follows:

Let us create the page that we will use in this project.
<html>
<head>
</head>
<body>
<div id="pageDiv">
<p> The engineering projects</p>
<button type="button" id="refreshNames">Manual Refresh</button><br/>
<button type="button" id="firstSort">Sort By First Name</button><br/>
<button type="button" id="lastSort">Sort By Last Name</button>
<div id="namesFromFile">
</div>
</div>
</body>
</html>
<!DOCTYPE html>: HTML documents are identified by this tag. This does not necessitate the use of a closing tag.
<html>: This tag ensures that the material inside will meet all of the requirements for HTML. There is a /html> tag at the end of this.
</head>: It contains data about the website, but when you view it in a browser, you won't be able to see anything.
A metadata tag in the head tag can be used to set default character encoding in your website, for instance. This has a /head> tag at the end of it.
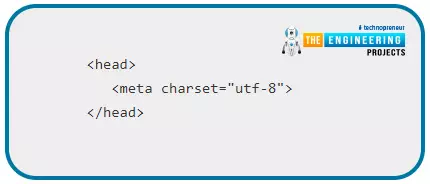
<head>
<meta charset="utf-8">
</head>
Also, you can have a title tag inside the head tag. This tag sets the title of your web page and has a closing </title> tag.
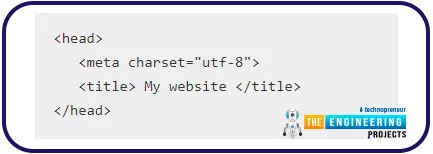
<head>
<meta charset="utf-8">
<title> My website </title>
</head>
<body>: The primary focus of the website page is included within this tag. Everything on a web page is usually contained within body tags once you've opened it. This has a /body> tag at the end of it. Many other tags can be found in this body tag, but we'll focus on the ones you need to get started with your first web page.
We will go ahead and style our webpage using CSS with the lines of codes below;
<head>
<!--
body {
width:100%;
background:#ccc;
color:#000;
text-align:left;
margin:0
;padding:10px
;font:16px/18pxArial;
}
button {
width:160px;
margin:0 0 10px;}
#pageDiv {
width:160px;
margin:20px auto;
padding:20px;
background:#ddd;
color:#000;
}
#namesFromFile {
margin:20px 0 0;
padding:10px;
background:#fff;
color:#000;
border:1px solid #000;
border-radius:10px;
}
-->
</style>
</head>
The style tags is a cascading style sheet syntax that lets developers style the webpages however they prefer.
Adding images to your web page
You can add images to your web page by using the <img> tag. It is also a void element and doesn’t have a closing tag. It takes the following format
<img src="URL of image location">
For example, let’s add an image of the Seeeduino XIAO
<p>The Engineering projects</p>
<img src="https://www.theengineeringprojects.com/wp-content/uploads/2022/04/TEP-Logo.png">
Reload the browser to see the changes
How to display the attendance list on the webpage
This is the last step of this project, and we will implement a program that reads our data.txt file from the apache root directory and display it on the webpage that we designed. Since we already have our webpage up and running, we will use the javascript programming language to implement this function of displaying the log list on the webpage. All changes that we are about to implement will be done in the index.html file; therefore, open it in the visual studio code editor.
Javascript – What is it?
JavaScript is a dynamic computer programming language. It is lightweight and most commonly used as a part of web pages, whose implementations allow client-side scripts to interact with the user and make dynamic pages. It is an interpreted programming language with object-oriented capabilities.
Advantage of javascript
One of the major strengths of JavaScript is that it does not require expensive development tools. You can start with a simple text editor such as Notepad.
How to use javascript with this program
Well, javascript as mentioned earlier is a very easy to use language that simply requires us to put the script tags inside the html tags.
<script> script program </script>
<header>
<script>
Here goes our javascript program
</script>
</header>
The javascript code first opens the data.txt file, then it reads all the contents form that file. Then it uses the xmlHttpRequest function to display the contents on the webpage. The buttons on the webpage activate different functions in the code.For instance manual refresh activates:
function refreshNamesFromFile(){
var namesNode=document.getElementById("namesFromFile");
while(namesNode.firstChild)
{ namesNode.removeChild(namesNode.firstChild);
}
getNameFile();
}
This function reads the content of the data.txt
The sort by buttons activate the sort function to sort the logged users either by first name or last name. The function that gets activated by these buttons is:
function sortByName(e)
{ var i=0, el, sortEl=[], namesNode=document.getElementById("namesFromFile"), sortMethod, evt, evtSrc, oP;
evt=e||event;
evtSrc=evt.target||evt.srcElement;
sortMethod=(evtSrc.id==="firstSort")?"first":"last";
while(el=namesNode.getElementsByTagName("P").item(i++)){
sortEl[i-1]=[el.innerHTML.split(" ")[0],el.innerHTML.split(" ")[1]];
}
sortEl.sort(function(a,b){
var x=a[0].toLowerCase(), y=b[0].toLowerCase(), s=a[1].toLowerCase(), t=b[1].toLowerCase();
if(sortMethod==="first"){
return x<y?-1:x>y?1:s<t?-1:s>t?1:0;
}
else{
return s<t?-1:s>t?1:x<y?-1:x>y?1:0;
}
});
while(namesNode.firstChild){
namesNode.removeChild(namesNode.firstChild);
}
for(i=0;i<sortEl.length;i++){
oP=document.createElement("P");
namesNode.appendChild(oP).appendChild(document.createTextNode(sortEl[i][0]+" "+sortEl[i][1]));
namesNode.appendChild(document.createTextNode("\r\n"));
//insert tests -> for style/format
if(sortEl[i][0]==="John"){
oP.style.color="#f00";
}
if(sortEl[i][0]==="Sue")
{ oP.style.color="#0c0";
oP.style.fontWeight="bold";
}
}
}
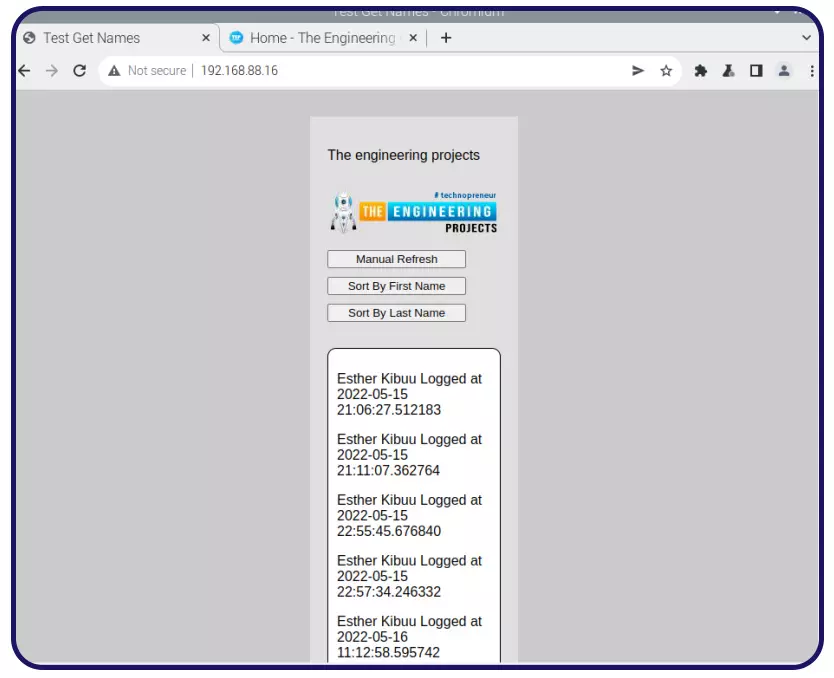
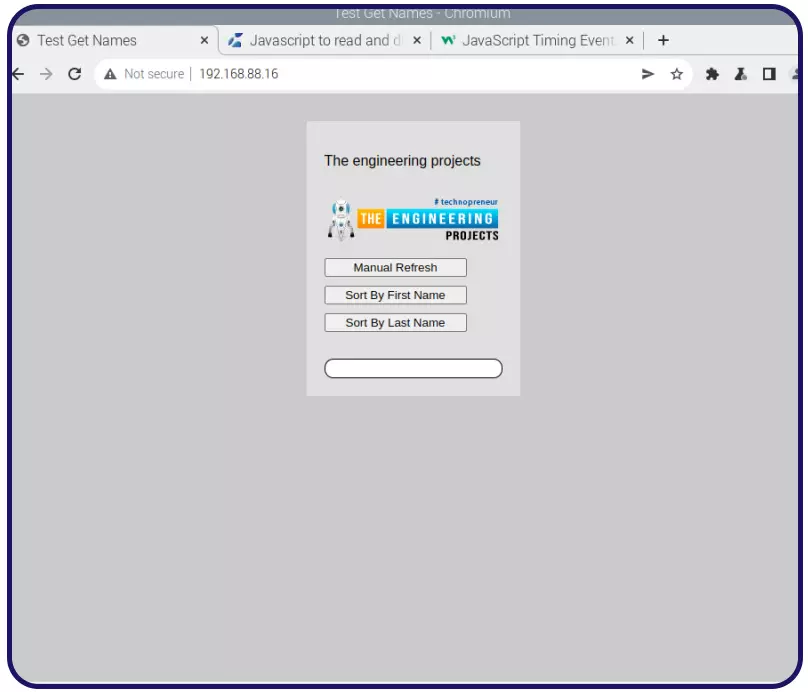
Output
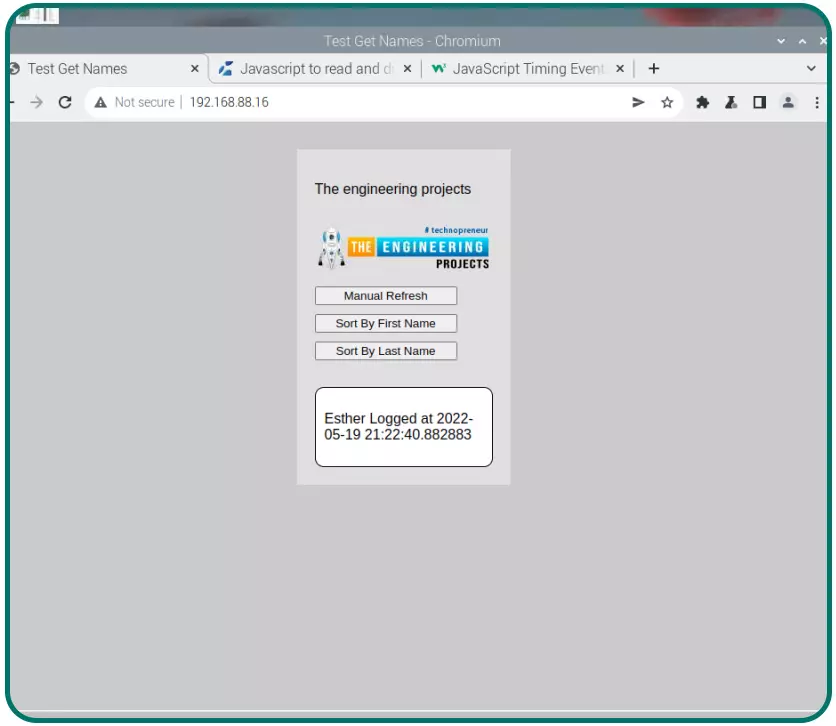
With no logged-in users
With one logged in user
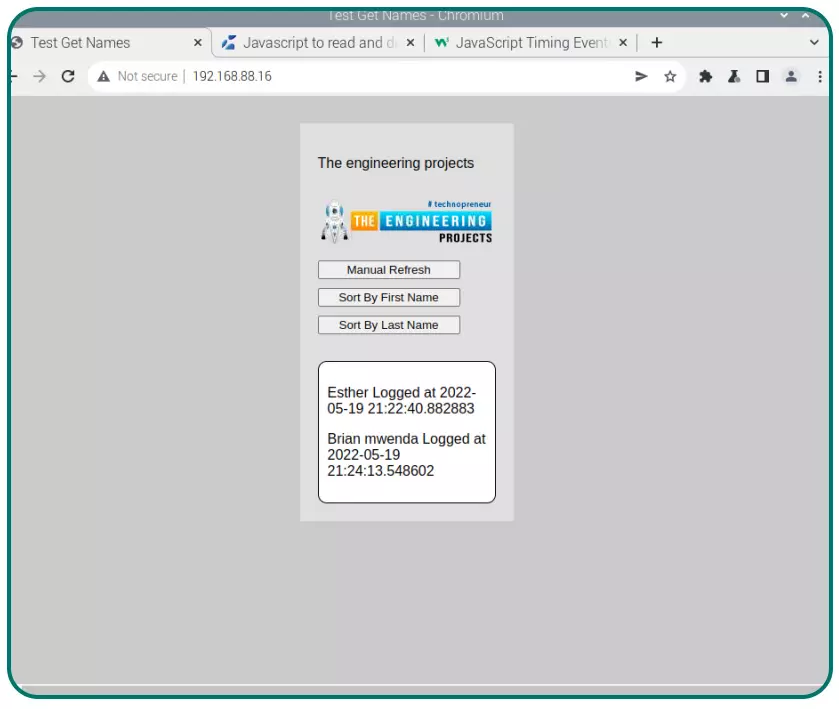
With two users logged in
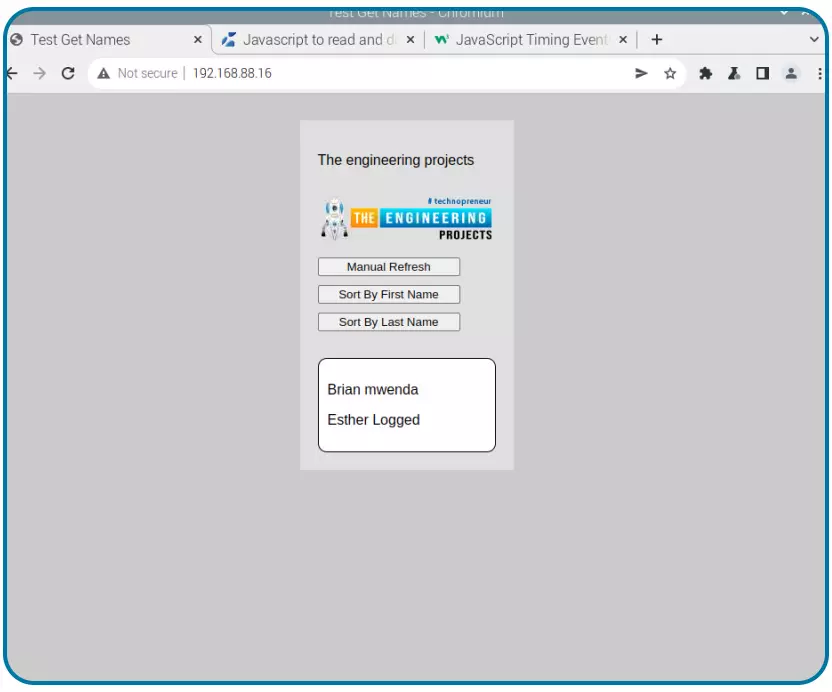
Sort by the first name
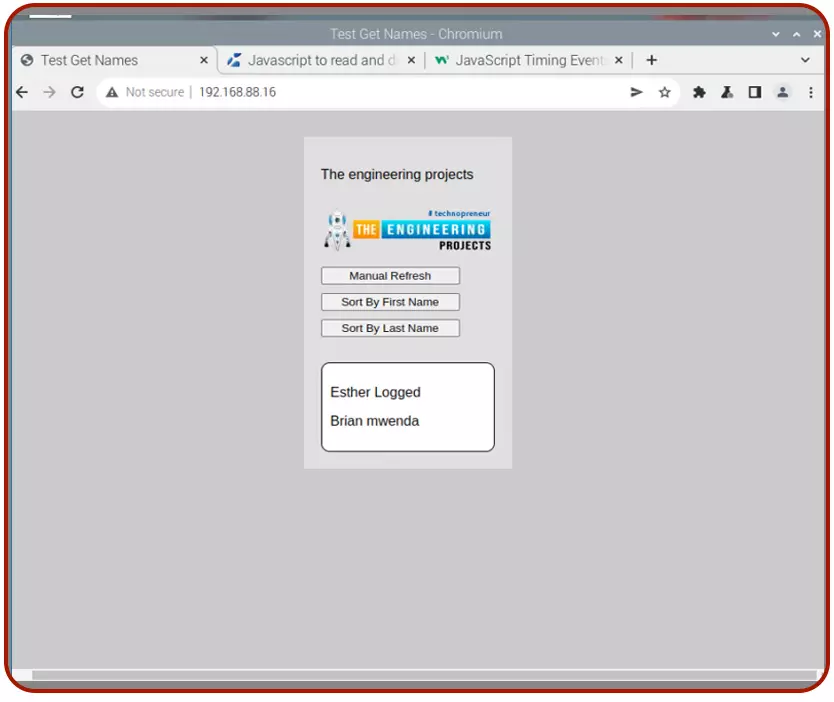
Sort by last name
Applications of RFID
Benefits of Smart Attendance System
Automated attendance systems are excessively time-consuming and sophisticated in the current environment. It is possible to strengthen company ethics and work culture by using an effective smart attendance management system. Employees will only have to complete the registration process once, and images get saved in the system's database. The automated attendance system uses a computerized real-time image of a person's face to identify them. The database is updated frequently, and its findings are accurate in a user interactive state because each employee's presence is recorded.
Smart attendance systems have several advantages, including the following:
Students in elementary, secondary, and postsecondary institutions can utilize this system to keep track of their attendance. It can also keep track of workers' schedules in the workplace. Instead of using a traditional method, it uses RFID tags on ID cards to quickly and securely track each person.
What are the applications of a smart attendance system?
Computerized smart attendance can be applied in many areas in our day today activities which include the following:1) Real-time tracking – Keeping track of staff attendance using mobile devices and desktops is possible.
2)Decreased errors – A computerized attendance system can provide reliable information with minimal human intervention, reducing the likelihood of human error and freeing up staff time.
3) Management of enormous data – It is possible to manage and organize enormous amounts of data precisely in the db.
4) Improve authentications and security – A smart system has been implemented to protect the privacy and security of the user's data.
5) Reports – Employee log-ins and log-outs can be tracked, attendance-based compensation calculated, the absent list may be viewed and required actions are taken, and employee personal information can be accessed.
Conclusion
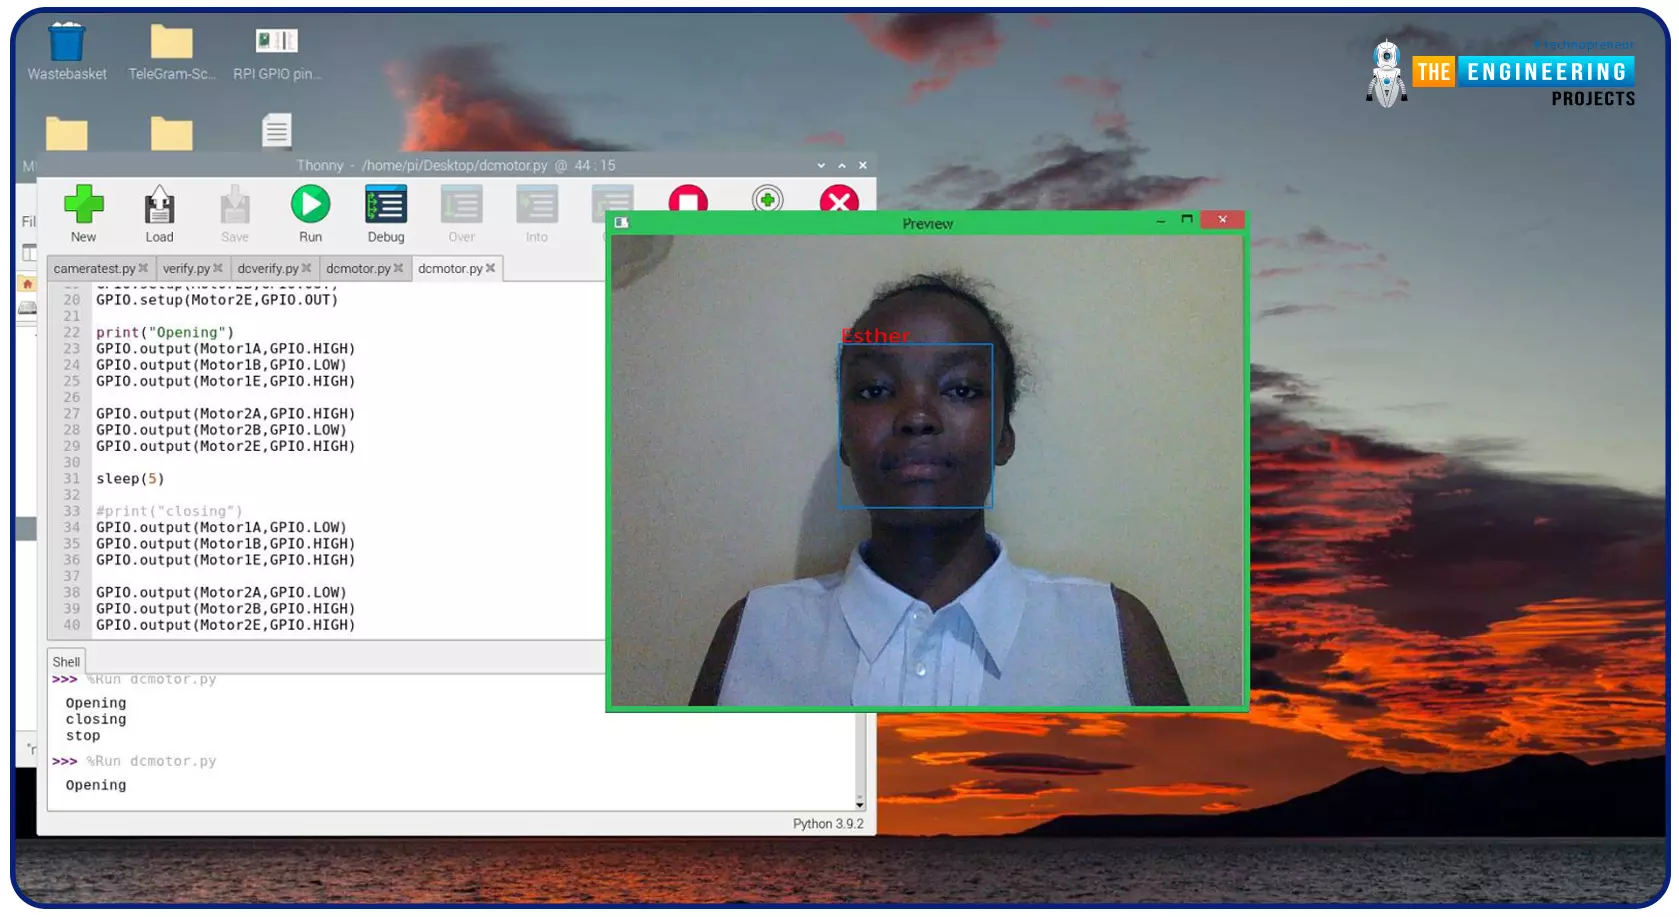
This tutorial taught us to build a smart RFID card authentication project from scratch. We also learned how to set up an apache server and design a circuit for the RFID and the LCD screen. To increase your raspberry programming skills, you can proceed to building a more complex system with this code for example implementing face detection that automatically starts the authentication process once the student faces the camera or implement a student log out whenever the student leaves the system. In the following tutorial, we will learn how to build a smart security system using facial recognition.