Hello friends! If you are developing an embedded project and need help with its firmware, The Engineering Projects can discuss your microcontroller programming requirements with you. Your project may involve a new prototype, a circuit that is not responding correctly or an existing program that needs a clearly defined improvement. Useful programming work starts with understanding the hardware and the required behaviour. A sentence such as “control a motor with a sensor” describes an idea, but it does not yet define a complete system. We need to know which motor, which sensor, how quickly the controller must respond and what should happen when a signal disappears. This page explains the types of work you can discuss with us, the information to prepare and the deliverables to agree before de ...
Hello friends! In this tutorial, we will learn how to get data from a web server using an Arduino UNO and the original Arduino WiFi Shield. We will use that data to switch two LEDs, so you can see how a command stored on a server becomes an action on a microcontroller. There are two parts to this project: a web page that changes a command file, and an Arduino client that reads the file periodically. We will discuss both parts in the same order as the original project, with clearer wiring, a defined response format and checks that prevent an incomplete response from becoming an LED command. This is a legacy-shield tutorial. The WiFi library and pin assignments described here belong to the original shield, not every board with WiFi in its name. We will first run the demonstration on a truste ...
Hello friends! Today, we will study a MATLAB project for modelling a DVB-T2 transmission system using consistent channel frequency responses. The main question is simple: when we compare two transmitter configurations, how can we make sure that a different random channel has not decided the result for us? We will follow the original project from its parameter-selection interface to its BER plots, then improve the experiment design through repeated trials and confidence intervals. Along the way, I will explain the difference between a channel realization and a received waveform, because confusing these two quantities makes a comparison unreliable. The original screenshots are retained as historical project results. Some settings and statistical labels in the earlier report were inconsistent ...
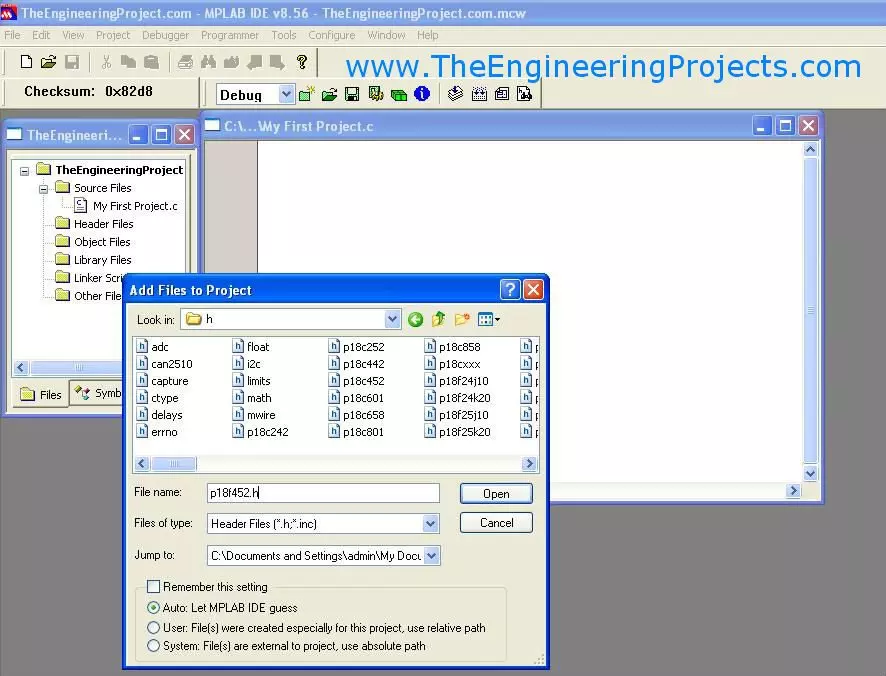
Hello friends! Today, we will create a PIC project in MPLAB and understand the files and settings needed before writing the main application. We have already covered installing MPLAB and installing the C compiler . Now we will bring those tools together in one project. The title of this older lesson refers to an MPLAB compiler, but the IDE and compiler have separate jobs. The IDE manages the project and invokes the selected language tools. The compiler and linker produce the firmware image. Understanding that distinction makes missing-file and build errors much easier to diagnose. The original screenshots show legacy MPLAB IDE with C18. We will retain that sequence for readers maintaining an older PIC18F452 project, while also explaining the corresponding decisions in MPLAB X with XC8. Do ...
Hello friends! Today, we will install a C compiler for MPLAB and make sure that a PIC project actually uses it. In the previous lesson, we covered installing the MPLAB development environment . The next step is to connect that environment to the language tools that translate our C source. The original article used MPLAB C18 and shows its historical Windows installer. Those screenshots remain useful for maintaining an older PIC18 project. For a new compatible 8-bit PIC project, MPLAB XC8 is the relevant Microchip compiler family to investigate. We will keep the two workflows distinct. By the end, you should know which compiler your project requires, how to install and select it, and how to separate an installation problem from a source-code or linker problem. We will use PIC18F452 as the ex ...
Hello friends! Today, we will install MPLAB software in Windows and prepare it for a PIC development project. In the previous lesson, we studied the PIC18F452 ports and peripherals . We now need a development environment in which to organize the source, select the device and build its firmware. The original screenshots in this article show MPLAB IDE 8.56. That is a legacy environment, while MPLAB X IDE has a different interface and installation workflow. We will explain both contexts clearly so you can reproduce an old project without mistaking its screenshots for a current installation guide. For a new setup, choose an MPLAB X release compatible with your Windows version, PIC device and programming tool. Install a suitable C compiler separately. The IDE provides the workspace, but it does ...
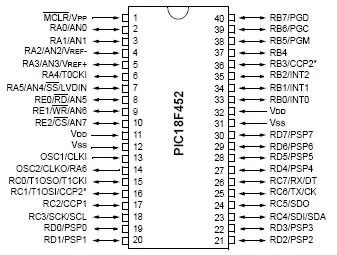
Hello friends! In the previous tutorial, we discussed getting started with PIC microcontrollers and the minimum circuit needed to run a PIC18F452. Today, we will examine its ports, timers, communication interfaces and other useful hardware functions. We will refer to the 40-pin PDIP package throughout this lesson. The signal names are more important than the physical pin numbers, because other packages can place those signals differently. Always match the package drawing to the component you actually have. The main goal is to help you allocate pins and select peripherals for a project. We will also work through timer, ADC, PWM and baud-rate calculations so the datasheet values become practical design tools rather than a list of unfamiliar abbreviations. Figure: PIC18F452 reference for port ...
Hello friends! In the previous lesson, we discussed microcontroller basics . Today, we will apply those ideas to a PIC18F452 and identify everything needed to make a simple program run on real hardware. We will use the 40-pin PDIP version of the PIC18F452, matching the original circuit in this tutorial. Our first output is an LED on RD0. Before writing the application, we will work through power, reset, the external clock, programming connections and the distinction between the IDE and compiler. The original lesson used older MPLAB tools and a socket-style programming workflow. Those are useful historical references, but a supported in-circuit programmer can program the PIC while it remains in the target circuit. The exact combination of device, programmer and software must be checked befo ...
Hello friends! Today, we are starting our microcontroller tutorial series from the basics. Before connecting a PIC, installing a compiler or writing an LED-blinking program, we need to understand what a microcontroller does and how its software interacts with an electrical circuit. Think of a project that reads a push button, changes a pattern of lights and reports its operating state. A microcontroller can coordinate those actions by repeatedly reading inputs, applying programmed rules and updating outputs. The same basic idea appears in sensor loggers, small robots, appliance controls and many other embedded systems. In this series, our detailed hardware example will be the PIC18F452. We will first learn the general ideas, then study that device's connections and development tools. You d ...
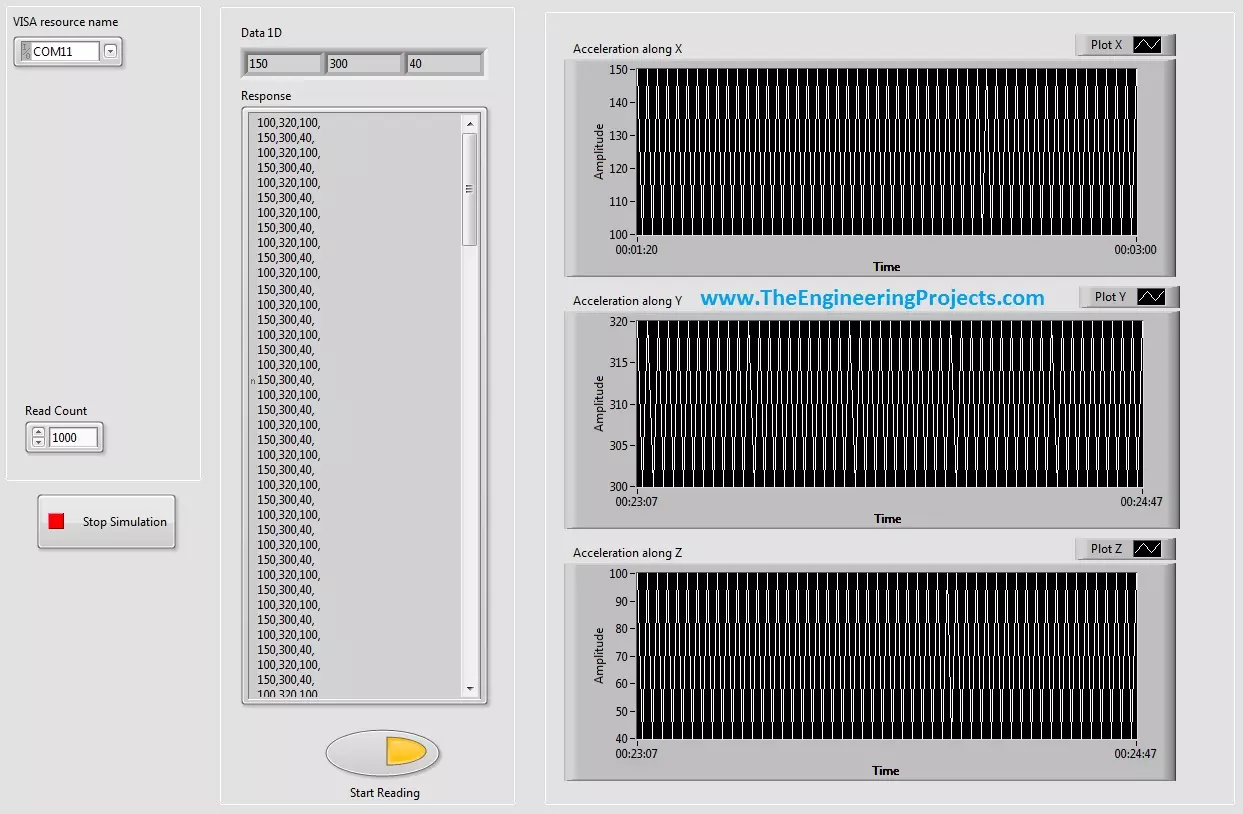
Hello friends! In this tutorial, we will display serial data on live plots in LabVIEW. In the previous lesson, we received comma-separated records from a COM port and converted them into a numeric array. We will now take the three values in that array and display each channel as a changing trace. If you have not built the serial reader yet, start with getting continuous data from a COM port in LabVIEW . The plotting stage assumes that a complete record has been received and validated. A graph cannot correct an incomplete message or determine which sensor a badly parsed number belongs to. We will preserve the original three-channel example and screenshots, then explain the differences between charts and graphs, how to label the time axis honestly, and how to keep the display responsive. Her ...