Monitor a Website with Raspberry Pi 4 using Python


Introduction
Welcome to the next tutorial in our raspberry pi programming. In the previous tutorial, we learned how we could run Xbox cloud on our pi 4. We found that we can run any game easily without lag or having raspberry pi shut down, proving that pi 4 is quite a powerful minicomputer. However, this tutorial will demonstrate how to use Python on raspberry to monitor websites. This Python program will execute on Pi 4 and watch over a website, alerting you whenever it changes or goes down. This is accomplished by keeping a straightforward webpage duplicate locally and monitoring for updates. This webpage monitor is straightforward, so it should work well on pi Zero. Throughout this tutorial, we will demonstrate how to develop your custom code to monitor a webpage. With this information, you ought to be able to modify the script to meet your unique requirements. However, for email updates to function, a few settings must be made in the core code.

The lack of an interface makes this project ideal for a headless Pi. Even though this tutorial concentrates on Pi 4, the core code can be used on any device that supports Python 3. That implies that, if you'd want, you could even execute this program on a Windows computer.
Equipment
Raspberry Pi
Micro SD Card
Power Supply
Ethernet Cable or Wi-Fi
How to get your Raspberry Pi ready for the webpage monitor
Ensure you have all the components you need to execute your website monitoring program before you begin. These actions include installing Python 3 and the necessary Python libraries. Updates to the package registry and any current packages come first. To make these upgrades, we must execute the following lines in the console on our Pi 4.

sudo apt update
sudo apt upgrade -y
We must make sure that Py 3 and its application manager, "pip," are both installed on the mini-computer. To guarantee that the two packages are loaded, use the below command.
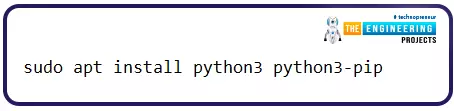
sudo apt install python3 python3-pip
Installing the necessary Python libraries is the last step before writing the program to monitor our web pages. Download the packages for queries, beautiful soup4, and lxml with this line.
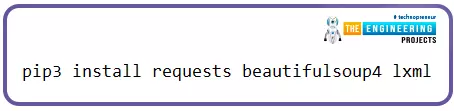
pip3 install requests beautifulsoup4 lxml
Coding a website monitor for your Pi 4
Having completed the installation of the necessary packages, we can begin drafting our elementary website monitoring code. So that you can understand how everything functions, we'll break this down into its parts. Though the nano editor will work, a more capable integrated development environment (IDE) like Visual Studio Code is recommended. Get started on the Python code to keep an eye on a website with your Raspberry Pi. Websitemonitor.py is the name of the script we'll be working with throughout this guide. Launch nano and enter the following command to begin writing the script.

nano websitemonitor.py
Writing a Simple Website Monitor in Python
Before we get too far into coding a complex website monitoring program for our RPi, let's start with the simplest possible solution. We shall craft a basic script to retrieve a web page, check its contents against a known master copy, and output an appropriate message if any changes have been made. At the beginning of any script, we must import the packages we'll be working with. These scripts' launch requires the "os," "sys," and "requests" packages.
Os: To communicate with the os, you will need to install the package known as os. For our purposes, we'll be using this to store a copy of our most recent website request in a cache. To detect any modifications, we will check this cache.
Sys – For any arguments supplied to the program, we utilize the sys library to retrieve them. We'll allow the user to provide the URL of the website and the name of the cache in this case.
Requests – Python can only send requests thanks to the requests package.
This allows us to take a certain website's content and save them.

import os
import sys
import requests
Coding the has_website_changed() method
Most of our logic will be handled by a function we'll write next. Two parameters must be set for this function: "has the website changed." The first input, the website URL, contains the website's address. We will make we obtain a request from this point forward. The website name, the second parameter, contains the website's name. This is a condensed form of the name used for the cached file. This method will have 3 potential return values: -1 if the webpage is "not ok," 0 if the webpage hasn't changed, and One of the webpages is altered.

def has_website_changed(website_url, website_name):
Keep in mind that indentation is crucial when using Python. Please make careful to keep the indentation when you complete this function.
Using Python Request Headers
Now that our function is specified, we can move on to implementing it. To initiate a website request, we must first define the headers sent by the request module. We are doing two things with these headers. For starters, there's the "User-Agent" header. Set it to whatever works best for you. For the most part, we are trying to keep things straightforward here.
Second, we instruct the client and the destination server not to store this request in their cache by setting the "Cache-Control" header to "no-cache." There is no guarantee that the requested web server will comply.

headers = {
'User-Agent': 'Mozilla/4.0 (compatible; MSIE 6.0; Windows NT 5.1; PIWEBMON)',
'Cache-Control': 'no-cache'
}
Putting in a Request to the Internet Service Provider
The queries package is secure enough to retrieve the passed-in URL with the requested headers. This is a vital part of our RPi's website monitoring software, as it returns the site's current status. This is an example of the get function included in the "requests" package. The "headers" and "website URL" variables are passed in. The result of this query will be saved in the "response" parameter.

response = requests.get(website_url, headers=headers)
Check That We've Gotten a Good Response
Once we've retrieved the website's response, we need to double-check that it was an "OK" response. Simply put, we need to ensure the error code is not below 200 or above 299, inclusive.
If the value is outside our allowed range, we will return "-1" to indicate an error on our end.
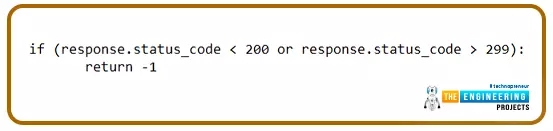
if (response.status_code < 200 or response.status_code > 299):
return -1
Record the Message and Cache Name in a Temp Directory
Let's set up two more variables after verifying the response to ensure we get a proper status code. For now, we'll keep the text of the response we received in a variable called "response text." This variable will allow us to tailor the response wording before saving it. Our RPi website monitor will continue to work with the present form of the answer text for the time being.
As a second step, we set up a variable named "cache filename" to hold the location of our cache's data file. This name will be fabricated using the "website name" argument and the suffix "_cache.txt." If our website's name were to be entered as "theengineeringproject," the resulting filename would be "theengineeringproject cache.txt."
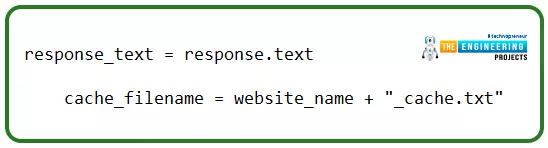
response_text = response.text
cache_filename = website_name + "_cache.txt"
Making a Cache for a Brand-New Website
It's possible that the current website's URL won't have a cache file when you initially run the program. We use the "path.exists()" function from the "os" package to see if the cache script already exists. If the cache file doesn't already exist, we make one by opening it with the "w" switch. We then append the text of the current response to the file, allowing our Raspberry Pi to check for updates to the website. Given that this is a brand-new request, we will respond with a value of 0 to indicate that the reply has not changed.
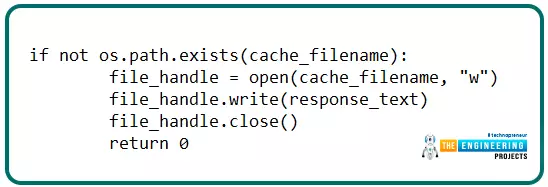
If not os.path.exists(cache_filename):
file_handle = open(cache_filename, "w")
file_handle.write(response_text)
file_handle.close()
return 0
Review the Pre-Cached Reply to a Prior Request
If the program reaches this stage, the "previous response text" variable will need to be updated with the contents of the cache file. Now we'll utilize "r+" with the open function. The following command informs open that we want to be able to read and write to our cache file. After Python finishes reading a file, the stream position is reset to the beginning; thus, we need to use the "seek()" function to return to the beginning. If this is a fresh reply, it will be simpler to truncate the file.
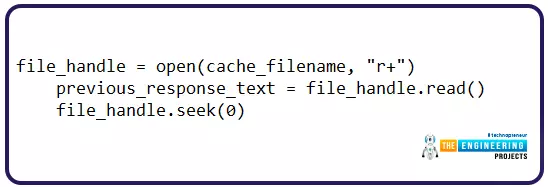
file_handle = open(cache_filename, "r+")
previous_response_text = file_handle.read()
file_handle.seek(0)
Verify the Message Text Identical to the Stored Message
We may now check for a match between the answer text and the original one.
If the responses are identical in content, we exit the process by closing the file handle and returning 0. Recall that a value of 0 indicates nothing has changed in the responses. This, together with the else statement, completes our RPi's "has website changed" monitoring function.
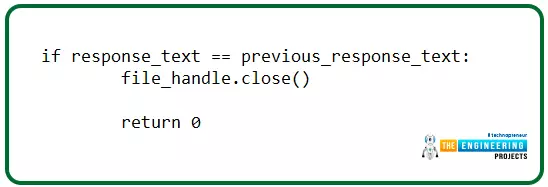
if response_text == previous_response_text:
file_handle.close()
return 0
How to make a New Cache Whenever the Response Has Changed
If the responses don't match, our RPi has picked up on a change while keeping tabs on the webpage. If the race were being run right now, it would be in position 0. We then append the updated reply to the file once it has been truncated. The file handle can be closed as soon as the writing is done because it is no longer required. Since the answer has shifted, we send back a 1 to show that it has been updated.
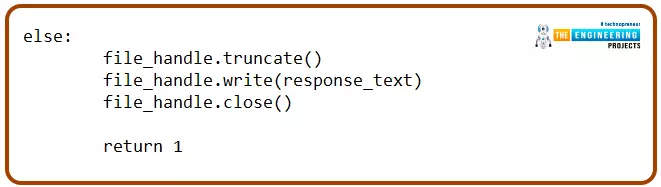
else:
file_handle.truncate()
file_handle.write(response_text)
file_handle.close()
return 1
Formulating the main() method
To continue our RPi-based website monitor, we must now create its main method. This method will be invoked anytime the script is executed. In this script section, we'll mostly be concerned with invoking the function we just made, so it should be rather simple. First, we'll identify the primary role. This is where the real magic happens for our RPi-based webpage monitoring.

def main():
Inspecting the Website for Updates
At this point, we can access the "has website changed()" method we've created. This method's initial and next parameters will be passed in via the "sys" package. The web address (Uniform resource locator) will be the first argument. As for the second, it will become the cache file's title. The function's output is saved in the "website status" variable we created.

website_status = has_website_changed(sys.argv[1], sys.argv[2])
Website Response Printing
Our variables now contain the current online status, so we can use that to inform our output. Our basic website monitoring software for the Raspberry Pi is now complete. We can expand upon this feature to make it possible to communicate via email or text message. This is a basic if, Elif clause that prints out various text based on the input.
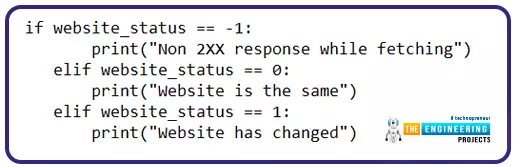
if website_status == -1:
print("Non 2XX response while fetching")
elif website_status == 0:
print("Website is the same")
elif website_status == 1:
print("Website has changed")
Last, we can wrap up our script by including the call that activates the script's main method. Using an if clause, we can be sure that the program was actually called and not just loaded as a Python package.
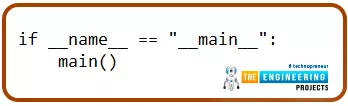
if __name__ == "__main__":
main()
The Final Structure of the basic program
The program can be saved and tested at this stage. What we have provided here is how the completed core code should appear. To save your work in the nano editor, use control + X, followed by Y, and finally, the Return key.
import os
import sys
import requests
def has_website_changed(website_url, website_name):
headers = {
'User-Agent': 'Mozilla/4.0 (compatible; MSIE 6.0; Windows NT 5.1; PIWEBMON)',
'Cache-Control': 'no-cache'
}
response = requests.get(website_url, headers=headers)
if (response.status_code < 200 or response.status_code > 299):
return -1
response_text = response.text
cache_filename = website_name + "_cache.txt"
If not os.path.exists(cache_filename):
file_handle = open(cache_filename, "w")
file_handle.write(response_text)
file_handle.close()
return 0
file_handle = open(cache_filename, "r+")
previous_response_text = file_handle.read()
file_handle.seek(0)
if response_text == previous_response_text:
file_handle.close()
return 0
else:
file_handle.truncate()
file_handle.write(response_text)
file_handle.close()
return 1
def main():
website_status = has_website_changed(sys.argv[1], sys.argv[2])
if website_status == -1:
print("Non 2XX response while fetching")
elif website_status == 0:
print("Website is the same")
elif website_status == 1:
print("Website has changed")
if __name__ == "__main__":
main()
Let us put the RPi's Web Server Monitoring Basics to the test.
Seeing that our web monitoring software is complete, it can be deployed on the Raspberry Pi. The following procedures will help us test and verify that the script is functioning properly. Our web monitoring script requires elevated permissions before proceeding. By executing the following line on the RPi, we may grant this access to the website monitoring program.

chmod +x websitemonitor.py
Now that the script has the correct permissions, we can run it. When running this script, you will need to know the URL you want to monitor and the name you want to use for its cache. For our example, we will use "https://www.theengineeringprojects.com/” as our URL to monitor and “project” as our cache name.

python3 websitemonitor.py https://www.theengineeringprojects.com/ project
You may check if the website monitor produced the cache file with the ls command in the console. A text document with the extension "_cache.txt" should be present. Take the "theengineeringprojects cache.txt" file as an illustration. If you execute this script, you may find an issue right away. Metadata can be dynamically set on some websites, meaning that even if the content remains unchanged, each request to the site could result in a slightly different response. If you use our website, you'll see that our script will flag the page as modified whenever we update the core code. In the next part, we'll demonstrate how to use Python's lovely soup to tidy up the outcome and remove anything that could falsely flag the webpage as modified.
Utilizing beautifulsoup to enhance the RPi Web Monitor
Here we'll use beautiful soup to enhance Raspberry Pi's web server monitoring. The beautifulsoup Python module is a potent tool for modifying HTML documents. We may eliminate clutter like style and script tags, for instance. You'll need to adjust the script we built in the last step for this one. A new import is added to the script's initialization. This will bring in the bs4 library and its BeautifulSoup module.

from bs4 import BeautifulSoup
Developing a Brand-New cleanup HTML() method method
Our new mission must now begin. Any HTML obtained from the queries package will be cleaned up using this method. As a result, our RPi's behavior during web monitoring will become more standardized. Including the following code in the file will define the new method. The HTML material to be processed will be supplied as the sole input to this function.

def cleanup_html(HTML):
Produce an instance of the BeautifulSoup object.
A fresh instance of BeautifulSoup is instantiated now. The first argument is the HTML string to be cleaned up. We specify the HTML parser we need to utilize in the second argument. XML is used since it is quick and has all the required features. A faster and more efficient program is always welcome in a resource-constrained environment like our RPi, in which we are executing a web monitor.
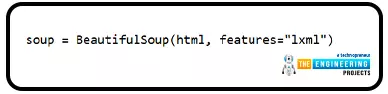
soup = BeautifulSoup(HTML, features="lxml")
Using BeautifulSoup to clean up the HTML.
With BeautifulSoup, we can parse HTML and get rid of unwanted tags. We strip off the "script," "style," and "meta" tags with for loops as well as BeautfulSoup's "select" method. You'll see that the ".extract()" method is called on each loop iteration. When an element matching the given criteria is located, this function deletes it.
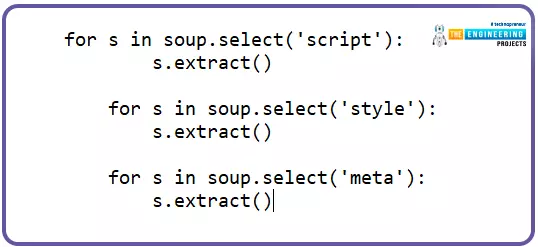
for s in soup.select('script'):
s.extract()
for s in soup.select('style'):
s.extract()
for s in soup.select('meta'):
s.extract()
The BeautifulSoup Object returned as a string.
After BeautifulSoup has processed the HTML retrieved by our website monitoring software, we can return it. It's not enough to return your soup object to its current state. Alternatively, the "str()" function must be used to transform it into a regular string.

return str(soup)
Streamlining the Obtained HTML Response
Our "cleanup html()" function is complete; now, we only need to update some other code to use it. Locate the piece of code below and change it. Instead of storing the reply text without thinking, we first pass it through the new method. The "has website changed()" method is where you'll want to put it.

Substitute the following for the sentence.

response_text = cleanup_html(response.text)
How to save the new extended web monitor
Once you've finished editing the script, the program should resemble what we've displayed below. To save your work when using nano, use control + X, followed by Y, and finally, the Return key.
import os
import sys
import requests
from bs4 import BeautifulSoup
def cleanup_html(HTML):
soup = BeautifulSoup(HTML, features="lxml")
for s in soup.select('script'):
s.extract()
for s in soup.select('style'):
s.extract()
for s in soup.select('meta'):
s.extract()
return str(soup)
def has_website_changed(website_url, website_name):
headers = {
'User-Agent': 'Mozilla/4.0 (compatible; MSIE 6.0; Windows NT 5.1; PIWEBMON)',
'Cache-Control': 'no-cache'
}
response = requests.get(website_url, headers=headers)
if (response.status_code < 200 or response.status_code > 299):
return -1
response_text = cleanup_html(response.text)
cache_filename = website_name + "_cache.txt"
If not os.path.exists(cache_filename):
file_handle = open(cache_filename, "w")
file_handle.write(response_text)
file_handle.close()
return 0
file_handle = open(cache_filename, "r+")
previous_response_text = file_handle.read()
file_handle.seek(0)
if response_text == previous_response_text:
file_handle.close()
return 0
else:
file_handle.truncate()
file_handle.write(response_text)
file_handle.close()
return 1
def main():
website_status = has_website_changed(sys.argv[1], sys.argv[2])
if website_status == -1:
print("Non 2XX response while fetching")
elif website_status == 0:
print("Website is the same")
elif website_status == 1:
print("Website has changed")
if __name__ == "__main__":
main()
The script is ready for further testing. More stable outcomes are expected this time around. We can decrease the likelihood of a false detection by eliminating the "script," "style," and "meta" tags. For instance, every query on our website must not be recorded as "modified" if you follow this pattern.
Implementing email support to the pi 4 web monitor
Our Raspberry Pi monitoring system is somewhat useless without a way to be alerted when a website has been updated. We'll add to our functionality here by notifying you through email anytime the script notices a shift. Remember that this will necessitate you to have the SMTP information for your email provider at hand. Here, we'll use the SMTP settings for Gmail as an example.
Introducing a Fresh Import
We must import a separate package to make SMTP connections from within Python. Thankfully, Python already has this module built in. Include the following line in your script's imports. This line will make it possible to establish SMTP connections quickly by importing the necessary "smtplib" package.

import smtplib
The Process of Defining Constants to Save Email Information
At the outset of the Python code, we must define certain constants. Below the existing "import" command, add the lines below. The fact that Python doesn't truly support constants doesn't stop us from naming these parameters with all capital letters, though. You shouldn't modify these values while the program is running.
SMTP_USER
Identity for your outgoing mail server (Simple mail transfer protocol) connection, as defined by this constant. This is the account you'll use to access Gmail.
We refer to the value saved in this constant for the simple mail transfer protocol connection.

SMTP_USER='example@gmail.com'
SMTP_PASSWORD
The SMTP user's password must be set inside this constant. This is the password for your Gmail account. Second-factor authentication (which you should enable) requires a separate app passcode.

SMTP_PASSWORD='PASSWORD'
SMTP_HOST
The address or URL to which the SMTP connection should be established is saved in the "SMTP HOST" constant. Here, we'll use the SMTP server information for Gmail as an example.

SMTP_HOST='smtp.gmail.com'
SMTP_PORT
Using this setting, we tell our RPi web monitor which port to use when it detects a change and needs to notify us through email. Using Gmail's port for implicit SSL, as shown below: (port 465).

SMTP_PORT=465
SMTP_SSL
These days, most email providers offer a secure connection (SSL or TLS). Our software will only be able to utilize HTTPS protocol. Ensure the constant is set to True to activate this support. By setting this to False, SSL will be turned off.

SMTP_SSL=True
SMTP_FROM_EMAIL
At long last, we have the option to designate the sender's email address for this message. It must be an account you have created to use this email. If you're using an Email account, this should be a verified email address. You need to set up that email account and domain in your transaction email provider, such as Mailgun.

SMTP_FROM_EMAIL='example@gmail.com'
SMTP_TO_EMAIL
The final required setting is the destination email address for the script to use to send the email. Enter the email address at which you would like to be notified of updates to the website.

SMTP_TO_EMAIL='sendto@gmail.com'
Creating the Email Notification method
Our "email notification()" method can be written when we have declared all necessary constants. This function will take care of the process of connecting to an SMTP server and sending an email. Let's begin by identifying our new role. There will be two inputs for it.

def email_notification(subject, message):
Forming an SMTP Link
Initiating an SMTP session is the first step of this method. Since we need to accommodate both SSL and non-encrypted connections, we'll have to make two distinct calls separated by an if clause. An SMTP session is established and saved in the "SMTP server" parameter if the "SMTP SSL" flag is set to True. When SSL is not enabled, we also take this action. We include the SMTP HOST and SMTP PORT environment variables when establishing the link.

if (SMTP_SSL):
smtp_server = smtplib.SMTP_SSL(SMTP_HOST, SMTP_PORT)
else:
smtp_server = smtplib.SMTP(SMTP_HOST, SMTP_PORT)
The SMTP Login Process
After establishing contact with the SMTP mail server, we can start composing and sending the email. We'll first fire off an "eh" to the server. We won't delve too deeply into what this information conveys to the server. The next step is to send an authentication message to the server. The credentials saved in the variables "SMTP USER" and "SMTP PASSWORD" will be sent along with this login request.

smtp_server.help()
smtp_server.login(SMTP_USER, SMTP_PASSWORD)
How to Layout an Electronic Message
The next thing we need to do is compose the message sent via the SMTP connection. This is crucial since it allows our Raspberry Pi to send you an alert if it detects a change to the website you've instructed it to monitor. This structure is adaptable to your needs. To avoid any confusion, please use the "FROM," "Too," and "Subject" lines as shown here. On different lines, please. In addition, one blank line should precede the main body of your email.
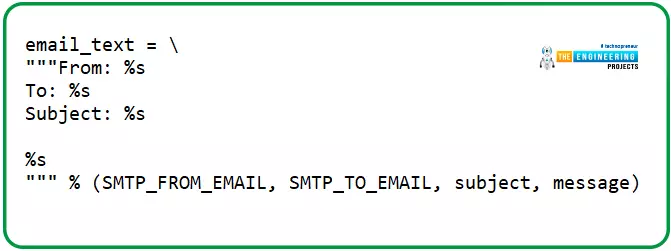
email_text = \
"""From: %s
To: %s
Subject: %s
%s
""" % (SMTP_FROM_EMAIL, SMTP_TO_EMAIL, subject, message)
Email transmission
As the final step of this procedure, we transmit the email over our SMTP session. The previously generated email, along with the email address from "SMTP FROM EMAIL" and the destination email address from "SMTP TO EMAIL," are passed into this function call. After the message has been transmitted, we terminate the SMTP session.

smtp_server.sendmail(SMTP_FROM_EMAIL, SMTP_TO_EMAIL, email_text)
smtp_server.close()
Including Function Calls for email notification()
Since the necessary method has been written, it must be called from within the program. Here, we'll modify the "main()" procedure. You need to locate the line below in your Python code.

print("Non 2XX response while fetching")
Follow that with the line below. The script will automatically send you an email to notify you every time the RPi web monitor encounters an error connecting to the webpage.

Moreover, we should have a line that alerts us whenever the webpage updates. Check your script for the following line. Ideally, it would be located below the previously discovered line. Try to find the following:

The following line should be added above it. Every time this line is reached, an email will notify you that the web has been updated.

The Complete Code
After making the necessary modifications, your script's core code should resemble what we have provided as an example. Before moving forward, make sure to save your code. Your website monitoring service should now send you email alerts if functioning properly. It will send a notification email whenever it is launched and detects a change to the website. This website will, however, notify you by email if it becomes unavailable or produces a status code other than 2XX.
import os
import sys
import requests
from bs4 import BeautifulSoup
import smtplib
SMTP_USER='example@gmail.com'
SMTP_PASSWORD='password'
SMTP_HOST='smtp.gmail.com'
SMTP_PORT='465'
SMTP_SSL=True
SMTP_FROM_EMAIL='example@gmail.com'
SMTP_TO_EMAIL='sendto@gmail.com'
def email_notification(subject, message):
"Send an email notification.
Message - The message to send as the body of the email.
"""
if (SMTP_SSL):
smtp_server = smtplib.SMTP_SSL(SMTP_HOST, SMTP_PORT)
else:
smtp_server = smtplib.SMTP(SMTP_HOST, SMTP_PORT)
smtp_server.ehlo()
smtp_server.login(SMTP_USER, SMTP_PASSWORD)
email_text = \
"""From: %s
To: %s
Subject: %s
%s
""" % (SMTP_FROM_EMAIL, SMTP_TO_EMAIL, subject, message)
smtp_server.sendmail(SMTP_FROM_EMAIL, SMTP_TO_EMAIL, email_text)
smtp_server.close()
def cleanup_html(html):
"""Cleanup the HTML content.
html - A string containg HTML.
"""
soup = BeautifulSoup(html, features="lxml")
for s in soup.select('script'):
s.extract()
for s in soup.select('style'):
s.extract()
for s in soup.select('meta'):
s.extract()
return str(soup)
def has_website_changed(website_url, website_name):
"""Check if a website has changed since the last request.
website_url - URL that you want to monitor for changes.
website_name - Name used for the cache file.
"""
headers = {
'User-Agent': 'Mozilla/4.0 (compatible; MSIE 6.0; Windows NT 5.1; PIWEBMON)',
'Cache-Control': 'no-cache'
}
response = requests.get(website_url, headers=headers)
if (response.status_code < 200 or response.status_code > 299):
return -1
response_text = cleanup_html(response.text)
cache_filename = website_name + "_cache.txt"
if not os.path.exists(cache_filename):
file_handle = open(cache_filename, "w")
file_handle.write(response_text)
file_handle.close()
return 0
file_handle = open(cache_filename, "r+")
previous_response_text = file_handle.read()
file_handle.seek(0)
if response_text == previous_response_text:
file_handle.close()
return 0
else:
file_handle.truncate()
file_handle.write(response_text)
file_handle.close()
return 1
def main():
"""Check if the passed in website has changed."""
website_status = has_website_changed(sys.argv[1], sys.argv[2])
if website_status == -1:
email_notification("An Error has Occurred", "Error While Fetching " + sys.argv[1])
print("Non 2XX response while fetching")
elif website_status == 0:
print("Website is the same")
elif website_status == 1:
email_notification("A Change has Occurred", sys.argv[1] + " has changed.")
print("Website has changed")
if __name__ == "__main__":
main()
Put your RPi web monitoring software on a schedule.
If you've taken the time to write a Python script to keep tabs on many websites, you'll want to set it to run regularly. You may implement an infinite loop to make the script run indefinitely; however, a cronjob will suffice. Our Python program must be installed on the RPi before you continue. You can grab the core code from the Git repo if you'd rather skip the intro. Be careful to complete the SMTP connection information. This instruction section assumes the script is located in the "pi" user's home directory (/home/pi/). After making the necessary changes to the crontab, our program will be run automatically every minute.
Start modifying the active user's crontab with this command.

crontab -e
When requested to choose a text editor, we suggest "nano." Please insert the following line at the end of the document. If you wish to track a certain URL, you'll need to make a small change to the command. In addition, a cache name must be specified. The cache name is optional and can be any string that helps you distinguish this request from others. Insert at the end.

CTRL + X, Y, and ENTER will save your changes to crontab. A new minutely check of the specified website will now be performed by your RPi. The software will notify you if it identifies a modification to a page's content.
Let's take a look at the main gains of monitoring your website.
Encourages problem-free operation of systems
To maintain optimal performance and satisfy clients, monitoring the website is essential. Customers are in a buying mood and don't want to wait for webpages to open or for controls that don't work. If you own an online store, you should examine key performance indicators such as daily bounce rates and page load time. However, regular usability testing will ensure consistent functionality and keep visitors returning.
Keeps a site running smoothly and efficiently
A growing top line is a sign of a healthy website. However, you will not be able to spot warning signs unless you understand your typical exchange rates and annual peaks. Monitoring your statistics can provide a clear picture of your website's performance.
Detailed user insights are revealed.
One of the essential benefits of web tracking is the ability to uncover hidden user and product possibilities. This may be achieved by setting up quarterly or monthly usability tracking based on your staff's population and your website's structure. One of the most effective strategies to enhance your site and raise customer satisfaction is demonstrating empathy for your customers by performing routine monitoring activities like analyzing comments.
E-commerce transactions can be optimized using customer feedback, for example, by removing an extra photo or description step between the product selection and the shopping basket. There's a chance that another user will vent their annoyance over not being able to access subscriber-only deals. If you take the time to listen to and empathize with your users' complaints, follow up with them to let them know they must sign in to obtain the offer and assure them that the site will be improved soon.
assures usability and boosts return on investment
Users may not be able to access and engage with your website in the event of downtime or page breaks. Prolonged outages can lead to being de-indexed, dropped in search engine rankings, and a dent in your reputation. No one will wait for a down website. Customers are not easily won back, and doing so requires an investment of both time and resources. If your site goes down in Perth but remains accessible in Sydney, you won't realize the difference unless you watch it constantly. In an emergency, tracking can assist you alert consumers and fixing any accessibility problems before they affect users.
In addition to preventing disruptions in the future, automatic downtime monitoring can provide real-time alerts by studying past incidents. Whether you need to check if your SSL certificate has expired or if there is an API problem affecting site speed, automation and control can help.
Facilitates easy interaction
When servers go down, your website becomes inaccessible, and so does all of your correspondence. Because of the prevalence of remote work and international teams, port failures have become increasingly expensive. Unfortunately, there is no viable or efficient way to communicate by text message on a mobile device.
Servers and port monitoring are often included in downtime monitoring software. Systems and tools make it easy to resolve communication issues between teams, offices, and nations. Customers will appreciate the timely alerts, and your employees will appreciate the mental stimulation.
Disadvantages of Website Surveillance
There are, of course, a few drawbacks to keeping an eye on your website. To decide if tracking is the best option for you and the team, consider these drawbacks. Some sites and portals may have a foundation of cybersecurity or automatic monitors; depending on your firm's specifics, you may just need a few more tools and processes. There is a silver lining to every cloud in the website monitoring storm. This article will provide some advice and solutions to help you deal with the drawbacks.
Costly
The cost of a good website monitoring technology might be a significant drain on a company's resources. Though many products provide free tiers of service, these tiers are sometimes not as feature-rich as paid tiers, leaving you vulnerable to security holes or unsupported APIs. Spending on paid monitoring software, if any, might range from $15 per month to $500 per month, depending on the features you require and the size of your firm.
Consumes a lot of time
Time is a necessary component of the organization, approach, and resource for successful web monitoring. How long would it take, for instance, to become an expert in website monitoring if you taught your current team how to do it? Because of the potential lack of workforce in other areas as a result of a single employee's pivot, training may not always be an option. Assume for a moment that your group possesses the necessary expertise to perform monitoring in-house. You should consider how much effort it will take and whether outsourcing is an option.
Blocklists
Checking in on your website regularly is essential. It's important to check in numerous times a day to ensure no outages. Regrettably, excessive monitoring can raise red flags with your hosting service, leading to your IP address being blocklisted. To some, blocklisting might prevent electronic communications and alert consumers that your site is a security threat, a major downside of website monitoring. However, this problem can be easily fixed by contacting your server and having your IP address allowed.
Monitoring errors
Even the most composed teams can quickly become flustered when confronted with novel tools and increased data. Mistakes in tracking can be caused by several factors, including a failure to communicate, inexperience, and hazy objectives. However, when a team is inundated with information, they may become paralyzed and unable to get the answers they need. Since the point of tracking is to swiftly handle problems within all data available instead of getting mired in data analysis, this may be particularly stressful and disheartening.
Conclusion
This tutorial taught you the fundamentals of setting up a web-based monitoring system on a Raspberry Pi 4. This code will retrieve the most recent version of the given URL each time it is used. Then, the cached response is checked again on the new request to determine if any changes were made. This script will notify you via an outside email server if the URL changes or becomes unavailable. In the following tutorial, we will learn how to build a raspberry pi 4 Wi-Fi extender for our home use.