Hello friends! Today, we are going to study serial communication with an 8051 microcontroller in Proteus. We will send characters from a Virtual Terminal to an AT89C52, use those characters to control eight LEDs and send a short acknowledgement back to the terminal. If you have completed our 8051 LED blinking project , you already know how to build the basic circuit and load a HEX file. This tutorial adds a communication channel so the output changes in response to a command instead of a fixed delay. We will keep the original command scheme and project download, while correcting an important clock detail. The revised program uses an 11.0592 MHz oscillator for 9600 baud. The older screenshots show a 16 MHz crystal, so change that value and the processor clock setting when following the prog ...
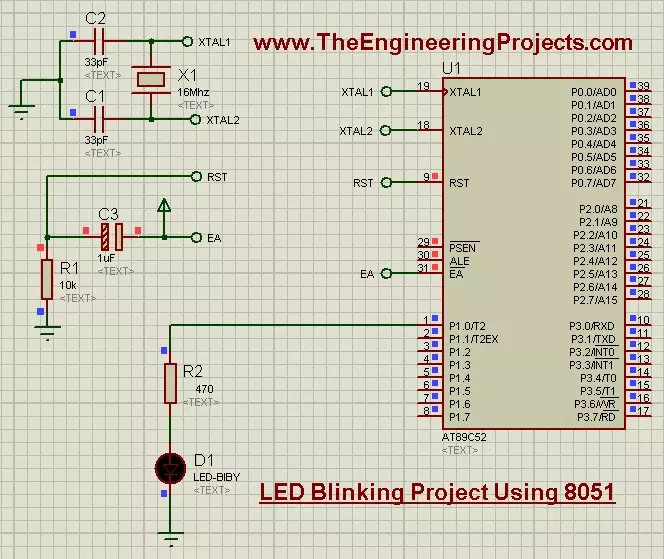
Hello friends! Today, we are going to build an LED blinking project using an 8051 microcontroller in Proteus. This is a useful first exercise because it connects a short C program with something we can immediately observe: an output pin repeatedly switching an LED on and off. We will use the AT89C52, which belongs to the 8051 family, and keep the original project's 16 MHz clock and P1.0 LED connection. I will explain the supporting circuit first, then show how to create the program in Keil, generate a HEX file and load it into the simulation. The original simulation and download remain available below. The updated example uses Timer0 for an understandable delay instead of relying on an empty software loop. That gives us a practical introduction to both digital outputs and the relationship ...
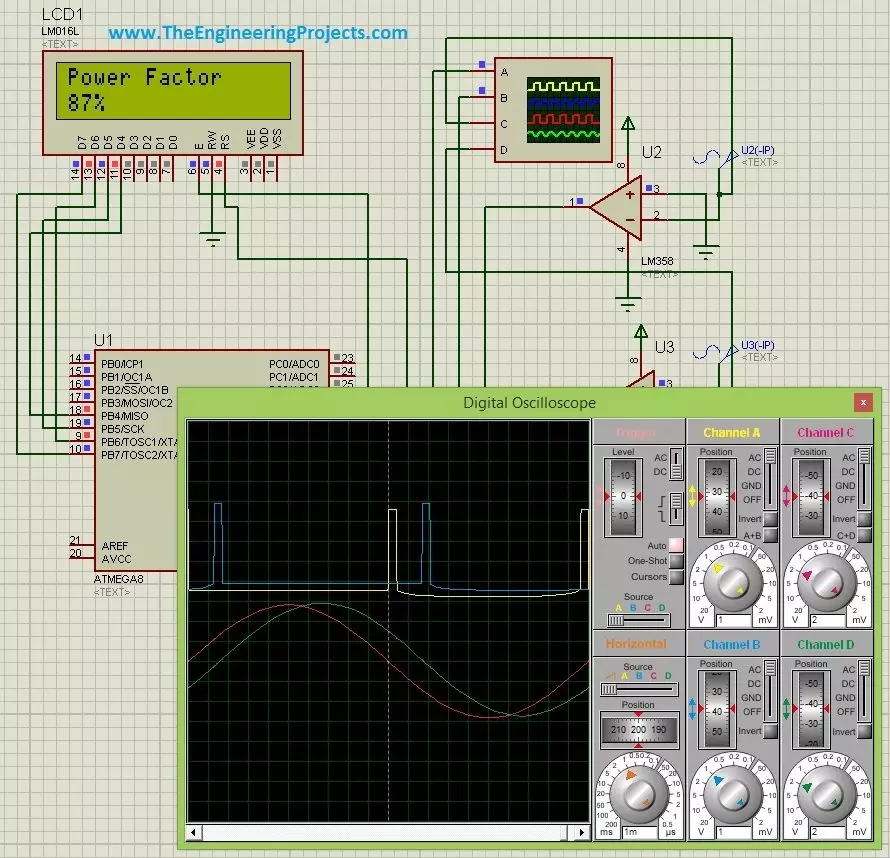
Hello friends! Today, we are going to discuss power factor measurement using a microcontroller in Proteus. We will use the ATmega8 project to understand how the timing difference between voltage and current can be converted into a phase angle, and then into a power factor reading on an LCD. I will start with the electrical meaning of power factor, because a correct calculation is useful only when we understand what it measures. After that, we will examine the zero-crossing stages, choose a timer resolution, work through numerical examples and discuss the changes needed for reliable firmware. The circuit is an educational simulation using separate signals to represent voltage and current. Its timing method is appropriate for sinusoidal waveforms. When a load draws distorted current, we need ...
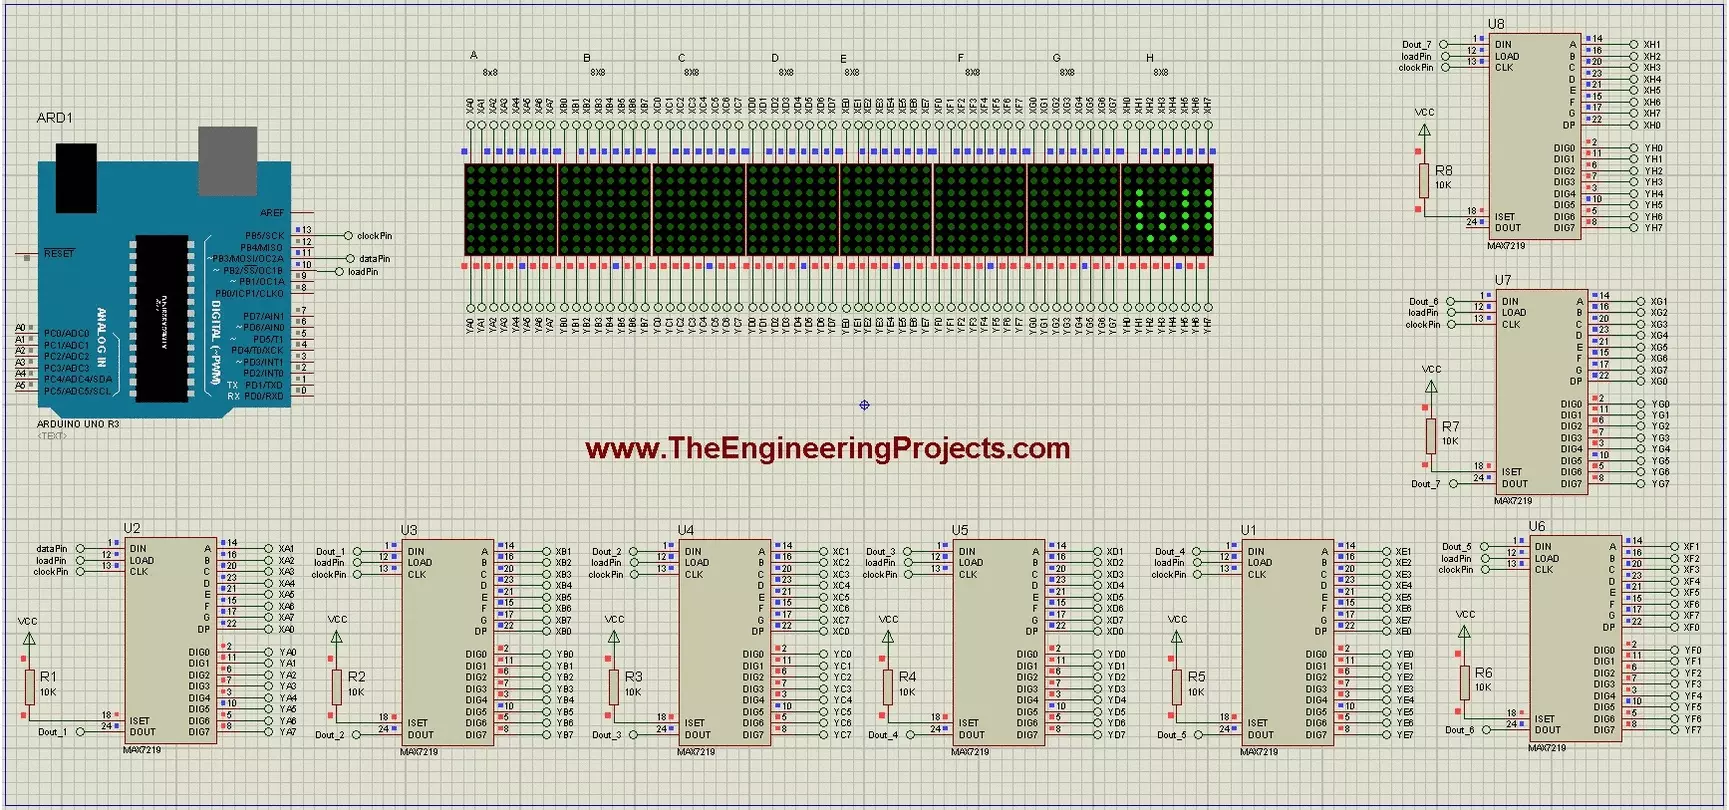
Hello friends! Today we will build a scrolling-text display using Arduino and eight 8x8 LED matrices. Each matrix has its own MAX7219 driver, and the drivers share a serial connection so Arduino can control the complete display through three signal lines. The original project demonstrates the text in Proteus and includes a useful circuit drawing and animation. We will retain those illustrations while explaining the driver correctly, checking the matrix orientation and using a current text-animation library interface. Our display is eight pixels high and sixty-four pixels wide. We will first understand one module, then connect the chain, display a short message and adjust the scroll timing. Power distribution and hardware mapping matter just as much as the sketch when moving from a simulato ...
Hello friends! In this tutorial, we will interface a matrix keypad with Arduino Uno and show each pressed key on a 20x4 LCD in Proteus. We will begin with the keypad's internal connections, then build the circuit and write a sketch that keeps the displayed text within a defined area. A keypad is useful when a project needs several related buttons, such as digits for a calculator or commands for a menu. A matrix arrangement reduces the number of controller connections compared with giving every button its own dedicated input. Our example uses twelve keys arranged in four rows and three columns. We will preserve the original circuit's pin assignments, explain how the Keypad library scans them, and check common mistakes such as reversed connector order, repeated characters and LCD overflow. F ...
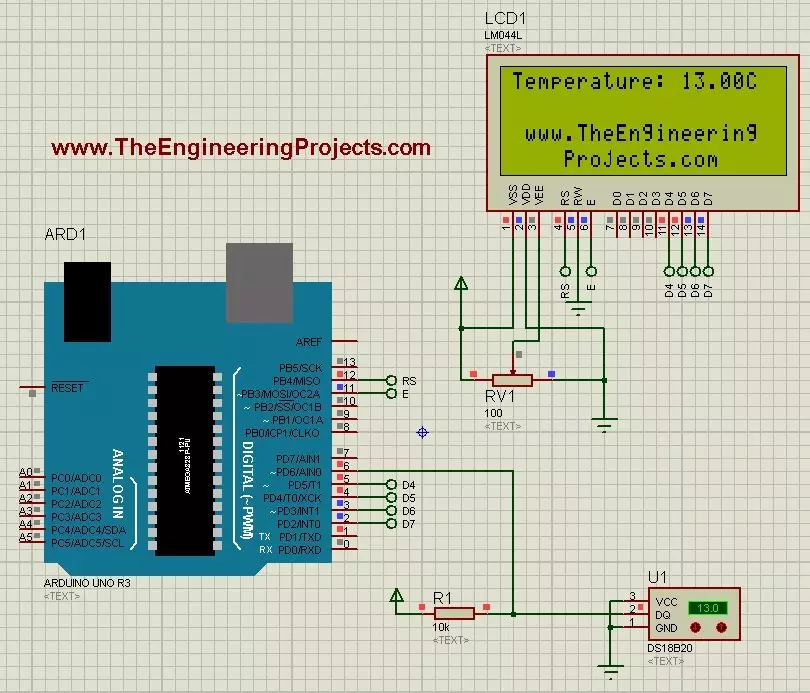
Hello friends! Today we will use the DS18B20 temperature sensor with Arduino Uno in Proteus and display its reading on a character LCD. The sensor is sometimes shortened to 18B20 in project descriptions, but DS18B20 is the part name we will use when selecting the device and checking its specifications. We will begin with the sensor connections, add a 20-column by 4-row LCD, and write a sketch that requests a temperature conversion before displaying the result. We will also handle a missing sensor explicitly instead of presenting an error value as though it were a real temperature. The Proteus model lets us change the simulated temperature using its controls. It does not measure the room around your computer. This makes it useful for checking the program and display workflow before building ...
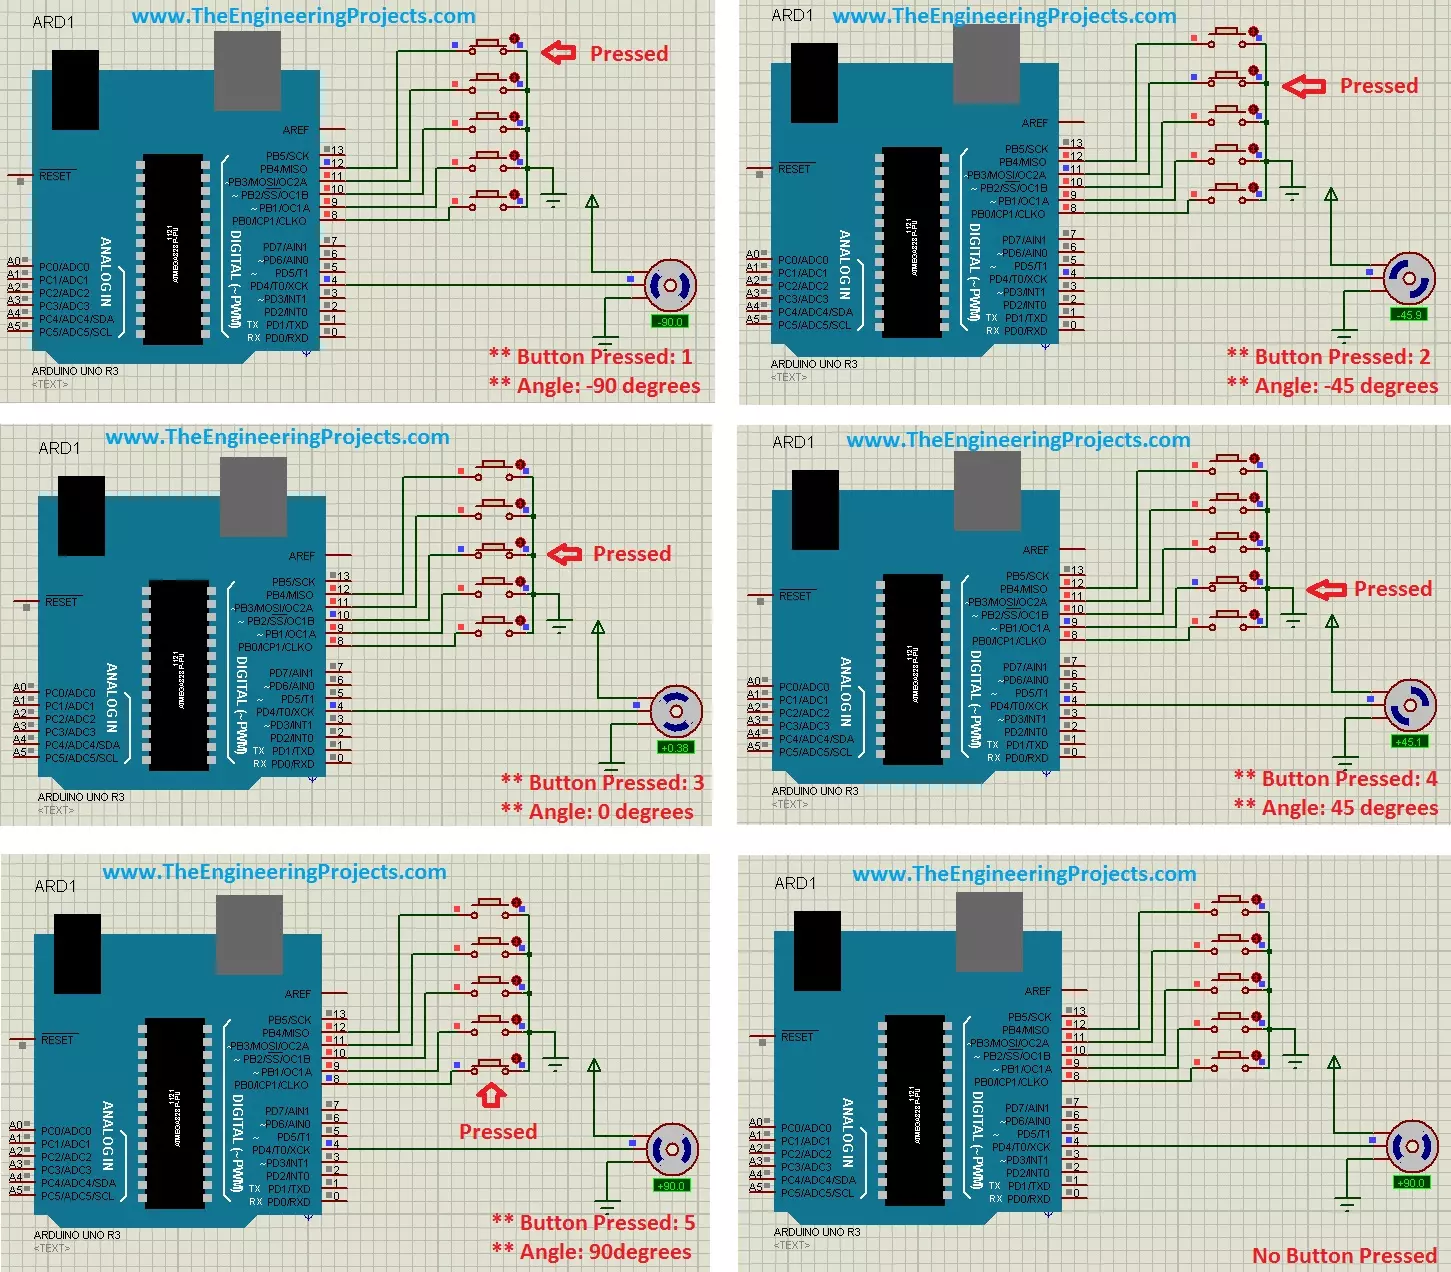
Hello friends! In this tutorial, we will control a servo motor with Arduino in Proteus. We will begin with a simple sweep, understand the signal that commands the position, and then add five push buttons so we can select individual positions. Libraries Libraries used in this tutorial Arduino UNO Library for Proteus: V1.0 (2015, used in this tutorial) · latest version: V4.0 (October 2026) Helping Tools Serial Monitor Advance : a serial terminal window for the UART of your board Serial Monitor Expert : the serial monitor with extra debugging tools LCD Library for Proteus V3.0 : 16x2, 20x4 and I2C LCDs to show your readings A positional hobby servo is convenient because its motor, gearbox and position controller are assembled in one unit. Arduino supplies a command signal while the servo's in ...
Hello friends! Today we will use an Arduino Uno footprint in Proteus ARES and turn it into a reusable package for our own PCB projects. This is useful when you want a removable Uno to plug into a larger board containing sensors, connectors or interface circuits. Libraries Arduino UNO Simulation Libraries Latest library: Arduino UNO Library for Proteus V4.0 (October 2026): working LEDs, a RESET button and a built-in serial monitor Other Arduino boards: Mega 2560 · Mega 1280 · Nano · Pro Mini · Mini (V4.0) All six V4.0 boards in one package: Arduino Library for Proteus V4.0 Helping Tools Serial Monitor Advance : a serial terminal window for the UART of your board Serial Monitor Expert : the serial monitor with extra debugging tools LCD Library for Proteus V3.0 : 16x2, 20x4 and I2C LCDs to sh ...
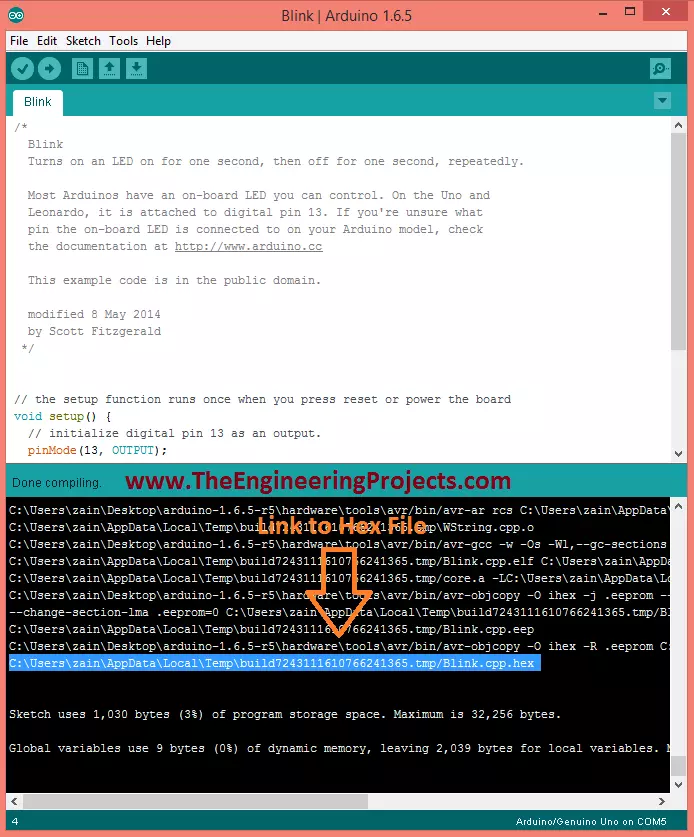
Hello friends! Today we will learn how to get the compiled HEX file from an Arduino sketch. This is useful when you want to load firmware into a Proteus model, program a compatible AVR microcontroller or keep a specific compiled version of a project. Libraries Libraries used in this tutorial Arduino Library for Proteus: V1.0 (2015, used in this tutorial) · latest version: V4.0 (October 2026) Arduino UNO Library for Proteus: V1.0 (2015, used in this tutorial) · latest version: V4.0 (October 2026) Helping Tools Serial Monitor Advance : a serial terminal window for the UART of your board Serial Monitor Expert : the serial monitor with extra debugging tools LCD Library for Proteus V3.0 : 16x2, 20x4 and I2C LCDs to show your readings Arduino does generate compiled firmware during its normal bui ...
Hello friends! Today we will build an intelligent energy-saving demonstration using an Arduino Uno, two doorway sensors, an LCD and controlled loads. The idea is to count completed entries and exits, then switch the model room's loads according to that count. The interesting part is not simply turning a relay on. We need to recognize direction, handle an interrupted crossing, avoid counting the same person repeatedly and decide what to do when the count becomes uncertain. We will develop those rules before looking at the complete program. This is a controlled educational demonstration. Two narrow beams cannot reliably count a crowd or guarantee that a real room is empty. We will use low-voltage demonstration loads and make the limitations visible rather than treating an imperfect counter a ...