

Hello Everyone! Happy to see you here. I welcome you on board. In this tutorial, I’ll walk you through the Water Sensor Library for Proteus. You won't find this library in the proteus software, and we are introducing it for the very first time. It will help you to better understand the working/ operation of the water sensor.
If you want a proteus library of any sensor, that is not available in proteus already, you can share it in the comments below, I’ll try my best to create and share that library asap.
Before I go further, it’s better to scratch and get a hold of what is a water sensor? A water sensor is an electronic sensor, used to detect the presence of water. It detects the water by measuring the water's electrical conductivity. These sensors are mainly used to ward off the flow of water in case any leakage happens. This device is mainly used for detecting water levels, rainfall, and water leakage.
Let’s dive in and study how to download and simulate Water Sensor Library For Proteus.
Water Sensor Library For Proteus
- Click the button below, to download a water sensor library for proteus:
Water Sensor Library For Proteus
- As you download the file, it will appear in a .zip file that comes with two folders named: Proteus Library and Proteus Simulation.
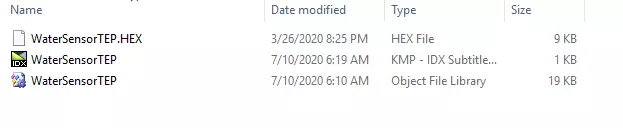
Now, you have to open the proteus library folder that carries three files, named:
- WaterSensorTEP.IDX
- WaterSensorTEP.LIB
- WaterSensorTEP.HEX
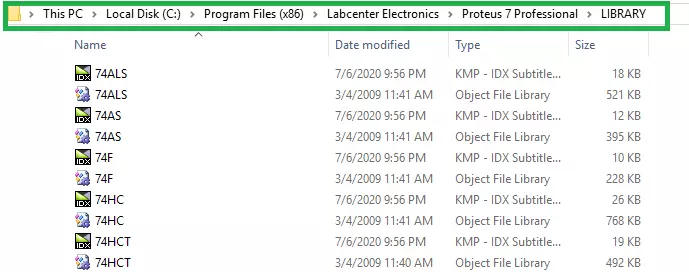
- Copy all these three files and paste them into the Library Folder of the Proteus software.
- After doing this drill, you have to start the proteus software. If it’s already open, restart.
- After starting the proteus software, search for the water sensor available in the component’s search box as mentioned below:

- As you search for the sensor, you will get the figure below. This is our water sensor library for proteus that we have recently added to the proteus library.

- As you click ‘OK’ you’ll watch the sensor appearing as a blinking image, indicating you can place this sensor anywhere you want in the proteus workspace. After doing this, you’ll get the below result:

- Almost half work is done. You’ve created the proteus workspace with the water sensor.
Sensor Layout
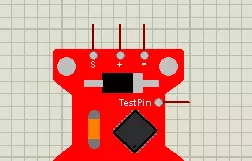
Still reading? Perfect. Before I move further and discuss how to add a sensor’s hex file and run a proteus simulation of the water sensor, let’s discuss the sensor’s pins and layout first. This water sensor comes with four pins as follows:- (S): This is an analog output pin that is used for the connection with the input of the circuit.
- (-): This pin is connected to the ground.
- (+): This is a power supply pin that is used to power the sensor. It is officially recommended to connect this pin with a voltage ranging from 3.3V to 5V.
- TestPin: This test pin is used for proteus simulation. You won’t find this pin in real-time on the water sensor.
- Though these copper trances are not directly connected, they stand connected when they all are submerged in water. Generally, they are placed together where one sense trace stands between two power traces.
- There is one LED incorporated on the board that turns on when the sensor is powered.
Working Of Water Sensor
Working is pretty simple.- The exposed parallel traces work as a variable resistor whose resistance is directly related to the water level.
- The sensor resistance is inversely proportional to the water level.
- When the sensor is fully immersed it shows the low resistance, thus indicating more height of the water.
- And when the sensor is partially immersed, it shows more resistance, and less conductivity, thus indicating less height in correspondence with the resistance.
- This variable resistance is directly related to the voltage appearing across the sensor. By measuring that voltage we can detect the water level.
Adding Sensor’s Hex File
- I hope you’ve got a clear idea of how this sensor works and detects the water level. Now, we’ll add the hex file of this sensor available in the library folder.
- Right-click on the water sensor and look for “Edit Properties” as shown in the figure below.
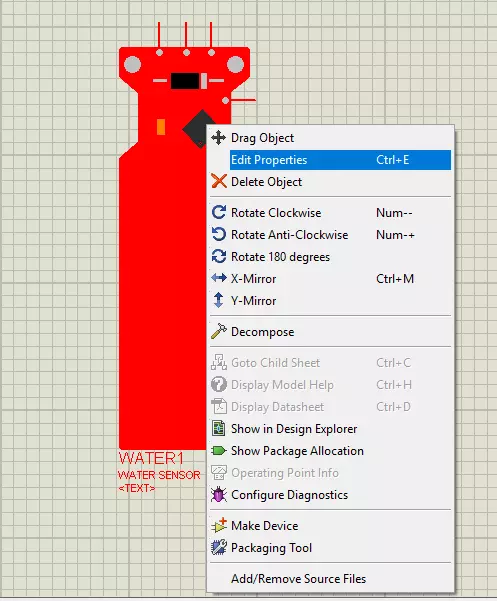
- You can also get the “Edit Properties” panel by double-clicking on the sensor.
- Now, you can add the sensor’s hex file by clicking the browse button as shown below. This file you can find in the library folder of the proteus software.

- You’ve added the hex file successfully. Now click “OK” and close the “Edit Properties” panel.
Proteus Simulation of Water Sensor
- Now we simulate the sensor we’ve produced in the proteus workspace.
- To do this, we’ll design a small LC circuit that will help simulate the water sensor.
- Connecting the LC circuit with the sensor is simple and straightforward. We’ll connect the sensor’s analog output pin (S) with the LC circuit through a voltmeter. And we’ll attach the variable resistor to the TestPin of the sensor. This resistance of this variable resistor will help us detect the water.
- The voltage on this voltmeter connected with the LC circuit gives the value against the variable resistor.
- When the resistance is zero, it gives the maximum voltage across the voltmeter i.e. 4.97V. Recall, when the sensor is fully immersed in water, it shows zero resistance, thus indicating more height of the water level.
- And when we start increasing the resistance across the variable resistor, the voltage on the voltmeter will start decreasing, thus indicating the sensor is not immersed in water, projecting the low height of the water level.
- There is a reason we’ve connected the sensor with the LC circuit. Because proteus always provides the peak-to-peak value of the sensor and we need to convert that peak-to-peak value into Vrms.
- We are using this LC circuit to run our proteus simulation, we don’t need it in the real-time hardware implementation of the water sensor.
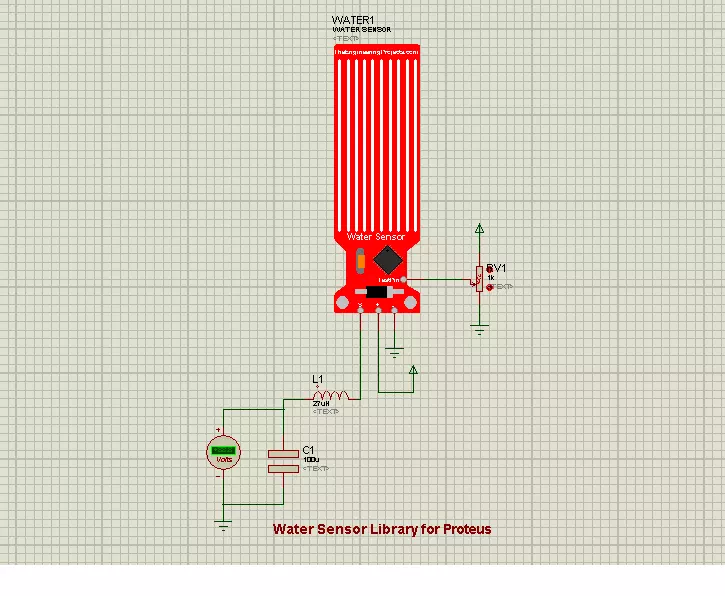
- We’ve done it. This is the complete simulation of the water sensor. This water sensor library is not available in the Proteus library, we’ve added it the very first time.
- Now, click the play button at the bottom left of Proteus software, it will show the result above.
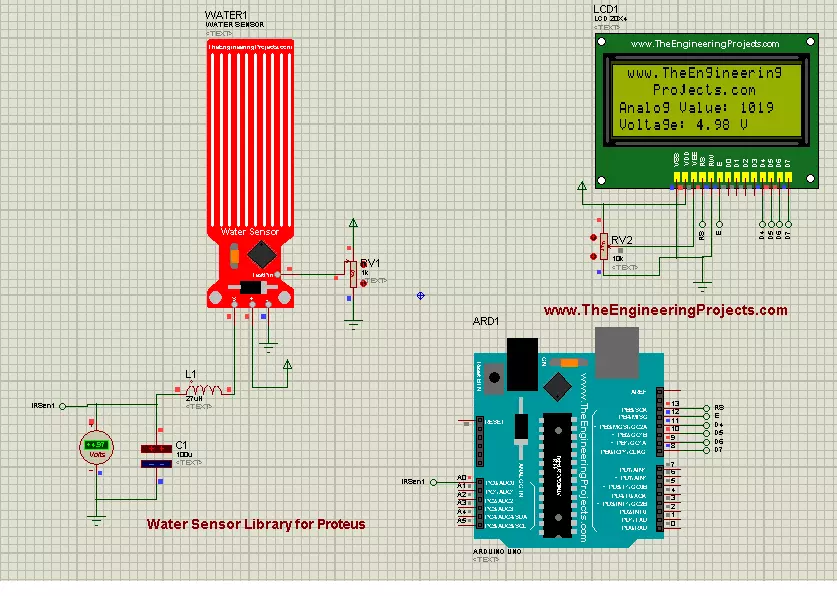
Water Sensor with Arduino
- Now, we’ll attach this sensor with Arduino.
- We’ll connect the output of the water sensor appearing across the voltmeter to the analog input pin of the Arduino board.

- When the resistance is zero, the voltage will appear as 4.97V, thus giving an equivalent analog value of 1019 on the LCD attached to the Arduino Board.
