


Training Error: Recognition Failed in EasyVR


Hello friends! Today, we will work through the EasyVR message Training Error: Recognition Failed. I originally encountered this error while training voice commands for an Arduino UNO project. Commander connected to the board, but the training attempt failed when I spoke the first command. Repeating the same attempt did not solve it.
In my original setup, loading an appropriate EasyVR example and changing the shield's J12 connection from PC to SW allowed training to continue. That observation is useful, but it needs an important explanation: the correct jumper position depends on the shield revision and the communication path being used. SW is not a universal cure for every recognition error.
We will separate communication problems from training and microphone problems, then return to the robot-command example. By the end, you should have a repeatable way to identify the failing stage, train a small command set and check that your Arduino handles unsuccessful recognition without taking an unintended action.
What Does Recognition Failed Mean?
EasyVR is a dedicated speech-recognition module. The Arduino asks it to perform an operation, and the module reports a result through its serial interface. EasyVR Commander provides a computer interface for defining, training and testing commands. The microphone connected to EasyVR supplies the sound; speaking into the computer's microphone does not train the module in this arrangement.
A training error means that the requested training operation did not produce an acceptable result. It does not, by itself, prove that the board is damaged. The useful diagnostic question is where the process stopped: before connection, before the speaking prompt, during the first utterance, during the second utterance, or only when recognizing an already-trained command.
Keep training and recognition separate in your notes. Training stores the information associated with a user-defined command. Recognition compares later speech with the command set selected by the application. A command can be trained successfully but fail during use because the application selects another group, the speaker changes substantially, or the operating environment is different.
The Error in My Original Project
The sequence in the original experiment was straightforward. I connected the shield to the UNO, selected the Arduino's COM port in Commander and connected. I then created a command and started its training procedure. The error appeared during the first phase, as shown below.
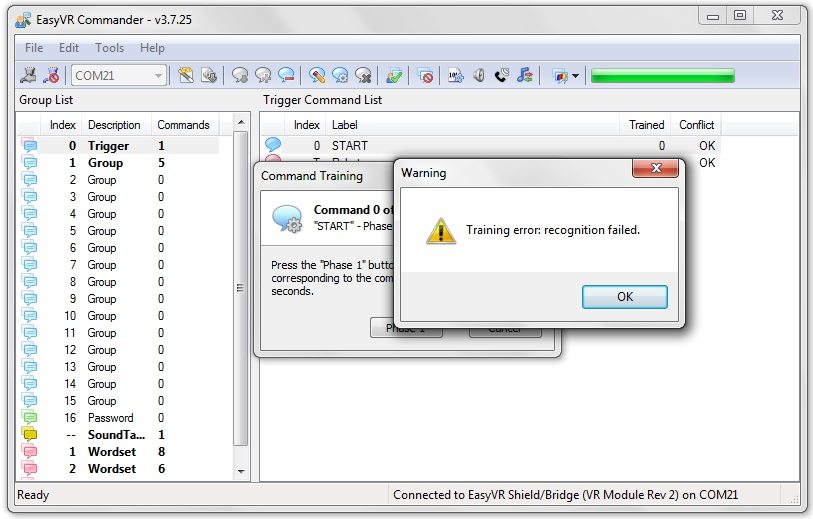
I first checked communication with an EasyVR example sketch, then returned to Commander with the shield configured for the software-serial bridge route. Training worked in that arrangement. The practical lesson is to make the jumper configuration agree with the program and wiring. Changing a jumper without identifying that route can merely exchange one fault for another.
The earlier version of this article suggested that newer shields no longer needed PC mode. That was too broad. A hardware revision, a direct computer connection and an Arduino bridge are separate matters. Follow the manual for the board in front of you, including its supported upload and operating modes.
Check the Communication Path First
Fortebit's EasyVR Shield 3 specifications explain its serial operating modes. In SW mode, Commander can communicate through a compatible bridge program running on the Arduino. PC mode uses a different route. These instructions apply to that documented shield; an older J12-labelled board must be checked against its own revision information.
| Connection arrangement | What must agree | Typical mistake |
|---|---|---|
| Arduino software-serial bridge | Bridge sketch, shield routing and selected serial pins | Choosing SW while the Arduino runs an unrelated sketch |
| Direct PC route supported by the shield | Shield mode and the board's documented host arrangement | Assuming the Arduino application still forwards the connection |
| Dedicated USB adapter | Adapter wiring, module power and adapter COM port | Selecting the Arduino COM port instead of the adapter |
Write down the path in ordinary words. For example: the computer opens the UNO USB port; an Arduino bridge sketch receives those bytes; the bridge forwards them to the EasyVR serial connection; replies return through the same program. Every part of that path must exist before changing recognition settings can help.
- Identify the shield and module revision from their markings.
- Disconnect power before removing the shield or moving a jumper.
- Use the upload configuration specified for that revision, and upload the matching library bridge or bridge-capable example.
- With power removed again, set the documented operating jumper position.
- Reconnect power, close other serial applications and select the correct port in Commander.
- Connect and confirm that Commander can read the module's command groups consistently.
If you cannot connect at all, stay with this stage. Check the USB cable, selected port, driver, power, shield seating and sketch. A successful compile only says that the source was accepted by the compiler. It does not confirm that the intended board received the program or that its jumpers route the serial signals correctly.
Avoid Two Programs Fighting for the Port
Close the Arduino Serial Monitor before opening the same port in Commander. Also close terminal programs left over from earlier experiments. A busy COM port can prevent the connection completely, while an unexpected board reset during connection can make the behavior appear intermittent.
Use a stable USB connection while troubleshooting. If the device repeatedly disconnects from the operating system, solve that before retraining commands. Repeatedly erasing and rebuilding the voice database cannot repair a loose connector or a board that is losing power.
Train One Command Under Controlled Conditions
Once the serial path is reliable, start with one distinct command. Do not immediately train a large vocabulary. A single command gives you a small experiment: you can establish the microphone position, speaking timing and repeatability without wondering which of several similar words caused a conflict.
The official EasyVR Commander guide describes a two-utterance training process. Wait for the speaking prompt in each phase, use consistent pronunciation, and finish both phases. It also explains that retraining requires clearing the previous training for that command. Record existing command names and group assignments before changing a working set.
- Select the intended user-defined command group.
- Add a clearly labelled command, such as FORWARD.
- Place the microphone where it will be used in the project.
- Start the first training phase and speak only after the prompt.
- Repeat the same word naturally during the second phase.
- Check the reported training status and any conflict information.
- Test recognition in that same group before adding the next command.
The command label is an identifier in the project, not an audio recording. Naming an entry FORWARD does not teach the module how you pronounce “forward.” The training utterances provide that information. Keep the label meaningful so the later Arduino code remains understandable.
Speak normally rather than shouting. Shouting can change pronunciation and may overload the acoustic input. A whisper used during training followed by a loud command during operation is another avoidable mismatch. Use a comfortable voice and a repeatable distance, then deliberately test reasonable variations after the basic case works.
Check the Microphone and Surroundings
Start in a quiet room with the project's motors stopped. Keep the microphone connector secure and its cable away from motor wiring. Check that the correct microphone is attached according to the module documentation; a visually similar connector is not enough to establish electrical compatibility.
In my original experiment, turning off a nearby fan helped create a quieter training environment. That does not mean every project must operate in silence. It means the quiet test gives us a baseline. After establishing it, turn the expected noise sources back on one at a time and observe what changes.
| Observation | Useful investigation | Controlled adjustment |
|---|---|---|
| Every command fails at the speaking stage | Microphone connection, timing or strong background noise | Check the microphone and train one word after the prompt |
| First phase works but second phase fails | Utterances differ too much | Repeat the same word with similar pace and distance |
| Only two similar words are confused | Vocabulary separation | Choose more distinct command words |
| Quiet-room tests work but robot tests fail | Motor noise, vibration or power disturbance | Compare motors off and on without changing the training set |
| Commander tests work but Arduino application fails | Group, command index or application state | Log the returned identifiers before enabling actions |
Do not immediately compensate for poor audio by making recognition more permissive. A setting that accepts more intended words may also accept more unintended sounds. First improve the physical arrangement and vocabulary. Then adjust one documented recognition setting at a time, keeping a record of the previous value.
Use the Error Information Rather Than Guessing
When a tool reports a detailed error or numeric code, record the exact value and operation. Fortebit maintains an EasyVR error-code reference. Match the reported code to the applicable firmware documentation instead of treating every failure as the same microphone fault.
A useful report includes the shield revision, Arduino board, jumper position, loaded example, Commander version, selected group, failing training phase and whether previously trained commands still work. This information is far more useful than “voice recognition does not work.” It also helps you recognize when a new failure was introduced by a changed setting.
Keep a small experiment log. In one run, keep the microphone position fixed and change only the word. In another, keep the word fixed and change only the distance. If you change the bridge sketch, command group and microphone placement together, a successful result will not tell you which change mattered.
Return to the Five-Command Robot Example
After resolving the original problem, I trained five commands for controlling a robot. The screenshot below preserves that stage of the project. For the complete hardware context, see our EasyVR shield and Arduino interfacing tutorial and voice-controlled robot project.
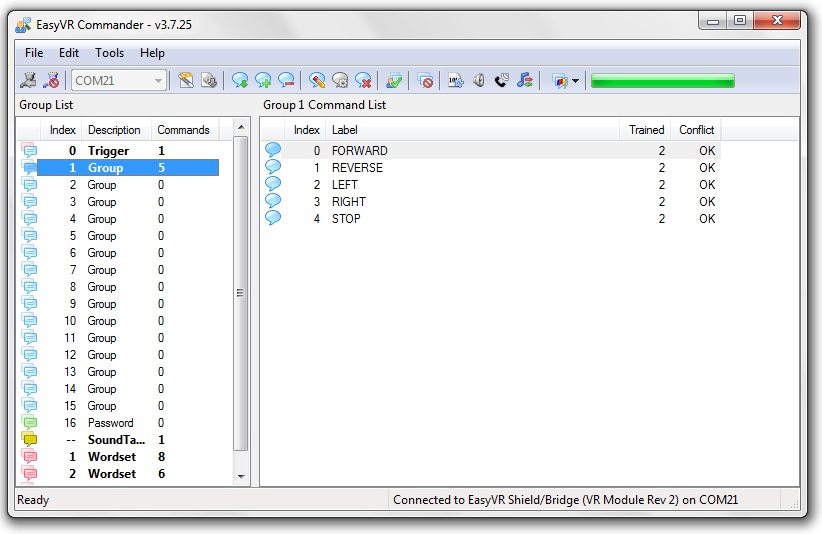
Before connecting those commands to motor movement, make the Arduino print the recognized group and command index. Check each command against your current Commander database. Deleting or rearranging entries can change the relationship between an index and the action your sketch assigns to it.
Use explicit application states. The robot can begin in an idle state, accept a valid movement command, and return to idle when its movement period ends. An unrecognized utterance should not be interpreted as a new movement command. A recognition timeout should also have a defined effect rather than leaving stale command data available for reuse.
During initial testing, raise the wheels or disable the motor driver and observe printed actions. A successful voice result only establishes the command interpretation; it does not confirm motor direction, driver wiring or mechanical behavior. Re-enable movement after those actions match your intentions.
Keep a Separate Stop Mechanism
A voice stop command is convenient, but it should not be the only way to stop a moving experiment. Recognition can fail precisely when motors and surrounding activity make the environment noisy. Provide a direct stop or power-disable mechanism appropriate to the project, and limit how long a movement command can remain active without renewal.
For example, suppose a demonstration allows motion for two seconds after a valid command. The controller records the command time and stops when the elapsed time reaches two seconds. This timeout is a design example, not a universal safe value. Choose the duration from the robot's speed, available space and intended behavior.
Measure Recognition Performance Fairly
The original article gave an informal accuracy estimate. Without a defined test set, that number is not a useful specification. Instead, measure the behavior of your own command set under stated conditions. Separate intended-command trials from background-noise and unrelated-word trials.
For intended commands, calculate the correct-recognition rate as 100 × correct results / total attempts. If a command is recognized correctly in 18 of 20 attempts, that test produced 90%. This is an illustrative calculation, not a measured result for the hardware shown here. Twenty attempts also provide only limited evidence about longer-term behavior.
Record wrong-command results separately from rejected attempts. A rejection means that no valid action should be taken; accepting LEFT when you said RIGHT is a different and potentially more serious application error. Combining both into one percentage hides the behavior you need to improve.
| Test condition | What to record | Why it matters |
|---|---|---|
| Original speaker in quiet conditions | Correct, wrong and rejected results for each command | Establishes the baseline |
| Expected operating distance | Same categories at the intended microphone position | Checks the physical installation |
| Normal project noise | Results with fans or motors operating | Shows the effect of the real environment |
| Unrelated words and silence | Any accepted commands | Reveals unwanted activations |
For background operation, record the observation time as well as the number of false activations. “No false commands during one minute” and “no false commands during an afternoon” represent different amounts of evidence. Keep the test description alongside the result so you can compare changes fairly.
Review of the Troubleshooting Method
The most useful part of this repair is the order of work. Confirm the communication route first, establish a quiet single-command training case second, and then test the intended environment. This avoids spending time on acoustic adjustments while the wrong sketch or jumper configuration is still blocking communication.
Once the baseline works, expand gradually. Add one command, test its distinction from the existing words, and then connect the recognized identifier to an application action. Keep a copy of the working sketch and a written record of the command database so you can return to a known configuration if a later change causes confusion.
Frequently Asked Questions
Should I always move J12 from PC to SW?
No. SW worked with the bridge arrangement used in my original repair. Use the position required by your shield revision, serial wiring and loaded program. Remove power before changing jumpers or reseating the shield.
Why can Commander connect but training still fail?
Connection and speech processing are separate stages. A working serial link lets Commander request training, but the microphone input, prompt timing and utterance consistency still determine whether that operation can complete.
Will a command trained by one person work for everyone?
Do not assume that for a speaker-dependent command. Test the actual users and select the recognition approach supported by the module for the intended application. A command label shared between users does not make their voices equivalent.
Should I erase every command and start again?
Only after identifying a reason to do so. Preserve a working set while testing one problematic entry. Broadly erasing the database removes useful evidence and can also break the command-index mapping in the Arduino application.
What should I share when asking for help?
Share the board revision, jumper mode, bridge or application sketch, exact error, failing phase and a short description of the microphone arrangement. Include whether the same command works in Commander. Those details make it possible to narrow the problem instead of repeating unrelated fixes.

You piece about easyVR commander is outstanding for putting it all together into one flow. I did it and all aspects worked very well. EasyVR 2.0 on Uno. I tried the next step but you code will not compile and many errors are generated for example tch_sep19a:4: error: 'SoftwareSerial' does not name a type
sketch_sep19a:13: error: 'EasyVR' does not name a type
sketch_sep19a:37: error: 'EasyVRBridge' does not name a type
sketch_sep19a.ino: In function 'void setup()':
sketch_sep19a:44: error: 'bridge' was not declared in this scope
sketch_sep19a:51: error: 'port' was not declared in this scope
In comparing your code to TestEasyVR, the first part with the includes are the same. So I don't see why one works and the other does not.
I then went to TestEasyVR which compliled perfectly, loaded and is now giving me the message that easyVR is not detected. I'm puzzled since the earlier part worked so well.
Any pointers on what I could do? I'm a retired electrical engineer from IBM and now need all the help I can get :<)
1 reply
Hi,
It's nice to hear that it worked for you. Now the problem you're facing is actually because you haven't added the required libraries. So download the Software serial library and add it in the arduino libraries folder. Recompile your program and i hope it will work for you this time. And also double check that you have also added the EasyVR library. If the problem still continues let me know.
Thanks.
1 reply
Do you have a link where i shoould download that library? because i've downloaded several, even created some with some code i ve found on the web but the problem persists
I tried all your steps 10 times but it doesn't seem to be working for me. when i uploaded the testEasyvr i tried to see if my Shield has any problems, but my shield is working fine. it's just that i cant train any additional command. i can train one trigger command but no other command from any group. i get the same error over and over. It would be great if you can help me out with this.
2 replies
Hi,
You must be making some mistakes, Its 100% working method and I got my EasyVR shield working with it. If the problem still persists, let me know and we will sort it out. Add me on Skype and we can discuss it in detail.
Thanks.
1 reply
hello sir can i have you skype name
1 reply
My Skype id is theenggprojects.
I've got the same problem and didn't solve it with your steps either. I've got EasyVR shield 2.0 and UNO R3 board. All the SWs are lastest version I can find. EasyVR Commander 3.8.0, EasyVR arduino library 1.5.
I did try flashing the UNO board with TestEasyVR, then set the Jumper to SW and connect EasyVR Commander to UNO board via the correct COM port. I can train Trigger, test the build-in commands but every time failed with training of group commands.
That's weird. Please help!!!
regards,
Xinyi
1 reply
Hi,
That's a bit strange, you must be doing some mistake. Anyways try again , reset everything, make sure you got the latest version , and if you still having the problem then let me know.
Thanks.
1 reply
I have updated the firmware to Rev.3 and this alone works (the jumper is set to PC). I can now train the commands too. Thanks!
Regards,
Xinyi
1 reply
Good to know, Always update the firmware and reset the board too, normally it solves the problem.
Hi there
Hello, I came to your blog because I have a problem with the shield that I couldn't solve since a couple of days ago.
I am working with the shield 2.0, easy commander 3.8, the firmware is rev. 3 and the library arduino is 1.5,those are the latest software I've found, the problem that I have is the training error when I want to add a custom command in any or groups, I always get the message: "Invalid SD / SV template"
and I checked my connections, I changed the arduino, I changed the com ports, changed the language, I changed the jumper from PC to SW, I changed the configuration of microphone and has not worked well, I still get the same error
I can not add custom command triggers, first I get the same error invalid sd / sv template and after the "training ended with error 0x0."
However, when I run test group in wordset to test pre-built commands, recognition works fine (english and spanish).
I really appreciate any feedback you may have to fix this problem
1 reply
Hi,
It seems like you have the updated versions, it makes such problems but don't disappoint and just test again and again. Reset the board, change the library version and update it again and your problem will be solved. If you can't solve it then add me on Skype and I will look at it.
Thanks.
Comments
14