


So, today I thought to share it with you guys. It isn't much difficult but will need a little patient. When I started working on it I couldn't find any data on it online and I have to work a lot to make it work. So that's why I am sharing it so that others can get it work easily. When I was starting this project then I have a bit confusion that whether to use the USB Host shield of Arduino or to use the usb cable through which we connect Arduino with computer. After a little research I got the idea that simple USB will work fine so I go with it. I have explained this tutorial in detail. First I have done the Arduino side because that one is quite easy and after that I touched the Android side that's a bit complex and you must have the prior knowledge of it if you wanna make it work. So, let's start this project. :)
Circuit designing for Monitoring Incoming Data
- First of all, I have used the OTG cable for interfacing Android with Arduino, which is shown in below figure:

- From the above figure, you have clearly got the idea that why I have used this cable, one side of this cable, which is mini usb, will be inserted in the Android mobile while the other side, which is the female usb port, will be plugged with the usb cable of Arduino, as shown below:
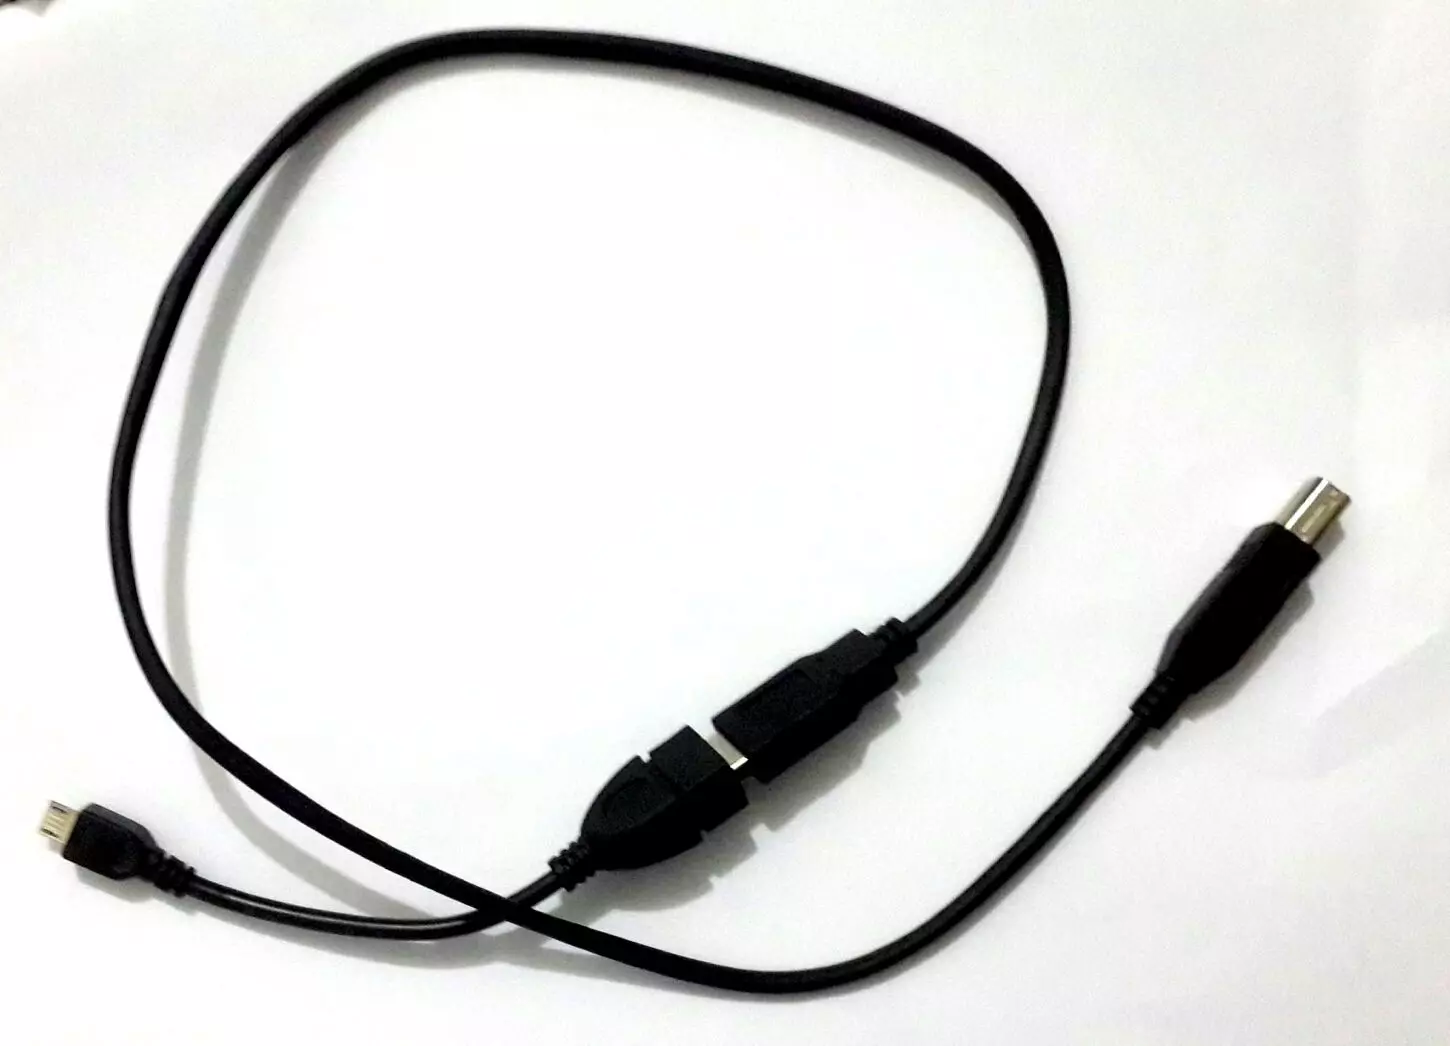
- I have connected the two cables in the above figure, now one end of this cable is gonna inserted in the Android mobile while the other side will be plugged in Arduino and in this way we will do the USB communication between Android and Arduino.
- But there's some problem, we need some way to display the data in Arduino, which we are getting from Android. So for that reason I have interfaced another Arduino with this Arduino and I am doing serial communication between these two Arduinos.
- So, in simple words, Android is plugged with first Arduino via USB and the first Arduino is connected with second Arduino via serial port. so, when Android will send the data to first Arduino then first Arduino will send that data to second Arduino, which we can easily see on the Serial Terminal. So here's the circuit diagram of two Arduinos.
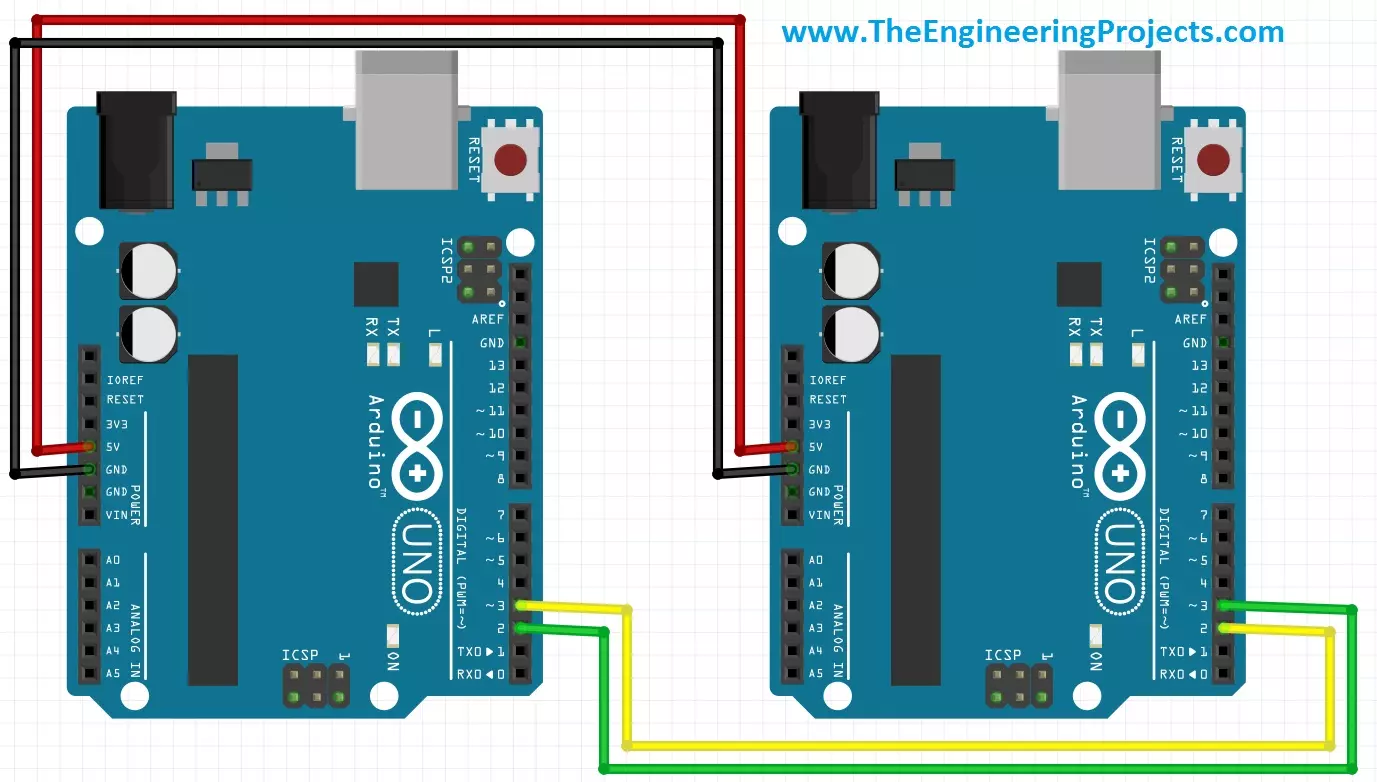
- Now you can have the idea in above figure that the two arduinos are communicated via pin # 2 and 3 which I have made Software Serial, now with the pins they are sending data from first Arduino to second Arduino. Now let's have a look at the coding of both Arduinos.
Programming Code for Arduino
- As in the above section, we have connected two Arduinos via Serial communication in which we used software serial.
- Next thing we need to do is to write the code for both of them, so simply copy the below code and upload it in both of your Arduino boards.
#include <SoftwareSerial.h>

SoftwareSerial mySerial(2,3);

void setup()
{
  Serial.begin(9600);
  Serial.println("www.TheEngineeringProjects.com");

  mySerial.begin(9600);
  mySerial.println("www.TheEngineeringProjects.com");
}

void loop()
{
  if (mySerial.available())
    Serial.println(mySerial.read() - 48);
  if (Serial.available())
    mySerial.println(Serial.read() - 48);
}
- Above code is quite simple and I am simply sending any data I am receiving on the Serial port to software serial, so when I get the data from Android via USB, I will receive that data and then will forward it to Software Serial on which my second Arduino is connected, which will receive that data and then show it over to Serial Terminal.
- Now let's have a look at Android side code, which is a bit complicated.
Programming Code for Android
- You must have the prior knowledge of Android, if you wanna make it work so if you know the basics of Android then you know that there are two main files designed in Android, which are Java file and XML file.
- So, first of all create a project in Android and place the below code into its XML File:
<LinearLayout xmlns:android="http://schemas.android.com/apk/res/android"
    xmlns:tools="http://schemas.android.com/tools"
    android:layout_width="match_parent"
    android:layout_height="match_parent"
    android:orientation="vertical"
    android:paddingBottom="@dimen/activity_vertical_margin"
    android:paddingLeft="@dimen/activity_horizontal_margin"
    android:paddingRight="@dimen/activity_horizontal_margin"
    android:paddingTop="@dimen/activity_vertical_margin"
    tools:context="com.example.androidusbhostarduino.MainActivity" >

    <TextView
        android:layout_width="wrap_content"
        android:layout_height="wrap_content"
        android:layout_gravity="center_horizontal"
        android:autoLink="web"
        android:text="http://www.TheEngineeringProjects.com/"
        android:textStyle="bold" />

    <ToggleButton
        android:id="@+id/arduinoled"
        android:layout_width="match_parent"
        android:layout_height="wrap_content"
        android:textOn="ON"
        android:textOff="OFF" />

</LinearLayout>
- Next thing we need to do is to add the USB permission in the manifest file, so paste this code in your manifest file:
<?xml version="1.0" encoding="utf-8"?>
<manifest xmlns:android="http://schemas.android.com/apk/res/android"
    package="com.theengineeringprojects.dani" >


    <uses-feature android:name="android.hardware.usb.host" />

    <application
        android:allowBackup="true"
        android:icon="@mipmap/ic_launcher"
        android:label="@string/app_name"
        android:supportsRtl="true"
        android:theme="@style/AppTheme" >
        <activity android:name=".MainActivity" >
            <intent-filter>
                <action android:name="android.intent.action.MAIN" />

                <category android:name="android.intent.category.LAUNCHER" />
            </intent-filter>
            <intent-filter>
                <action android:name="android.hardware.usb.action.USB_DEVICE_ATTACHED" />
            </intent-filter>

            <meta-data android:name="android.hardware.usb.action.USB_DEVICE_ATTACHED"
                android:resource="@xml/device_filter" />
        </activity>
    </application>

</manifest>
- Now the last thing, you need to do is to add the code in java file so copy the below code and paste it in your jave file:
package com.theengineeringprojects.dani;

import java.nio.ByteBuffer;

import android.support.v7.app.ActionBarActivity;
import android.content.Context;
import android.content.Intent;
import android.hardware.usb.UsbConstants;
import android.hardware.usb.UsbDevice;
import android.hardware.usb.UsbDeviceConnection;
import android.hardware.usb.UsbEndpoint;
import android.hardware.usb.UsbInterface;
import android.hardware.usb.UsbManager;
import android.hardware.usb.UsbRequest;
import android.os.Bundle;
import android.widget.CompoundButton;
import android.widget.SeekBar;
import android.widget.ToggleButton;
import android.widget.CompoundButton.OnCheckedChangeListener;

public class MainActivity extends ActionBarActivity implements Runnable{

    private static final char CMD_LED_OFF = '1';
    private static final char CMD_LED_ON = '2';

    SeekBar bar;
    ToggleButton buttonLed;

    private UsbManager usbManager;
    private UsbDevice deviceFound;
    private UsbDeviceConnection usbDeviceConnection;
    private UsbInterface usbInterfaceFound = null;
    private UsbEndpoint endpointOut = null;
    private UsbEndpoint endpointIn = null;

    @Override
    protected void onCreate(Bundle savedInstanceState) {
        super.onCreate(savedInstanceState);
        setContentView(R.layout.activity_main);


        buttonLed = (ToggleButton)findViewById(R.id.arduinoled);
        buttonLed.setOnCheckedChangeListener(new OnCheckedChangeListener(){

            @Override
            public void onCheckedChanged(CompoundButton buttonView,
                                         boolean isChecked) {
                if(isChecked){
                    sendCommand(CMD_LED_ON);
                }else{
                    sendCommand(CMD_LED_OFF);
                }
            }});

        usbManager = (UsbManager)getSystemService(Context.USB_SERVICE);
    }

    @Override
    public void onResume() {
        super.onResume();

        Intent intent = getIntent();
        String action = intent.getAction();

        UsbDevice device = (UsbDevice)intent.getParcelableExtra(UsbManager.EXTRA_DEVICE);
        if (UsbManager.ACTION_USB_DEVICE_ATTACHED.equals(action)) {
            setDevice(device);
        } else if (UsbManager.ACTION_USB_DEVICE_DETACHED.equals(action)) {
            if (deviceFound != null && deviceFound.equals(device)) {
                setDevice(null);
            }
        }
    }

    private void setDevice(UsbDevice device) {
        usbInterfaceFound = null;
        endpointOut = null;
        endpointIn = null;

        for (int i = 0; i < device.getInterfaceCount(); i++) {
            UsbInterface usbif = device.getInterface(i);

            UsbEndpoint tOut = null;
            UsbEndpoint tIn = null;

            int tEndpointCnt = usbif.getEndpointCount();
            if (tEndpointCnt >= 2) {
                for (int j = 0; j < tEndpointCnt; j++) {
                    if (usbif.getEndpoint(j).getType() == UsbConstants.USB_ENDPOINT_XFER_BULK) {
                        if (usbif.getEndpoint(j).getDirection() == UsbConstants.USB_DIR_OUT) {
                            tOut = usbif.getEndpoint(j);
                        } else if (usbif.getEndpoint(j).getDirection() == UsbConstants.USB_DIR_IN) {
                            tIn = usbif.getEndpoint(j);
                        }
                    }
                }

                if (tOut != null && tIn != null) {
                    // This interface have both USB_DIR_OUT
                    // and USB_DIR_IN of USB_ENDPOINT_XFER_BULK
                    usbInterfaceFound = usbif;
                    endpointOut = tOut;
                    endpointIn = tIn;
                }
            }

        }

        if (usbInterfaceFound == null) {
            return;
        }

        deviceFound = device;

        if (device != null) {
            UsbDeviceConnection connection =
                    usbManager.openDevice(device);
            if (connection != null &&
                    connection.claimInterface(usbInterfaceFound, true)) {
                usbDeviceConnection = connection;
                Thread thread = new Thread(this);
                thread.start();

            } else {
                usbDeviceConnection = null;
            }
        }
    }

    private void sendCommand(int control) {
        synchronized (this) {

            if (usbDeviceConnection != null) {
                byte[] message = new byte[1];
                message[0] = (byte)control;
                usbDeviceConnection.bulkTransfer(endpointOut,
                        message, message.length, 0);
            }
        }
    }

    @Override
    public void run() {
        ByteBuffer buffer = ByteBuffer.allocate(1);
        UsbRequest request = new UsbRequest();
        request.initialize(usbDeviceConnection, endpointIn);
        while (true) {
            request.queue(buffer, 1);
            if (usbDeviceConnection.requestWait() == request) {
                byte rxCmd = buffer.get(0);
                if(rxCmd!=0){
                    bar.setProgress((int)rxCmd);
                }

                try {
                    Thread.sleep(100);
                } catch (InterruptedException e) {
                }
            } else {
                break;
            }
        }

    }

}
- Now hit the Enter button on your Android Studio and if everything goes fine then you will get a screen as shown below on your mobile:
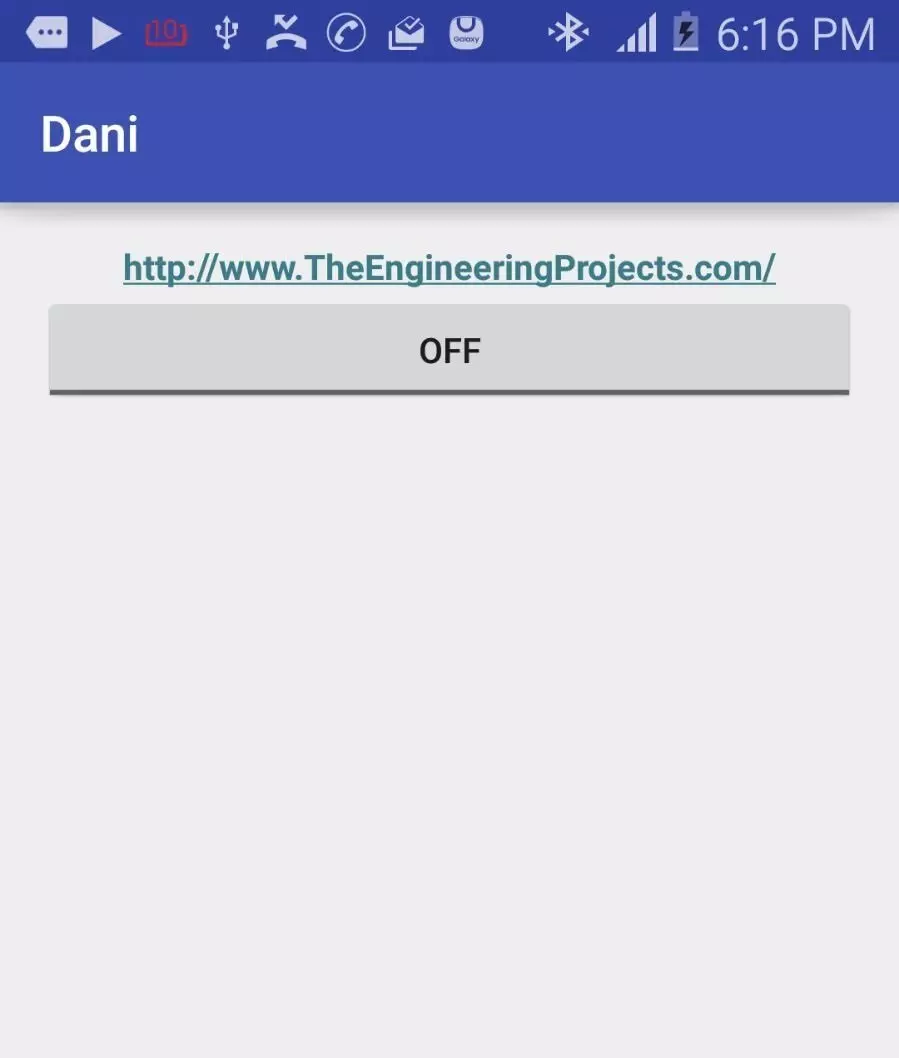
- Here's a simple button, when you press this button, it will show ON and will send the data which you wanna send for example, in my case I am sending character "1" and "2" on button press.
USB Communication Between Android and Arduino
- Now let's do the usb communication between Android and Arduino, I hope till now you have configured your Android Mobile and both the Arduinos so their overall picture will look something like:
- You can clearly see in the above figure that the Android Mobile is connected with Arduino, which is further connected with second Arduino and US of Second Arduino is connected with computer, where I am checking the coming data from Android in Serial Terminal.
- Now when I press the button on Android app, it will send 1 or 2 to Arduino, which is shown in below figure:

- I have pressed the toggle button on Android many times thats why I have got many 1 and 2 in Serial Terminal.
- So, that's how I am receving data from Android to Arduino. Now instead of sending 1 and 2, you can send any kind of data from Android to Arduino. I will post more tutorials on it in which I will be sending some data like GPS coordinates from Android to Arduino plus I will also post the 2 way communication i.e. receving data in Android from Arduino.
The Arduino part is easy but the Android part is bit difficult so if you need help then ask in comments and I will help you out. That's all for today, will meet you guys in coming tutorials. Take care !!! :)
