How to use digitalRead in Arduino ?
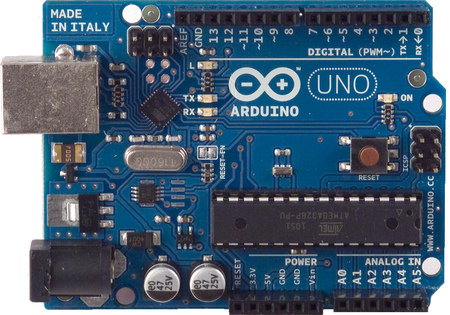
- As I have explained in the above section that Arduino UNO has 14 digital pins in total starting from 0 to 13 as shown in below figure:

- So, you can see in the above figure that we have RXD at 0 which is sued for Serial receiving and then we have TXD at 1 used for Serial writing.
- So, these pins from 0 to 13 are all digital and after these digital Pins we have GND.
- Now I hope you have got the idea of digital Pins.
- Next thing is How to use these digital Pins, normally we connect different digital sensors with these digital Pins.
- For example, I have a digital Sensor named as Vibration Sensor. This sensor gives HIGH when it feels vibrations and gives LOW in normal condition.
- So, I am gonna connect the Signal Pin of this Sensor with any digital Pin of Arduino.
- Now, coming towards digitalRead command, this digitalRead command is used in Arduino for reading the status of digital Pins on Arduino.
- So, when we want to read whether the digital Pin of Arduino is HIGH or LOW, we use this digitalRead command.
- The syntax of digitalRead is as follows:
int Reading = digitalRead (int PinNumber);
- digitalRead command takes one input which is the value of the Pin, like if you wanna read the digital status of Pin # 8 then you have to enter 8 in the small brackets of digitalRead.
- digital Read returns Boolean data which is either HIGH or LOW and it is saved in the integer variable which I have named Reading in the above syntax. We have discussed it in Arduino Datatypes.
- So, let's have a look at the example of digitalRead:
Reading = digitalRead (8);
- In the above example, I am reading the status of digital Pin # 8 of Arduino and saving it value in the Reading variable.
- So, I hope now you have understood completely How to use the digital Read in Arduino.
- One important thing to note here is that because we are reading the data from digital Pin so that digital Pin must have to be an input.
- So, you need to declare that Pin as an input.
- So, let's have a look at a small code in which we will read the status of pin # 8 of Arduino and then display its status on Serial Monitor.
- I hope you have already read How to write Arduino Code and knows its basics.
int Pin = 8; // Initializing Arduino Pin
int Reading;

void setup() {
  pinMode(Pin, INPUT); // Declaring Arduino Pin as an Input
}

void loop() {
  Reading = digitalRead(Pin); // Reading status of Arduino digital Pin

  if(Reading == HIGH)
  {
    Serial.println("HIGH");
  }

  if(Reading == LOW)
  {
    Serial.println("LOW");
  }

}
Summary
So, here's a short summary of the above discussion for a quick revision: Definition:- digitalRead is used to read the status of any digital Pin in Arduino.
- We have to give the digital Pin number in the small brackets.
- Syntax of digital Read is:
int Reading = digitalRead (int PinNumber);
Return:
- digitalRead returns HIGH or LOW depending on the status of corresponding digital Pin.
Reading = digitalRead (8);
Restriction:
- Before reading status of any digital Pin, we have to first declare that Pin as an input.:
pinMode(8,INPUT);
So, that's all about today. I hope you have enjoyed today's tutorial and are gonna learn something out of it. In the next tutorial, we will have a look at How to use DigitalWrite Arduino Command, which is used to update the status of digital Pins. Let me know if you have any questions in it. Take care !!! :)


