

Stepper Motor Direction Control using Arduino
In this tutorial we will learn how to make a program for Stepper Motor Direction Control using Arduino by sending dfferent commands from the serial port. First of all, I am going share the list of components used for this mini project.- Arduino UNO
- Stepper motor (6 wire)
- L298 Motor Controller (H-Bridge)
- Voltage Regulator (7805)
- 1000uF
- Jumper Wires
- Solderig Iron
- Soldering Wire
Stepper Motor
Basically, stepper motors are like the DC motors that rotate in discrete steps. They have multiple arranged coils and they are usually known as phases. Motor will rotate one step at a time if we energize each phase sequence. High levels of precision can be achieved by controlling the stepper motor with computer. Steppers motors are available in the market in many different sizes. The speed of the stepper motor is controlled by frequency of pulses generated. They have wide range of applications like hard disk drives, robotics, telescope, antenna, toys etc. A six wire stepper motor is shown in the figure below.
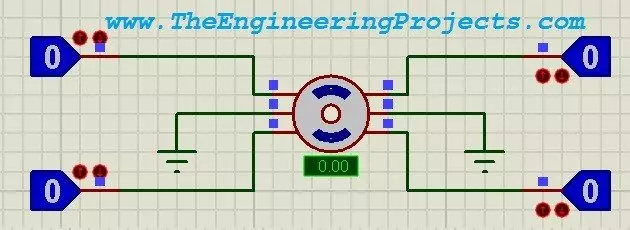
- I have designed Stepper Motor Drive Circuit using Proteus ISIS and its screen shot is given in the figure below.
- You can download complete source code for Stepper Motor Direction Control using Arduino by clicking the below button:
Selection of Wires
- I have used 6 wire stepper motor and each wire has its own function.
- I have first divided these six wires into two pair.
- Each pair is consisting of three wires out of which one wire is common and the other two generate pulses.
- The two pair of three wires are shown in the figure below.

- Then, I have chosen a common wire in each pair from which the resistance to the other two wires is common.
- I have checked the resistance from the common wire to the both of the other wires of the same pair.
- I found that the resistance from the common wire to both of the other wires is same.
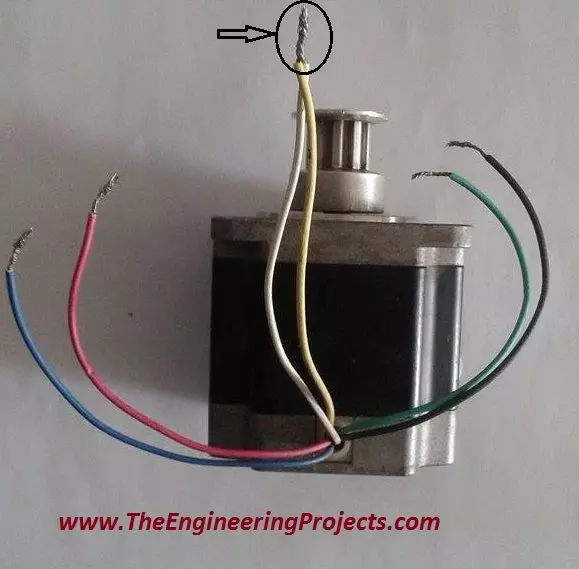
- We can see in the figure above the blue, pink and white wires belong to the same pair out of which white is a common wire.
- Here is the screen shot of the figure when I found the resistance between white and blue wire and I found it to be 8.0 ohms.
- The screen shot of the above steps is shown in the figure below.
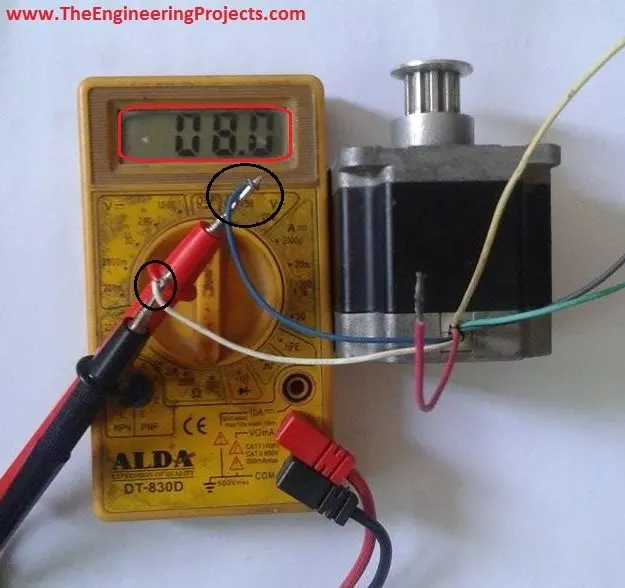
- After that. I checked the resistance between white and pink wire and found it to be 8.1 which is almost the same as 8.0 so, this shows that the white wire is common to both of the blue and pink wire.
- Here is the screen shot of the above step.

- Then I found the resistance between pink and blue wire and it was 15.6 which is exactly the double of the earlier resistance.
- It is shown in the figure below.

- I have connect the both common wires as shown in the figure below.
- Here's the video in which I have discussed it in detail How to identify the wires of Stepper Motor:
- The remaining four wires are used to generate pulses which are also know as steps
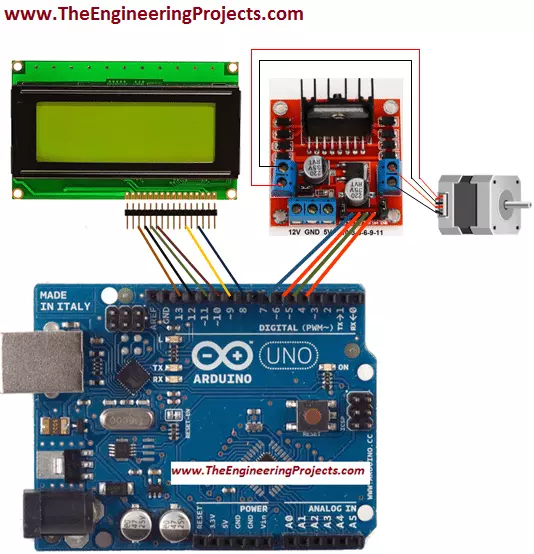
- I have connected theses four wires to the output pins OUT1, OUT2, OUT3 and OUT4 of the L298 micro controller.
- Input pins of L298 micro controller In1, In2, In3 and In4 are connected to the pin no 7, 6, 5 and 4 of the Arduino UNO's board respectively.
I have also controlled the stepper motor using PIC micro controller so I would suggest all of you to first go through that tutorial before going into the details of this tutorial.
Block Diagram
- I have made a simple block diagram for Stepper Motor Direction Control using Arduino, which will be helpful to clearly understand the algorithm and the assembling of the components of Stepper Motor Direction Control using Arduino.
- The screenshot of the block diagram is shown in the figure below.

- First of all we need a power supply to run the project properly.
- Arduino reads the commands from the serial port and sends to the L298 motor driver to rotate the stepper motor.
- The commands got printed on the LCD (Liquid Crystal Display).
Arduino Source Code Description
- The main function of the Stepper Motor Direction Control using Arduino is given below.
#include <LiquidCrystal.h>//Library for LCD
#include <Stepper.h> //Library for Stepper motor

const int stepsPerRevolution = 255;

// initialize the stepper library on pins
Stepper myStepper(stepsPerRevolution, 4, 5, 6, 7);
char data;
//LCD pins assigning
LiquidCrystal lcd(8, 9, 10, 11, 12, 13);
void setup() {
  // set the speed at 60 rpm
  myStepper.setSpeed(60);
  // initialize the serial port:
  Serial.begin(9600);

lcd.begin(20, 4);//LCD type

lcd.setCursor(3,0);//setting LCD cursor and printing on it
lcd.print("Stepper Motor");
lcd.setCursor(5,1);
lcd.print("Direction");
lcd.setCursor(5,2);
lcd.print("Control");
lcd.setCursor(2,3);
lcd.print("via Arduino UNO");

delay(3000);

lcd.clear ();//Clearing the LCD screen

lcd.setCursor(0,2);
lcd.print("www.TheEngineering");
lcd.setCursor(4,3);
lcd.print("Projects.com");
}

void loop() {
  if(Serial.available())
  {
    data = Serial.read(); //Reading the data from serial port
  }

    if(data == 'C'){Clockwise();}//Clockwise rotation
    if(data == 'A'){AntiClockwise();}//Anti-clockwise rotation
    if(data == 'S')//stopping the stepper motor
    {
      data = 0;
      lcd.setCursor(3,0);
      lcd.print("No rotation");}

}
- In the code given above we have first initialized the LCD and Stepper motor libraries.
- Then, I assigned stepper motor pins at which it is connected to the Arduino.
- After that I initialized the LCD pins at which it is connected to Arduino UNO.
- Then I have made three different if statements, C for the clockwise, A for the anti clockwise rotation and S for the no rotation.
- Then in the loop I called clock wise and anti clockwise functions whose source code will be give and explained below.
- Then, I cleared the serial data in order to stop the rotation of the motor.
- The source code of the clockwise function is given below.
void Clockwise()//function for clockwise rotation
{
    Serial.println("clockwise"); //printing on the serial port
    Serial.println("");//prints blank line on the serial port
    myStepper.step(stepsPerRevolution);//counter clockwise rotation
    lcd.setCursor(3,0);//setting LCD cursor
    lcd.print("Clockwise"); //printing on LCDa
}
- The source code for the anti clockwise function is given below.
void AntiClockwise()//function for anti clockwise rotation
{
  Serial.println("anti-clockwise");//print on the serial
  Serial.println("");//prints a blank line on the serial
  myStepper.step(-stepsPerRevolution);//clockwise movement
  lcd.setCursor(3,0);//setting LCD cursor
  lcd.print("Anti-clockwise");//printing on LCD
}
- Now, open your Arduino software, just copy and paste the source code given above.
- Run the program and open the Serial Port at the top right of the Arduino software.
- Now, when you enter the command C stepper motor will start running in clockwise direction.
- If you send the command A through the serial port stepper motor will start to rotate in counter clockwise direction.
- If you send the command S the rotation of the stepper motor will be stopped.
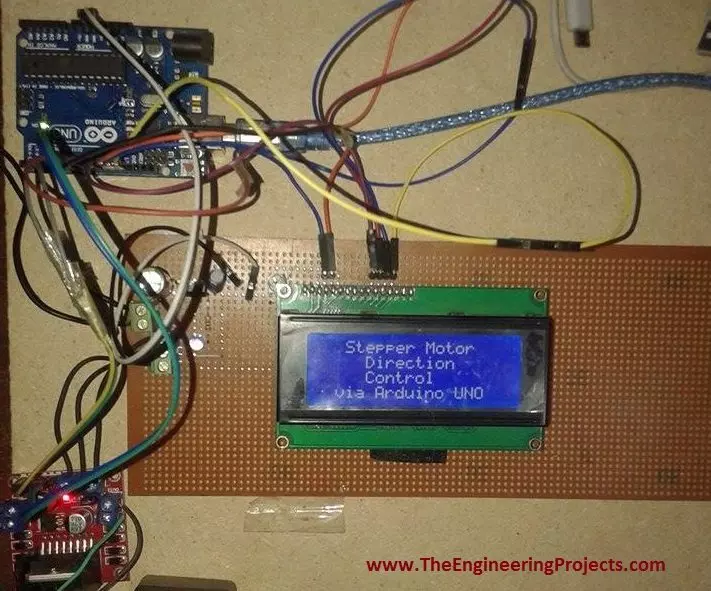
Actual Hardware Setup
- The actual hardware operating setup for Stepper Motor Direction Control using Arduino is given in the figure below:
- Now, if you send the command C through the serial port the stepper motor will start to rotate in clockwise direction and the command will also be printed on the LCD.
- The screenshot of the printed command on LCD is shown in the figure below.

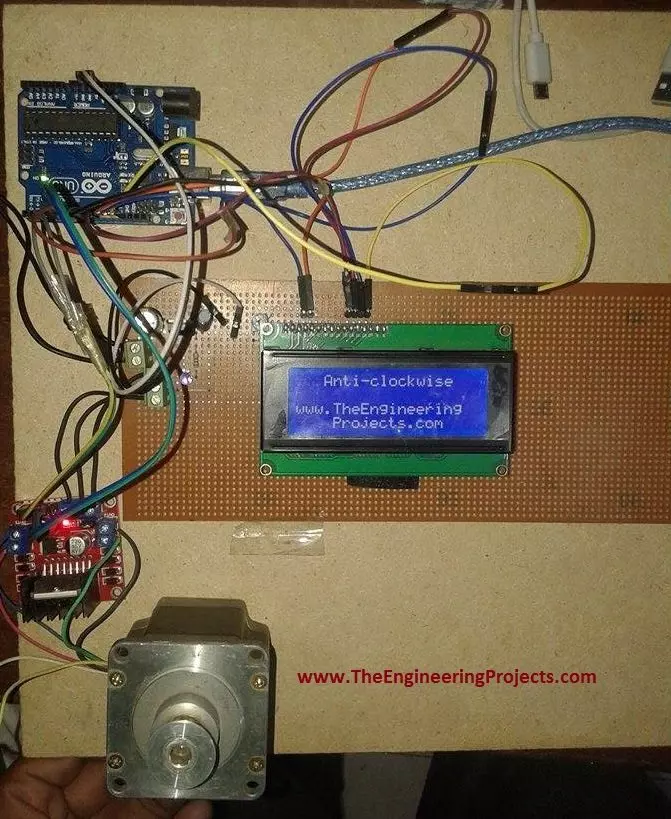
- Now, if you send the command A through the serial port the stepper motor will start to rotate in anti clockwise direction and the command will also be printed on the LCD.
- The screenshot of the printed command on LCD is shown in the figure below.
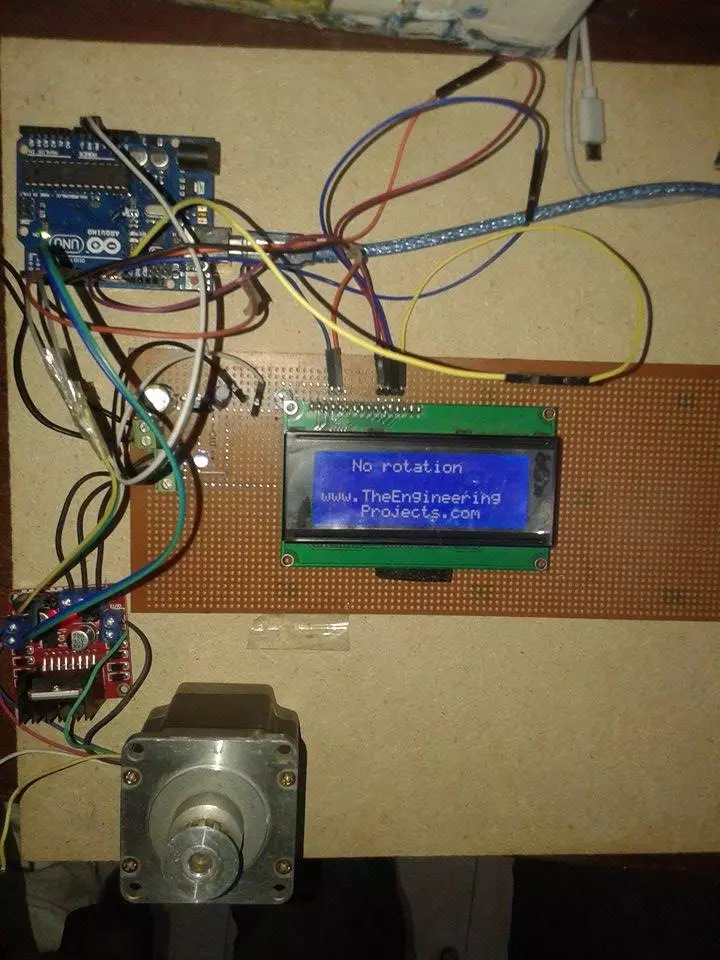
- Now, if you send the command S through the serial port the stepper motor will show no more rotation and the command will also be printed on the LCD.
- The screenshot of the printed command on LCD is shown in the figure below.
- Here's the complete video demonstration of Stepper Motor Direction Control using Arduino, I hope it will help as well:
