In this post, I'll take you through the brief Introduction of the Software, how you can install it, and make it ready for your required Arduino module. Let's dive in and get down to the nitty-gritty of this Software.
| Where To Buy? | ||||
|---|---|---|---|---|
| No. | Components | Distributor | Link To Buy | |
| 1 | Arduino Uno | Amazon | Buy Now | |
Introduction to Arduino IDE
- Arduino IDE is an open-source software, designed by Arduino.cc and mainly used for writing, compiling & uploading code to almost all Arduino Modules.
- It is an official Arduino software, making code compilation too easy that even a common person with no prior technical knowledge can get their feet wet with the learning process.
- It is available for all operating systems i.e. MAC, Windows, Linux and runs on the Java Platform that comes with inbuilt functions and commands that play a vital role in debugging, editing and compiling the code.
- A range of Arduino modules available including Arduino Uno, Arduino Mega, Arduino Leonardo, Arduino Micro and many more.
- Each of them contains a microcontroller on the board that is actually programmed and accepts the information in the form of code.
- The main code, also known as a sketch, created on the IDE platform will ultimately generate a Hex File which is then transferred and uploaded in the controller on the board.
- The IDE environment mainly contains two basic parts: Editor and Compiler where former is used for writing the required code and later is used for compiling and uploading the code into the given Arduino Module.
- This environment supports both C and C++ languages.
How to Download Arduino IDE
You can download the Software from Arduino main website. As I said earlier, the software is available for common operating systems like Linux, Windows, and MAX, so make sure you are downloading the correct software version that is easily compatible with your operating system.
- If you aim to download the Windows app version, make sure you have Windows 8.1 or Windows 10, as the app version is not compatible with Windows 7 or older version of this operating system.
- You can download the latest version of Arduino IDE for Windows (Non-Admin standalone version), by clicking below button:
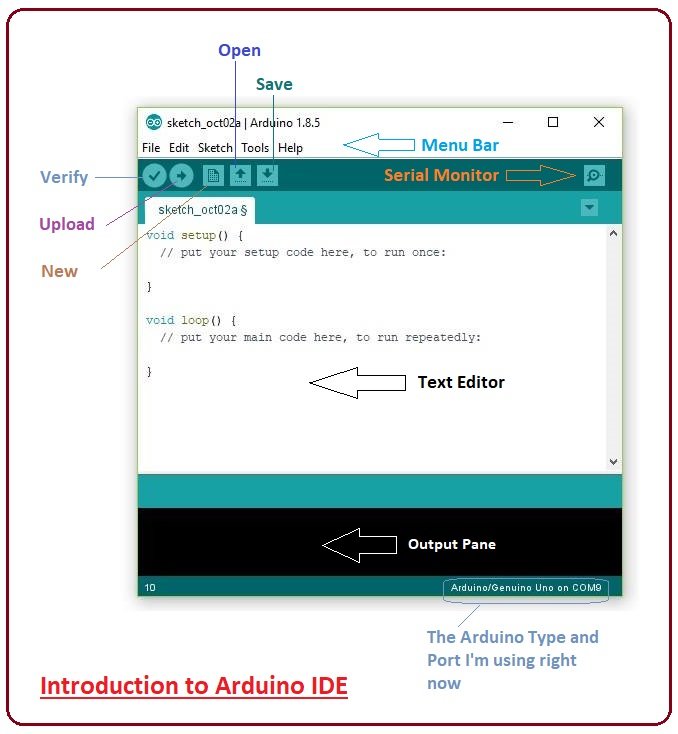
The IDE environment is mainly distributed into three sections
- Menu Bar
- Text Editor
- Output Pane
As you download and open the IDE software, it will appear like an image below:

The bar appearing on the top is called Menu Bar that comes with five different options as follow
- File - You can open a new window for writing the code or open an existing one. The following table shows the number of further subdivisions the file option is categorized into.
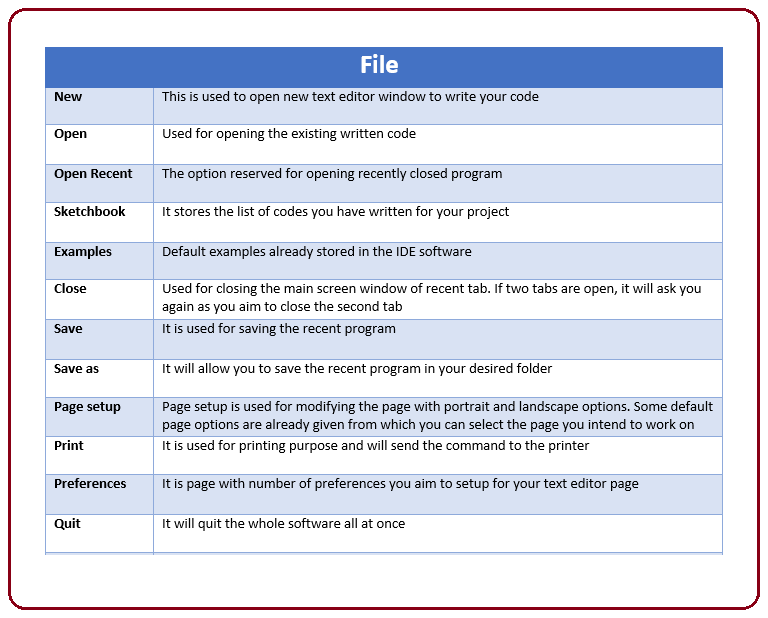
- As you go to the preference section and check the compilation section, the Output Pane will show the code compilation as you click the upload button.
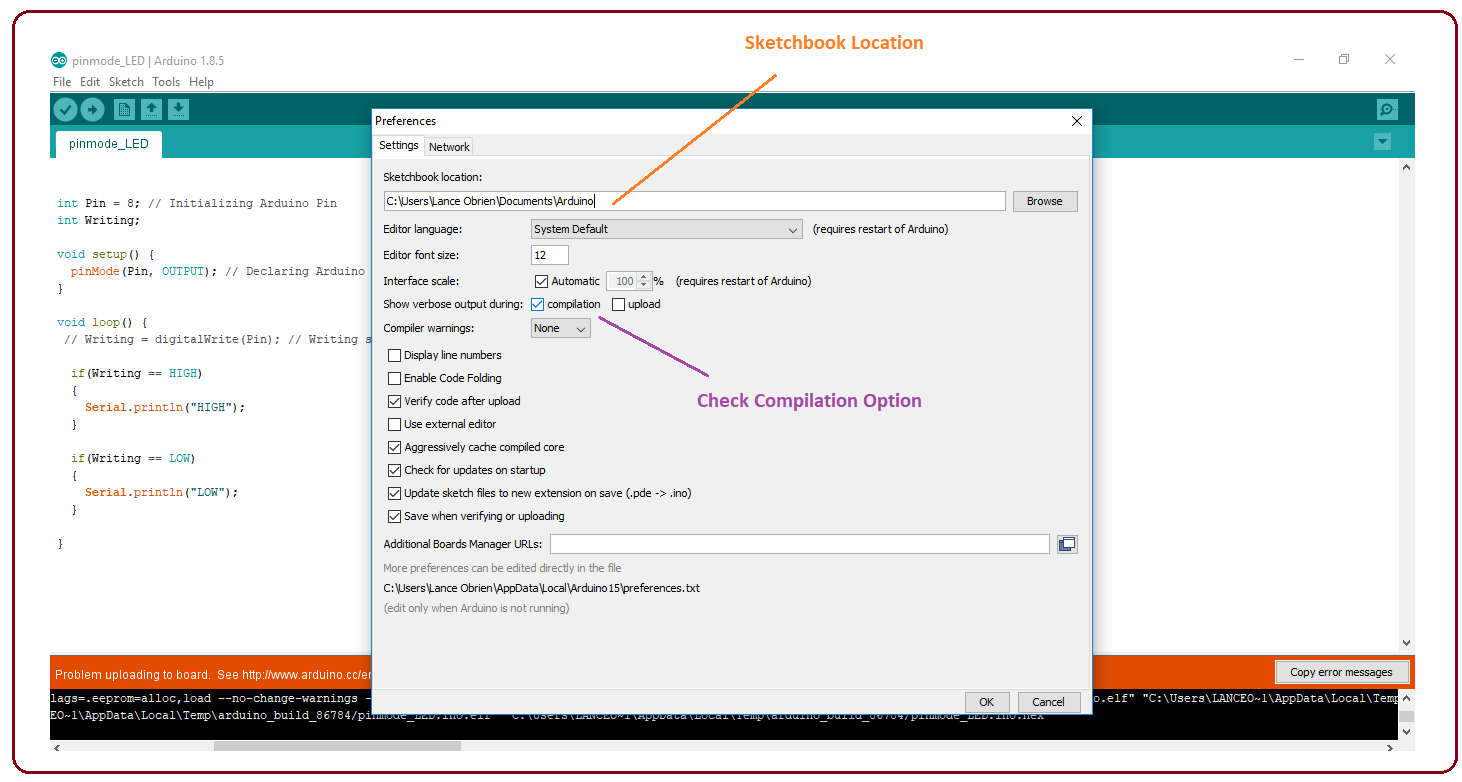
- And at the end of the compilation, it will show you the hex file it has generated for the recent sketch that will send to the Arduino Board for the specific task you aim to achieve.

- Edit - Used for copying and pasting the code with further modification for font
- Sketch - For compiling and programming
- Tools - Mainly used for testing projects. The Programmer section in this panel is used for burning a bootloader to the new microcontroller.
- Help - In case you are feeling skeptical about software, complete help is available from getting started to troubleshooting.
The Six Buttons appearing under the Menu tab are connected with the running program as follows.
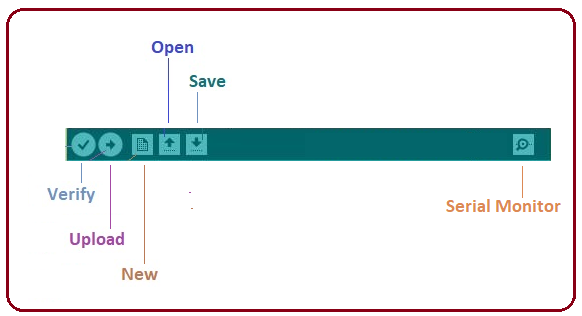
- The checkmark appearing in the circular button is used to verify the code. Click this once you have written your code.
- The arrow key will upload and transfer the required code to the Arduino board.
- The dotted paper is used for creating a new file.
- The upward arrow is reserved for opening an existing Arduino project.
- The downward arrow is used to save the current running code.
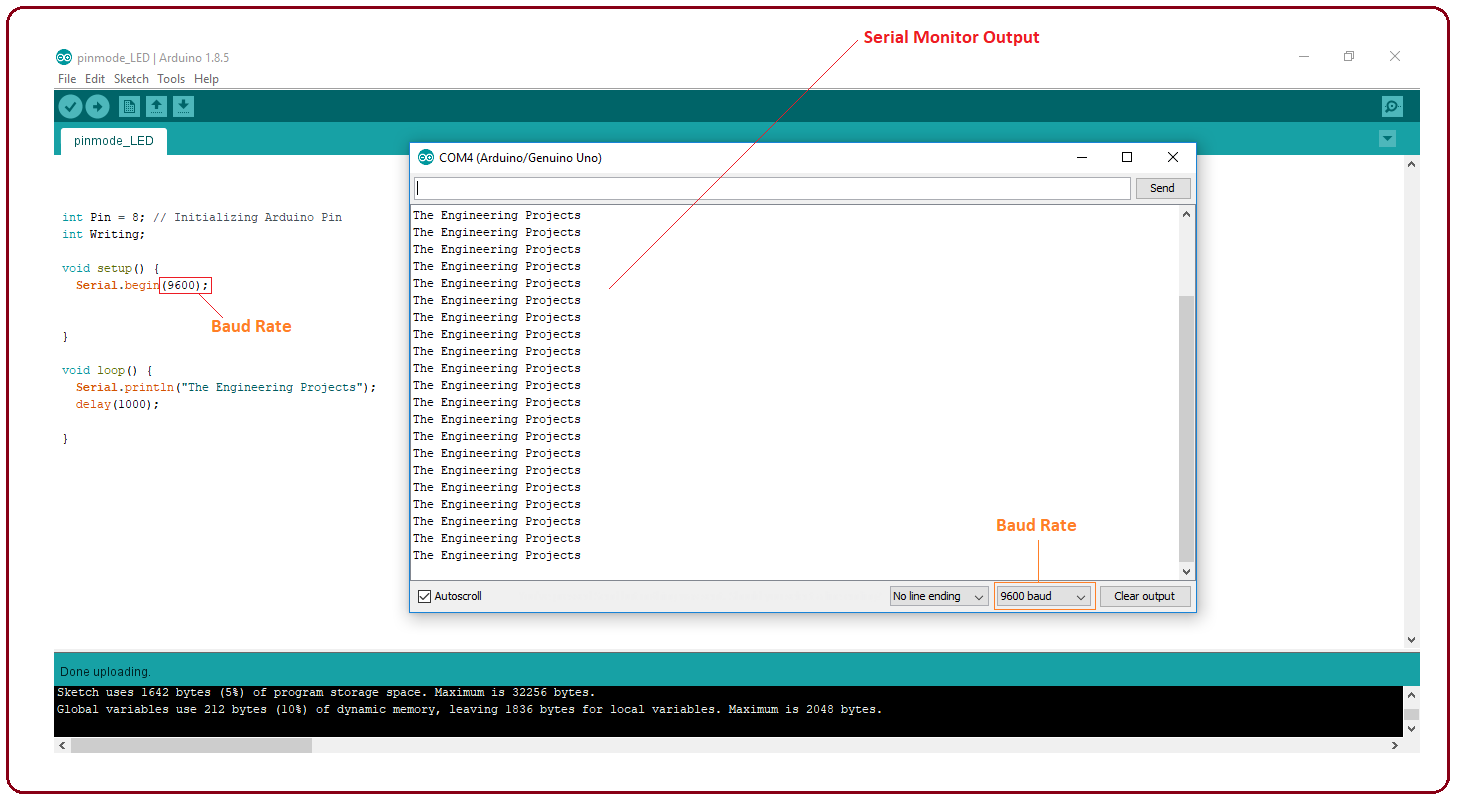
- The button appearing on the top right corner is a Serial Monitor - A separate pop-up window that acts as an independent terminal and plays a vital role in sending and receiving the Serial Data. You can also go to the Tools panel and select Serial Monitor, or pressing Ctrl+Shift+M all at once will open it instantly. The Serial Monitor will actually help to debug the written Sketches where you can get a hold of how your program is operating. Your Arduino Module should be connected to your computer by USB cable in order to activate the Serial Monitor.
- You need to select the baud rate of the Arduino Board you are using right now. For my Arduino Uno Baud Rate is 9600, as you write the following code and click the Serial Monitor, the output will show as the image below.
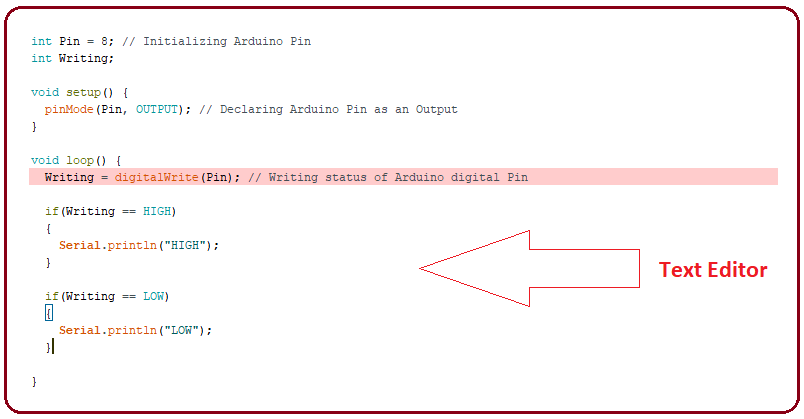
- The main screen below the Menu bard is known as a simple text editor used for writing the required code.
- The bottom of the main screen is described as an Output Pane that mainly highlights the compilation status of the running code: the memory used by the code, and errors that occurred in the program. You need to fix those errors before you intend to upload the hex file into your Arduino Module.

- More or less, Arduino C language works similar to the regular C language used for any embedded system microcontroller, however, there are some dedicated libraries used for calling and executing specific functions on the board.
Arduino Libraries
- Libraries are very useful for adding extra functionality into the Arduino Module.
- There is a list of libraries you can check by clicking the Sketch button in the menu bar and going to Include Library.
- As you click the Include Library and Add the respective library it will be on the top of the sketch with a #include sign. Suppose, I Include the EEPROM library, it will appear on the text editor as
#include <EEPROM.h>
- Most of the libraries are preinstalled and come with the Arduino software. However, you can also download them from external sources.
Making Pins Input or Output
The digitalRead and digitalWrite commands are used for addressing and making the Arduino pins as an input and output respectively.
These commands are text sensitive i.e. you need to write them down the exact way they are given like digitalWrite starting with small "d" and write with capital "W". Writing it down with Digitalwrite or digitalwrite won't be calling or addressing any function.
How to Select the Board
- In order to upload the sketch, you need to select the relevant board you are using and the ports for that operating system.
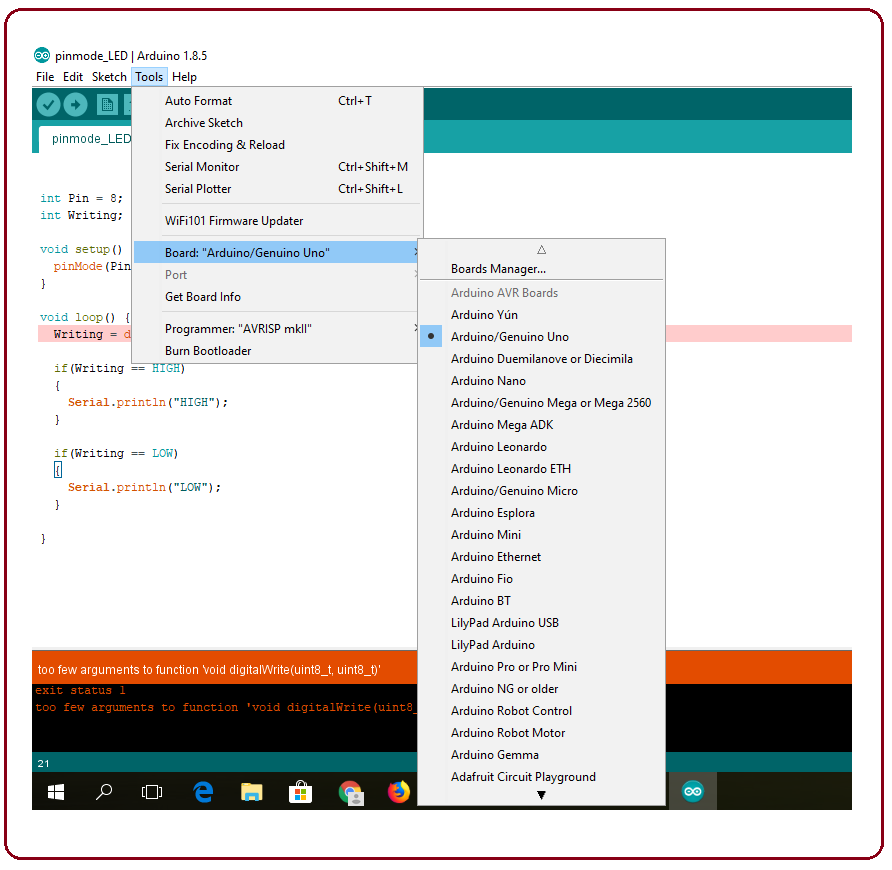
- As you click the Tools on the menu, it will open like the figure below:

- Just go to the "Board" section and select the board you aim to work on. Similarly, COM1, COM2, COM4, COM5, COM7 or higher are reserved for the serial and USB board. You can look for the USB serial device in the ports section of the Windows Device Manager.
- The following figure shows the COM4 that I have used for my project, indicating the Arduino Uno with the COM4 port at the right bottom corner of the screen.
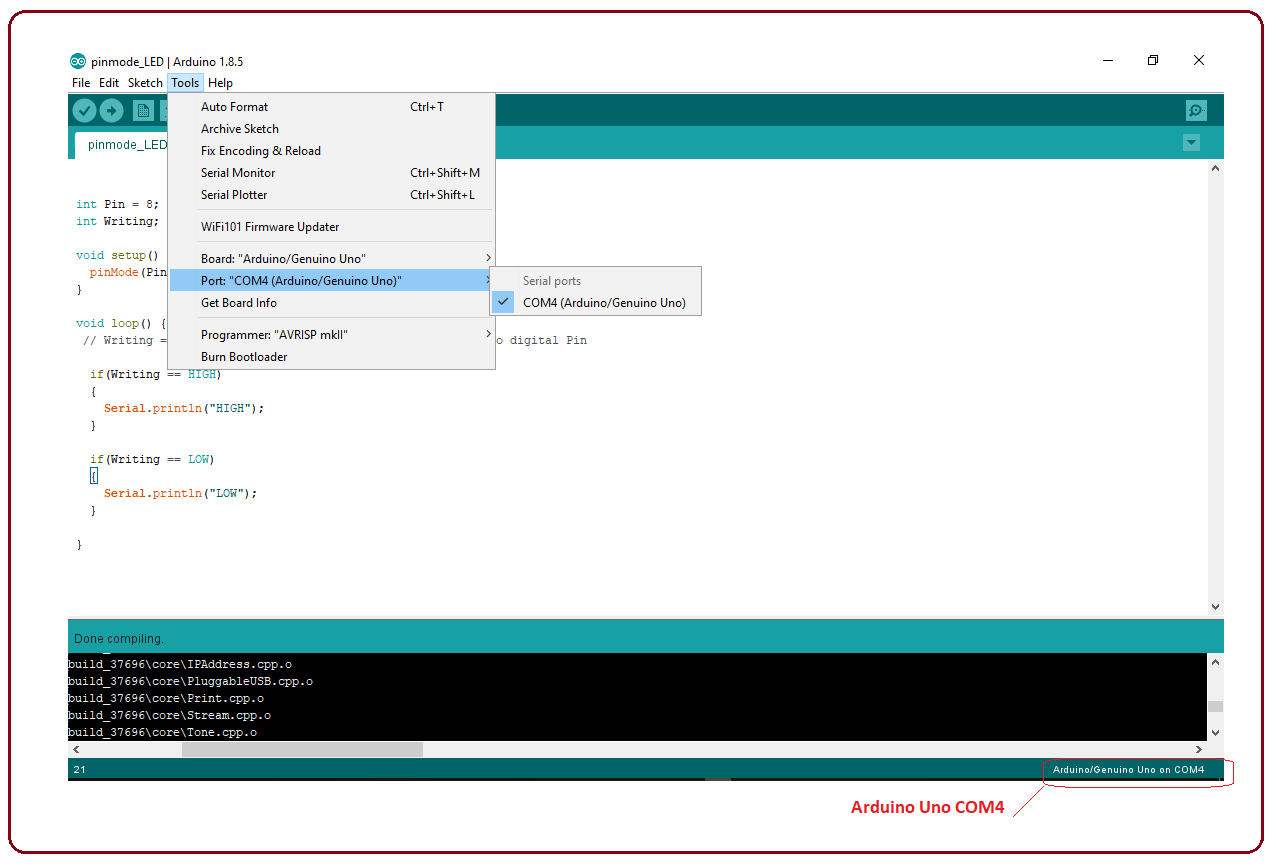
- After correct selection of both Board and Serial Port, click the verify and then upload button appearing in the upper left corner of the six-button section or you can go to the Sketch section and press verify/compile and then upload.
- The sketch is written in the text editor and is then saved with the file extension .ino.
It is important to note that the recent Arduino Modules will reset automatically as you compile and press the upload button the IDE software, however, the older versions may require the physical reset on the board.
- Once you upload the code, TX and RX LEDs will blink on the board, indicating the desired program is running successfully.
- The amazing thing about this software is that no prior arrangement or bulk of the mess is required to install this software, you will be writing your first program within 2 minutes after the installation of the IDE environment.
Arduino Bootloader
- As you go to the Tools section, you will find a bootloader at the end.
- It is very helpful to burn the code directly into the controller, setting you free from buying the external burner to burn the required code.
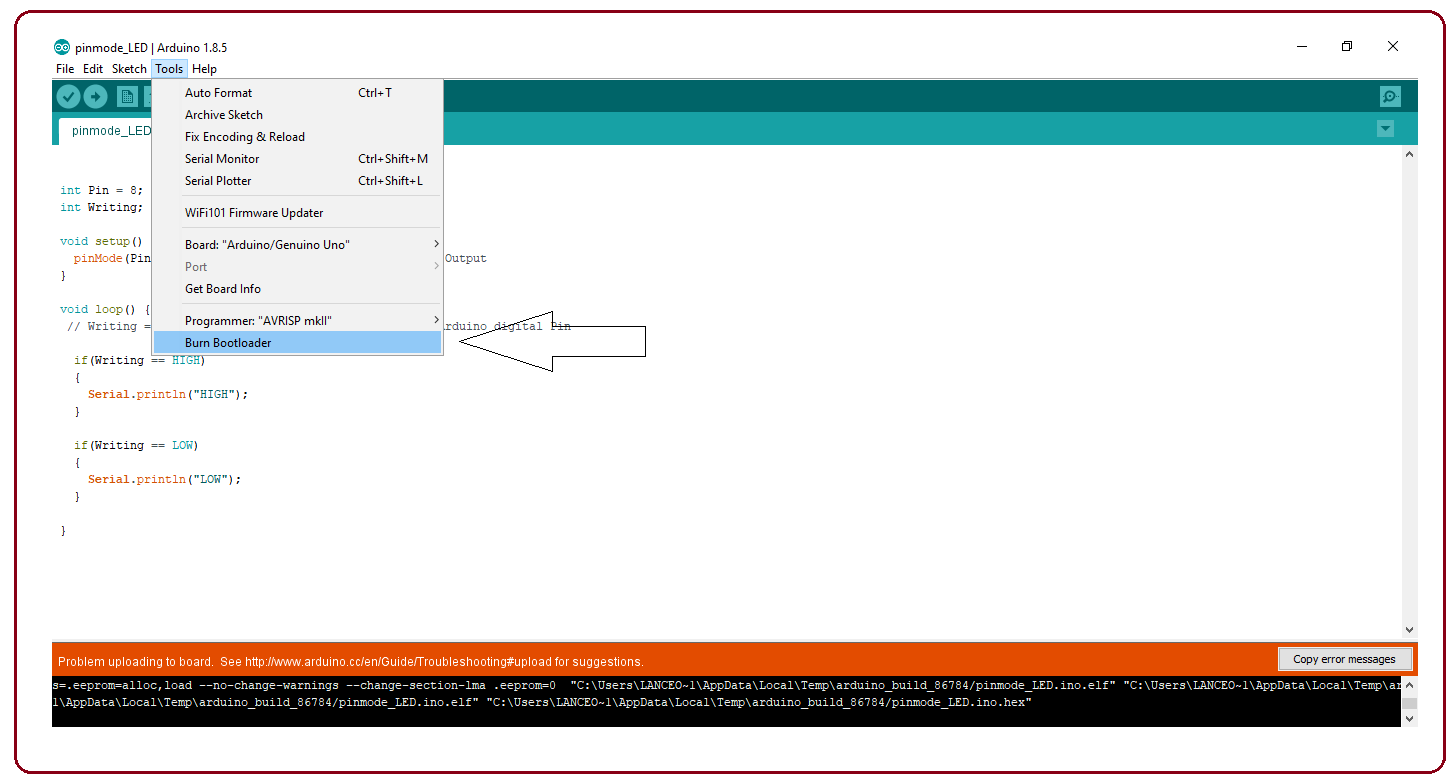
When you buy the new Arduino Module, the bootloader is already installed inside the controller. However, if you intend to buy a controller and put it in the Arduino module, you need to burn the bootloader again inside the controller by going to the Tools section and selecting the burn bootloader.
That's all for today. I hope I have given you everything you needed to know about Arduino IDE. If you are unsure or have any questions, you can ask me in the comment section below. I'd love to help you the best way I can. You are most welcome to keep us updated with your valuable feedback and suggestions, they help us provide you quality work so you keep coming back for what we have to offer. Thanks for reading the article.


