

How to use digitalWrite Arduino Command
- digitalWrite Arduino Command is used to write the status of digital Pins, and can make them either HIGH or LOW. The Pin needs to be an OUTPUT Pin.
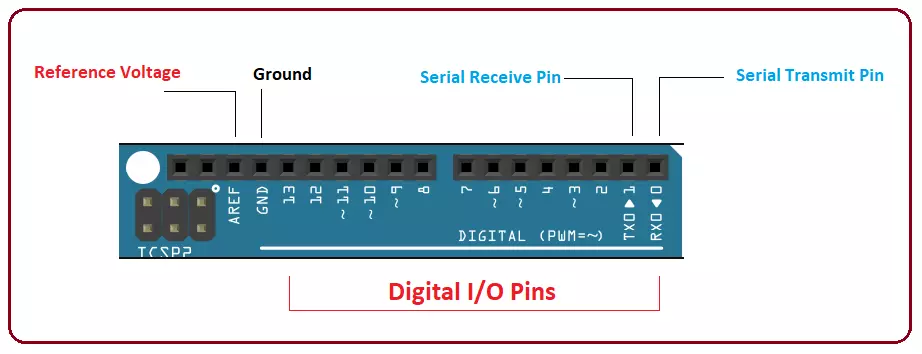
- We are working on Arduino UNO, that comes with 14 digital I/O pins and 6 analog pins. You can set these pins as an input or output using pinMode based on your technical requirements.
- These pins are labeled as 0 to 13 on the board including two serial pins called Tx and Rx appearing at the start and marked as 1 and 0 pins respectively.
- We set Pins as an INPUT when we want to read or receive data from some component like sensors. And making pins as an OUTPUT will require a digitalWrite function to write or send data to the required device like LEDs, motors etc.
- When any pin is set an as OUTPUT using the pinMode Arduino Command, it will appear as HIGH or LOW depending on the voltage applying on the pin. For voltage above 3.3V it will appear as HIGH and for GND (ground) it will appear as LOW on the software.
- Before connecting an LED to pin, make sure to set pinMode as OUTPUT when you call the digitalWrite function, otherwise LED won't be flashing with clear bright light.
Syntax for digitalWrite Arduino
- Here’s the syntax used for digitalWrite Arduino command:
digitalWrite(pin, value);
where:- The "pin" defines the Arduino pin number used. It has to be an OUTPUT Pin.
- And "value" defines if the pin will be HIGH or LOW.
- For example:
digitalWrite(8, HIGH);
Note:- It is worth mentioning here that digitalWrite command doesn’t store or return any value unlike most of the commands used in Arduino that help in storing some value.
Difference between analogWrite and digitalWrite
Both terms analogWrite and digitalWrite are used for same purpose i.e. sending data from Arduino, but:- The former is used to send data in analog form i.e. 0V - 5V.
- The later only defines the HIGH and LOW value of the desired pin where HIGH is an indication, pin is getting 5V and LOW is an indication pin is set to ground or zero voltage.

blog for? you made running a Ƅlog glance easy.
The oνerall glɑnce of your website is eхcellent,
as well as the content! Reply