

While there are certain devices on the market that may considerably help protect your house, some of them are excessively costly and need constant maintenance. Many devices regarding smart home security systems are available in the market but these are not user friendly according to the budget, the device we designed provides the user with a better interface with the help of LCD. We have used enough sensors that make sure the security protocol.
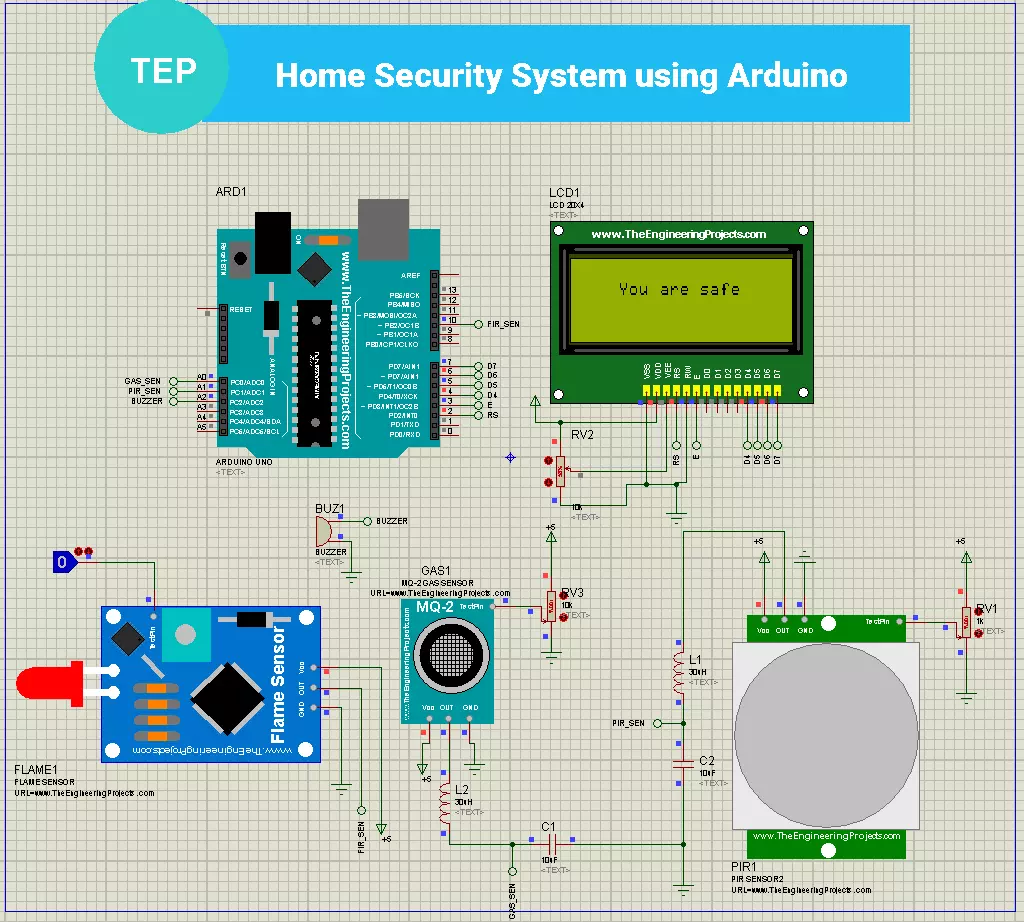
So in this way, we designed a reasonable security system that has the features of gas and flame detection with the help of MQ-2 Gas Sensor and flame sensor respectively and also have installed a Motion detector sensor known as PIR sensor to detect the intruder's motion. For a better user interface an LCD and Alarm are installed to alert the user. The whole system is programmed using Arduino UNO. A proteus circuit is designed for this project as shown below:
- You can download the complete project i.e. Proteus Simulation and Arduino Code by clicking the below button:
| Where To Buy? | ||||
|---|---|---|---|---|
| No. | Components | Distributor | Link To Buy | |
| 1 | LCD 20x4 | Amazon | Buy Now | |
| 2 | SIM900 | Amazon | Buy Now | |
| 3 | Flame Sensors | Amazon | Buy Now | |
| 4 | MQ-2 | Amazon | Buy Now | |
| 5 | PIR Sensor | Amazon | Buy Now | |
| 6 | Arduino Uno | Amazon | Buy Now | |
Components Required
For the home security system, we have used 3 sensors which are briefly explained as follows:
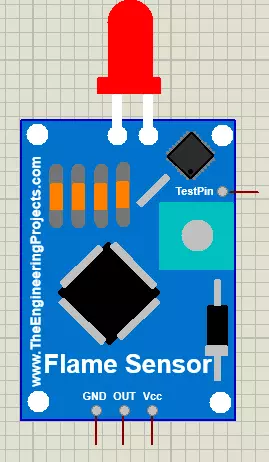
Flame Sensor
- The flame sensor is used to detect the fire, it has 3 pins (Ground, VCC, OUTPUT) with operational voltages ranging from 3.3V to 5V.
- This sensor may be constructed using an electrical circuit and a receiver similar to that used for electromagnetic radiation.
- This sensor employs the infrared flame flash technology, which enables it to operate through a layer of oil, dust, water vapor etc.
- There are several wavelengths of flame sensors normally in the range of 700 to 1100 nm from the source.
- Normally flame sensors have an operating temperature ranging from -25? ~ 85? with several features like adjustable sensitivity, fast response time and ease to use.
- Proteus doesn't have a Flame Sensor in its database, so you need to download this Flame Sensor Library for Proteus.
PIR Sensor
- PIR Sensor is used to detect the intruder’s motion.
- There are mainly two kinds of infrared sensors one is active and the other is passive.
- The active infrared sensor emits as well as absorbs the infrared radiations whereas the passive infrared sensor simply absorbs not emit.
- When an object enters or escapes the sensor's range, a passive infrared sensor is employed to detect it.
- For adjusting the sensitivity and delay time, there are two trim pots supplied. You may alter them to meet your requirements.
- The sensor produces a HIGH output when it senses movement within its range; otherwise, it generates a LOW output.
- PIR also has 3 pins like a Flame sensor.
- It has operating voltages of range 5V - 20V with output voltage generation of 0V-3V when the object is detected in the sensing range that is 7 meters.
- Proteus doesn't have a PIR Sensor in its database, so you need to download this PIR Sensor Library for Proteus.

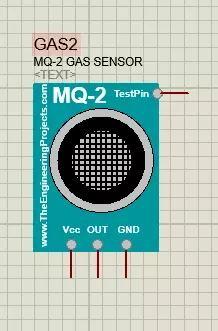
MQ-2 Gas Sensor
- MQ2 gas sensors detect the presence of gases such as LPG, methane, ethanol and carbon monoxide in the air ranging up to 10000 ppm using electricity.
- It is also known as chemiresistor for the MQ2 gas sensor.
- The resistance of the sensing material changes depending on the amount of gas present.
- When it comes to detecting gas, sensors use variations in resistance value that generates the output voltage.
- When a sensor material is heated to a high temperature in the air, oxygen is adsorbed on the surface.
- Because current can flow via the sensor, its analog voltage values may now be read.
- The voltage values reported here may be used to compute the concentration of a gas. When the gas concentration is high, the voltage values are greater.
- Proteus doesn't have a Gass Sensor in its database, so you need to download this Gas Sensor Library for Proteus.
Arduino UNO
- Atmel's ATMega328 is used in the Arduino Uno, an open-source single-board microcontroller.
- Either an external power source or a 5V USB connection may be used to power the device.
- In all, there are 14 digital input/output pins on the board, with 6 of them serving as PWM outputs.
- On the board, you'll find a reset button and six analog input pins. The Arduino software is used to program the board, which is written in C language.
- When it came to controlling the home security system, the Arduino Uno's capabilities were found to be sufficient.
- Arduino Boards are not present in Proteus, so we need to use this Arduino Library for Proteus.

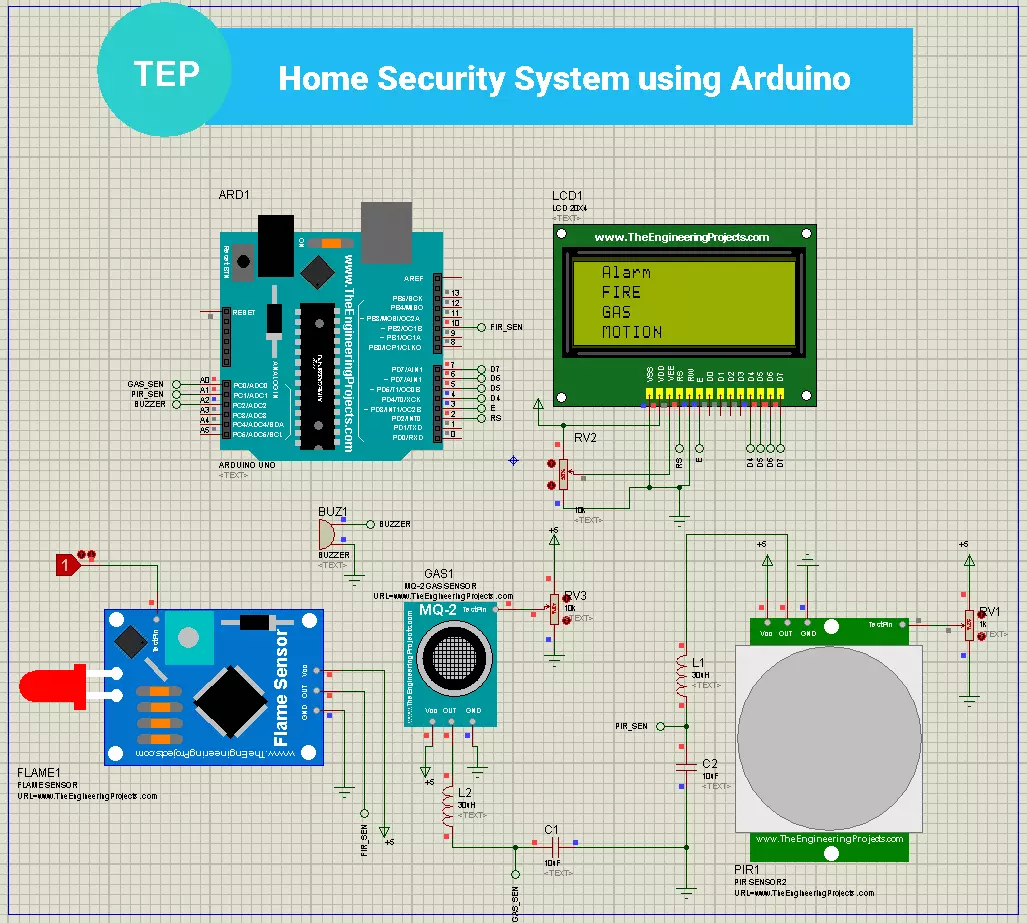
Circuit Designing
- This whole project is designed to provide a security system for the home in which multiple safety sensors can be installed with a Buzzer and LCD for a better user interface.
- We won't design this project in real, instead, we are going to design its Proteus simulation.
- If you are working on an electronics/embedded project, then it's always a best practice to design its simulation first.
- In simulations, it's easy to debug your code and thus you can program quickly.
- Once you are satisfied with your project's working, you can move forward to hardware designing.
So, let's design our Proteus Simulation for Smart Home Security System:
Proteus Simulation
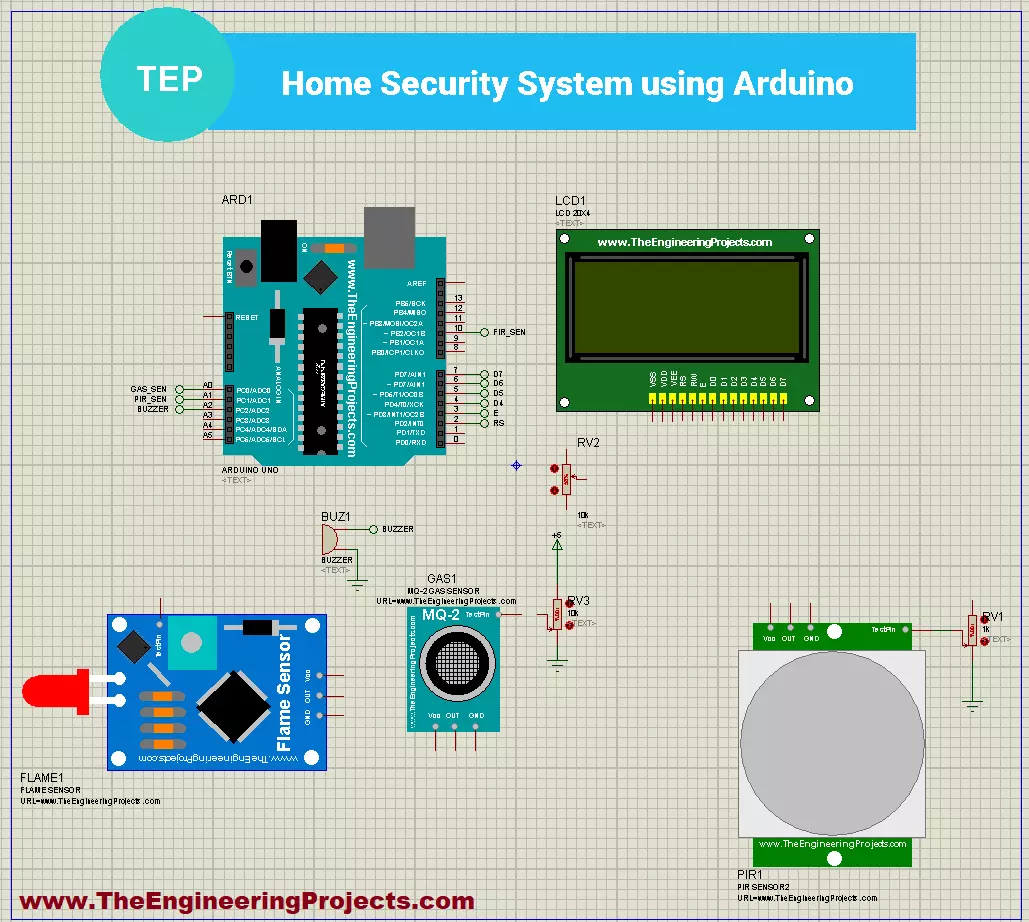
- These are the components, which we are going to use for designing our Proteus Simulation:

- So, select these components from Proteus Components Library and place them in your workspace, as shown in the below figure:
- Next, we need to connect these components' pins to complete our circuit, as shown in the below figure:
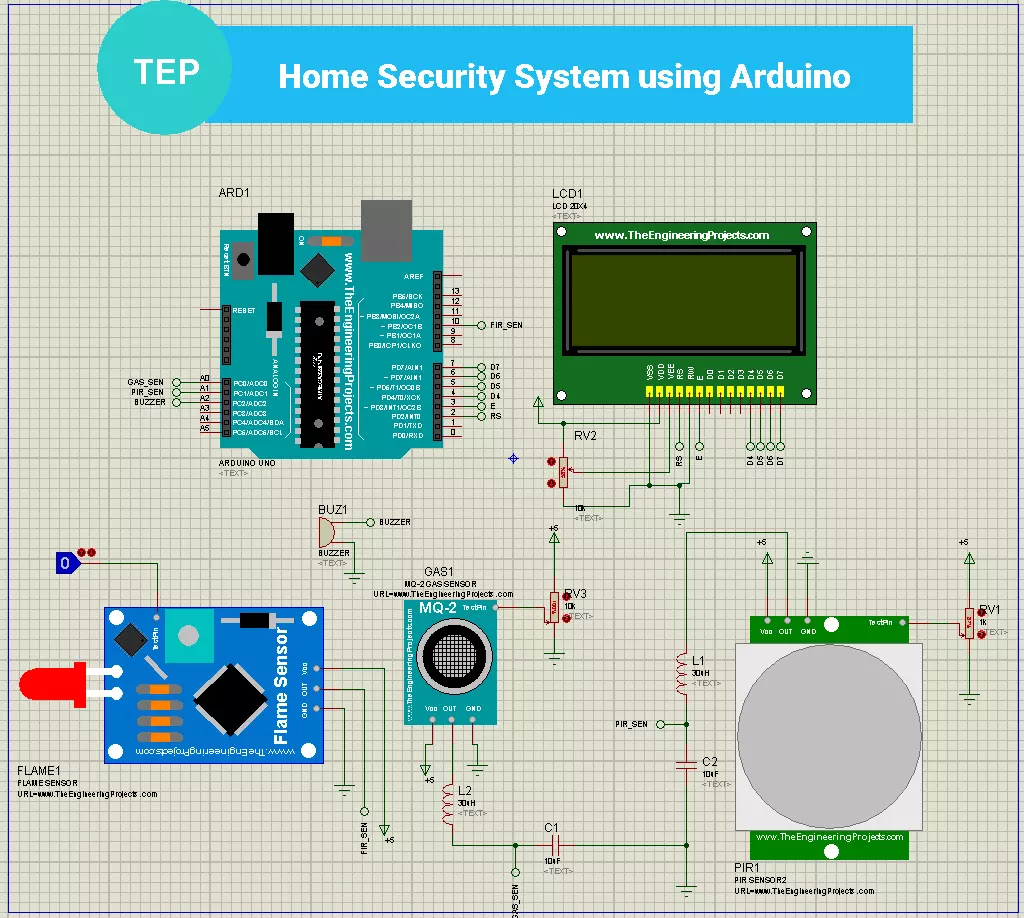
- As you can see in the above simulation, we have used three sensors in total, which we have discussed above.
So, now we are going to design the Arduino Code for this simulation:
Arduino Programming Code
We have designed the circuit in our Proteus Simulation and next, we need to design its Arduino Code, in order to make it work.
LCD Initialization Code
- First of all, we are going to interface LCD with Arduino UNO and will display the Project's name on the screen.
- The code is shown in the below figure:
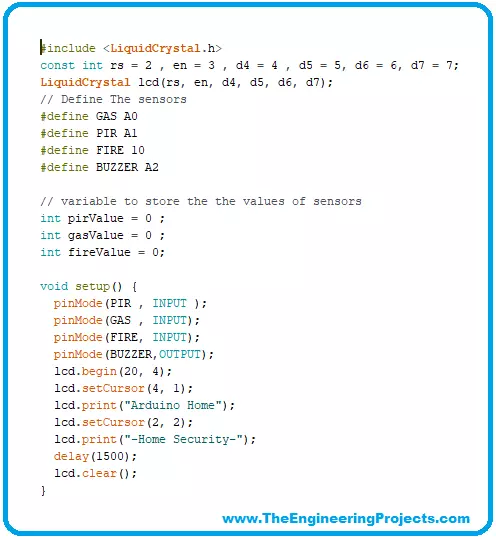
- As you can see in the above figure, we have first initialized the variables.
- Arduino board is programmed using Arduino IDE software which has mainly 2 sections void setup and void loop.
- Before void setup, we have to declare the pins of sensors and actuators that we are using in our project.
- Depending on the nature of sensors (analog or digital) the pins of sensors are connected to Arduino UNO accordingly.
- #define is used to declare the pins of Gas, PIR, FIRE and BUZZER.
- Initially, all the sensors have zero value that is stored by an integer variable.
- In the void setup section, input and output sensors are defined.
- GAS, PIR, and FIRE sensors are employed as input sensors to detect and activate the BUZZER, which is an output component.
- LCD 20×4 is used and lcd.begin is used to initiate the LCD.
- lcd.setCursor is used to cursor position on LCD and the name of the project is displayed on LCD Screen using lcd.print command.
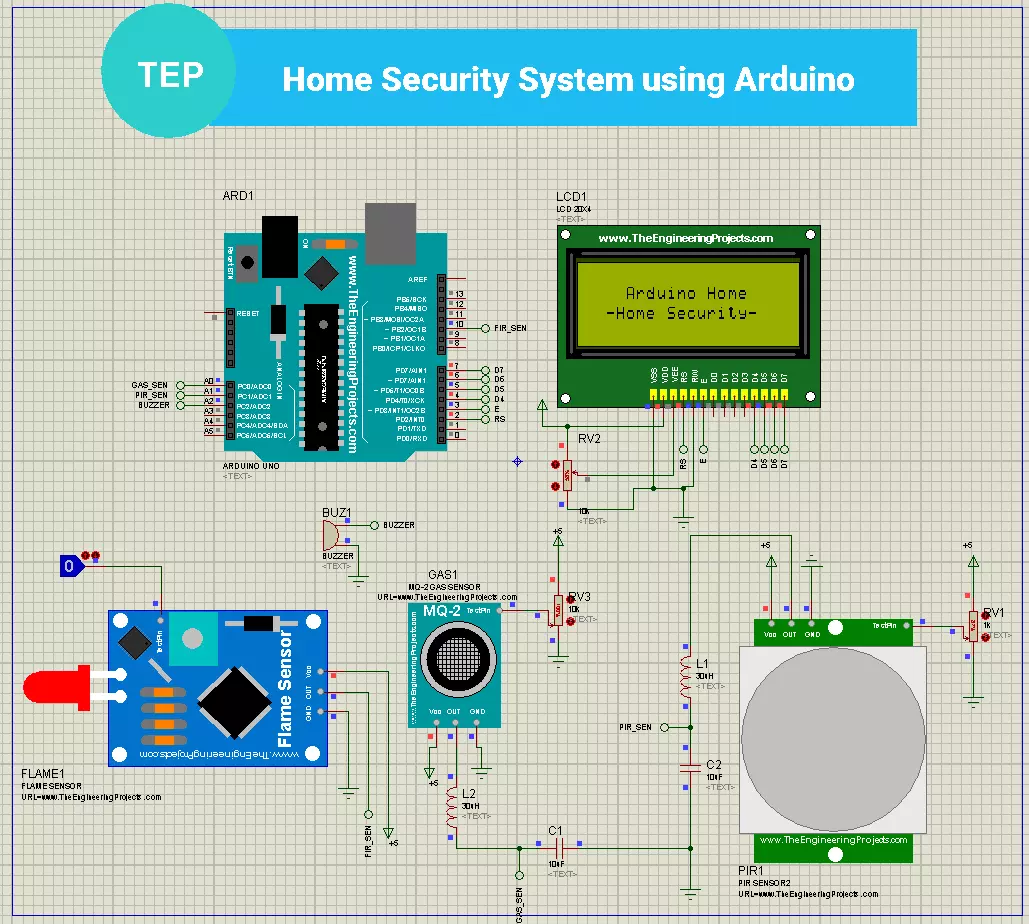
- Now, let's run our simulation to check the results, shown in the figure below:
Sensors Interfacing with Arduino
- In Arduino IDE code execution, void setup runs once while the void loop executes again and again.
- analogRead and digitalRead commands are used to read the value of analog and digital sensors respectively, while analogWrite and digitalWrite commands are used for sending commands or data.
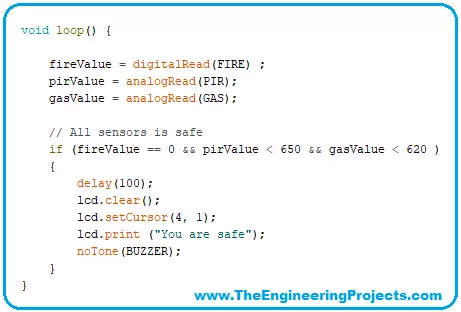
- As shown in the above figure, first, we have read the sensors' data and if all sensors are in LOW state, then have displayed the message "You are safe".
- Let's run the code to check the output:
- As you can see in the above figure, all sensors are at a LOW state and thus LCD is displaying the safe message.
- Next, we have added the if loop for the case where all sensors are giving HIGH value:
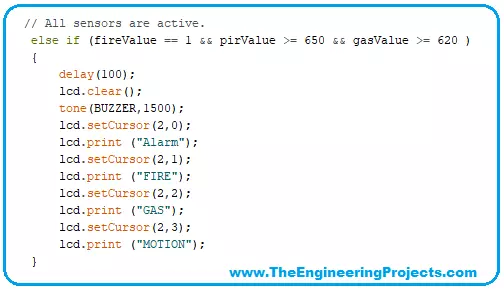
- The rest of the code has similar if loops for various conditions of sensors.
- You can download the complete code and Proteus Simulation from the link, given at the start of this tutorial.
- Now, let's run our final simulation and test the sensors and if everything goes fine, you will get results as shown in the below figure:
Future Recommendations
It deters the crime and notifies the user about the gas or fire problem. Home security systems are mostly utilized for safety reasons in residences, businesses, and educational facilities. Another option is to use a mobile device or the internet to send data to a remote location. Other modules, such as a wind sensor or a fire sensor, might be added to the system in the future. Voice alarm modules may also alert you to an intruder or a gas leak if you use them. We can increase the number of sensors to make it better. We can use the latest technology of the Internet of Things that makes our system wireless. A growing number of devices and goods are being connected to the Internet, which is referred to as the Internet of Things by the phrase. We can use the Internet of Things to produce a low-cost security system for residential and industrial applications that is especially useful for home security. When the door is opened or an unauthorized entry is detected, the system will send an alert to the owner. The user may take action after getting the notification. ESP8266 Wi-Fi module will connect to and interact with the Internet, while an Arduino Uno microcontroller keeps track of the system's status, as well as a magnetic Reed sensor for sounding the alarm. The principal advantages of this system are ease of installation, low costs, and low maintenance requirements.
So, that was all for today. I hope you have enjoyed today's project. If you have any questions, ask in the comments. Thanks for reading. Take care !!! :)
